1961 Land-Rover Series II

Thanks for your nice comments!

Now to the questions:

Layout: 4-cylinder, in-line
Block/head: Cast iron/cast iron
Valves: OHV, chain drive camshaft, push-rod operated
Capacity: 2,286 cc (139.5 cu in)
Bore × stroke: 90.47 mm × 88.9 mm (3.562 in × 3.500 in)
Compression ratio: 7:1/8:1
Carburettor: Solex (up to 1971), Zenith (up to 1983), Weber (post-1983)[22]
Power: 74 hp (55 kW) @ 4,200 rpm (in standard, non-emissions-controlled tune and 8:1 CR)
Torque: 120 lbf⋅ft (160 N⋅m) @ 2,000 rpm (in standard, non-emissions-controlled tune and 8:1 CR)

I have the 7:1 compression ratio and thus a little less power and torque.

For the beginning I will keep the carburetor to be able to run on petrol as well. This is probably better during the learning curve. But “no dino” sounds good - well, first lets see how everything works out.

The net weight is about 1500 kg.

@LewisM, you are right, either love them or hate them. Guess on which side I am :wink:
This is my first Landy, but I own it since 2008. It was just in hibernation for 4 years.
Yes, nearly all parts are easily available and cheaper as for many newer cars. I had no problems with the brakes so far.
I will keep the 4 cylinder engine. The V8 would be great, but registering it with this engine is very complicated here. And for me, the original engine is reasonable powerful. The petrol engine is actually much better as the diesel, although the horsepower in numbers is no great difference. It is also the lighter short version.
Well, all the Landys had a different long life and are thus very different in the driving experience today. My steering is quite smooth and the leaf springs are OK. But I have driven others which were different, one had heavy duty springs that barely moved no matter what happened.

No, I will keep the roof top tent. I can really recommend it for camping. :slight_smile:

8 Likes

I was in the workshop today and made a picture of the engine.


The carb was dismounted for repair but is now back and the engine is running.
You can see the inlet manifold. It is heated by the exhaust which is directly below. Not good for woodgas, maybe I will replace it later like Bruce on his MG.

A Land-Rover of this age is more a fast tractor than a car. In old commercials, the company always put a focus on farm-work. For what we are used today, the old advertising videos from the 50s and early 60 are quite funny. Here are some, if you are interested:

My ideas about the gasifier setup made some progress. I keep working on a sketch.

7 Likes

After the war one of the Jeep manufactures tried to promote the Jeep for farm use with some special implements such a plows made available. At the same time the tractor manufacturers went from war time production back to farm equipment. Most things were rationed during the war so people had nothing to spend their money on. When real tractors became available again the farmers went for the tried and proven farm tractors. As a farm tractor, the Jeep found another market. TomC

3 Likes

Thanks for the videos Til . Enjoyed !

2 Likes

Agree. It seems the Landy makes farmwork so easy you can do everything dressed up in white shirt and tie :smile:

5 Likes

Hi,
I made some sketches about my design-suggestions. Sorry for the modest quality, that are just some first thoughts and I would like to hear your opinion on that.

First, I think of a gasifier close to the Svedlund and Mako S principle. Dwondraft with a central nozzle. After the gasifier, there is a heat exchanger, in which the air is heated and the water from the “carburetor” is turned to steam. After that a combination of heat exchanger and dropbox to heat the air before the caburetor and drop lager particles. Then a cooler, if the gas is still to hot and finally a sack-filter, inspirated by the design of Gohin-Polunec.

Now to some details: I would like to use the “umbrella” Max Gasman suggsted a while ago to prevent the nozzle from sticking deep in the char. The nozzle shuld be rather thick walled, same principle like Kritijan’s Leitinger Nozzle.
I can be with just one central whole in the middle pointing downwards, but I would rather make the second option with the central hole splitting up to three or four holes sidewards to make the reacton zone wider.

The gasifier itself is rather similar to the Svedlund. A moveable grate at the bottom, hearth insulated with ceramic material (blanket or refactory). Hopper with a convenient shape. I would just like to set the lighting port directly above the nozzle, so it can be used for inspection of the nozzle and fire and for poking ash and slag at the nozzle tip with a poking rod.

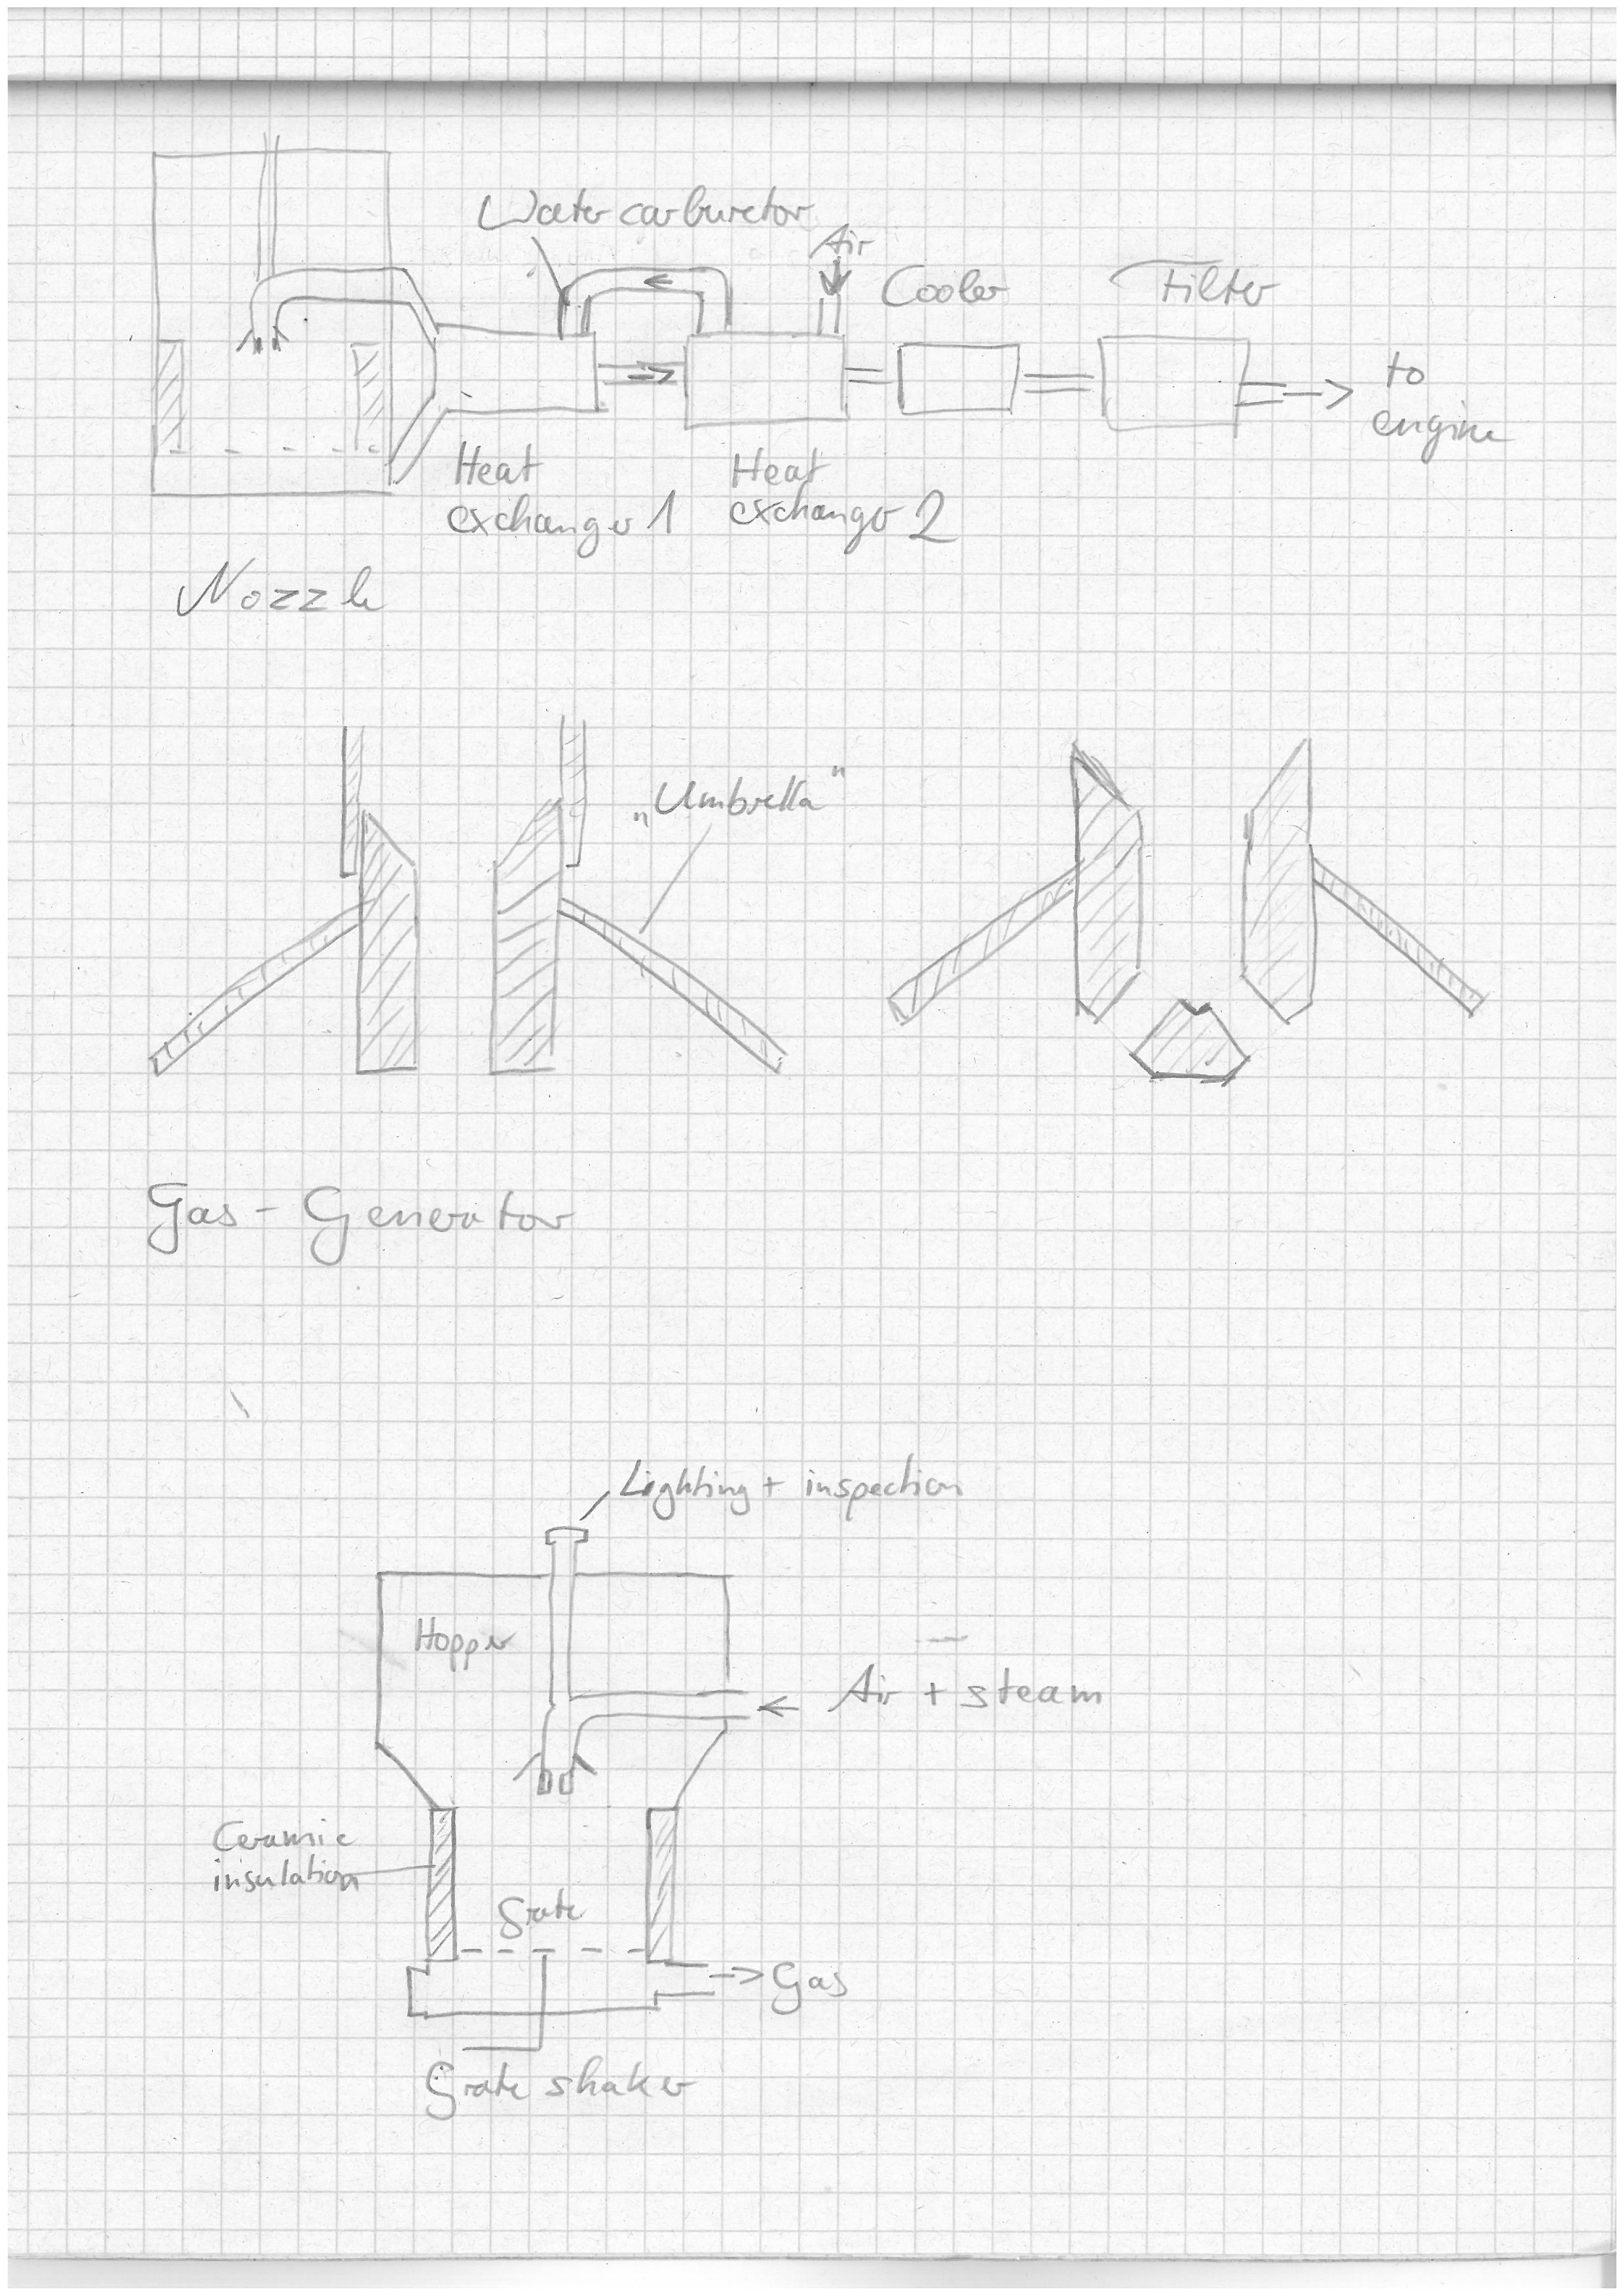
First heat exchanger/steam generator:
I think of a bunch of pipes sourrounded by a chamber. The hot gas goes through the pipes. The air and water in the chamber. Some baffle plates make the way for the air longer, thus give more surface for preheating it and evaporating the water.

Second heat exchanger for prehaeting air before the water addition in the carburetor and drop box for larger dirt particles.
A larger tube with baffle plates. The gas has to change its direction several times, and the larger particles can settle in the corners of the plates. Plates are mounted on a rod and can be pulled out for cleaning.
Tube has fins on the outside and is surounded by a larger tube. Counterflow of air in the outer gap for prehating.

Filter: Sack-filter similar to Gohin-Poulenc design. Upper covr and lower bucket can be removed for cleaning/maintenance. The sacks can be easily shaken and the dirt falls down in the lower part. Then just empty the lower buket. I hope for less dirty cleaning here.

What do you think? Please let me know your thoughts and suggestions on this sketches.
Regards, Til

6 Likes

Hi there,
just a little update:
The Land-Rover is running again and it passed the vehicle inspection. The vehicle inspector was pleased with the overall condition. The only thing he mentioned in his report was “Engine and drive-train wet of oil”. His comment: “No one would believe me if I wouldn’t write that” :wink:
Its registered for the road as well (plates not yet mounted on the photo).
I changed the hardtop against a soft-top also.

Bad news: So far there was no time for building a gasifier.
Maybe I change my original plans a bit and start with an easier gasifier (a bit like Steve Bowman on his Corolla), collect some experience and improve it step by step.
Hope to be able to present something here in late summer.

Regards,
Til

8 Likes

Til,
Looking forward to another European project. And of course lots of pics and vids :smile:

4 Likes

Would love to get my hands on one of these so i could run it on charcoal .

5 Likes

Hi Til! Great news! What JO sayd.

If l were you, l wuld stard from forward to backward. Make all the piping, valves, controls, engine adaptions, filters… those things you need with any system. Then, if the woodgas bug is biting to strong, you can make a simple gasicier in a hour out of a 60l oil drum and a couple of fitings screwed in it. Just to test it all. If not, you can take your time and do what you originaly planed.

I found this works best for me, becouse if l build the gasifier first, l am so eager to test it on the car that its easy to miss something on the rest of the system (wich is as important as the gasifier it self!)

8 Likes

Hi Kristijan,
this is a very good advice!
I think this is exactly what would have happened to me if I start with the gasifier first :wink:

7 Likes

Nice looking rig Mr Til.

Each region/country can poise it’s own challenges. And yet offer up it’s own solution sets, too.
Here USofA/Canada there are many generation’s of 1960/70’s cast iron inline large displacement six cylinder engines still available for free/cheap. Many already coupled up to truck-type four speed transmissions and dual range 4x4 transfer cases.
To our eyes that setback engine radiator begs to be set forward with a 240/250/292/300 cid six cylinder engine placed behind it. Legal here because of the age of the vehicle. (you can pull up youtubes of some who have done this!)
In Germany? Maybe an inline older MB or Volvo engine?

Anyhow I can certainly see a vertical tubed woodgas/chargas cooler w/condensate tank set into that between the front fenders empty space.
Head lights relocated into the front fenders.

You are at the Imagineering phase now. Stretch your boundaries. Painting yourself into no legal restiction-use corners.
Regards
Steve Unruh

5 Likes

Dear Steve,
please just call me Til, this is my given name.

A six-cylinder engine would be nice. I have read about many possibilities like the six cylinder engines that you listed, the rover V8 and others.

My problem is similar to Kristijan’s: We have regular vehicle inspections here (every two years) and Germany is quite strict in what is allowed. Especially when you want to make such a vehicle stronger and thus faster with a bigger engine.
Well, for older vehicles some rules are also less strict here, but I am still not as free as you in the US.
Additionally, it is registered as historical vehicle. That means I have to keep it in an original and good condition.
It can be changed to a normal registration which less restrictive in this respect.
But a historical registration has many benefits here:

  • Less tax (fixed amount, normal it is coupled to the engine displacement and emissions, so old cars are otherwise quite high in tax)
  • Less insurance, as the insurance companies know you take care of it as a historical item
  • No problems with emissions: I can drive in “environmental zones” in cities which are normally just allowed for modern cars with newest emission control.

Just let me say that fitting a gasifier is in a legal grey zone in this case. So I don’t want to make it too obvious and go a bit stealth as Kristijan.
It is not forbidden but also not really allowed. Let me explain:
In Germany, vehicles with petrol engines that are first time registered prior to 1968 are not under emission-control. As woodgas is no official fuel, the emissions are not known and there are no limit values defined. This is a problem with younger vehicles, as they have to fulfill certain limits. With woodgas, this can’t be fulfilled or you have to spend heaps of money for official measurements. But with vehicles prior to 1968, this is not a problem and allows a more or less legal use of woodgas. At least, there is a legal loophole.

A problem is that I can’t change too much on the appearance and drive-train, as otherwise I won’t pass the vehicle inspection. The Land-Rover is too young to be a real WW2 woodgas vehicle.

A vehicle inspector who by himself restored a woodgas-powered tractor from the 1940s once gave me the advice to not install the gasifier permanently but as a piece of cargo. So there is no change to the vehicle. If there is a hose from the cargo to the engine, this is not important.
So this is what I want to do. Through this forum I got a lot of ideas and suggestions. Combined with the old books this is like a goldmine of knowledge.

And please keep in mind that this is a more a hobby and experiment for me, similar to Bruce’s MG. Do it because I’m fascinated about woodgas. Build it, drive it, see what works and what not, improve it and have a lot of fun along the way.
My hat is of to those who use woodgas everyday for there needs, but this is not my intention.

Sorry, this became a very long post.
Regards,
Til

8 Likes

I was told cargo is not allowed to be bolted to the vehicle, only strapped. This is why I went with kind of slide in/hook on/easy off-on for inspections, rather than stealth with the Rabbit. Looked kind of funny, so only smiles from police.
Just saying. Easy on-off might limit you less than stealth.

5 Likes

Thank you Til for the current in-Germany explanation.
Vehicles in the USofA are individual state-by-state licensed, safety and emissions inspected(or not), insurances state-by-state allowed or restricted.
Ha! Only some areas here are a woodgas free-for-all.
Some states here have a Historic licensing/registration with similar modification/use restrictions.
Most here ARE grey-area woodgas roads driving, too.
Old U.K. English, “Mum’s the word”. Current USA, “Don’t ask. Don’t tell”. Older Americanism, “Open mouth; and insert foot”
S.U.

8 Likes

Hi Til

you want to adjust the water flow of your gasifier with a gasoline engine carburetor?
it seems like a great idea. Is this your idea or this design has already been tested?
Do you think that the internal temperature of the gasifier could be automatically controlled in this way?
a central nozzle vs several concentric air jet which advantages? :thinking:

Thierry

3 Likes

I have been thinking about that idea for a while now. Very interesting to me. I would aim the sensor from one of those new pistol type color temperature thermometers directly into a nozzle, and use the signal to add more or less EGR or water.
Rindert

2 Likes

Hi Thierry,
no, it was not my idea. Max Gasman suggested this in the Seat thread of Kristijan more than three years ago:

(See this post and the ones following)
Anyway, I think no one really tested it this way.
I just try to absorb all good ideas “as a sponge” and then try to combine it. I hope that I can control the internal temp with this, as the water-air-mixture should be more or less constant at the generator inlet for different loads instead of a water drip.
Advatages of a central nozzle:
Easier to built and if the Lighting port is directly above (as in my scetch) easy to look directly into the burning hearth of the gasifier. → Easier to check reaction temp (white glowing char or orange glowing)
Easier to replace or try a different design/material of the nozzle.
Disadvantage:
For the reaction there should be no big difference. With a central nozzle, the danger of a channel is burned down through the char to the grate (bridging) could be higher. Also the reaction zone could be more centralised and longer (more space between nozzle and grate needed). A design like Krisitjans last one can be more compact.

Hi Rindert,
I thought about this, too. Gary Gilmore is doing this according to the colour of the reaction zone in his simple-fire-gasifiers: White glowing char = too hot, red glowing char = too cool, organge glow is about right.
In numbers: About 900 °C (centigrade) is the optimum point for EGR or added steam: With this temp, the best equilibrium of the reaction is reached: Most of the added EGR or steam is cracked and there is not much CO2 in the gas. With lower temps in the reaction, the amount of CO2 in the gas raises, with hihger temps you waste the surplus heat of the reaction.
Note: the hotter the primary air plus steam, the more steam can be added and the richer the gas.

Regards,
Til

5 Likes

thanks Til

summary very interesting. I suppose you build a down current generator (coal) for the same reason as Kristijan? (ie to avoid the problems of imperfectly carbonized and wet coal). Do you think that under our temperate climate, the coal exposed for some time to the atmospheric air is very wet for a Gilmore style?

Thierry

2 Likes

Hi Thierry,
Thanks!
Yes, that’s the reason. Kristijan reported problems with his updraft system with not totally charred coal.
For the same reason, updraft gasifiers were not very popular during WW2, especially at the early years before strict quality standards of car-charcoal were established.

Charcoal can absorb quite a lot of moisture, but it depends on how you store it (warm dry place against a cool moist one) and if it is in a breathable bag or a sealed barrel.
If the char is too wet, you will get a lot af condensation in your cooler and filter. But maybe someone with more practical experneice can give some advice here?
I think I have seen a graph of how much moisture the char can absorb at different air humidities. I will try to find it.

Regards,
Til

7 Likes