Now i am learning, next step for me, to buy an arduino… keep it coming ( school they have but they are soo busy and bureaucratic 
1 Like
“Hi Joe can you give us an example of your code?”
I’ll post up the averaging bits. There are many ways to code a control valve. I have found the averaging to be helpful. The length of the array can be changed to tune.
In the declarations:
const int numReadings = 10; // use this value to determine the size of the O2 sensor readings array
int readings[numReadings]; // the readings from the lambda sensor
int index = 0; // the index of the current lambda reading
int total = 0; // the running total of lambda readings
Initializing the array in setup:
for (int thisReading = 0; thisReading < numReadings; thisReading++)
readings[thisReading] = 0; // set all positions of the lambda readings array to 0
The Loop:
total = total - readings[index]; // subtract the last reading
readings[index] = analogRead(O2Pin); // read from the sensor
total = total + readings[index]; // add the reading to the total
index = index + 1; // advance to the next position in the array
if (index >= numReadings) // if we’re at the end of the array
index = 0; // …wrap around to the beginning
float voltageAverage = total / numReadings * (5.0 / 1023.0); // calculate the average
1 Like
I’d suggest reading that oxygen sensor for a while under varying system conditions before going too far with a lot of complex code. Remember that the 02 sensor is only measuring the remaining oxygen in the engine exhaust.
Did I mention that the GEK Gasifier Control Unit code is open source and is available on their website?
Pete Stanaitis
1 Like
Yeah I know, but I have to pave my own road on this.
But I did get some run time today, the last case code is working pretty well, I need to tune it some yet. I also came to the realization what I am doing with the manual pot and autorun is the wrong way to the go about it. What I was initially trying to do was switch the inputs of the potentiometer for manual tuning and then the input from the O2 sensor. What I need to do is create another servo object and then simply switch the output wires to the servo. Once I get this I think I will have it.
1 Like
Pick a digital pin and wire a toggle switch to it with a 10K resistor to GND. The other leg of the switch to 5V. That gives you a nice HIGH/LOW switch. Do things when it is HIGH. Do other things when it is LOW.
You may not need to reinvent the wheel here. As mentioned by Pete APL has made their code available. I have some code for a Gasifier Monitor here, http://www.hayriv.com/arduino/gasifier-ir which includes reading up to 4 thermocouples, two differential pressure sensors and a narrow band O2 sensor with some code to control a servo. It has a speed controller for the startup fan but that needs some work. I also have set it up so it can do real time graphing on a laptop.
On the yahoo “woodgas” Stephen Abbadess also has a servo controlled by an O2 sensor. His servo is mounted on a ball valve which he loosened up somehow so it turn very easily.
As far as the manual override I would suggest that you have the O2 sensor on one analog pin and the potentiometer on the other. Use Joe’s suggestion and have a switch on a digital pin.
Hey guys,
How I now have the code set up is I have the pot on pin (a1) and outputting on pin 10 and the O2 sensor inputting on (a0) and outputting on pin 9. Both outputs are wired to a relay, with the pot output on the normally closed side and the O2 sensor on the switch side. I believe this is working now I am able to switch between modes. However, Im out of fuel so I can’t fully test it yet argh!!
As for the APL open source code I feel this is off limits for us as we are thier major competitor and this is a saleable item as part of the machines we manufacture. We can not use anything APL has to offer even open source. Open sourcing is for sharing ideas, however, you can not take the idea and sell it. You must first get licensing permissions.
1 Like
OK Im going to try and revive this thread. The code worked quite well on the LS machine; however, I have added the switch function to go from manual to auto mode. This is working well on the bench but I need to test this in a real world test.
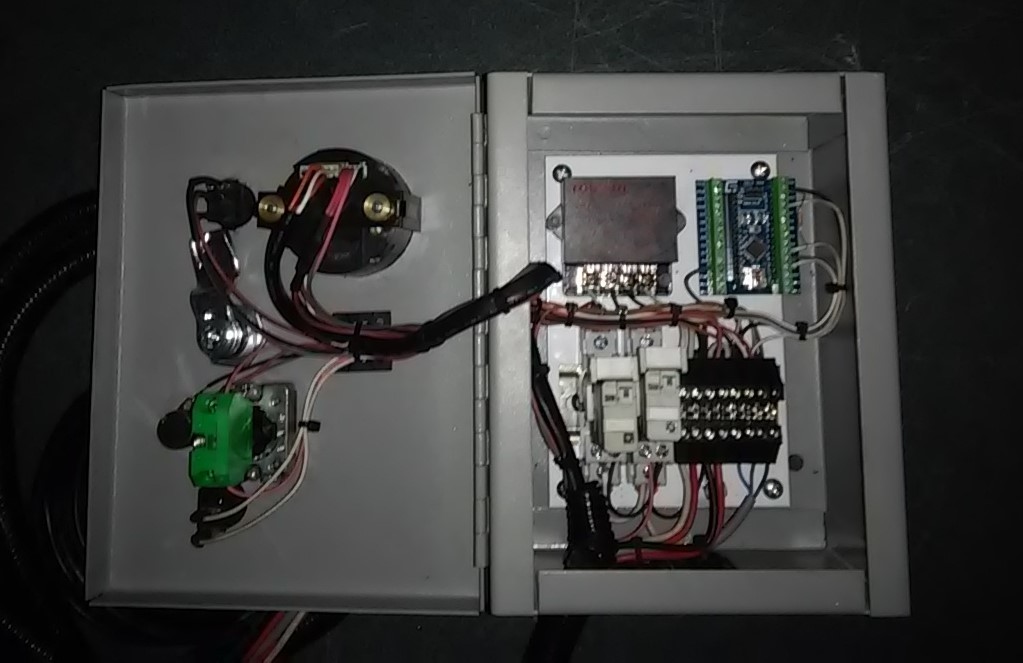
If this works I will go into a simplified detail of how to build this. We are also going to launch this as a new product on ebay as well for around $550.00 Material cost for this is around $300.00 plus overhead and I have a days labor into it. This features an interface to connect to the engines starter and run most small engines from this panel as well. This comes with 12v power to ignition and also a ground interrupt is supplied for engines requiring this. So both types of ignition system are covered. We can build this with valves from 1" on up to 2" cost will not be affected by valve selection.
I had a hard time posting code on the last website so I abandoned the thread. I will try again here with latest code that will work on a stationary setup. Hopefully we can advance this to work on vehicle installations.

#include <Servo.h>

Servo myservo;  // create servo object to control a servo


// These constants won't change:
const int O2SensePin = A0;    // pin that the O2 sensor is attached to
const int O2SwtPin = A2;   //Pin Auto Mode Switch is attached to
const int O2ManPin = A1; // Reads the O2 Manual Adjust Potentiometer on pin A1


const int threshold1 = 690;   //Threshold limit for rich gas condition
const int threshold2 = 710;   //Threshold limit for lean gas condition


int val;    // variable to read the value from the analog pin
int lastpos = val;     // variable to store the servo last position
int O2SwticthState = 0;         // variable for reading the Fuel Mixer Mode status

void setup()
{
  myservo.attach(9);  // attaches the servo on pin 9 to the servo object


      // Need to create a set point for servo start position after manual tuning
  {
  val = analogRead(O2ManPin);  // reads the value of the potentiometer (value between 0 and 1023)
  val = map(val, 0, 1023, 20, 180);     // scale it to use it with the servo (value between 0 and 180)
  myservo.write(val);                  // sets the servo position according to the scaled value
  lastpos = val;                       // sets lastpos to equaul the position of the manually set position
  delay(15);                           // waits for the servo to get there

  }
}

void loop()
{
    // read the state of the pushbutton value:
  O2SwticthState = digitalRead(O2SwtPin);
   // read the value of the O2 sensor:
  int analogValue = analogRead(O2SensePin);


  if (O2SwticthState == LOW)
  {
  val = analogRead(O2ManPin);  // reads the value of the potentiometer (value between 0 and 1023)
  val = map(val, 0, 1023, 20, 180);     // scale it to use it with the servo (value between 0 and 180)
  myservo.write(val);                  // sets the servo position according to the scaled value
  lastpos = val;                       // sets lastpos to equaul the position of the manually set position
  delay(10);                           // waits for the servo to get there

  }
   else if  (analogValue < threshold1)
      {
         // we need to move the servo 1 degrees in the POSITIVE
         // direction so we need to add ADD to the last known
         // position.

         myservo.write (lastpos + 1); // Moves servo negative 1 degrees

         // now we need to save that last position value
         lastpos = lastpos +1;
         delay(100); // Delay time between 1 degree movments
                               // Decreasing the number = slower response time
    }
    else
    {
         delay (10);
    }

   if  (analogValue > threshold2)
  {
         // we need to move the servo 1 degrees in the POSITIVE
         // direction so we need to add ADD to the last known
         // position.

     myservo.write (lastpos - 1); // Moves servo negative 1 degrees

     // now we need to save that last position value
     lastpos = lastpos -1;
     delay(100);  // Delay time between 1 degree movments
                               // Decreasing the number = slower response time
  }
        else
{
     delay (10);
    }
}
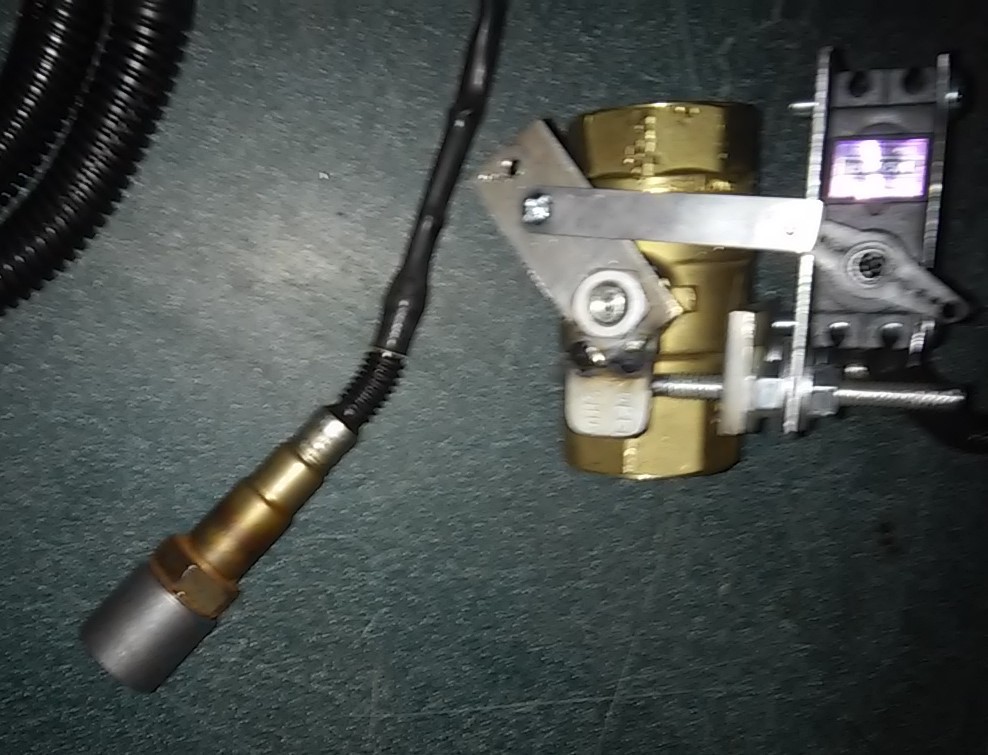
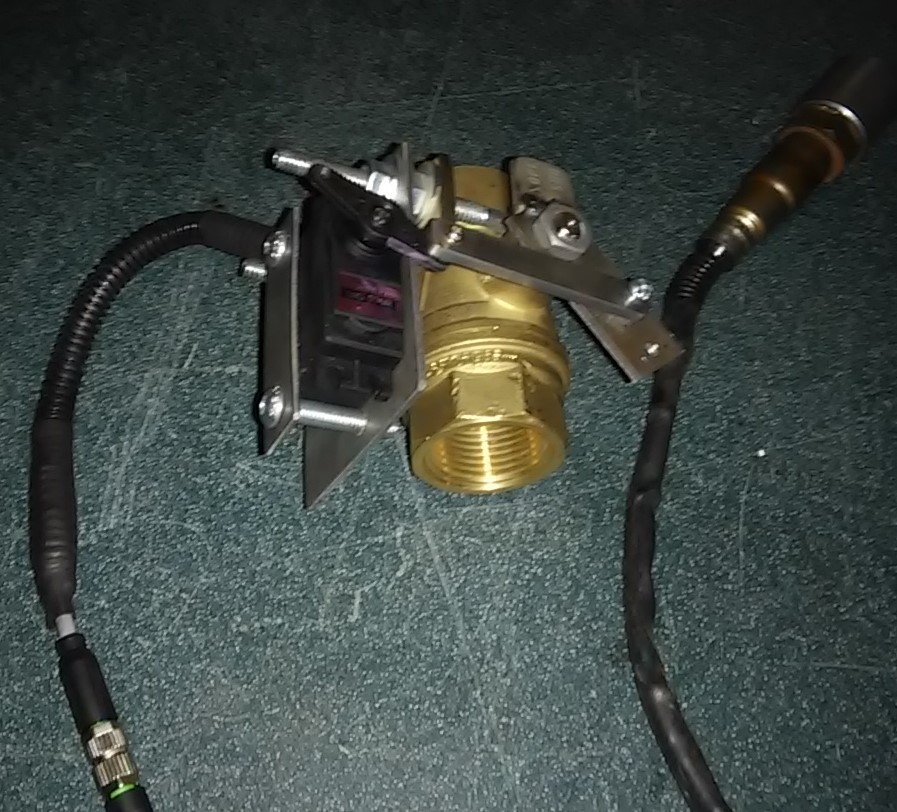
Good looking hardware Matt. Thanks for sharing the code.
If you put in four leading spaces it will show up as code, I’ve done this to your post.
EDIT: seems that only applies to each line. A better way is to:
- Paste your code in
- Select all your code (highlight it blue)
- Click the “code” button in the editor or Ctrl-K
it will add all the spaces correctly to your code without messing up any formatting.
1 Like
thats awesome thanks Chris!!
I did a video of the arduino mixer in action today. We opened the hopper lid and put a load on it to try and trip up the mixer control. We ran this with a 1500 watt load and added to two grinders adding another 900 watts each. This only made subtle changes so the mixer only moved very slightly and was hard to pick up on camera. I found a better way and that was simply putting my hand over the intake of the gasifier. So we will be doing another video of this, along with a cold start up showing how much this system makes life easier firing up on 100% wood gas. The Pot fine tune next to a starter button makes things so much easier!
I added a bit more code to this, the code I just posted only drives the servo at one speed. This is ok when things are close to running in normal parameters, but its reaction is too slow for abrupt changes. So I added a bit of code so that it will react slow when things are in tolerance and to maintain a smooth rpm. But I also added some code so that the servo will react very fast in situations like a WOT event. I think with some tuning this code may work for you guys running vehicles and the manual adjustment for starting up is a real nice feature.
Here is a link the Youtube video of this;

Here is the updated code, I have to clean this up yet. Ill edit and post this along with any new updates.
#include <Servo.h>

Servo myservo;  // create servo object to control a servo

//Created by Matt Ryder of Vulcan Gasifier LLC, May 7 2015

// These constants won't change:
const int O2SensePin = A1;    // pin that the O2 sensor is attached to
const int O2SwtPin = A2;   //Pin Auto Mode Switch is attached to
const int O2ManPin = A0; // Reads the O2 Manual Adjust Potentiometer on pin A1


const int threshold1 = 400;   //Threshold limit for rich gas condition
const int threshold2 = 500;
const int threshold3 = 600;
const int threshold4 = 760; //Threshold limit for lean gas condition
const int threshold5 = 900;

int pos = 0;    // variable to store the servo position
int val;    // variable to read the value from the analog pin
int lastpos = val;     // variable to store the servo last position
int O2SwticthState = 0;         // variable for reading the Fuel Mixer Mode status

void setup()
{
  myservo.attach(9);  // attaches the servo on pin 9 to the servo object


      // Need to create a set point for servo start position after manual tuning
  {
  val = analogRead(O2ManPin);  // reads the value of the potentiometer (value between 0 and 1023)
  val = map(val, 0, 1023, 20, 180);     // scale it to use it with the servo (value between 0 and 180)
  myservo.write(val);                  // sets the servo position according to the scaled value
  lastpos = val;                       // sets lastpos to equaul the position of the manually set position
  delay(10);                           // waits for the servo to get there

  }
}

void loop()
{
    // read the state of the pushbutton value:
  O2SwticthState = digitalRead(O2SwtPin);
   // read the value of the O2 sensor:

   int sensorReading = analogRead(A1);

  if (O2SwticthState == LOW)
  {
  val = analogRead(O2ManPin);  // reads the value of the potentiometer (value between 0 and 1023)
  val = map(val, 0, 1023, 20, 180);     // scale it to use it with the servo (value between 0 and 180)
  myservo.write(val);                  // sets the servo position according to the scaled value
  lastpos = val;                       // sets lastpos to equaul the position of the manually set position
  delay(10);                           // waits for the servo to get there

  }
    else
    {

         delay (10);


  }
   if  (sensorReading <= threshold1)
  {
         // we need to move the servo 1 degrees in the POSITIVE
         // direction so we need to add ADD to the last known
         // position.

         myservo.write (lastpos + 10); // Moves servo negative 1 degrees

         // now we need to save that last position value
         lastpos = lastpos +10;

         delay(10); // Delay time between 1 degree movments
                                   // Decreasing the number = slower response time

  }
    else (sensorReading >= threshold3);
         myservo.write (lastpos);
         delay (10);

   if  (sensorReading <= threshold2)
  {
         // we need to move the servo 1 degrees in the POSITIVE
         // direction so we need to add ADD to the last known
         // position.

         myservo.write (lastpos + 5); // Moves servo negative 1 degrees

         // now we need to save that last position value
         lastpos = lastpos +5;

         delay(10); // Delay time between 1 degree movments
                                   // Decreasing the number = slower response time

  }
    else (sensorReading >= threshold3);
         myservo.write (lastpos);
         delay (10);

    if  (sensorReading <= threshold3)
  {
         // we need to move the servo 1 degrees in the POSITIVE
         // direction so we need to add ADD to the last known
         // position.

         myservo.write (lastpos + 1); // Moves servo negative 1 degrees

         // now we need to save that last position value
         lastpos = lastpos +1;

         delay(100); // Delay time between 1 degree movments
                                   // Decreasing the number = slower response time

  }
    else (sensorReading >= threshold3);
         myservo.write (lastpos);
         delay (50);

   if  (sensorReading > threshold4)
  {
         // we need to move the servo 1 degrees in the POSITIVE
         // direction so we need to add ADD to the last known
         // position.

         myservo.write (lastpos - 1); // Moves servo negative 1 degrees

         // now we need to save that last position value
         lastpos = lastpos -1;
         delay(100);  // Delay time between 1 degree movments
                                   // Decreasing the number = slower response time
  }
    else (sensorReading <= threshold3);
         myservo.write (lastpos);
         delay (50);

   if  (sensorReading > threshold5)
  {
         // we need to move the servo 1 degrees in the POSITIVE
         // direction so we need to add ADD to the last known
         // position.

         myservo.write (lastpos - 1); // Moves servo negative 1 degrees

         // now we need to save that last position value
         lastpos = lastpos -1;
         delay(100);  // Delay time between 1 degree movments
                                   // Decreasing the number = slower response time
  }
    else (sensorReading <= threshold3);
         myservo.write (lastpos);
         delay (50);
}
4 Likes
Ok I have a new video, showing this recover from more aggressive events. First I block of the air intake to the engine and then the air intake to the gasifier.
Video will be here once uploaded;

I ran for about 8 hours today tweaking on this and added some more code. I added a target parameter that the arduino tries to achieve when its asked to intervene. I think it is there!!
Im going to run another day without editing this new code. So far it seems to be very stable, I run all day tomorrow and see how it goes.
4 Likes
Thanks for the video .
Great work yall are doing there 
1 Like
Thanks Wayne,
I dont want to jinx myself, but it is looking like we are going to make it. If so I am trying to get permission to bring this with us plus some other stuff. But I just cant predict that far in advance, we are hoping to attend this year.
3 Likes
Great Matt .
Sure hope you can make the trip . 
Ok this is the latest code. This is working very well, as long as there is good gas supplied it will keep things in check. The generator when loaded abruptly will open wot and this will intervene very quickly. This was an issue with earlier code as it just was not responsive enough. On the LS system I had to place a static valve to keep the governor from going into wot to quickly. This code will adapt to most situations and is very responsive without over correcting. There is always room for improvement, I hope others will attempt to build this. I will do a tutorial on exactly how to build this I have to order the 02 sensor kit, then I will have all the parts to build this. I will do what I can to get lesser expensive parts, however the 02 sensor kit will remain the same as I know it works and is a reliable kit. More to come very soon, the 02 sensor kit will be on order next week 
#include <Servo.h>

Servo myservo;  // create servo object to control a servo

 //VG 02 Mixture Controller v0.1
//Craeted by Matt Ryder, Vulcan Gasifier LLC May 5, 2015
  //Last edit; May 8, 2015

// These constants won't change:
const int O2SensePin = A1;    // pin that the O2 sensor is attached to
const int O2SwtPin = A2;   //Pin Auto Mode Switch is attached to
const int O2ManPin = A0; // Reads the O2 Manual Adjust Potentiometer on pin A1


const int threshold1 = 500;   //Threshold limits for rich gas condition
const int threshold2 = 640;
const int threshold3 = 690;

const int target1 = 710;      // Target Parameter for rich condition
const int target2 = 730;      // Target Parameter for lean condition

const int threshold4 = 740;    //Threshold limits for lean gas condition
const int threshold5 = 800;

int pos = 0;    // variable to store the servo position
int val;    // variable to read the value from the analog pin
int lastpos = val;     // variable to store the servo last position
int O2SwticthState = 0;         // variable for reading the Fuel Mixer Mode status

void setup()
{
  myservo.attach(9);  // attaches the servo on pin 9 to the servo object


      // Need to create a set point for servo start position after manual tuning
  {
  val = analogRead(O2ManPin);  // reads the value of the potentiometer (value between 0 and 1023)
  val = map(val, 0, 1023, 20, 180);     // scale it to use it with the servo (value between 0 and 180)
  myservo.write(val);                  // sets the servo position according to the scaled value
  lastpos = val;                       // sets lastpos to equaul the position of the manually set position
  delay(10);                           // waits for the servo to get there

  }
}

void loop()
{
    // read the state of the pushbutton value:
  O2SwticthState = digitalRead(O2SwtPin);
   // read the value of the O2 sensor:

   int sensorReading = analogRead(A1);

  if (O2SwticthState == LOW)
  {
  val = analogRead(O2ManPin);  // reads the value of the potentiometer (value between 0 and 1023)
  val = map(val, 0, 1023, 20, 180);     // scale it to use it with the servo (value between 0 and 180)
  myservo.write(val);                  // sets the servo position according to the scaled value
  lastpos = val;                       // sets lastpos to equaul the position of the manually set position
  delay(10);                           // waits for the servo to get there

  }
    else
    {

         delay (10);


  }
   if  (sensorReading <= threshold1)
  {
         // we need to move the servo 1 degrees in the POSITIVE
         // direction so we need to add ADD to the last known
         // position.

         myservo.write (lastpos + 10); // Moves servo negative 1 degrees

         // now we need to save that last position value
         lastpos = lastpos +10;

         delay(10); // Delay time between 1 degree movments
                                   // Decreasing the number = slower response time

  }
    else (sensorReading >= target1);
         myservo.write (lastpos);
         delay (50);

   if  (sensorReading <= threshold2)
  {
         // we need to move the servo 1 degrees in the POSITIVE
         // direction so we need to add ADD to the last known
         // position.

         myservo.write (lastpos + 5); // Moves servo negative 1 degrees

         // now we need to save that last position value
         lastpos = lastpos +5;

         delay(10); // Delay time between 1 degree movments
                                   // Decreasing the number = slower response time

  }
    else (sensorReading >= target1);
         myservo.write (lastpos);
         delay (50);

    if  (sensorReading <= threshold3)
  {
         // we need to move the servo 1 degrees in the POSITIVE
         // direction so we need to add ADD to the last known
         // position.

         myservo.write (lastpos + 1); // Moves servo negative 1 degrees

         // now we need to save that last position value
         lastpos = lastpos +1;

         delay(10); // Delay time between 1 degree movments
                                   // Decreasing the number = slower response time

  }
    else (sensorReading >= target1);
         myservo.write (lastpos);
         delay (100);

   if  (sensorReading > threshold4)
  {
         // we need to move the servo 1 degrees in the POSITIVE
         // direction so we need to add ADD to the last known
         // position.

         myservo.write (lastpos - 1); // Moves servo negative 1 degrees

         // now we need to save that last position value
         lastpos = lastpos -1;
         delay(200);  // Delay time between 1 degree movments
                                   // Decreasing the number = slower response time
  }
    else (sensorReading <= target2);
         myservo.write (lastpos);
         delay (300);

   if  (sensorReading > threshold5)
  {
         // we need to move the servo 1 degrees in the POSITIVE
         // direction so we need to add ADD to the last known
         // position.

         myservo.write (lastpos - 3); // Moves servo negative 1 degrees

         // now we need to save that last position value
         lastpos = lastpos -3;
         delay(100);  // Delay time between 1 degree movments
                                   // Decreasing the number = slower response time
  }
    else (sensorReading <= target2);
         myservo.write (lastpos);
         delay (50);
}
4 Likes
Thanks for the share Matt!
I know you and I have chatted via Youtube. Along the same lines, wouldn’t be great if we could have a second Arduino circuit acting as a engine speed governor, rather than having to purchase one with limited function and a high price?
Brit
Yes this is something on my plate. I think it would be easy enough to do.
Hey Matt,
I was checking out this code and I haven’t really tried to dissect it, but I don’t think it is working like you think it is working.  (I really get it, and you are happy it works and that is great, and great that you shared it. )
You have like:
if(sensorReading <= threshold2) { block of statements} //gets executed if condition is true
else (sensorReading >= target1); //this does nothing
myservo.write (lastpos); //executed everytime
delay (50); //executed everytime.
-=–
I think you really mean:
if(sensorReading <= threshold2) { block of statements}//executed if true
else if (sensorReading >= target1) //executed if true and the if statement was false
{
myservo.write (lastpos); //executed if else-if is true
delay (50); //executed if else-if is true
}
//then you can add
else if() {} //executed if else-if condition is true and the previous if and if-else statements were false
else{} //executed if nothing previously was true.
Well like I said in the beginning Im a complete novice with Arduino and this is why its here so it can be made better…
Here is how this is supposed to work, so let me know if this is correct. When it reaches any target parameter it is supposed to write the last position and stay there. These target parameters are supposed to help dampen things as the 02 signal is always delayed. Without this part of the code, situations can occur and cause over correcting and the engine will lobe until it either stalls out or the code stabilizes.
So it sounds like the else statements are simply just being ignored or at least looked at during the next run of the code?