First Down Draft Charcoal Gasifier

One more step before I call it a day.

This is the idea for the nozzle. As marked, I’m thinking about 5 holes in the flute and will have them pointed down. The simple fire has 4 flutes if I remember right so this will be one extra unless I change my mind before I drill them.

Not sure what diameter I’ll make the holes but probably smaller at the end.

It’s a 1/2 inch diameter pipe 11 inches long.

6 Likes

If you have the ability to take it in and out, start small and make them bigger if it’s not running the generator.

Edit:
I’d say 3 holes at 1/4" to start. I ran a 2 liter with 6 holes at 3/8" for reference.

3 Likes

I drained out maybe a tablespoon of water out the bottom after the run. I opened the top and there was some condensation on the lid but the felt looked clean and the planer shavings were a little damp but not wet like before I added the rocks.

I didn’t empty the charcoal from before so it had more moisture than it should have had. Still run OK but probably would have run better if I would have changed it to dry charcoal. Hopefully the new gasifier isn’t so picky about the fuel.

I’m still happy with the simple fire and will continue to use it but will probably dedicate the down draft gasifier to the generator and use the simple fire for the log splitter or maybe a different generator at another location.

5 Likes

Looking around for a cover for my ash clean out port I might use an old circular saw blade.

This was just a thought before it gets dark here. Pretty close the right size and flat.

The square tube I have isn’t big enough so I’ll probably use angle iron to bolt this in place using the flat bar as support and to block the holes in the blade.

I still have more to do before I need to worry about that so I might find something else that looks nicer but this should work.

Next step will either be the gas outlet pipe or the grate as well as welding the end of the flute nozzle shut and drilling some holes.

That flute nozzle should be easy to get to as long as the charcoal is not in the way so I’ll start with less holes than I originally thought and drill more or enlarge them if needed.

Oh yeah, I forgot to mention but the bottom of the tank is rounded and my clean out isn’t at the lowest point but I figure I will just leave some ashes in it to help insulate the base.

8 Likes

Looking great Brain, nice workmanship on your build. Yes use your simple fire on your more portable stuff. And like the bigger gasifier handle the generation part. I like the saw blade idea, I have a few old blades on the wall. Put them into a new use as hatch covers for clean outs.

5 Likes

This doesn’t really have anything to do with this build but kind of related to the saw blade and I didn’t want to lose this video just in case I needed another project someday.

On the comments Kristijan said it was a sawblade 2 or 3mm thick but should have been 4 or 5mm.

Mounted directly on the PTO of a 70hp tractor at idle.

I haven’t looked to see if there was any more information on this here but doesn’t look complicated to figure out just from the video.

EDIT:

EDIT AGAIN TO ADD:

5 Likes

Looking good. You might run in to some problems with the nozzle overheating (heat rises up) but definitly go small on the nozzles. Like Cody sayd l wuld go 3 6mm for a start.

Problem also with a down facing nozzle is molten slag drips down the nozzles and plugs them. Atleast it was in my case…

The chunker was stupid easy and cheap to make and worked good, apart from the disc being too thin. Only aditional talk about it was me recomending to Cody to change the geometry of the disc from this snail shape to a more rounded shape for extra strengh.

8 Likes

Hi Kristijan, I plan to use 1-1/2 inch schedule 80 pipe passing entirely through a 100 pound propane tank. I want to try two 6mm nozzles inclined 20 degrees down from horizontal. Nozzles pointing away from 4 inch perforated grate on opposite side 10 inches below nozzles. The tank is 15 inch diameter. I plan to line the tank with 1 inch refractory insulation. I plan to place the nozzle holes 7 inches apart drilled at 45 degrees facing toward each other. 45 degrees points the two hot zones into the center and allows easy cleanout from each side opening. Do you see potential problems with any of that? Thanks in advance for your thoughts.

5 Likes

Correction: to 3/8 inch nozzle size 8mm or 9mm?

2 Likes

I’ve been thinking to just sharpen a disc and adding the hub off center. Fluidyne’s manual chipper is essentially just that. All you need is the curvature to slice without the entire edge going in at once, and like you said a more rounded shape is stronger. The shark fin design I think would eventually snap at the tip.

http://www.fluidynenz.gwprojects.org/simplechipper.gif

I have a 9" diameter steel disc at 1/4" thickness right now, haven’t sharpened it yet. I’m hoping to run it slow enough I can automate it to cut with an angled hopper like Patrick did with his.

6 Likes

Here is my pto chunker:

I wish my pto turned slower but it chunks a lot of wood in a short time.

11 Likes

Thanks for the information and links to the simple chunkers. Someday I might try making one.

Today I fired up the simple fire again and did some more work on the down draft gasifier.

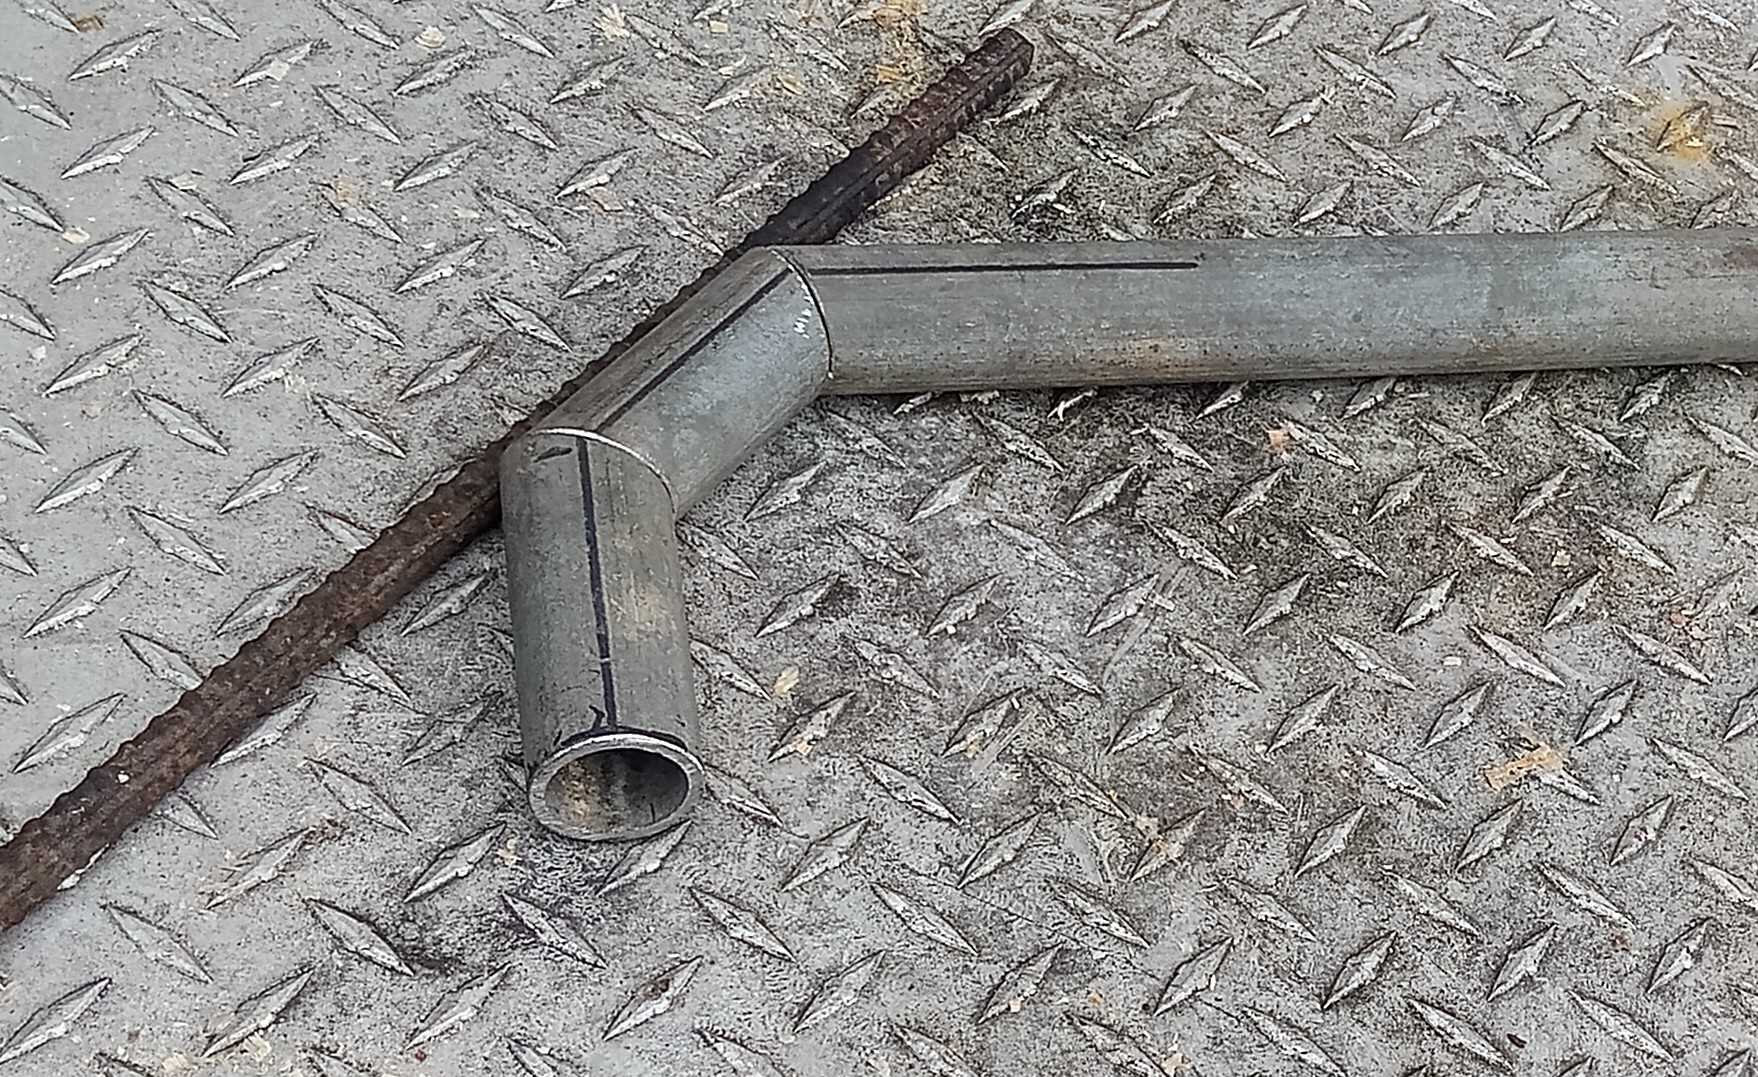
First I set the chop saw up to cut some pipe.

Thought I’d try less sharp bends this time. The simple fire I just cut 45 degree angles but this time I set it at 22.5 degrees. Took extra welding but might have less restriction for the gas flow.

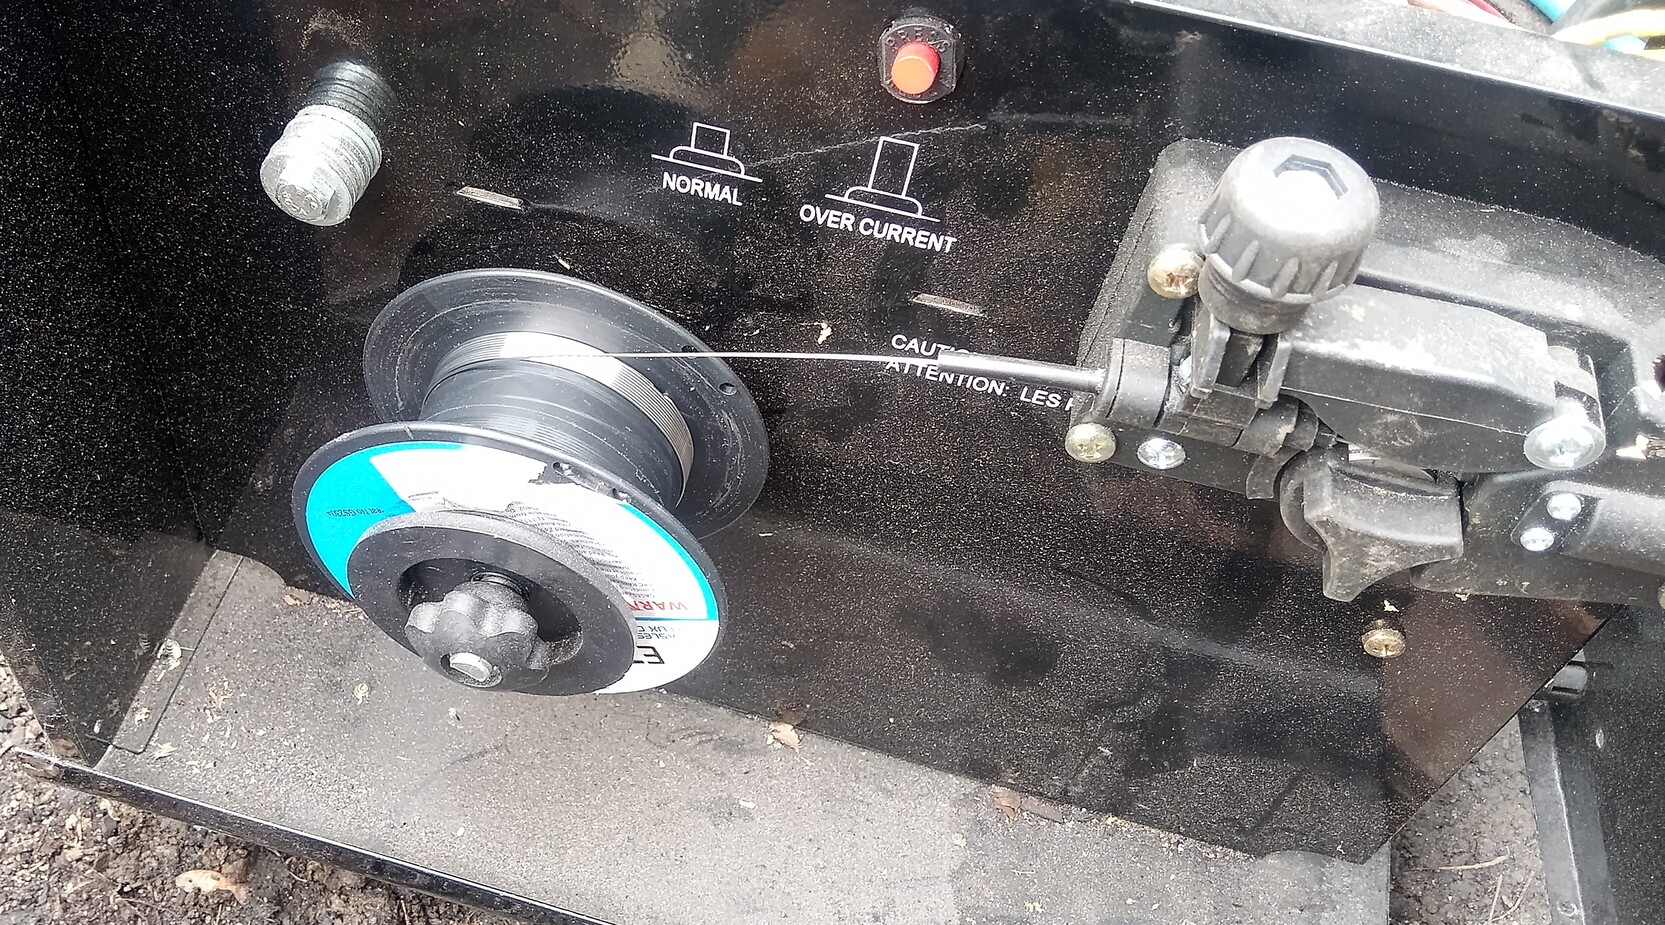
Just about finished another 2 pound roll of flux core wire.

Now, I could have hidden this lumpy mess but I wanted to show good and bad to encourage others and show that you don’t need to be a professional welder to do this.

I wasn’t happy with that lumpy mess but I could have tested it for leaks and put some silicone or JB Weld on it to fix any leaks and called it good enough but decided to grind it off and see what it looked like under all that weld.

Not real bad but found some places I’m going to weld up.

This is a temperature reading just after shutting off the simple fire. I guess it was time to shut down. This burnt a lot of charcoal (probably a bucket full) but was running good. I think I’ll let it cool off and empty it out tomorrow to get rid of ashes and to check on the nozzle.

Closer to the nozzle the outside of the tank was over 450 degrees F (232 degrees C) but the temperature after my cooler was still under the boiling point of water. I didn’t check how much water it condensed but today’s charcoal should have been drier than yesterday’s run.

I probably should have shut down and refilled it sooner but it was running really good and I was almost done.

I didn’t time this run but it must have been a couple hours or maybe a little longer. It run long enough to cut the pipe pieces, grind the edges, weld them together, and grind the lumpy weld back off. I was going to weld some spots that looked like they might leak and grind those welds back down by my uncle came and offered to take me to get some firewood slabs.

This is all hemlock so not the best firewood but a local sawmill told me to take as much as I wanted. This will likely be just burnt in the furnace but I might try turning some into charcoal.

10 Likes

Hi Brian. I have been reading and watching you closely. Hope to start building soon. My experience is that hemlock burns with as much heat as fir but it doesn’t smell as good and must be really dry.

4 Likes

Thanks Darrell. I’ve burnt lots of hemlock before. It is really nice to start the fire as long as it’s dry but burns a lot faster than hardwood so the furnace needs fed more often. It doesn’t have as much sap as pine or fir so less creosote worries. It was FREE and not very far away.

I’ve made charcoal out of pine for the simple fire gasifier and it worked ok so I expect hemlock would be a little better than the pine.

I still have a ways to go before this down draft gasifier is ready to try out but I have (and use) the simple fire gasifier. Keep in mind, I’m new here (48 days) and this build is basically an experiment. It should work but I am just trying to take everyone’s suggestions and come up with something using the materials I have.

I’m sure you have seen the plans for the simple fire.

I made mine more complicated than it has to be. It “shouldn’t” need the cooler/condenser and the filter could be simpler than I made mine. I had my generator running on the simple fire the same day I built the main body of the gasifier. I only ran it for a minute or two since I didn’t have a filter but it was way “simpler” than any I tried before.

8 Likes

Bruce, culd you do a skech? Im having trouble imagining this.

3 Likes

Thanks for the reply. I’m away from my computer until the 30th. I’ll draw something when I get back. Unless I can figure it out on this phone.

3 Likes

Another fun day.

Got the gasket for the top glued in place with clear silicone. Might not handle the heat but the remains of my high temp silicone is needed for a different job and should work long enough to see if this down draft gasifier even works.

Drilled some holes in the flute nozzle and welded the end closed. The holes might need bigger or more but this should do for testing. This will be twisted in tighter to get the holes facing down or at least angled down.

Patched some possible leaks and welded the gas outlet pipe to the tank. Almost out of yellow paint but this is mostly just to help stop the fresh ground and welded metal from rusting.

This is why I wanted the pipe raised up. I’m hoping to put the filter under that pipe. I’ll use this one from the simple fire for testing but eventually it will get one of its own.

Pipes cut for the cooler. The big pipes are 12 inches long and fit over the gas outlet pipe on the gasifier. I didn’t measure the diameter but I’m guessing about 1-1/4 to 1-1/2 inch inside diameter. The smaller pipes are 16 inches long and almost 1 inch outside diameter so was probably 3/4 inch electrical conduit. I think it was originally from a tarp canopy. It’s been laying around for years so this seemed like a good use for it.

Yes, this was as much fun as you can imagine. No, it didn’t work. At least it wasn’t a corded 1/2 inch drill so didn’t break my wrist.

I ended up drilling the big holes on a drill press. Still wasn’t much fun because the lowest speed on the little drill press was still faster than it should have been and I had to cut a little off the big drill bit to get the pipe to fit under it when it was in the drill chuck.

That was enough fun for one day. The cooler still needs all those pipes welded. That’s probably going to take another bucket of charcoal to power the welder. Hopefully I can weld it without burning through.

No idea if this will be enough cooling and didn’t decide on where/how the drain will be. This is different than the one on my simple fire so a lot less condensation should make it to the filter but any that does condense will need a way out and I’d prefer it not to end up in the ash pan of the gasifier. Hopefully most of the moisture gets converted into fuel instead of leaving the gasifier like it does with the updraft simple fire.

11 Likes

Hi Brian , from my play with downdraft i needed a lot more cooling , the filter with the stones in the bottom is a great way of cooling down the gas and help drop out any condensation as well see how you get on and just keep adding till its cool enough for the engines .
Dave

4 Likes

It’s going to rain all day so very little gasifier progress but I did braze the cooler together.

I thought it would be quicker than welding it but it probably took just as long but I didn’t burn through the thin pipes.

If I attach it to the end of the outlet pipe I think I can get a slight downward slope to it. I wish I would have angled that outlet pipe down instead of straight but too late now.

I’m thinking I will tack weld the cooler on the outlet pipe and seal it with high temp silicone so I can get it back off if I need to change it. I don’t know how hot it will get but a rubber coupler probably wouldn’t do.

4 Likes

I just had to know.

The lid is held on by gravity. The clean out port is stuffed with felt and a plastic bag covering it.

I forgot to put the lid on my charcoal barrel so it got a little wet from the rain so figured I’d use some for this test.

This video was taken just minutes after lighting it.

At least now I know this just MIGHT work.

I shut it down just after taking the video. Really just wanted to make sure I wasn’t wasting my time with this build.

No lemons here. Maybe a shot of lemon juice will help?

16 Likes