Thankfully, I have about 60 gallons of charcoal stored up for when I finally get the gasifier built and working. I built one last summer out of an old steel bug sprayer, and while it kind of worked, I never really got the mower to run smoothly, and the hose melted after a few minutes. Now that I have studied many of the designs of members here, I think I have a better idea of how it should be built. When it warms up, I’ll be back at it.
1 Like
Good morning Cory.
I think there are some advantages and disadvantages of living in a dead zone. On many occasions I would try to send a smoke signal with several units including 5 trucks and a old farm tractor on a clear day . I would scan the horizon and get NO answer or reply as far as the eye could see in all directions . The best I can figure I am stuck in a dead zone but I feel sure if I drive out to the main highway I would get a reply.![]()

After sending this message I saw from the far north horizon something that looked like ( please check the number and try again ) but it turned out just being a cloud ![]()
9 Likes
LOL! That’s orders of magnitude more smoke than I made! Love that last pic of flames shooting out of the back!
2 Likes
Hi Cory, When people start living close to each other, one person’s actions can annoy another’s. Therefore ordinances are put in place to regulate activities. Get a copy of the burn ban ordinance. Contact the code enforcement officer who you have already met and find out what is legal and what is not. As I see from reading the posts, you figured out the problem with the two barrel method was unseasoned wood. Making charcoal from that creates a smoke bomb! The wood has to be seasoned to 20% moisture or less. If small camp fires are permissible, consider a pyramid kiln.

Gary in PA
4 Likes
The Moxham kiln is a similar concept, on a bigger scale. It could be scaled depending on the size of tank, or other round material available, and the size of wood at hand. I expect it should run fairly smoke free, given the heat it will produce. I suspect the dousing with water of that much charcoal at such high temperatures might partially activate it, might be good for biochar, but that’s just my speculation.

My newest drum system at the test
first video, cooking the charcoal, drum can rotate
the excess gas is rerouted towards under the tank, can see this and hear this in this vid.

second video, testing the new charcoal in the barbeque, no smoke, no yellow…

2 Likes
You are very lucky Koen to have all that bamboo , it looks like the perfect material for making charcoal with , I have native Australian hardwoods and no matter how well I cook mine it will always have that yellow tint in the flame , I also think there is less dust with your charcoal when crushing it from what I have seen .
If only I could grow it where I live I would be very happy too , so I shall have to wait till I retire to a beach front somewhere so I can harvest coconut shells for charcoal as I am told they make the best charcoal .
Dave
5 Likes
I collected up a truck bed full of logging slash from a newish clear cut a few miles down the road. Mostly red alder and maple branches about 1/2 to 1 inch (12.7-25mm) diameter.
The piles closer to the middle of the clearing should be much drier, as they get better sun/airflow.
I packed it into my modified/inverse Hookway charcoal retort and lit it up.
4 hours of constantly feeding it kindling later, I let it die out. Never had a self-sustaining flame in the chimney tube from expelled woodgas. Never burned off any paint from the barrel, even on the uninsulated top surface. (My insulation is on the inside of the barrel). 
It’s pretty obvious that the wood was still quite green/wet: about 20 minutes after the first firing, maybe a quart/liter of liquid water seeped out from my barrel lid (on the bottom no seal yet, just gravity and a ring clamp holding it shut.)
I’ll try firing it again tomorrow after I spent all this energy driving off so much water.
Will post pictures and more words to a dedicated thread later.
6 Likes
cooking and testing
Connecting the feedback gas to under the tank

3 Likes
Temperature probing
outside the tank

and inside the tank
when the charcoal is “done” “engine grade” or “cooking grade” it reaches about 650 degree celcius inside the tank.
Rotating the tank speeds things up fast

1 Like
rotating the glowing tank…

3 Likes
Koen You mention the char is done when the inside of the tank gets to 650 C. I have heard the 650 figure used a lot but I thought that was 650 F when the pyrolesis stopped. If I figure correctly 650C wood be about 1112 F That is the temperature we go for for reduction TomC
3 Likes
I made 130 gallons of charcoal in the last couple of weeks this way.

9 Likes
Hi Tom,
The 650° C is where the char is clean from volatiles, so where no more orange/yellow flames coming from the tank,
Anything above that temperature is almost pure CO coming out the retort.
2 Likes
Don; You seem to me to have the best charcoal making system and I am sure others would like to duplicate it but don’t have a pyramid or conical shaped container to use like you have. May I suggest that you look a some old combine hoppers and see if you wouldn’t be able to recommend one of them for a replacement for people starting… Most farmers have out grown the small combines and are junking them out Tomc
2 Likes
I was thinking of an old gravity wagon for charcoal production.
If you are not able to find or afford a good cone, I saw a video of digging a cone shaped hole in the ground to make charcoal. Only downside is you would have to dig the char out instead of just opening a gate at the bottom.
3 Likes
I cut off a 55 gallon drum at 45 degrees to form an oval/cone shaped hopper. To visualize, tip a barrel 45 degrees on edge and slice through parallel to the ground. Begin cutting just above the lip where the bottom meets the side. A gate/door for startup air and charcoal removal is easily attached to the flat area near the bottom of this “cone.” I also fashioned an oval lid for sealing a full batch, but this is not necessary if operating continuously and dropping finished char into and air tight can.
7 Likes
Rebuilding , modifying…
The red bricks now stacked up to the top,
need to make some more improvements, but the end results are good quality charcoal…
2 Likes
Charcoal without smoke…from the armchair…ARMCHAIR WANNABE
!
Ok I too would like to make charcoal, and eventually benefit from the heat byproduct thereof.
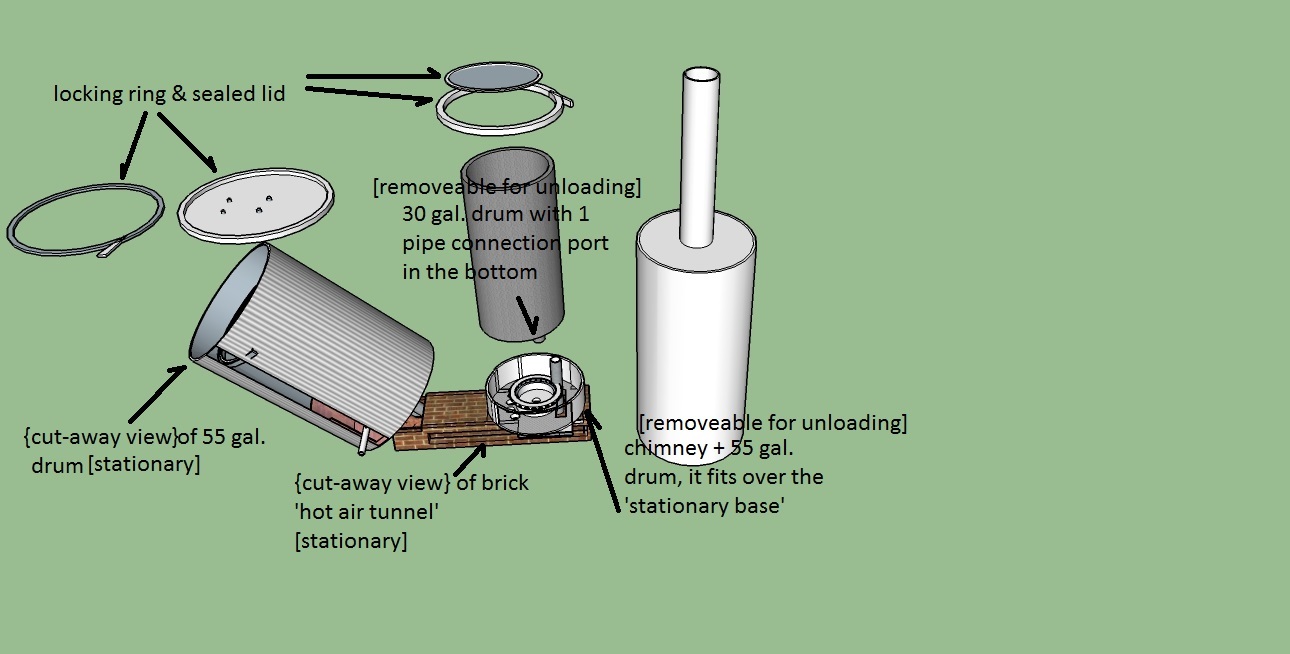
So I want to build a ‘stationary stove’, that requires tending but hopefully after it is fully warmed up, will process wood/biomass into charcoal without any adverse emissions, that is the goal, for little or no emissions. I’m hoping to process all of the pyrolysis gas from the 30 gal. batch barrel (full of raw wood/biomass to be baked-charcoalized), and utilize that dirty pyrolysis off-gas thereof to be diverted into & flow thru the ignited charbed that resides in the 55 gal. batch barrel, therefore cleaning the gas and increasing the exit temperature thereof.
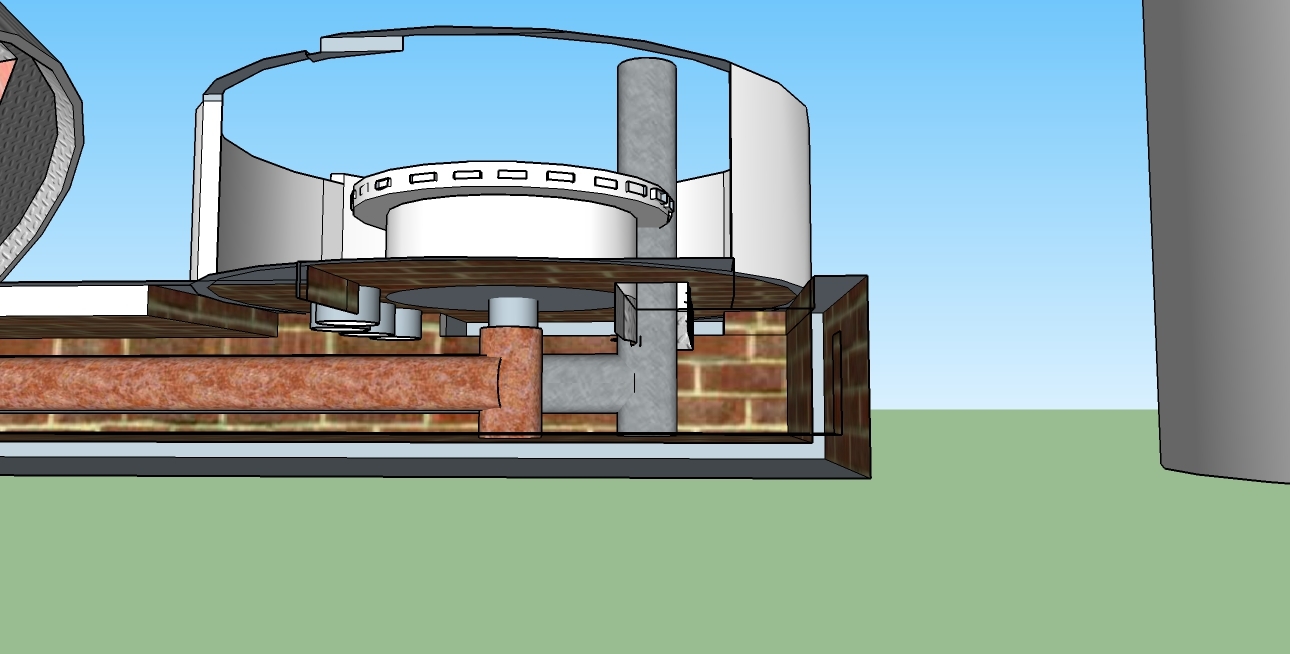
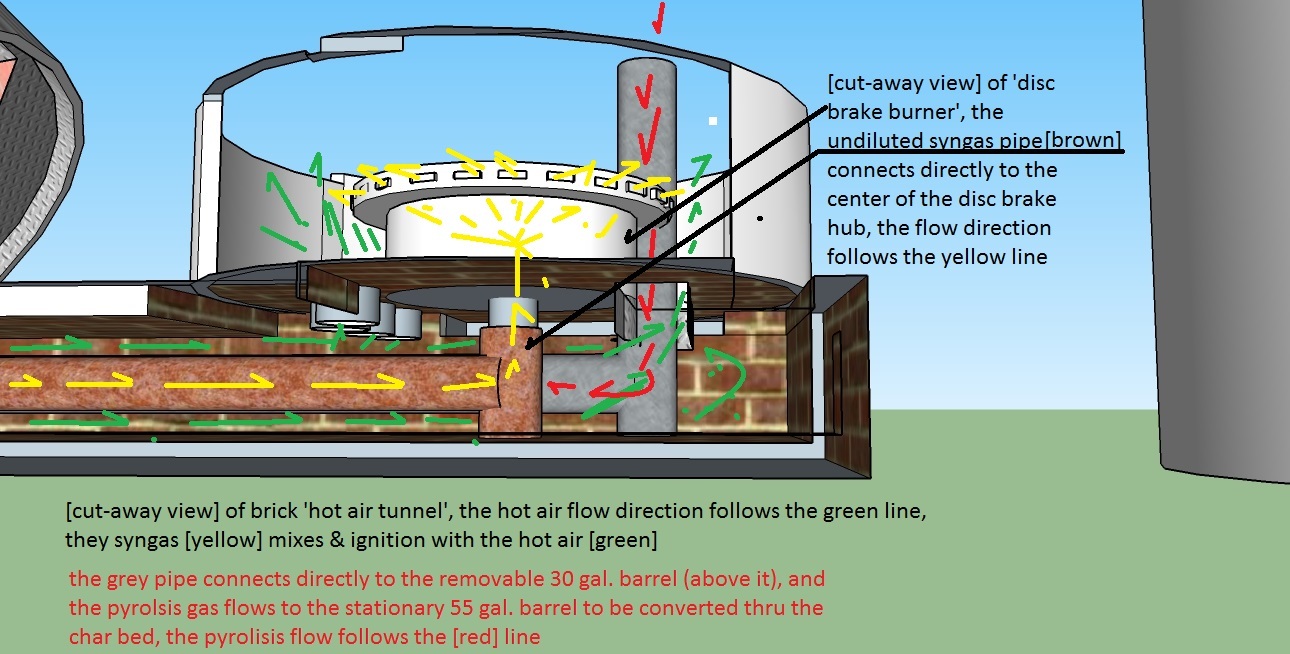
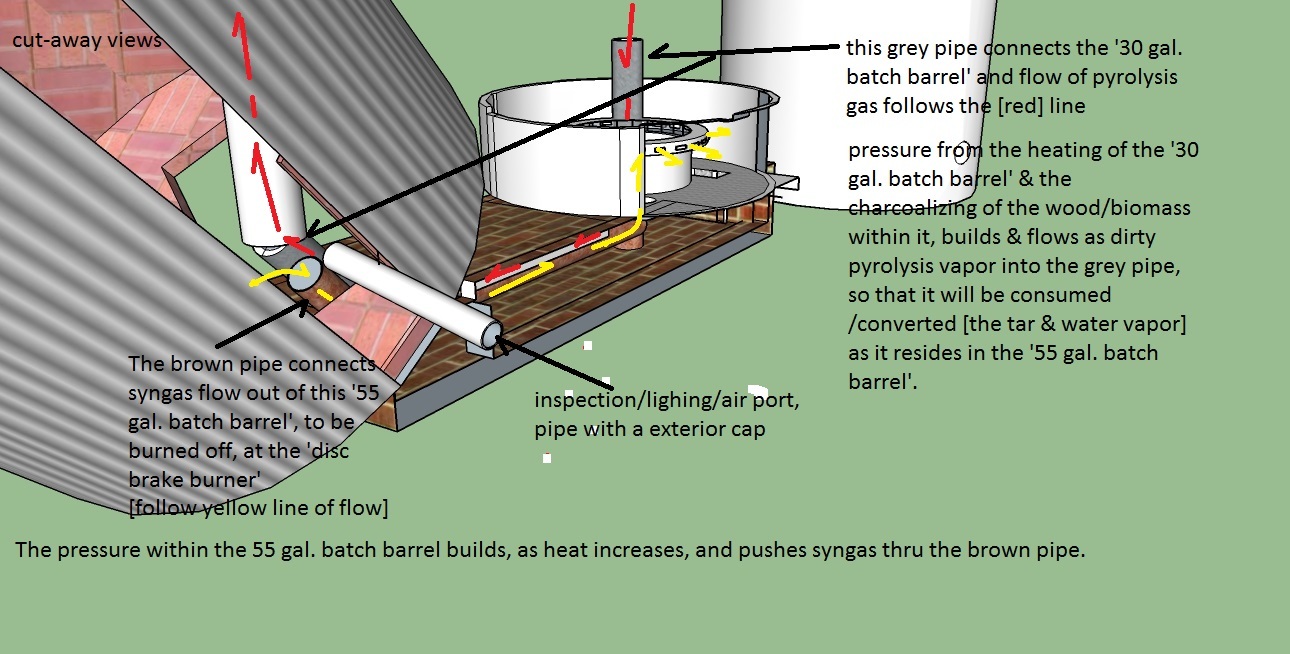
These pictures shows some of the main pieces, the 55 gal. drum on the left side, it will be nearly filled with charcoal, generally no raw wood is used in this barrel, primarily charcoal. I’m hoping that all offgases within this barrel will be converted to a cleaner higher grade & higher temperature syngas, as the fumes pass thru the ignited charbed in the bottom of the barrel and out thru a nozzle & pipe [brown] in the bottom of the barrel. And since the 55 gal. drum is sealed at the top with a removable lid, the pressure developed will force the syngas thru a pipe [brown colored/yellow flow line] that connects to a used disc brake [located in the center of the unit]. A blower may become necessary to force the syngas thru the nozzle in the bottom of the 55 gal. barrel, I expect to put a ‘condensation inner plate’ on the lid, this hopefully will help condensate moisture & direct it to the gutter & drain in the side of the 55 gal. barrel. Perhaps eventually adding a contained ‘cooling coil’ that circulates water in the lid area, perhaps to condensate moisture faster. This disc brake seems to me to be similar to a propane gas kitchen stove top burner. The disc brake should act like a gas stove burner, the syngas escaping thru the equal spaced ‘cooling ports’ that are already cast into the assembly. The interior void of the disc brake will be covered somewhat when the 30 gal. raw batch barrel is set upon it, the cast iron should make a structurally stable foundation for the 30 gal. barrel to set directly upon. As the syngas arrives into the hub of the disc brake via the sch. 40 [brown colored] pipe [follow the yellow flow lines] [additional structural support is given by embedding the pipe ‘T’ into the foundation brickwork] , the syngas should ignite & sustain just outside of the disc brake perimeter, as it is in this burner area, hot air mixes with the syngas, hopefully at a mixture of about 1 part syngas to 5-7 parts hot air. The hot air inlet ports may be adjustable somewhat to change the 1:5 ratio. A cool air inlet into the same area may be used, as a simple access door [facing front], of which is used to light the burner.(the door is not shown in the pictures because of the ‘cut-away views’ (imagine) a simple door to see how the disc brake flame is burning.
In the pictures you will also see the 30 gal. raw wood/biomass barrel (in the middle of the picture), it has a lid & locking ring, and a single pipe that protrudes out of the bottom of the barrel. This bottom of the barrel pipe connects by sliding inside the stationary [grey colored] pipe below & sealing & lending structural support. The flow of the pyrolysis gas developed within the 30 gal. barrel is forced downward and [follows the red flow direction lines] thru the grey colored pipe [sch. 40]. This pipe goes directly to the 55 gal. batch barrel, and by anchoring the pipe into the brick foundation area, it is used as a structural support of the 55 gal. barrel & 30 gal. barrel but primarily transmits the pyrolysis gas into that barrel. I expect to run the [grey] pipe nearly to the top (on the interior of the 55 gal. barrel) so that it can release it’s pyrolysis gas into the upper part of the barrel.[red flow line] There it will probably be necessary to have an inline-one-way-check-valve, near the top of this grey pipe to somewhat prevent backflow, as if the 55 gal. charcoal batch is pressurize with a blower.
A few words about the brick ‘hot air tunnel’, it is the hollowed out foundation to the whole unit, it allows inlet air to pass thru it, and the air temperature is increased substantially as the 2 pipes (the brown & the grey) are radiating their heat into the air flow. The brickwork tunnel should help stabilize temperatures of the whole unit, while generally keeping it’s operation on the hot side.
The disc brake, resides within a burner area, a 5-10" tall section of a 55 gal. barrel is used around this area, and has been cut-away view, but basically is rigidly mounted to give the structural support of the removable outer 55 gal. flue/chimney assy. [which fits over the 30 gal. batch barrel, pilots onto the 5- 10" lower section of barrel] which contains the flames and emissions to be directed upward between the sides of the 30 gal. barrel & the 55 gal. flue, & finally out the top of the 8" stove pipe chimney. I would probably weld some handle bars onto the 30 gal. barrel, and the 55 gal. flue, the stove pipe might be easily attachable to the 55 gal. flue.
Most of my ideas are fairly impractical, but I’m just about willing to give something like this a try, any constructive criticism or suggestions are welcome.
oliver
1 Like