I don’t disagree. I ran into several of those recipes, there is one on this link that supposedly won’t crack. I thought I found one safe(r) for electrodes, but I don’t appear to have bookmarked it.
3 Likes
Thanks for the kiln wash info. Here are some pics of the nozzle:

It took three tries to find a brick that didn’t crack.
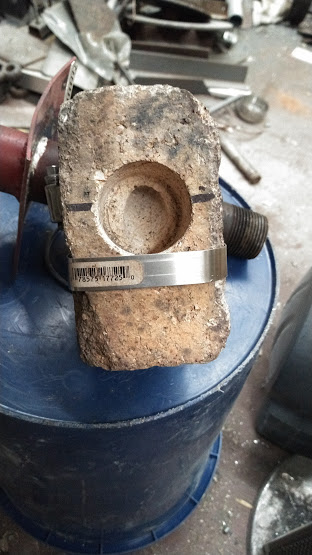
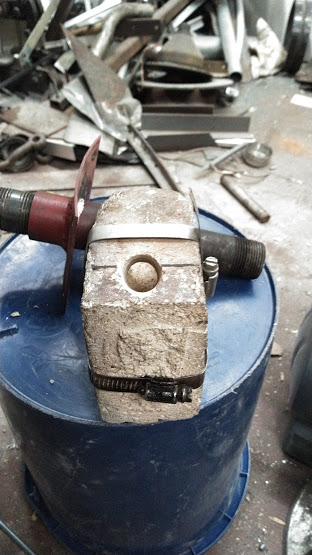

Flexible cleanout rod is the handle from a flexible inspection mirror.
9 Likes
What kind of brick are you using? Is it just a clay brick? or is that a reflective type?
Nice scrap pile btw. 
1 Like
I am using an actual refractory firebrick that i got at a local masonry supply hose. I use these bricks to line the firebox on my homemade maple syrup evaporator. They were just lying around, so I used them. As Thomas Edison said, “In order to invent things, you need a good imagination and a big pile of junk.”
11 Likes
I hadn’t heard that one before, but i like it a lot!
5 Likes
Are you using a drill press? It is usually really soft, and fairly easy to cut but I could see a vibration in the drill breaking it instead of cutting especially if the wall gets too thin.
I never heard that one before either. It is great! Not to be an ass, but more for reference, the quote technically is “To invent, you need a good imagination and a pile of junk.”
4 Likes
Yes, thanks. Quotes should be quotes not paraphrases.
These firebricks are hard and slow drilling with diamond edged core bits/saws. I pilot with a 1/4 inch masonry bit in a hand held hammer drill then use a non hammer drill with a core bit/saw that has a central 1/4 inch bit as a guide. I use the drill press with core bits that lack this center guide pin.
3 Likes
I was more worried someone would put it in the Argos shirt. Lol
It doesn’t sound like you have the reflective brick which is lighter and far easier to cut. They sell both styles at our sugar Bush supply place along with various other types of insulation.
I’m not going to suggest buying new brick since you have obtainium. The coatings might help longevity but hard to tell. They can crack for a variety of reasons.
3 Likes
I once used a soft type of fire brick that came out of a kiln oven , i used a 25mm carbide hole cutter on it ,it went through it like a hot knife in butter , i used that brick to install my first tungsten carbide nozzle .
The fire brick turned to glass pretty quick nothing at all happened to the carbide nozzle .
Dave
4 Likes
It probably did. It depends on the temp rating of the brick all bricks aren’t made equal… Kilns aren’t necessarily designed to withstand super high temperatures. and the higher the temp rating of the brick, the more it costs.
2 Likes
Since I had some down time today, I went back and read through both charcoal nozzle topics. I realize that my firebrick idea may have distracted us from Dave’s very important discovery that Tungsten Carbide is a winner for a charcoal gasifier nozzle. It is looking like Dave is about to surpass his 200 hour goal.
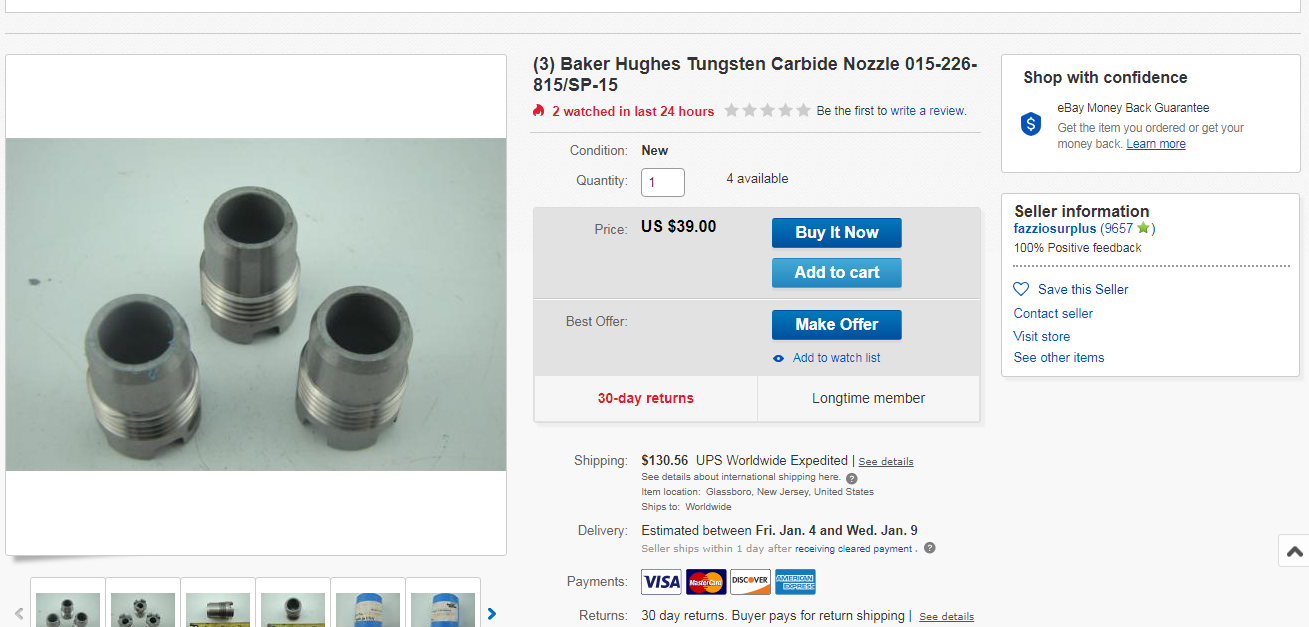
I see that there are solid TC nozzles with 3/4" NPSM threads (same threads as NPT, but without taper). They come in various IDs. I see some on ebay with what looks like a 1/2" orifice (sweet spot for a wide range of small engines?) that work out to about $20 a piece:
I’m thinking of adding a little of Sean’s kiln wash to keep the slag loose and some high-temp anti-seize to seal the threads into a 45 degree NPT coupling. Is this the holy grail for a SimpleFire style gasifier? A permanent, off the shelf, easy to change nozzle? Am I missing something? What would be the weak point(s) in this nozzle set up?
4 Likes
Allow me to insert my confusion here.
When you talk about this being a winner nozzle, does that mean when it comes in from the side? What about Jeff and Don’s inlet coming in from the bottom? Iknow Jeff has been running for a while from underneath. Is there a downside to his setup?
3 Likes
Bruce i just looked at the link thinking i might order one to trial and then saw the shipping price of US$138.
If you decide to buy one could you let me know when you get it if it is real tungsten carbide , you will know what i mean when you place it in your hand it will feel like a lump of lead it is so dense and heavy
I used to have a friend in Texas that would post me items up too 2lb in weight for about $13 from his loacl post office so i have no idea why this seller is asking that much for postage.
Bill my latest trials have all been from the bottom vertical blast allowing for a degree of protection from the volcano effects of the slag helping to protect the nozzle , the test i did about 3 or 4 years ago with a proper piece of tungsten carbide worked really well but was inserted into the side of the gassifier and then the tc was mounted into a fire brick within maybe 2 or 3 runs of approx 4 hour runs the fire brick had turned to molten glass , the tc nozzle was still in great shape and not harmed one little bit but would have fallen out of the brick after another few runs i think .
Dave
4 Likes
Hi Bill, I like those bottom lit designs a lot. The only “downside” is the “downside.” Lighting from underneath requires some frame to lift the gasifier up high enough to light. This must be even higher if we are using a bowl to catch coals. I like setting my gasifiers down on a flat surface for aesthetics, ease of lighting and convenient EGR. Because there are advantages to the vertical nozzle, I am suggesting the 45 degree as a compromise which offers some of the advantages of horizontal and vertical.
5 Likes
Dave,
My shipping is only $10.92. I made a reduced offer to see if the seller will shave the price a bit. If I order these (they are only offered in threes), and if they are actually TC, I will send one to you.
3 Likes
Bruce, thanks for the clarification. I guess I need a video of how Don and Jeff light their gasifiers.
2 Likes
Here is a verbal video for you Bill. I have a 3/4 inch pipe that goes from the outside of the gasifier to just short of the reaction zone. There is a pipe cap outside the gasifier with a sight glass (clear marble) that screws off and after the starting blower is activated I stick the torch in the pipe opening for 3 to 5 seconds and that is all it takes. My walk around video shows the lighting port starting at 6:20.
https://www.youtube.com/watch?v=BvRtMk_huHM&t=71s
10 Likes
Don’s lighting port/sight glass is elegant!
4 Likes
Bruce , thank you thats very kind of you , if they do turn out to be the real deal i think we should have a winner there , i just wish i could fire up my gasifier now to carry doing hour tests on the life of the nozzle i put in last month , my charcoal supply is dwindling with every BBQ and the sun is blisteringly hot no way of making more just yet .
Don thank you for your walk around video ,i do not think i have seen that before, a very well thought out and compact unit if i may say , are there pictures or video’s of the build ? and do you use the same sort of blacksmiths forge type nozzle that Gary G used on his ranger ? i would love to try that type out one day on my 2007 v6 hillux if its possible even if its for hybrid driving up here in the hills as i know it wouldn’t cope with our steep road here , but one day when i get time for sure i will try .
Dave
4 Likes
Here you go Dave

3 Likes