Funny you should mention that. As I was closing up the shop I saw that laying on the floor by my work bench. If I do anything, I have to remember to weld just one end of the bars on the grate— correct.
You know when my truck is running I am very happy. A 5000 pound truck with a 4.3 L engine, I can’t expect too much, thus the satisfaction with it. I don’t think a WK would do any better than my Embert/ La Rotor.
Now having said that, I have to ask---- what do you think I would gain by putting in the reduction tube with a charcoal insulation and the grate with the insulated bars. I have it torn down to where I could do it if I had some expectations of running faster or some other advantage.
I have been looking for a Chevrolet S10 pickup with a 4.3 L engine. I think that would drop 500 to a 1000 pounds and the frontal area is much less. With one of those I don’t have to build a new gasifier. Just switch mine over to the newer truck. So far all I find is rust buckets. TomC
Good photos of both hearths from above and sides as well as from below makes it easier to compare. Supposing the “new” one is made according to recommended measures and getting the planned ash drawer installed, a few things should change.
Slightly bigger upper hearth volume, better insulation of the reduction part. 10 nozzles making heat.
You have the measures.
Easier to clean. Selfprotecting angle iron grate, this time both ends sunk in a jack on the peripheral band iron ring! And right, only one end welded.
Each second welded at one end, each other in the other end.
The drawer has to be airtight, if it has an outer side wall, or the current ash door if it is used!
Those air leakages are spoiling all efforts to get a satisfactory performance, old or new.
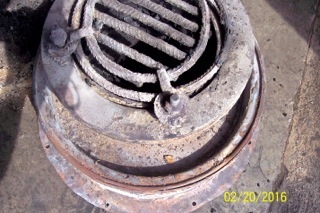
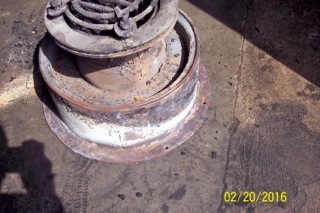
Gentleman; You may or may not know I didn’t get to go to Argos because my gasifier was not working. Many of you made suggestion as to what the problem is / was. I appreciate the suggestions, but it is hard to solve a problem thinking and talking about it. The alliterative is to take it apart for an inspection, which I finally did. I found some suspicious things as I went through the tare down but nothing that I could say, " That is it". The last part was the nozzle/ restriction/ and grate. I was trying to inspect it without turning it over because there was still charcoal on the grate. I finally bit the bullet and turned it over and staring me right in the face was my problem. An air leak in the chamber that feeds the nozzles.
Slight split in the edge of the rim
You can see how the bead area of the rim is filled in to make and air chamber and the nozzles are on the center of the rim getting air from the chamber.
There was so much white discoloring that I wasn’t sure where the leak was until I turned it over. The white color really wasn’t where I finally found the leak She is welded up and going back together incase there is another Argos— in my dreams TomC
Hi Max, I want to thank you for all your interest in my problem. As I was taking it apart, I was considering the changes that we had started and talked about last year. Your statement about 10 nozzles stop me. I would have to get an angle drill to put 5 more nozzles in. Then I would have to start all over again testing to get the correct nozzle diameters. I went through all of that when I final arrived at the sleeves I am using now. The grate and reduction bell are still on the floor and I looked at those to install. Then I remembered why I stop on that suggestion. I made the reduction bell a cylinder. It should have been a cone. When I made the grate to the diameter of the reduction bell, because of the straight sides, the grate diameter was too small. You once said the area of the openings in the grate should equal the area of the restriction. Because of the small diameter, I didn’t feel my grate met that condition. There for I am sorry to say, she is going back together just the way she came apart. I really do appreciate the time you spent working with me.TomC
Don’t throw your axe in the sea!
The flow-through area in the grate can be smaller than the restriction; this is one way to get it selfcleaning!
How much smaller, can be solved by sending me the diameter of the bell and the width of the angle iron to be used.
So you have all the other modifications done from the 10 nozzles and the restriction, to the insulated reduction tube and the flat closing bottomplate?
You have all the measures I gave documented, of course?
Below the flat “big” closing plate, there is room for horizontal “excursion”, if nessesariy?
Pictures & measures will make the grate solving easy, including the angle iron.
Hello friends; I don’t remember when I started driving my truck. For a long time I drove it on the country roads with no license plates or insurance. Then early on last summer, I got legal, and drove it to Green Bay. That gave me courage to drive to Argos last year. All the time working on WK’s suggested 75% learning. Thought I was doing quite well. Then today it seemed the “ship hit the sand”!! I have never been big on flaring, but my battery for my thermocouples was dead and I didn’t want to ruin this engine ( two with a couple of added tare downs to replace push rods is enough.) I kept trying to flare but no luck, dispite a puff back, and a ton of brown grungy smoke when I opened the hopper lid. I held my breath and tried to start on woodgas. Yep, she started. Hmmm Why didn’t it flare and why didn’t I have smoke coming out of my flare tube? After eliminating a few things, it came down to I was sucking air into the gas at my Kirby, thus diluting the gas or smoke. Today I rebuilt my Kirby set up. I also changed to a new hopper lid. Ok, started the Kirby and gasifier up. While waiting, I noticed that smoke was “puff” out of the lid. Why would the lid puff,puff, puff. If it leaked, it should have sucked air into the hopper–not blow smoke out. Anyway no difference at flaring. no heavy smoke, and it would not flare. I have a pipe with a larger tin can with both ends removed fastened so the pipe is a little down inside the tin can. I tried high speed and low speed on the Kirby. Nothing. Then as I was reaching for the speed control, the flame of my torch dropped down to the under side of the tin can and the gas lit. What the heck is with that? I tried it a couple of more times and it lit every time. And finally time for a road test. Pulled out on the road with the air valve in the full close position that has always been where I have to run it. It got up to 2000 rpm in 4th and that is about the best I have ever gotten so I turned around and headed home. Instead of watching the tack and gear I was in, I looked at the vacuum. Man, it was running about 30 and 18 in. H2O. Before I repaired the leak in my air chamber I always ran at 10 and 5 in. Why am I pulling so much vacuum?? I have a hill to go up as I drive up my driveway, and the engine started to die. So I was going to switch to gas. I reached down and opened the air intake and before I could flip the switch to turn on the fuel, the truck took off up the hill. I looked down at the vacuum and it was 10 and 5 in. with the wire 1/2 open. Wow. What is with that??? When I stopped at the shop it was running fine. I played with the air mix and found when the valve was closed I pulled 25 and 16 in. but it was stuttering and wanting to die. I open it back up and it smoothed out a 10 and 5. I guess that air leak in my air chamber has been sucking air for a long time, just got worse lately.
If you think that is the end of my educational day, I have one more for you, especially Carl Zinn. I recharged and desulfanated the little 12 volt wet cell battery I us just for my thermo couples. I hooked it up and only one of my meters lit up. The one that never worked. I thought I had burned it out when I put it in, but there it was lit up. Hmmm Why are 3 out and one that is normally out, is on??? These are just DC lights so the polarity can’t have any effect. Oh well, try it. I switched the cables on the battery on the one that was lit went out and the other 3 gave me thermocouple readings. Carl, are these meter polarity critical. If so then on the one that never worked when I sparked it putting it in I reversed the polarity. How can I get it back to the same as the other three???
Ok that is my questions for today. I started out thinking I had the 75% down to about 50% but today I went back up to 85% to be learned.TomC
DC devices are by nature polarity critical especially if they have a circuit board in them. You might get away with it on a motor but most other stuff you make smoke
Yes, they are polarity sensitive. It sounds like one is wired backwards to the other three. Use a DC volt meter to make sure they are all powered correct.
Ok Thanks I’m back down to 75% to learn. Brought down from the85% I will check the light for polarity. I sure would like to have the thermo read out.Tomc
Thank you JO. Yes, I am very hopeful that it is running even better than before. From the indications yesterday, I will have to learn all over again how to drive it. It never would run with the air even a little open. It is raining today but I might put a load of wood in it and take a drive up around the dams. TomC
No I don’t Now I may be seeing the advantage of having one. Always before I just closed the air valve and it ran best that way. ( simple huh?) Now more learning and probably a fuel/air meter. That is why I say I went from 50% learning needed back up to 85%. It is raining today but I think I will load it up with wood and take a drive for a test of my new learning. He he he. TomC
Oh Lordy, Lordy. I just took about a 35 mile test drive and all I can say is " ship me a case of those lemons". All the time I have been driving on wood, I never really knew the great feeling. I had always blamed my problems on a heavy truck and a small engine. Today I concede that it isn’t a powerful as gasoline but it is soooo close. I’ll take it. I even found the truck has a 5th gear. “Oh what fun it is; to ride in a woodgas truck”. TomC
Hey Tom, glad that you’re enjoying the magic. At Argos, several people were giving me advice about my potential multiple leaks around the air cleaner lid and my 4 two inch air cleaner dampers. Wayne had a hard time running my truck with hardly any fresh air at all. Even pringled the air cleaner lid from a road run there. Boom! I was told that if you can stall the motor with all the dampers closed, that’s a good baseline. Try that. I will get there
f you can’t stall the engine at the art cleaner, how can you expect to pull enough to make good gas I had a good seal on the air cleaner but didn’t know I had an internal leak. What a difference it has made TomC
Another beautiful day to go driving on wood. Haven’t taken the truck out since my last over excited post. Been chunking wood and trying to fix my gages. It was cool today and we have had some rain but now mostly big puffy clouds and now and then sun. I “fired” the truck up and took the wife for an enjoyable ride around some of the local dams and back waters and followed along the river. The truck ran beautifully, as it had last time, and I was just smiling. My wife enjoyed watching what I was doing and what the gages meant, but most of all she just enjoyed getting out for a drive where we weren’t on a schedule to get some place Some day I would like to make a movie of my “dam” ride. TomC