Tom, Cause of death, The Car? , The Gasifier?, or Both? I like the simplicity of the build.
Bob
1 Like
Tom, did you ever try running the gasifier on wood chips?
Bob
To be clear, I never built this gaifier. I saw Joseph’s postings and thought it was a design for small engines. You don’t find many actually building gasifiers for small stuff. Usually, now it is charcoal. Then I read how he ran that Ford on it. Impressive. The death of the project was the car. I had one like it and the body that holds the rear shock towers rust out and let the spring pop up in the rear compartment. I do have the stuff to build on, but “the stuff” never seems to include “time”. TomC
4 Likes
Max Gasman; Today I tore my gasifier apart for some needed repairs. I was looking at the reduction bell and grate you advised me to build. Are you still interested in advising me on changes to my goasifier? TomC
1 Like
Hi, Tom!
21. of October 2016
To mess. 445
On the last instruction thread, you stopped when reaching the grate outdraw rails.
Then you put in the older hearth.
2 Likes
Yes Max I believe my last post to you was questioning what to do because the area of the spaces between the bars in the grate did not equal the area of the restriction. Something that I though you had posted sometime back. That is when I lost contact with you so I had to put the gasifier back together as it had been.
At this time I can easily put the new reduction bell in and if I don’t change anything else, I see the benefit from doing that based on the statement credited to Dutch John about the “ball” size in the oxidation zone and the reduction zone. I do have the grate with the angle iron bars so will probably use it. I believe you suggested putting rails in to hold the grate so it could be slid in and out. Don’t know if I will do that as I could not get the grate out of the ash door. Finally, I understand the reasoning of having more nozzles. Increasing from 5 to 10 is going to require some experiment as I don’t have an angle drill and I think it might be required to drill new nozzles holes. Tom C
3 Likes
Tom, if its of any help, l cut aditional slots in the grate plate becouse the open area matching the ceduction area didnt work for some reason. Ash constipated the charbed. No sigh of ash now.
4 Likes
Hi, Tom!
22. 0f October 2016
Do you have the skizzes and the working measures?
1 Like
Hi, Kristijan!
22.10.2016
Do you use a plane plate with upward-bent slots? Do you have pictures
from “before” modification and “afterwards” of the slot-pattern"?
Is it tight at the periphery against the heart tube wall?
How big is the active (open) area of the restriction area? %-wise?
2 Likes
Hi Tom, don’t know if this will help but there is a attachment that turns 90* for a drill they work, just use a short drill bit. I don’t know the cost of them now. Mine is really old.
Keep things posted with pictures on your rebuilding of your gasifier please. Would like to see how yours is built.
Bob
1 Like
Thank you for your reply Max. I found this drawing from 2 years ago and to my surprise it has a lot more information than I had remembered you giving me. Unless you see something incorrect this is what I will work off. One error on the drawing---- I notched the top of the grate rings and will set the angles in on top. The space between angle strips is about the width of an angle strip. The grate will either be bolted to the bottom of the reduction bell or if you have some reason that persuades me, it can slide into rails tight to the reduction.
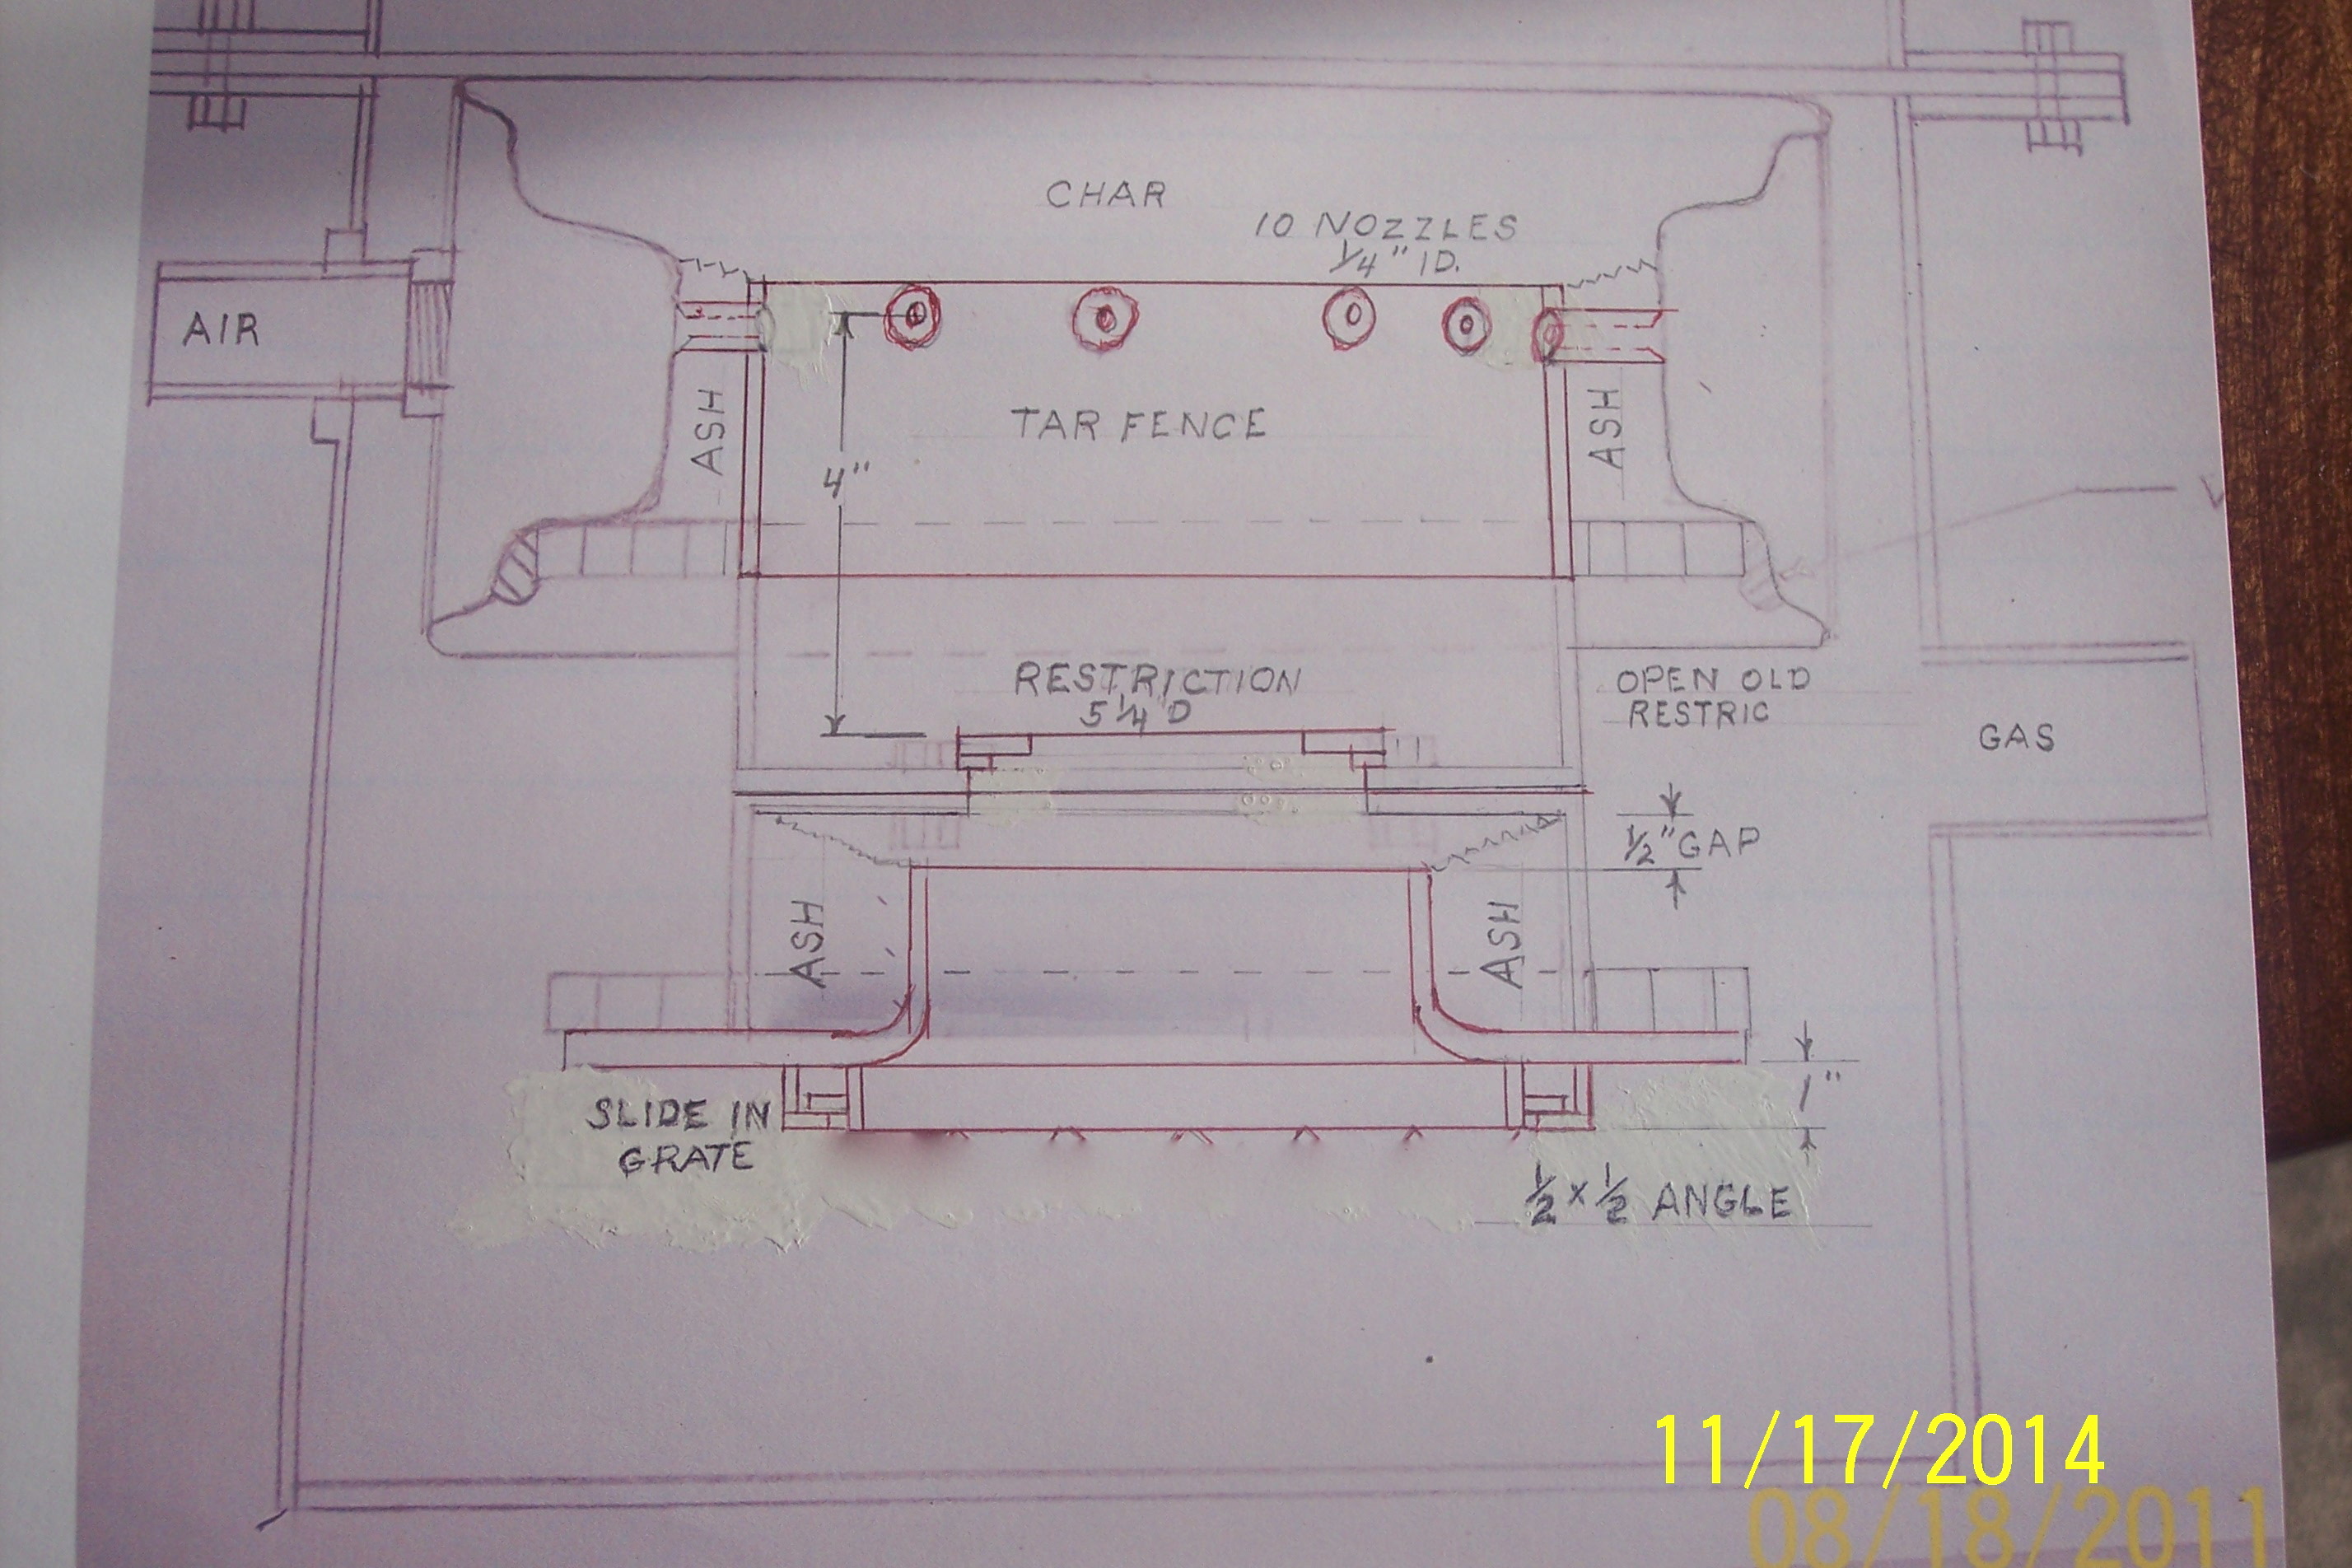
The 1/2 x 1/2 angle— what the grate bars are made of. Facing up and made of heavy angle. TomC
5 Likes
Tom, it looks to me that the drawing shows the point of the angle faces up instead of down. I think you need it the other way around so the angles fill up with ash and protect the grate from melting. You could use thinner angle that way also.
2 Likes
Don I had a mistake on my original drawing and when I photo-shopped it I ended up with the little points. The angle bars are recessed into the top of the grate circle and the opening is facing up so they will fill with ash.TomC
3 Likes
Hi, Tom!
22. of October 2016
to mess. 453
Remember to “sink” the anglebars into the flat iron frame! Rectangular, seen from above.
So that their open top is flat with the frame upper edge!
Weld only each second from one end, and the other second from the the opposite end.
If enlargening the cleaning door is not to your liking, make a rectangular frame; moving towards and backwards, seen from the door.
Make 4 horizontal taps at each corner on the longitudial frame-bars. The “backrow” taps and the “frontrow” taps glide in the angle iron rails, when you move the grate(frame) forward to you and backwards from you.
Pulling the frame enough towards you (through the opened door) makes the front tap-pair drop down from their rails.
The grate-frame bends down and remains hanging on the “back-pair” of taps.
Now, wrenching the frame a little, the “back-pair” of taps will let the frame completely loose!
Easy to take out through the door.
But it asks for a locking mechanism so that does not happen on the road!
3 Likes
Max,
I use a plane tightly pressed on the firetube with slots about 1,5cm wide. No upbent edges. First the open area was the same as the restriction, then l cut 2 aditional slots in. Looks like this:

The idea is that the part around the slots accumulate ash to insulate the reduction, while the gas has enough speed to carry ash from the reduction zone.
Restriction l think is 9.5cm.
4 Likes
Kristijan!
I will answer on your own page!
1 Like
I made a couple of scetches to shw what l ment.
l made this

instead of this
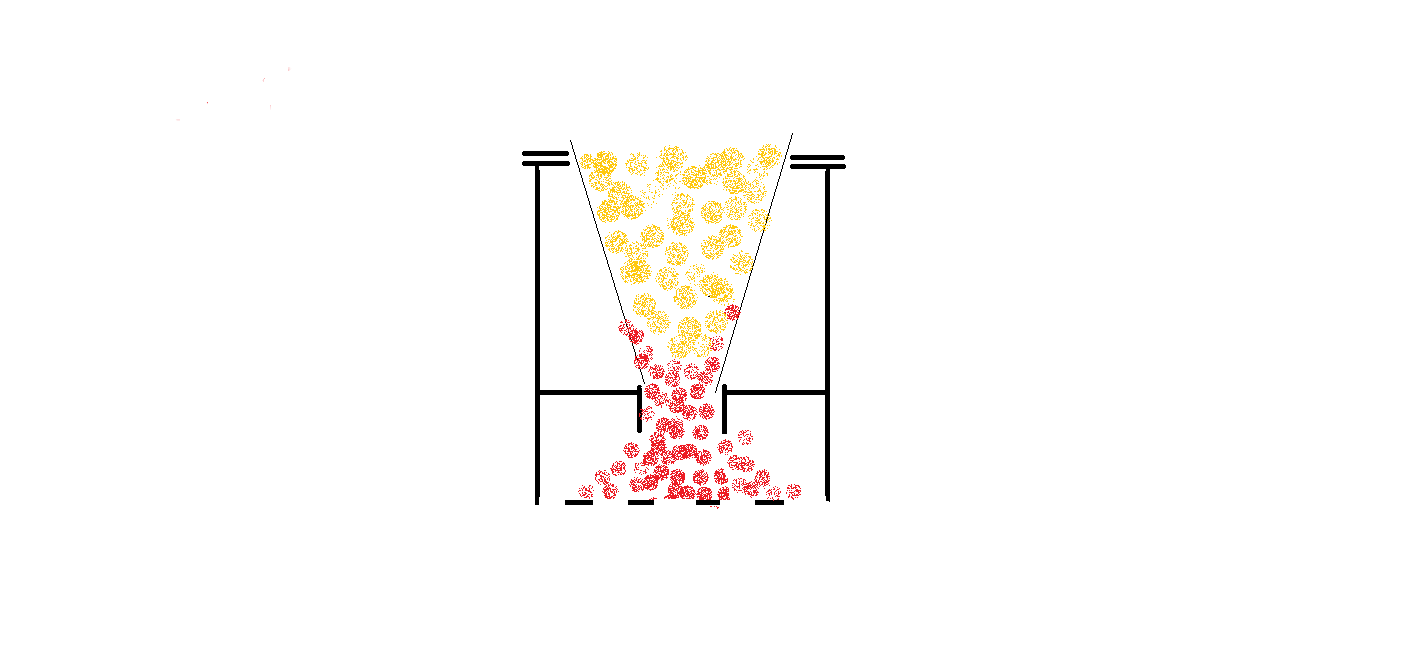
this way l get more gas velocity therefot more ash draw.
3 Likes
Where is Tom now?
24.10.2016
mess. 456
1 Like
Max Gasman; I read you question in another thread. You know, I never realized that you were recommending a rectangular grate (?) Why do you want a removable grate?
OK---- Now the real NEWS. Yesterday I was opening the circle below the restriction. Last time I took the two brake drums to a machine shop and had the holes machined. ( kind of pricey) So this time I put the amps at the max and using a larger piece of weld rod, I “blew” the holes bigger. Crude but effective. The room was filled with brown dust, and my helmet lens kept getting totally coated. When I stopped cutting and inspected what I had done, I saw many cracks in the rim of the brake drum. The dust had acted like “magna flux”. First thought was, it will probably hold for a while. But after sleeping on it I am making plans to build new guts for the gasifier ---- oxidation zone, nozzles, restriction and reduction zone. Not interested in using a brake drum again.
Right now my plan is to use your dimensions to build the new parts out of mild steel— no scrap iron parts I have an appointment at a machine shop to roll me a new cyclone and cone for the bottom of my hopper. I will talk to them about rolling me a 9 inch dia. x 6 in tube ( about 2 in. down to the nozzles, and 4 inches down to the restriction.) 5/16 Thick. The air inlet and out let will have to be the same location as the old system so that I can use the lower housing with ash pit etc.
Don’t have it drawn out yet. Things will become more clear when the pencil meets the paper TomC
2 Likes