JO; Some people just live right. I have posted pictures of down town Crivitz, where they load logs on trains. A lot of forest are cut down around here. They use machines that grab the tree, cut it off at the ground, tip it up horizontally and it de-limbs the trunk, then cuts the trunk into 100 inch pieces , and stack them to the side in piles. Our oaks, pine and others that they cut don’t have nice straight limbs like you show in your truck. Even if trimmed down, the limbs would stack more like hay.
I am thinking of getting my chunker pulled into my shop to start working on it. This sawing the wood is very slow and truthfully scares me a little after running my thumb through the blade. Those typing lessons didn’t help me with my wood working abilities— and I didn’t get any dates out of it either. TomC
Hi, Tom!
22.9.2018
Those in J-O’s Nissan are young stems, not limbs!
The powerline undergrowth is regularly cut down, never getting old…
I’ve found that a machete is the best tool for trimming branches off brush, faster, better reach and easier to swing than axe or hatchet.
Hi, Tom!
23.9.2018
Any pictures or drawings on your chunker?
Has normal lighting-on improved the truck behavior?
Normal = without any backblowing.
Have you made the “conical roof” shown in 635?
Standing on the nozzle-shafts. Easy to lift off at service.
Tom, congradulations! I have been off the site fot a while and l see l missed a lot.
On the slag talk, and the wood being too dry, l agree with JO. Cant have too dry wood but youvcan have a gasifier not fit for too dry wood.
I think the secret is in gasifier being able to adapt to different fuels. Few are so lucky to always have same size same quality fuel on hand, so l am thinking for a while now how to make this happen.
3 things define the gasifier. Oxi zone, restriction and reduction. Idealy all 3 shuld be made adjustible. Not as hard as it seems:
Oxidatiion zone can be enlarged with double plane air nozzles, folowing 60° ashslope (see JOs recent build)
Reduction is by its self adjustible in a grateless updraft reduction (used on my Chevy, Mercedes and JOs Mazda)
Restriction is the tricky part. I have some ideas and already posted some, but its a work in progress.
So, for example. Say you usualy burn air dry rebak chunks, but happen to stumble on some kiln dry 2x2s. You wuld open the restriction and thus lower the temperature while reduce drag of the gasifier. Then, you are on the road and run out of fuel. You get your hands on some woodchips, you top up, tighten the restriction and shrink the oxy zone, voila, you made a woodchip gasifier. And so on.
Hi, Kristijan!
23.9.2018
Tom has a “newly” designed gasifier, which performed to his taste in a positive way. That was last year.
As long as he had a certain fuel size. That he tries to satisfy as best as he can now with available resources.
===============================================
The horizontally blowing Imbert-based hearth has very little provision for responding to needed process volume in accordance with the draft = gas demand.
That leads to big temperature variations… and quality changes.
===============================================
In the 1960 — 80ies a stationary gasplant in Kenia had the active hearth volume changed by pushing in and out airtubes along the 60 degree slope, (up and down) with the nozzles at the tube ends blowing horizontally.
This makes a “fully” adjustable active hearth-cone size according to gas-need.
With the same nozzle-tips the blast velocity is somewhat following the need of PENETRATION! towards the center of the hearth!
Bigger active hearth-diameter = stronger blast!
===============================================
So, why only do this manually?
As the blast-beams do the VARYING PENETRATION,
why not have them to regulate the process VOLUME too?
Ideas bubbling…
Hi, Kristijan!
23.9.2018
This process volume regulation by blasting can only be done in ready made char, otherwise you are blowing thick smoke into the reduction char, which cannot handle it.
Back to square no:1 ?
I understand Tom had some great resaults with the gasifier, and will without a dubt again. Sorry if l seemed to preach him, l was thinking generaly. What we now use vs what wuld be ideal.
Hmm yes penetration. Wery important. Perhaps the nozzle planes shuld folow a more cilindrical incline? Resaultung in same penetration and bigger oxy zone…
I see what you mean. A fast, in operation transition from low nozzle plane to a high one is a bad idea yes, but if one can plan ahead and adjust the gasifier prior to lightup l see no problem.
But this opens a whole new feald of engenearing. If the gasifier can be made (and l have no dubt it can) fully adjustible, how does one make it adjustible while in operation? In other words, expand the realistic turndown ratio to petrol like?
I feel that the question behind this whole discussion lately is; How can we control reaction zone temperature on the fly? Don’t we allready know this? Perhaps EGR or water injection?
Rindert
If I know ahead of time that I will be working the gasifier harder than usual, instead of changing the gasifier reaction area size I will change the size of the fuel. ( use smaller and finer wood )
Hi, Rindert!
23.9.2018
We are not looking for “outside” downholding effects and introductions. They are already known to most.
The aim is to make the oxidation zone adjustable automatically by the prevailing draft blast level, fast.
Coordinating preheated airflow and activated fuel volume is the aim.
The hotter the primary air, the faster response in contact with the warm fuel. But the fuel should not emit more than the existing airflow can handle.
There is a lot to define… Wayne’s statement is always applicable!
Making the active contact surface match the production need in the available volume.
Going up, and going down with fast response.
I feel this development of thought is going somewhere potentially significant, and look forward to how it develops.
Well this is not a report that I was hoping to post. When I was on that drive a couple of days ago, I was quite a ways away from home and the gas supply seemed to be getting weak. I pulled over and added about 3, 5 gal buckets of wood chunks. It ran better until I got a mile or so from home when it started stumbling again. I babied it home. I shut it down and let it sit The next day I came out and opened the hopper and to my surprise the wood was almost up to the top/ full line. Why was it stuttering when I came home. I poked the hopper with my wood stick and the center fell in about 6 inches. Ok, so it bridged. Yesterday I poked and prodded the hopper. Using my stick I worked a hole down to the char. Started it with a torch like Mr. Wayne does. Set the vacuum on the cooling rail at about 5 to 7 inch H2O and the hopper was about 2 1/2 to 3 inches. I let it run and run and never got much smoke out of the exhaust of the Kirby. Several times I opened the hopper and the brown grungy smoke was very heavy coming out ( I’m sure I could have lit the smoke but I don’t like to do that) I turned the Kirby on and the Kirby would pull the smoke down to just the height of the hopper opening. I set the vacuum on the cooling rail to 10 inches and the hopper was 4 or 5 inches. I closed the opening that feeds air to the nozzles and the hopper vacuum went up to equal the cooling rail vacuum of 10 inches so I don’t think I am leaking any air into the hopper that would lower the vacuum in the hopper. The drop of the hopper vacuum is because of air coming in the nozzles ( when the opening to the nozzles is not restricted) The engine was getting a little weak gas-- when running on petro and closing the air to the mixer, the engine would studer, with wg being pulled into the engine, but it would die when the petro was shut off.
Today I probed the hopper and the wood was tight, and I could feel about 6 inches of char/ash mostly above the restriction. I opened the ash clean out and using my finger, I rubbed between the rails on the grate to see what kind of char/ash fell out. As I ran my finger between the rails I was hitting something hard and sharp. I dropped the grate and just what I feared, the hard sharp objects were pieces of clinkers. As I took small handfuls of char off the great and dropped it into a tin can, it sounded like stones hitting the bottom. Some of it was hard and round like pea gravel. Others were black char but extremely hard.
I am thinking I have too large of nozzles-- there is still raw air getting below the restriction and burning what gas is getting made and the heat is making clinkers out of the carbon on the great.
I am ashamed to admit I don’t know what the diameter of the opening in my nozzles are. I went back through this thread and found that I think I made the first set of 10 with an opening of .375 inch dia. I never ran that set. I believe Max calculated a diameter and I ordered a new set with that diameter. Since my fire I lost a lot of the paper work such as the drawing I gave the shop that machined my nozzles. I went back through my thread today but could not find Max’s post. Tomorrow, I hope to clear out the hopper and see if I can reach the nozzles to take them out and measure them.
If you guys think there is some other problem here, I will gladly research what ever you suggest.TomC
I think you nailed it with water or condensate injection…
Inject small quantity’s in the “preheated air” will temper and soften clinker forming
Placing a thermocouple at a strategic position will do the trick.
Tom, thanks for sharing this experience, now i know / understand how to build my next set…
Tom, if anything, if you’re running too hot, the nozzles are too small. However I don’t believe changing the nozzle size will make much difference. No more than running 45 instead of 50 mph.
I mentioned before and I still believe smaller fuel would solve the problem. Even with the tiny hearts we’re running it will take a hopper or two before the charbed is converted. If you want to speed up the process - add some char (only if you already have some available). Don’t bother screening out fines and ash.
What about temperatures? Do you meassure crossover or outof the cyclone? What does the material you catch in the cyclone look like?
Edit: You know by now I’m sometimes running 5 blasting nozzles and sometimes 15 lazy ones. I can’t tell much difference other than slightly different vacuum readings. However fuel size makes a huge difference on performance and temperatures.
yup, thats a quote i second… its all about fuel behavior…
Manage your fuel = managing your gasifiers performance…
Hi, Tom!
24.9.2018
Are you still using only 2" X 2" X 2" ? size?
I thought my note about VARYING cutting angles also would vary size.
I need to become more specific!
Avoid 90 degree cuts!
New “mixing-in” length 3/4" — 1 1/4" spread.
Make about 1/3 of the batch by mixing-in the “odd” new bits. To begin with.
Next:
Do a total inspection (with mirror if applicable) of the hearth and ash bin. Airmantel.
It is not the first time ill-placed welding seams have cracked!
“The heat-pump” is always present!
Give it bending “swing-room”! Co-ordinated expansion and shrinking between joining parts. (along the metal piecies)
Take the calipers-measure of the nozzle tip-end hole!
Yes Max, I am still running the 2x2x2" construction wood. I did cut up 3 buckets of 2x2" oak at varying angles. I’m afraid that cutting on angles I ended up with larger chunks. With the blade on an angle and the “sticker” on another angle, I have to cut bigger pieces to keep my fingers away from the blade. My pieces come out looking like big diamonds. When I do cut a small piece it ends up with a sharp knife like edge that drops into the area between the blade and the table and when making more cuts the sharp edges gets caught by the blade and thrown out very harsh at me. I could get better chunks if I cut 2x2x1 1/2 to 3" pieces. Small will have smaller air spaces than the diamond larger pieces. (?)
When I empty the hopper and ash pit, I will look them over for any weld cracks. I think my test of pulling 10 inches on the cooling rail and plugging the entrance to the nozzle manifold and getting a 10 inch reading in the hopper pretty well told me I don’t have any air leaks in the ash pit all the way to the top of the hopper at the lid.
My main reason for cleaning the hopper again is to pull out at least one nozzle and measure the tip end hole. I am embarrassed to say I don’t know what I had them drilled at.
JO. Right now I am trying to cut the wood as Max is suggesting, but I am afraid I enjoy my fingers too much to do more cutting on angles. I would rather cut squares as I said to Max, with a thickness down about an inch to 3 inches and vary that dimension.
My Thermocouples have never been accurate. I am down to one and it measure the grate temperature. I have only turned it on once since I started evaluation the latest build. It was very erratic. Don Mannes suggested I wait until the grate gets up to 900 F before I drive on would. This time when I had it on it went up and down – 800 F down to “FF” what ever that meant. I do have a electronics meter that can measure two channels of TC’s. It has always been accurate. I have to wire it in special, which maybe would be a good thing.
Frankly, I haven’t seen enough in my cyclone jar to empty it. I will today and get back to you. I think I have a good set-up for having the ash come off the grate and out the pipe with the hot gas, but a long time ago I thought that was a bad thing and I put a shield in front of the opening so the ash would drop to the floor. I think I have a very good cyclone that would collect it.
I guess the fact that you run from 5 to 15 nozzles kind of kills my theory that I am getting too much air and it is causing clinkers on the grate.
I appreciate everyone joining in and trying too help TomC
Hi, Tom!
24.9.2018
It’s OK with your diamonds! For the time beeing.
If I remember right, you do not have a real “full height” air heating mantel.
You still have a brakedisk, or two in the lower part of the hearth.
I remember the original striving to close unvanted air entries with sheat metal.
Then some of the cavities were filled with ash for insulation.
There may have happened some rupture when heatpumping wants to shrink the sheat-metal, cycle after cycle of shrinking…
Zigzaging upper side lower side through bolt-holes…
That route, maybe air is leaking in from outside, shunting the normal inner draft route, entering just under the restiction ring.
Through the ash-pocket-ring.
This route has to start abowe your ashbunker, of course.
There you have to do an improvised smoke test, or water leak test.
Heavy work, but how to reveale leaks otherwise?
Inner airpressure + soapwater… bubbles, foaming…
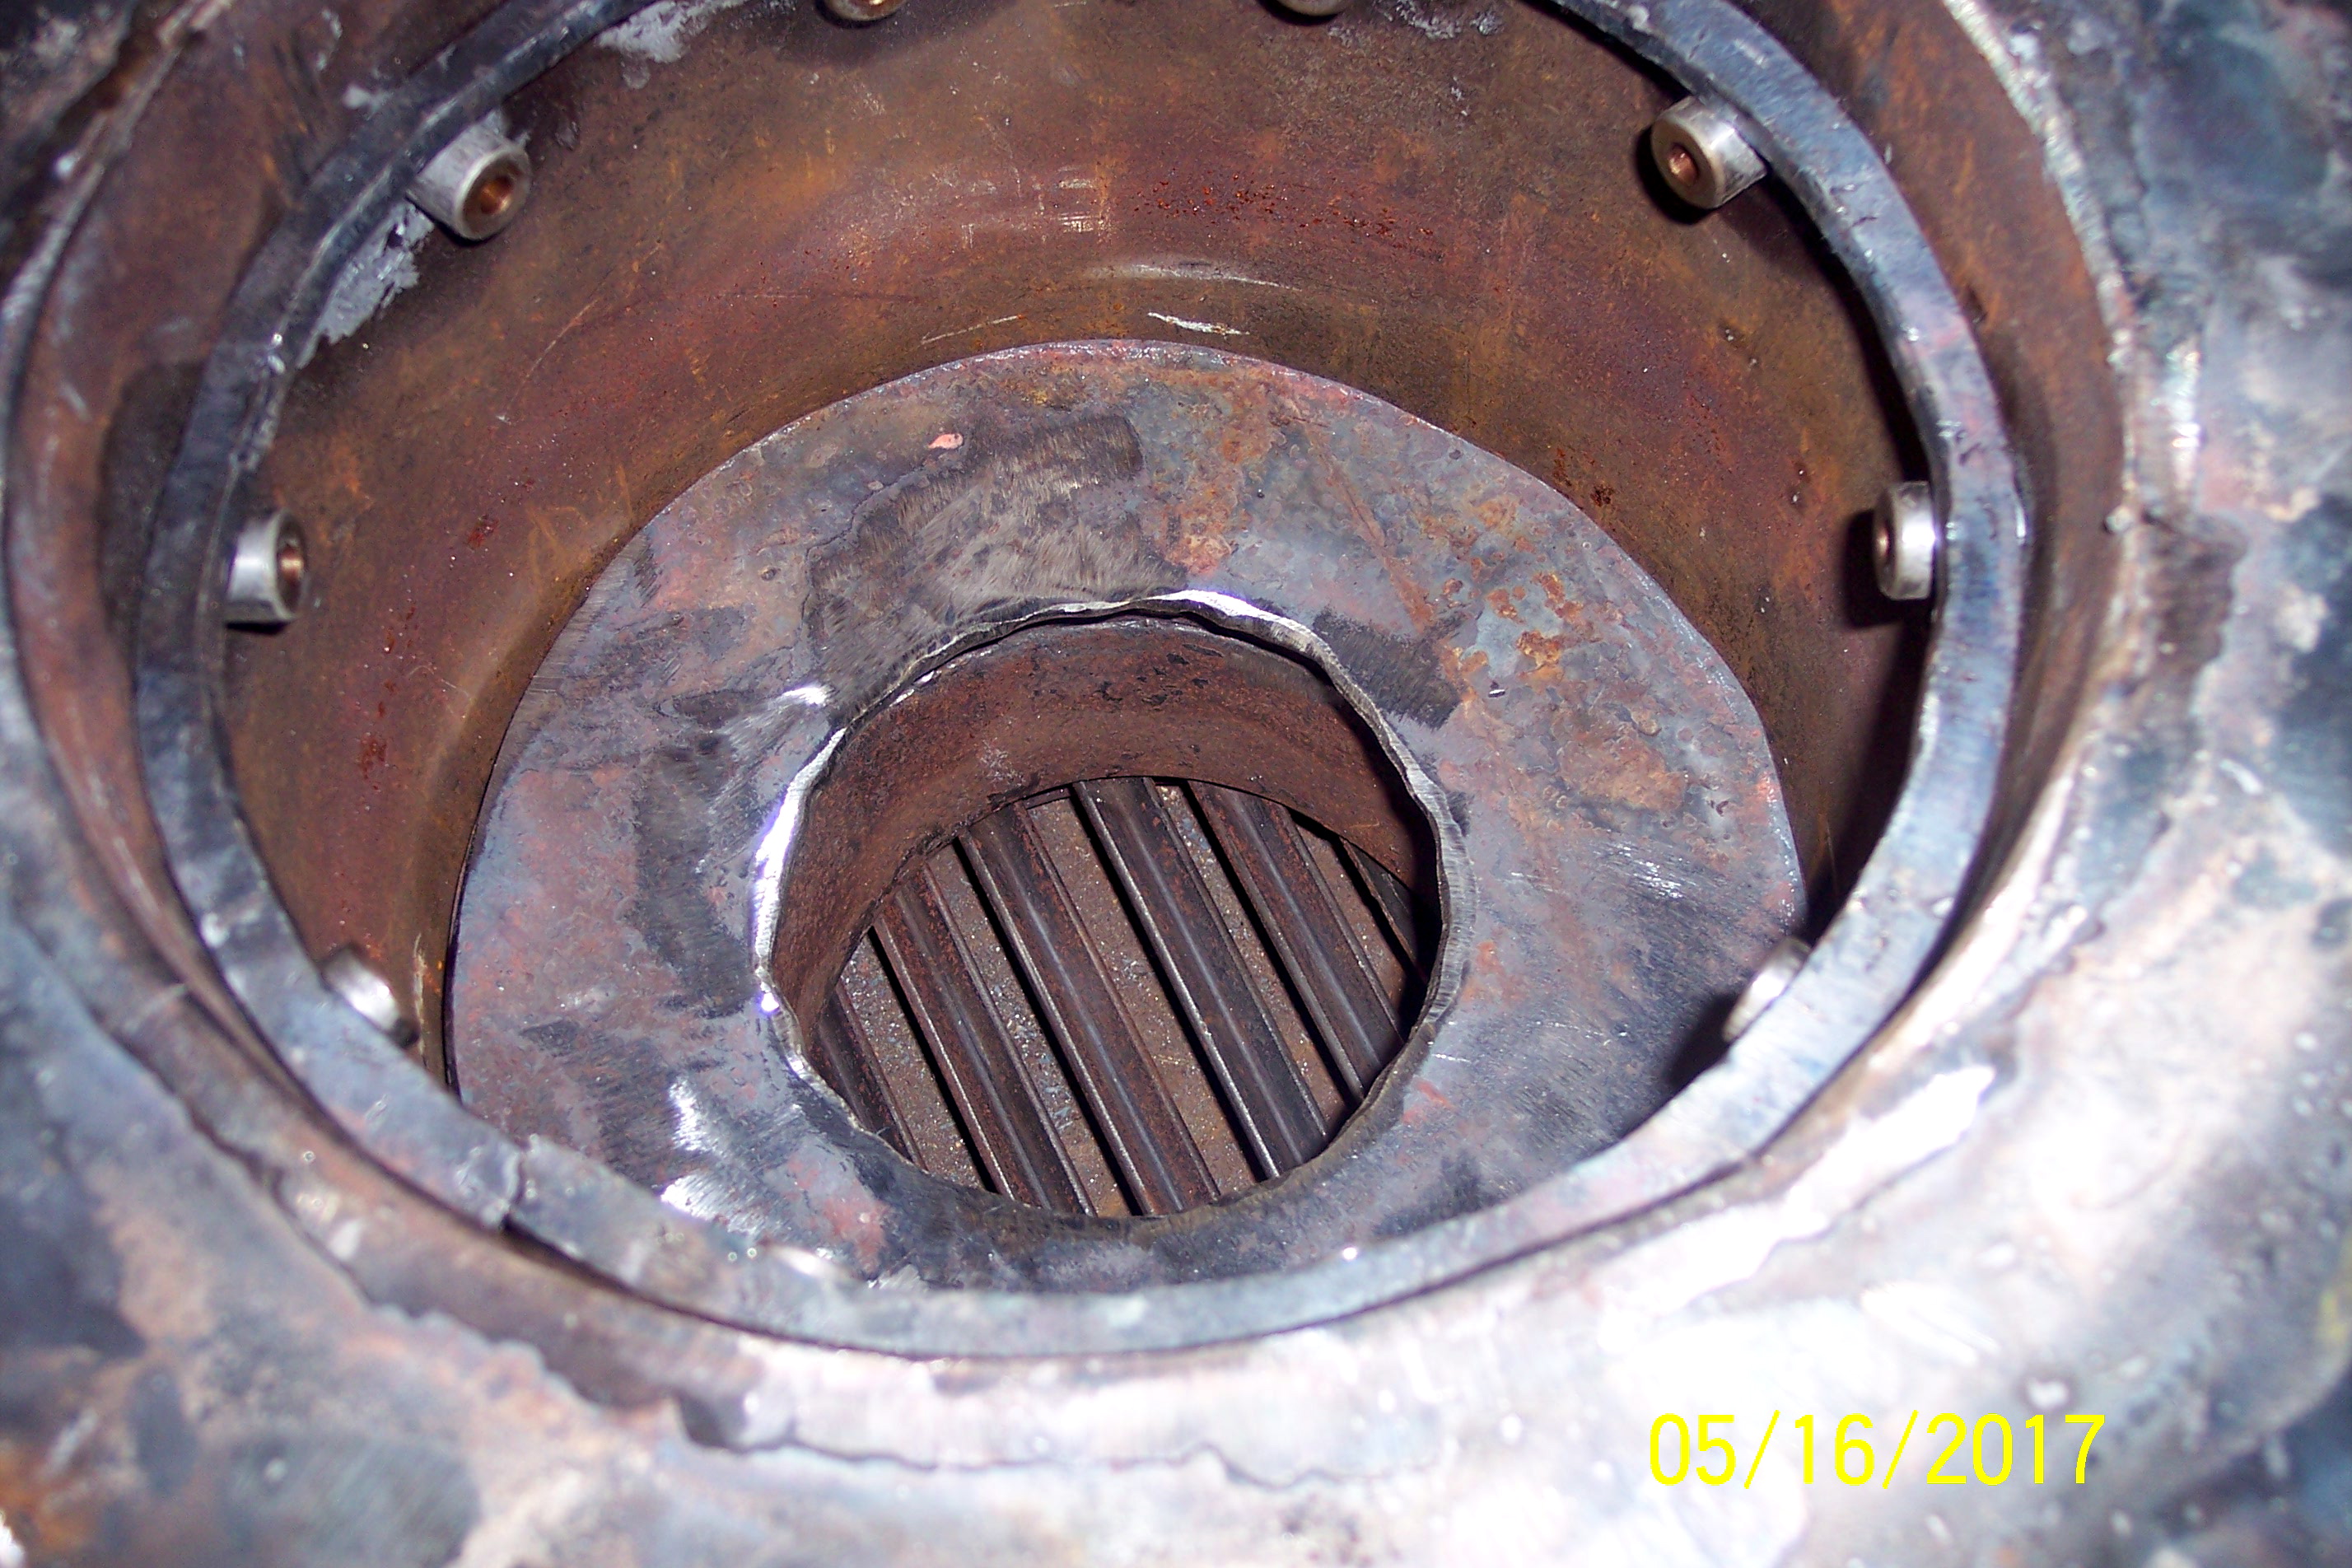
Just got done cleaning out the hopper. I’ll come back to that but first, you said you thought I was using a couple of brake disks. Not now. I said at the get go that I was going to build this by design and not make shift brakes and rims. I had thought that the reduction area was just any space below the restriction. You convinced me to “design” a reduction zone. We worked out this one with ash insulation;
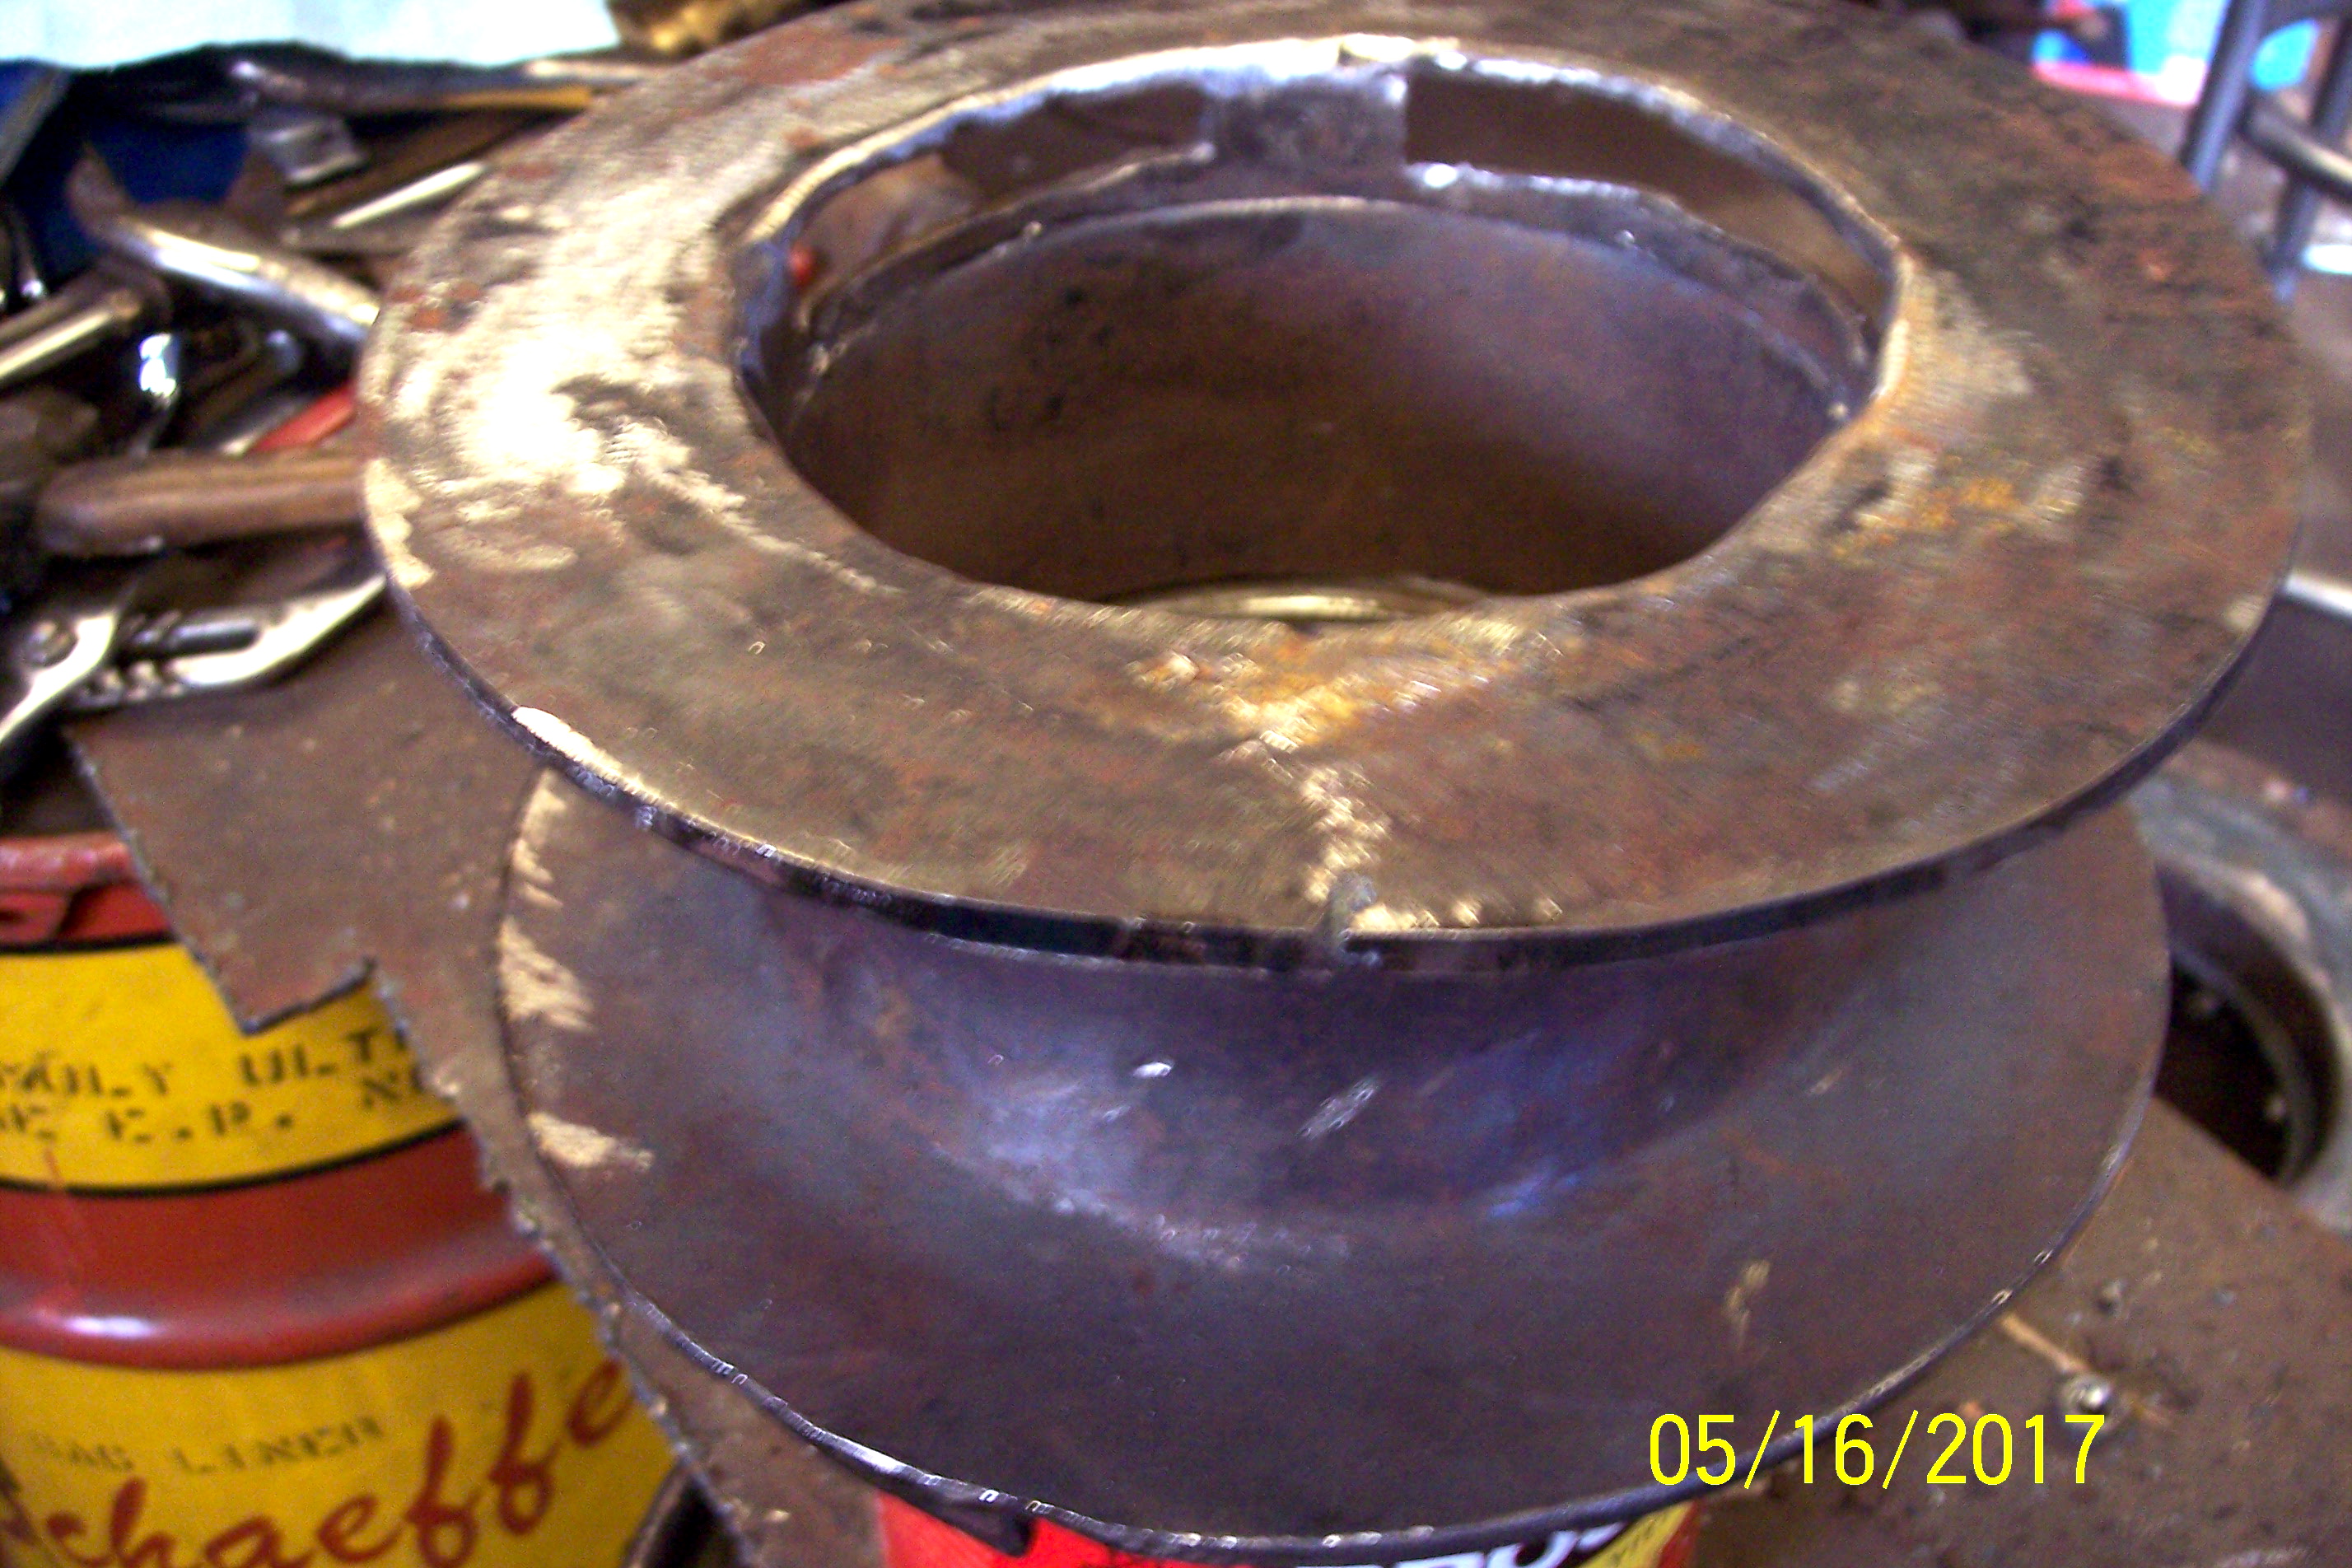
Reduction zone installed;
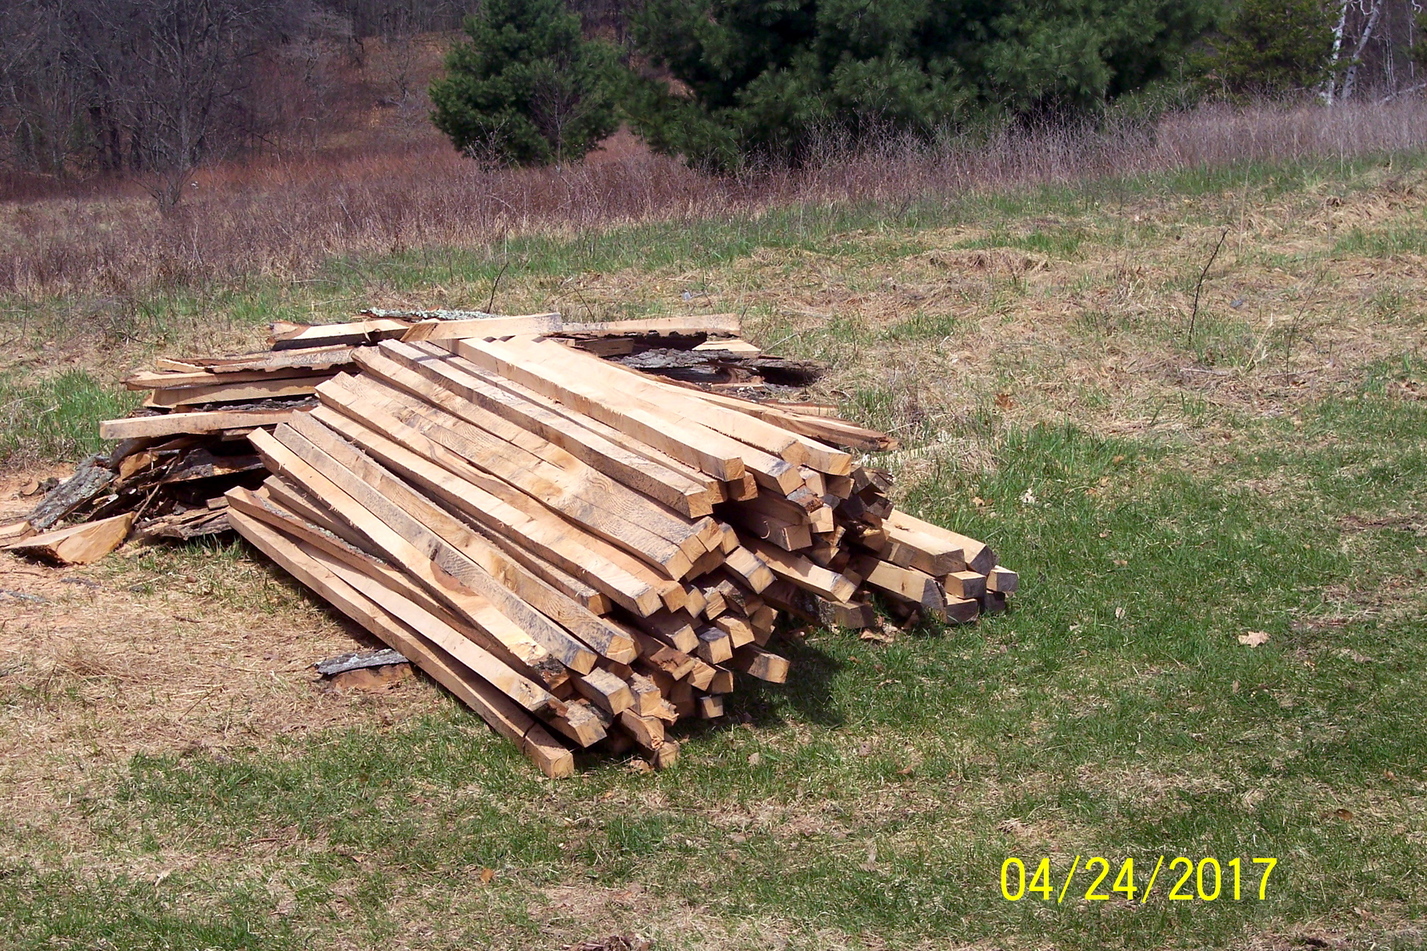
2x2 oak stickers to be chunked;
Back to the tare down of the hopper; I had burned up very little of the 2x2x2 inch construction wood. The wood was “smoked” but did not find any that was “charred”. The wood went all the way down to the fire tube. Normally when I tare down a hopper, I will find wood chunks, then the chunks start to show some charring. After that the chunks show charring most of the way through and a definitely lighter but still holding their shape. This is just above the nozzles. At or below the nozzles the wood/char starts breaking up into peanut size pieces. These go through the reduction zone getting smaller and more ash showing in the pile.
So for what ever reason, I don’t see that I was getting any charing of the wood chunks I put in the hopper.TomC