I think Menards also had two different grades of it. One with a higher temperature rating then the other at least that was the case a year or so ago, and two different thicknesses. It comes in a bale and sheets rather then a rolls. It is sold as I believe acoustic insulation.
Be careful handling it, you don’t really want to breathe the dust.
It should hold up better then glass at higher temps.
Thank you Andy and Sean; My recollection was that you had to order it from somewhere. I am pleased that it might be available at Menards. I find it hard to believe mineral “wool” has a higher melting temperature than glass— but I have heard enough talk that I WILL believe it.TomC
Thank you Andy. It is very interesting. The word “wool” was throwing me. I even looked it up in a dictionary and it refers to sheep wool. Now I see that they are using lava rock and other materials it is much easier to understand it’s ability to with stand heat. Now I can go back to bed I learned something today.TomC
That is one nice vidio,now i know too how that wool confort bat is made, Thanks andy and Tom C.I am hopeing i dont need it ,will see how hot it gets at shut down.NOW we know why they call it rock wool.
Because it is minerals(rock) heated up and spun out as fibers?
The other option is a ceramic fiber like a kaowool. They use that for high temp ceramic kilns. Kaowool, is actually expensive, but it can go up to 2400F (2600F rated). I don’t know if there is a cheaper knock off, or not now.
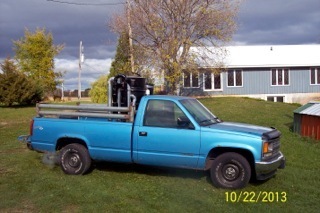
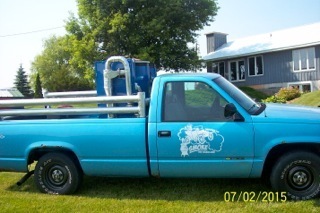
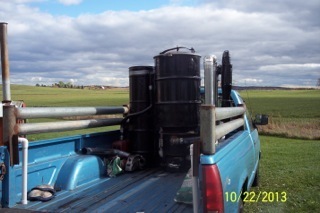
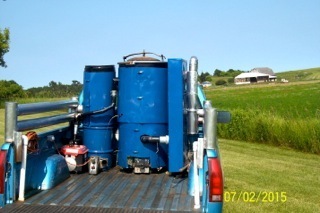
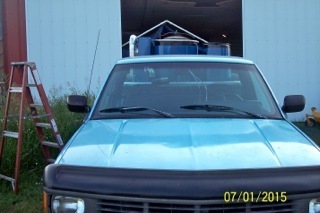
Hello Friends; When in Argos I said I was done changing my truck and going to work at the 75% part. Fate had a different plan. Heading west coming home I had a head wind and my tall hopper/hay filter/ heat exchanger were so high above the cab, that my little V6 had a hard time. So I came home and cut 6" off the top of everything. ( haven’t driven one mile since I got home)
Sorry the pictures didn’t come out in order. It was suppose to have a before and after side view, then back view, and then a shot from the front. TomC
HI TOM C,That custom rework looks real nice,amazing how much that will help.i allready shortened by cooling rail too get less wind drag,i could tell a big difference even with out a gasifier finished yet.
Thanks Chris; I worked hours ( until 2;00 am) trying to make them smaller. This morning I E-mailed them to myself and down loaded them to iPhotos and then on to DOW. In all that, they got mixed and I couldn’t fix it. I have some more pictures I want to post of construction, but will hold off Thanks again-- I don’t like being a problem with these pictures but I just am not computer wizeTomC
Even just sitting there, it looks better. I like the blue insulation that almost matches the truck, and the lower profile. I hope it works as good as it looks!
Hi Tom,
Super looking truck. For the pictures try this. Start a practice post. Write a sentence or two, then post 2 pics. Note that the pics appear in a bracketed form, < whole bunch of text>. These are text forms representing the picture. Put the cursor before the <, then highlight that text message, brackets and all and choose the cut function. Then move your cursor to where you want the picture and click paste. To add spaces between pics put the cursor before the < and use the enter key to add space between the pics and or the message. To space out regular text message put the cursor at the beginning of the text and just hit the enter key. I’ve been using 4 spaces which seems to look OK.
If you minimize the 2 screens (your pics folder and the DOW screen) by clicking on the double squares box in the extreme upper right hand side of the screen you will be able to left click and hold and drag pics from the pics folder to this DOW message box. With practice you will be able to place the pics better, if not use the above method to cut and paste them where you want.
Hope this helps.
Pepe
Thanks Pepe but the problem is I can’t “post” the pictures in the “trial post” because the pictures are too big ( to many pixels per inch). I tried many many things and at one point I was able to down size them by changing to jpf or something but couldn’t move them from that page. The Lord knows I tried, programs that were suggested, going to the net for ideas. I knew that my computer downsizes pictures automatically when I e-mail them, so I e-mailed them to myself and was able to drag them to DOW. Can’t teach an old dog new tricksTomC
Tom, I used Paint for a while for downsizing and it works ok, just a lot of steps and you have to know where Paint is sending the downsized pics. I can send you a small tutorial if you’d like. Then someone suggested changing the settings on my camera so I got out the manual eventually and was able to change the output size to meet DOW’s parameter. Perhaps you could do the same if your camera has that option. Yes, it took me 3 days to locate my manual, lol. Pepe
My 20 $ digital camera i bought from wholesaler,had a bloch in the flont cristal screan but it has no efect on the pic,as stated ,i bought a couple more for around 10$ just in case,it seems too work good after loading it on my big computor,it then loads too dow with out any trouble.Never tryed paint for down sizeing.HAPPY TRAILING,SWEM
Hi Tom,
I went ahead and posted a how to on using Paint in the off-topic section. How to resize photos using Paint, Hope this helps, from one old dog to another.
Pepe
WELDING; This should go under “welding general” but I could not find that as a subject. After coming home from Argos I wanted to lower the height of my gasifier. I cut 6" out of the drums and all the heat exchanger pipes. When I put it back together the 55 gal drum leaked badly. I filled it with water and ground off where it was leaking and then I kept blowing through. I went back to basics and checked every thing on the welder== all was set correctly. I took a scrap piece of barrel and shined it up with the grinder and tried to weld it. I couldn’t get the arch to start with out spitting and sputtering. Finally the weld would start but no matter what I did, it would over heat and blow out. I tried every thing over the next couple of weeks. ( started by watching Mr. Wayne) Tried to borrow a welder from a friend, but he went to the hospital. I call a high school buddy who was at one time the vice president of a welding company. Today I found Hobart on the net and called their help line. After a discussion with a fine gentleman, he gave me some things to try.
My problem was TOO LONG AN EXTENSION CORD OUT OF TOO SMALL GAGE WIRE. I am so embarrassed because I have been on here telling new people how to make good welds. I now have to go back and practice to learn how to weld with a properly working welder.TomC


 And nice truck…!