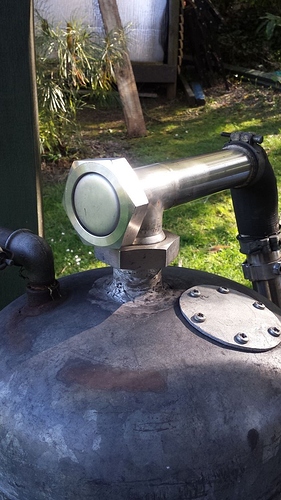
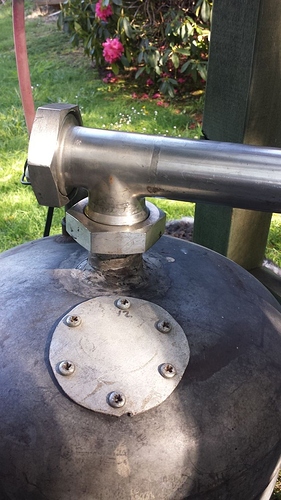
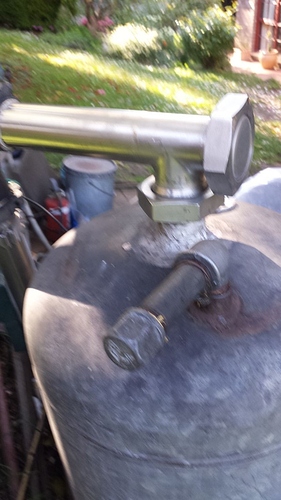
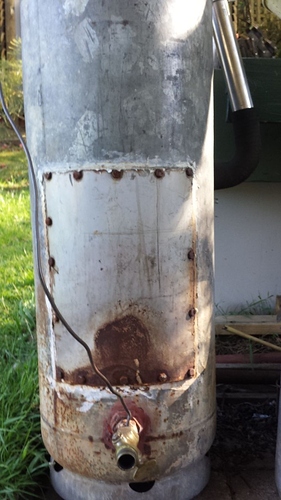
Mart, I wish you could find my old pictures just to give you ideas, Chris got himself a real job so is slow on this site. I have to head out and plug a tire on my travel truck … Chris caught my older pictures and stored them somewhere … Maybe he will catch this post and post the link … He didn’t catch the latest stuff but all of the propane tank stuff. I have been building from water pressure tanks the last few years … Mike
Then I have to fix the leaking bathtub faucet …
You don’t have to fight working with an old tough leaf spring for this. I used just a piece of steel of about the same dimensions and it works fine. It shapes much easier. Once in position the spring takes up the force before the steel bends. TomC
I agree with the placement of the pipe. I went to the video where he built it and it was not where he shows it in the diagrahm it was near the top.
Forgot to address the odour issue in used propane tanks. I built an air pig years ago out of a propane tank and couldn’t use it because of the smell. Stripped the fittings off, rinsed it multiple times with water and other things over the course of a month and finally gave up. It sat all winter full of rainwater that froze and thawed and when I went to throw it into the scrap pile in the spring I noticed the smell was gone. I have used it ever since, no smell.
MartH. since you are starting with 100 pound sized protane tanks and are now looking over different systems you might search up here on the DOW a topic about “Ben Peterson’s Plans?”
His Book system is based on 100 pound propane tanks.
Regards
Steve Unruh
Hi Mart ,
Is this is a charcoal gasifier you are building with this tank ? , if so one way to make an easy job would be not to cut the top off the tank but leave it intact , use the old valve fitting hole as the gas out pipe to the filter and with a jig saw cut a 4 inch hole to the side and screw a plate or use a catch to hold the plate in place for refilling .
On my tank I have gone in the side about 4 inches from the bottom with a horizontal nozzle and about 6 inches above I have another hatch for clean out and changing the nozzle, again its just a plate that is screwed onto the tank with a rope seal .
Dave
Hi Mart, Dave and Brian have a good point. The top is already threaded so just take the chargas out there. BUT what size engine do you plan to run? The valve hole is 3/4" which should handle an engine up to 12HP or so. If your engine is larger, you will need to enlarge the gas outlet to 1" or maybe more. Placing the nozzle in the side of the tank also reduces the heigth of the unit. If you drip water in that nozzle (it should tip downward about 5 degrees) the heat of the nozzle will vaporize it both cooling the nozzle and adding hydrogen to the chargas. Not to mention it is much easier to build.
Gary in PA
Thanks for chiming in. It would not hurt for me to give that a go. Do you have a pic of your setup? I picked up two tanks so if I mess one up I have second ready to go.
Powermate PM0496500 Black Max 8125 Watt portable generator
Honda 13.0 Motor that is my setup.
I have done no cutting yet I have the tank filled with water, just taking my time and collecting the best ideas…
I am not sure if I want to cut it or flip it upside down as another builder has done…
Cheers,
Hi Mart here are a few quick snaps I went out and took a moment ago for you to see .
On my tank it had 2 outlets on the top , so the standard outlet I cut out and welded a 2inch screw outlet for my stainless dairy pipe I have and I use that for the larger engines , on the other side is a standard 3/4 threaded outlet and I use that as well when I am running small engines sometimes , the filling hole on mine is only about 3 inch in dia and sealed with a piece from the bottom of a aluminium saucepan screwed onto the tank with a small amount of silicone for a gasket that so far has lasted nearly a year as it never gets that hot up there .
The hatch at the front is over kill ,I made it far to large but least I don’t have to struggle to get large clinkers and the like out and that has a stove rope seal around it that’s lasted a few years now .
I keep promising myself that one day soon I will build a nice posh looking unit , but this old thing just keeps working and working and so the old motto of if it aint broke don’t fix it applies 
All the best with your build
Dave
Hi Mart, Here are a few photos of the unit I made with a large propane tank. The nozzle is attached to a three inch pipe cap so it can easily be removed and serviced. The ash dump is also a three inch cap welded on the bottom. The unit is mounted on wheels and easily moved about. The engine you are proposing to run is small and this size set up will allow you to run for hours. I’ll also recommend a fluid drip to boost the BTU content of the chargas, Something little engines like in order to be easier to start and run,
Gary in PA
My bad, that is a water tank shown in the photos. But the idea is the same:grinning:
Gary in PA
I use this method to mark and cut tanks. I’m terrible at gas cutting, so I tried the circular saw. Results almost perfect if you set up a reference plane and measure only from it. I set propane tanks on the deck and measure up to get a series of dots, then connect them using tape to set the line straight. Works great. I also built a drum roller to facilitate accurate results with little fuss. Water tanks usually have a flat bottom with a good edge to measure up from. Keep the saw blade on the outside edge, go slowly to avoid a wavy cut and gaps you’ll have to fill with weld, aggghh!
A few pics of my early lid at the bottom. Go to small engine section and check out “My first small engine run” for more pics and my latest design changes.
Pepe
The test plate is 5/8" thick.
So do you just turn it upside down to Empty the ash out?
I like something that works  I am leaning back torward the spring lid top, I do like the idea of having a large hole on top to fill it up / empt.
Thanks for the snaps!
Sweet!!! That is great.
Hi Mart ,
I have been using this tank now for 2 years and in that time I have only had to tip it on its side when full up of charcoal twice ,and that was to change out the nozzle, laying on its side just made it easier to get nozzle out without all the charcoal falling out , i don’t seem to have much ash at all and have never had to empty the tank , i guess all my ash must be in the form of clinkers , that i take out every hundred or so running hours , or whenever the nozzle needs changing .
I have never had a need to have a tank with a removable lid ,all the cutting and making flanges and then getting it air tight seemed a lot of hard work when all you need is a small filling hole and a small gas outlet hole on the top of the tank .
A small hatch just above the level of the nozzle is good enough , so if ever the tank would need emptying and it also allow access to the nozzle
The whole tank only took about 2 hours of cutting drilling and tapping the holes and welding the nozzle adapter onto the tank and a larger gas outlet pipe on top .
Dave
Dave and gary your gasifiers are charcoal
you are not using a safety valve on the gas generator. It’s not necessary ?
Gary I think the gasifier on the ford ranger possesses a safety valve
Thierry
The water tank unit did not have a “safety valve” or puffer lid as it is sometimes called. I do use it on all my other charcoal gasifiers though. Yes the Ford Ranger also has the puffer lid. Basically it is a coil spring that holds down the lid. I’ve only had two chargas ignition events in the gasifier and both times the pressure was released through the nozzle. It was a real shower of sparks but no explosion. It makes me wonder if a puffer lid is necessary but for now I’ll err on the side of caution here.
Gary in PA


