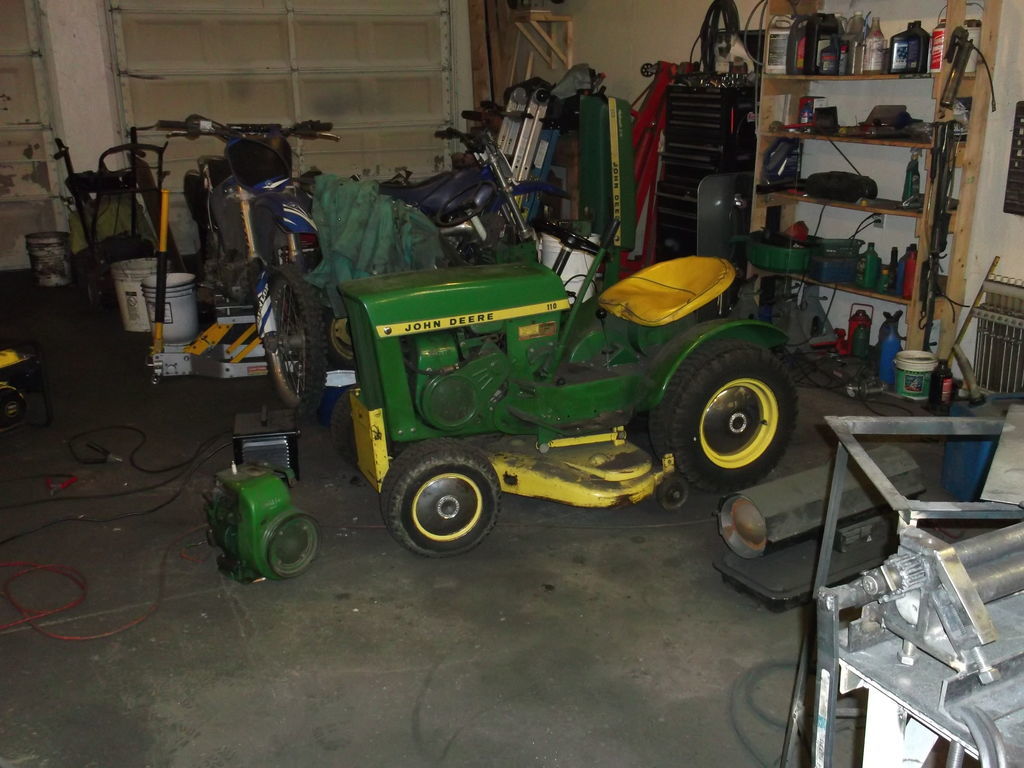
OK here is my beloved 67 John Deer Round fender that will be getting an updated M-1. I have two of these one is for parts.
Im going to do this in a couple fazes.
I want this tractor to run on E-85 so the first step will be just playing around with jetting the carb and timing. The engine that is in the tractor has a rattle to it. So it will be coming out and exchanged for the engine in front of it… The one Im pulling out is for the second stage, it will get a rebuild and if possible the compresion bumped up.
So once I get her running good on ethenol then I will be installing a new M-1 and this will be our demo unit. So any input is very welcomed. I do consider myself and expert builder but not an expert gasser.
Also here are some pics of my machines to give a little detail how they are built. Nothing speacial just basic impert gassers. Again any unput is welcomed for those who wish to help out. Any improvement is a good thing.
The E-1 is one Im just finnishing up tomarow Ill be tearing it down and getting it ready for paint. That one is going to Gardiner Mt. This is number three so I can duplicate them
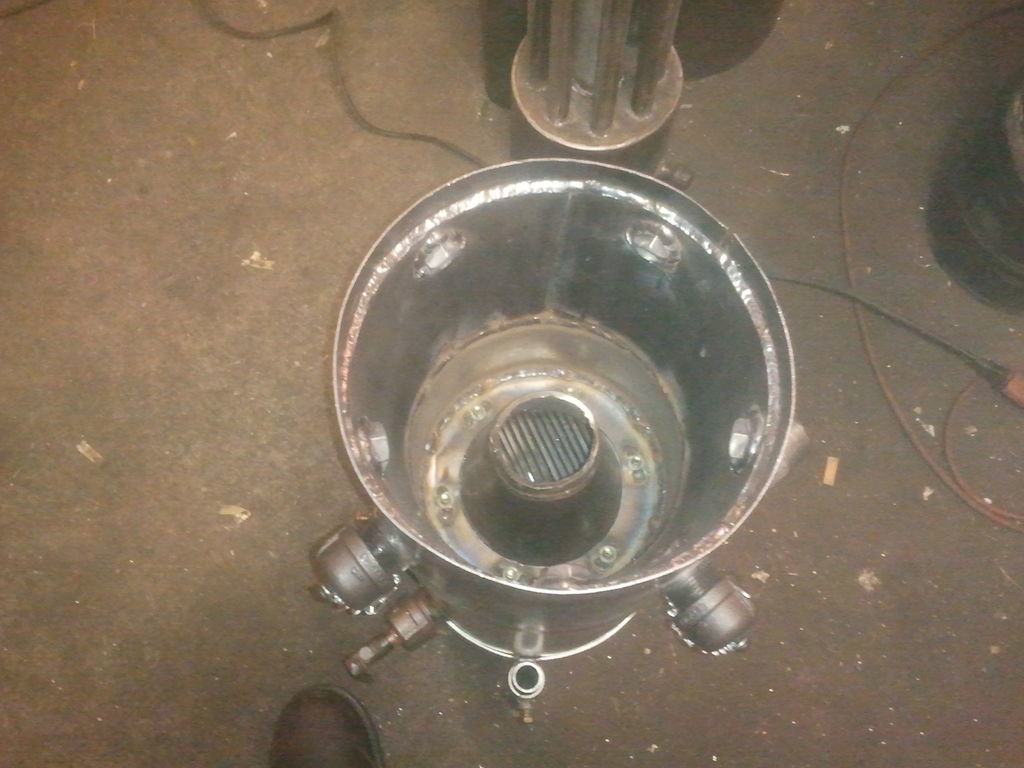
The other pics are the hearth design. This is going to change a little the last one is how they will be built going forward. The M-1 and E-1 will both share this design and now the little M-1 has just an inch smaller hearth that the E-1.
Hi MattR
Good old Spam prefried then diced really perks up the Mac’nCheese.
You internal hearth architecture look fine. Interesting detail on the downward sloping nozzles. Next one you build up try skipping the reduction cone and flange drilling and bolting. Test operate it just sitting in place. Lots of guys successfully doing this now.
On your extended raw fuel hopper option strongly consider adding in an upper internal condensate gutter. Guys WILL be putting +/- 20% moisture fuel in this on you. Every 100 pounds of fuelwood ran through will produce 10-20 pounds of condensate in the hopper and your cooler/filter. That is 1.5 to 2.5 US gallons. Better overall system performance to get out as much as possible in the hopper before the hearth. You have to large opening port (tar goo’s) this externally to be able to gravity flow into a sealed container.
Thanks for the input. Yeah the prefiried spam is a great meal, that is one of my faverits!! lol
Yeah I had thought about doing that but I wasnt sure how well it would work and I needed to get these developed. But that Is what I will be doing form now on. That will definatly save me some work.
I do have a condesate trap built into my lids. But I didnt think there was that much condensate that had to be delt with. Im going to have to re-think that design a bit to make more room in there. So far I havent had too much acumulation in the troft, but I have only tested limited fuel medias.
Has anyone ever purghed the condesate out of the hopper. Tar clogging is probably a problem with this. But I have been thinking about using a simple diafram pump to just lightly purge out the moister in the hopper.
OK I have been working on this project. I had to get the tractor back on line and running before I could go any further with it. I ended up putting back in the original engine. It just needed the carb cleaned. The other engine has a blown head gasket.
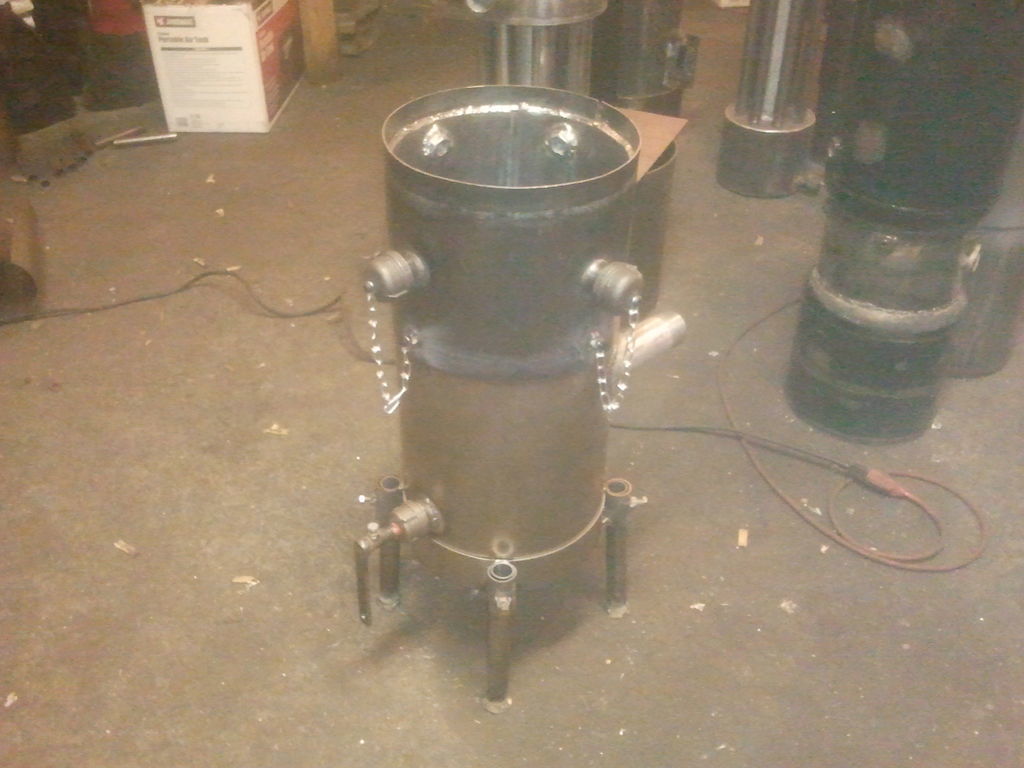
Im going to use this little tractor as model for the Farm All that is coming here for a conversion. Im developing a new gasifier just for this tractor and it will be available after the conversion. Im also developing a new condensor for it as well.
For the JD conversion I think Im going to change direction with this project. For now Im just going to do a straight up conversion. But later instead of moding the engine, there is a twin vangard engine that will fit this tractor. What I am now thinking is getting one of those and installing a PMA in it. Then this tractor will be able to serve mutliple purposes.
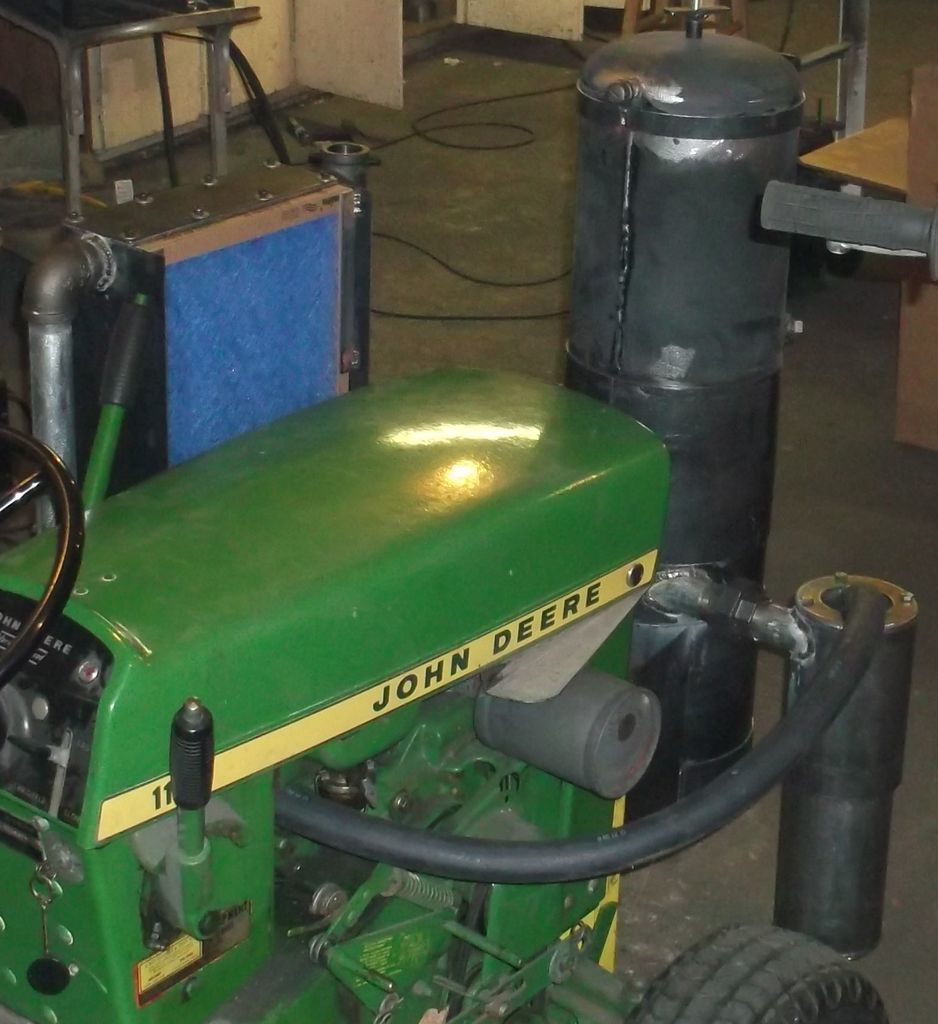
Here is a mock up of this tractor with our M-1 gasifier and our proto type condensor. This new condensor is going to be fan cooled with a 10" fan from Auto Zone. There will be a filter on the back side and I may shroud it so it pulls air from the top. This new condensor will be avialable as an upgrade to our gasifiers and there will be few diferent sizes available.
In the second photo where the hose is coming out there will be a simple seperator there that will attatch to the condensor. Gas will then enter at the top, go through the condensor and then exit back out the top on the other side. Here will be a mixer, seperator sort like a cylcone that the intake air will mix with the gas and condense any left overs. From here it goes into the engine.
More progress. I have the fan and cyclone mounted. The gasifier is now just about complete except for paint and I plumbed in the gas in to the condensor. Im waiting on steel, it should be ready for delivery tomarrow. So all that is left is to finnish the cyclone and build the mixer/seperator that mount to the gas exit side of the condensor. Then Ill just need to finnish up so more plumbing and wire in the blower and fan.
I got this fan from Auto Zone for 52 bucks. Not that Im promoting Auto Zone or any thing lol…its just there is a store just up the road from me.
But hopefully Ill have it up and running this weekend
Hi Matt, I must respectfully disagree with just laying in the cone, although this isn’t the first time I seen this suggested. On my fluidyne unit I left the fire tube to flange connection only spot welded(accidently). The unit successfully produced gas but operating on only one or two of the 5 inlets open. Gas by passing the reduction zone through this crack condensed a LOT of water out downstream. Probably more than a flat laid flange or cone, but still leaving that possibility open. I’m sure, even though it flared well, the gas quality was not what it could have been.
For the perceived convenience of not drilling, gasketing and bolting the cone in you run the risk of a customer complaining about low gas quality, water in system, etc. Now you’re looking at the dreaded, time consuming, bring it to the shop( worse yet go pick it up to appease customer) (even worse yet, lose of customer confidence and possible bad mouth advertising), tear it down and do the drilling gasketing and bolting, anyway. Do it on your own unit if you wish, do it on a customer unit and you may wish you hadn’t. Don’t take that chance on something that might come back and bite your posterior! I know you have to get these units out, but you want them to stay out.
That’s, as Chris would say, is my two cents, Pepe
Matt, I got carried away before I could say that your units look great and I’m inspired to outfit my 18 hp rider with something similar once I get my present unit refined. Very nice workmanship. Pepe
Matt, I like the shake a grate application you have used. Mine is on the bottom of my unit and is a bit cumbersome to operate although it works well. I guess I’ll be moving the handle location. Thanks for posting.Pepe
Matt, One more thing about laying the cone in. When this baby does get up to temp a loose cone could warp from the heat increasing the possibility of a larger gap for gas to by pass the reduction zone and for particulate matter to gather under the flange really compounding the loss of airtight integrity.
Am I up to a nickle, yet? Pepe
LOL thanks Pepe, Yeah I did acutally send a couple out with drop ins and then I read of few of your post esle where on here. I have now changed them back. Im sure it could work and no disrespect to Steve when he has somethign to say I listen But, like you have mentioned above its an inssurance policy if I bolt them in and and then seal them. Eventually Im going to have them made out of SS and offer them as an upgrade. Right now I dont have the equipment to buildout of SS that stuff is very hard on equipment especially if its done on a daily basis.
Yeah the grate pivots on an axis There is a pivot arm that is held on to the grate axil via set screw. The acutator axil shaft has bolt welded to the end of it and pokes through a hole in the pivot arm. So when you shake the acutator handit it grab the grate pivot arm and rotate is back and forth. Its adjustable to but you need to tear into to adjust. I like your adjustable set up. Its geven me an idea to combine your set with mine and use Miter gears on the inside. So the shaker handle will serve tow purposes one is to shake the grate, But it will also be a hand crank for adjusting the grate hight:)
Hmmm. Yes Pepe you make a good point - if there is any way for people to muck it up they will.
Ha! Ha! You all enjoy tring to turn out all of these threaded bolts once they have been hundreds of heat cycled and molecularly metal welded themselves in. 50 years of wood stoves, 45 years of IC engine exhausts and 4 years of gasifiers says ANY exposed threads, nut and bolt head flats will have heat eroded shrank in size and rounded away too.
So at least take a page from the FInn builders and heavily coat ALL gasifier internal threads and fasteners surfaces with the highest temp 2100F nickel based Never-Seize for a future possibility of disassembly.
Broken off bolt shanks in threaded plate or captive weld nuts will make for customer complaints too.
Regards
Steve Unruh
(Post edit: had to add a decade to my years if experience. Seems this morning I am running about ten years behind)
Thats a tuffy lol. I do already use anti sieze but I’d have to look at it to see excaclty what type it is. I does make life easier to get the jets out.
Removing those bolts and replacing them I may need to add to the maintanance schedual for now.
I made much more progress today. I just about have it all done except for few more minor things. I need to build the manifild for the carb yet, finnish the clean out port on the cyclone, install the blower and wire it.Then it will be ready to fire up!! Ive been working some long hours trying to get this done, I need to get back to customer builds. But we have been needing a new demo for a while now. We have come so far in a short time and the demo we currently have is out of date. I hate showing that one, when we have much better machines that we can show.
But I was lazy though and put a set of jets I had used on the E-1 test unit that didnt work. But since I am experimenting with a looser grate and running scraps from the OSB crates we build to ship our units I thought Id give em a try. But no worky
So tomarrow Im going to build a set of stock jets for this unit and try again. The jets that are in there now have a 3/8" opening and are cut way back. The stock jets I use have a 0.28 openning and are about an 1" longer.
But I did get to drive it around a bit though. The unit flows very well on the tractor when the engine is running. It drives good but running the mower deck is marginal. The flare is pretty orange and the unit is running very hot. Im running it with the grate all the way to its lower adjustment. I think I have to much combustion and this is why Im having the issues Im having. So we will see what happens tomarrow. I get some pics then too.
Ok I put the stock jets in it and it made a difference but I found my lid wasnt sealing so I replaced the rope seal. The flare is running a blue/pink/purple and orange color and can not be seen in the day light. The more I run the better it gets.
I actually mowed with it today an 8HP lawntractor, I think would be smallest this could be done with. lol You need good sharp blades and the deck must be in good condition. I have quite a bit more throtle too, so im going to adjust it up a bit and I bet it will mow just fine.
Unfortunatly, the electrical system on this tractor has a hard time supporting the fan. This tractor has the old generators that start the engine and charge the battery. Dont know if its just week or bad battery or if it just doesn’t have umph to do it. But even with the blower off the condensor seems to be doing a good job now that the temp is down to a normal opperating temp.
Good Job MattR.
You have now answered your question about what a good engine fueling power flare should potentially look like.
Ha! Ha! First . . . the engine must qualify it!
Regards
Steve Unruh