Here is how I built my charcoal gasifier out of a 30 gallon water heater.

Here is how I built my charcoal gasifier out of a 30 gallon water heater.
Don,
Thats not fair…
That is not a gasifier, that is a piece of art…
Very impressed with your build Don. From 17 sec you show what appears to be some kind of hearth. Could you explain about that and how the water is fed and turned into steam?
At 1:20 it appears you have welded a cap over the water inlet tube. I surmise that that whole hearth is a sealed chamber somehow.
I didn’t see an actual grate over the hole. Does the shaker component just serve as the grate as well?
Any kind of ceramic on that nozzle?
Looks like an air hose fitting on the water inlet pipe. Is that just for a quick connect or is the water pressurized.
Why twin cyclones and have you found them to be useful based on some of the comments I’ve read other places on the site?
I’d like to build something like this. Not real clear on the hearth though. Seems like that is the most important component. I see more flanges in my future. I guess we still need them stinking flanges.
Thanks so much for the video. Most of my time now is spent canning and dehydrating the stuff from my garden but I always like to spend some time each day on a project. Now I have a direction to proceed with.
Tom, here is a screen shot of the main parts of the gasifier.

Yeah, I think you are on the right track. The extreme heat in the hearth of a charcoal gasifier is a big challenge. I am looking forward to seeing what you build. Make sure you start a thread and post some pictures as it comes together!
Will do Carl. Right now I’m planning to clone Don’s unit if he has no objection. No point in reinventing the wheel. This is already saving me a lot of wasted effort from the first plan I was going with. Still have some brain picking to do. As I said, and as you well know being a grower, this time of year gets a little hectic. It has been hotter than usual here this year and things like tomatoes have come on early. I have a couple hundred plants, three quarters are determinates so getting them all canned basically at once is a job. Sure glad I’m retired but I think I got more rest when I was working a job.
No objection Tom but I forgot to say that Gary Gilmore needs the credit for the nozzle design. That was his idea after he observed how the heavy nozzle of a forge lasts for years of use.
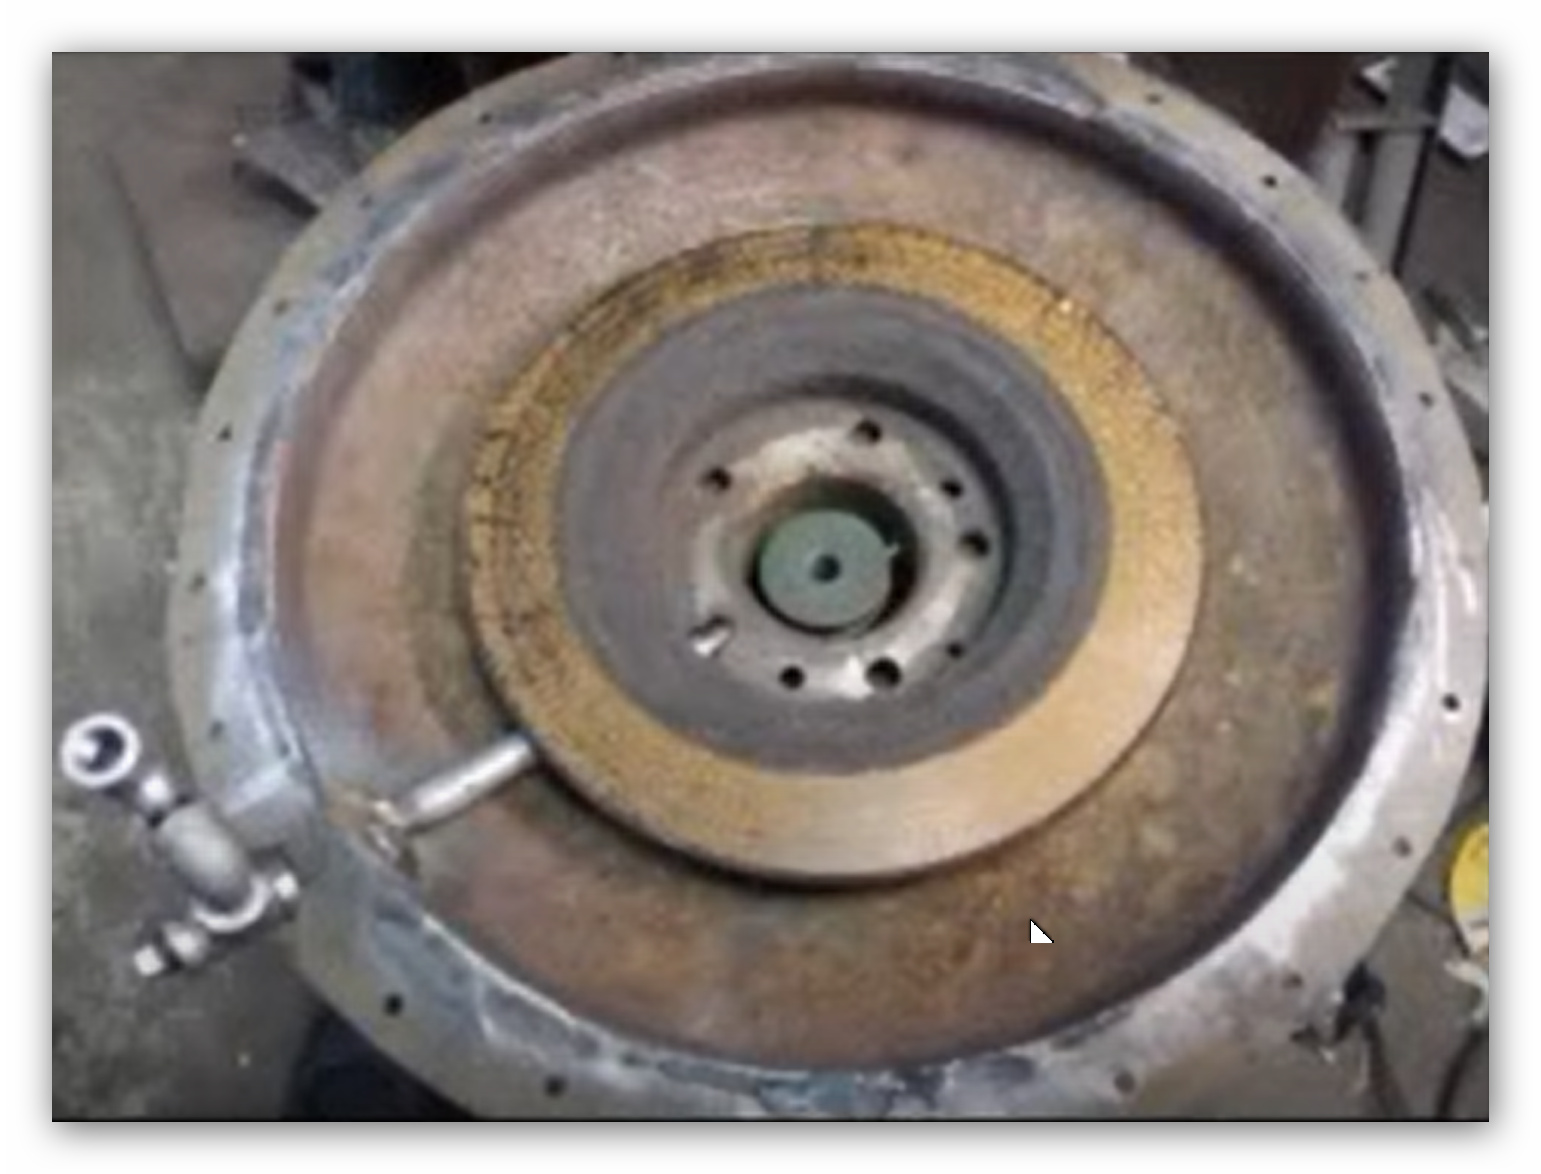
I have a few other questions about your build Don. I think I’ve got it mostly figured out now. Took me a while. I’m going to explain what I think is going on and ask you to set me straight. There is no nozzle in the hopper itself. The only pipe coming in is a water feed. The combustion air is fed from the ash hopper through the three inch pipe with the spinner in it and that is the actual combustion zone. It is protected by the brake rotor. This is where I’m a little unclear. The picture at 24 sec is the rotor inverted. The band and the tabs hold the rotor up slightly as it sits on top of the protruding 3 inch feel pipe and allows the water pipe to bleed into that space to create the hydrogen steam. The spinner in the nozzle is to move ash into the hopper but you say you didn’t really need it. I assume that’s because it’s in a vehicle and the vibration keeps the nozzle clear. It would be necessary in a stationary unit? Is there any need to control the amount of air going to the nozzle? On the open fire gasifier they estimated that they could attain a one to one hard fuel- water ratio. Is that a proven theorem now? Seems extreme.
I have other more general questions. I have watched a lot of video now. Koen’s, that I could find and I rewatched Gary’s. When I put up the diagram of the Troy Martz design it was said that building that fire tube with a side nozzle would overheat the opposite side of the pipe but Koen’s tubes seem about that size and not as thick as sch 80 pipe and yet his tube in that area don’t seem red hot. He stuck a welding rod in there and only the center of the rod seem to reach melting temps. No longer interested in that Martz design but wonder about that.
Wondering about the cyclones. If there is not enough velocity to actually spin the heavy particles and dust around why wouldn’t a diverter plate set in the center of a tube drop the larger particles just as well. Much simpler to fab.
I haven’t seen any mention of using fiberglass insulation as a filter medium. Any reason why it wouldn’t work well?
When you are placing the thermocouple in the hopper what are you measuring. The heat in the combustion zone or just the heat of the gas as it rises through the charcoal. What is that temp telling you?
In the Ben Peterson book I think he said that for the gasifier to function at least 9 inches of WC were necessary but that more was better. In some of the posts it seems that you are getting better performance from your vehicles by lowering the pressure. Just wondering about that. My pea brain has a hard time sorting all this out.
About the fiberglass:
I have used it in my JXQ-10 gasifier. It works, but it gets wet and fills up with whatever comes its way. Then slows the gas flow. As far as i know, there’s no way to clean and reuse it, so you have to be prepared to throw it away. Just my opinion.
Tom,
The possibility of getting fiberglass in an engine scares me. I’m concerned about what it might do.
If you know your engine displacement and RPM, you can figure out how much air is going to get sucked through your nozzle. remember that you are mixing air back in at the carb at about a 50:50 ratio) Koen made a spreadsheet about that, and I think it can be found in the nozzle thread somewhere? If you know how much air is being pulled in, then making the nozzle smaller increases airspeed. The higher that airspeed the better quality the gas is, at least up to the point where it becomes too restrictive and the engine struggles to fully fill the cylinder due to the drag. I wanted to hunt for that magic size, but found that just about any nozzle size seems to work, so I lost interest. For a smallish 5-10hp engine, anything from a 1/2 to 1" hole seems to work fine.
About the best I ever managed was 25% of the fuel mass in added water. I think the key to getting higher ratios would be to dial in the steam generation system. You would probably want to be re-capturing all the heat you could from the outgoing gas and using that to create super-heated steam. My system was too small, I think, so if I delivered too much water it would not fully turn to steam and the liquid water would slow the reaction too much. I did find that the water makes a big difference in power, so I do think it is worth implementing.
Tom, here are some better pictures of the nozzle area. There is a depression around the 3 inch center pipe that holds about a half cup of water.

Hi Tom,
Koen’s gasifier, and the one Troy build have a nozzle that is centered in the tube and points straight up. This means the oxidation zone is surrounded on all sides with an insulating layer of charcoal. When you put the nozzle in from the side, there is a possibility that the force of the incomming air will push the oxidation zone sideways and if your tube is not of sufficient diameter, it can heat it up.
Cyclones are a wonderful component on a charcoal gasifier. They spin out the finer dust which is more of a problem than larger particles. I used to us a diverter plate that sat on top of the gas outlet pipe, but found out it wasn’t doing much. The cyclone can be a simple straight pipe and doesn’t have to taper. I’ll see about getting a picture up.
Fiberglass is abrasive and a cost. I prefer wool or some fabric you can rinse and dry. Open cell foam also works well.
The purpose of the themocouple in the hopper is to tell you when it is time to shut down the gasifier and refuel. I find it amazing. When you run an updraft charcoal gasifier (where you take the chargas off the top of the fuel) is the long period of time it takes for the gas to heat up. Charcoal is such a good insulator that the chargas will not heat up (and by heating up I mean about 120F or less) until the amount of char covering the oxidation zone is depleted enough to allow the heat through. This is when your thermocouple will let you know when to refuel. I use my hand in place of a thermocouple and can tell when it is time to refuel.
Ben’s book on building his charcoal gasifier is fine, however, it is more complicated than what I feel is necessary.
Here is a picture of a Hexoloy silicon carbide nozzle I just made based on the success Dave has had. Look at post #10 in this section for his recommendation. You can use regular steel but it will burn out quickly, stainless steel will last longer but you will need some exhaust gas to cool it, but Dave has put many hours on this type of nozzle little detrimental effects. You will see the assemble is screwed to the side of a drum with four screws and you have the nozzle ready to go. Just add a gas exit, an air tight lid, some engine grade charcoal and you are ready to flare. Once you have the steady flare, you are ready to hook up the engine and run it. I have been working over the past 8 years on charcoal gasification and ended up going down a rabbit hole of “How simple can I make this?” That lead to the Simple Fire which I believe inspired Troy to develop the “Cross Fire” Anyhow, my point is you can start simple and start learning or you can spend a lot of time making it complicated. Either way, you will learn! I still remember all the time I spent on the FEMA woodgasifer before stumbling on charcoal!!!
Oh, let me post those pictures. You will see the entire assembly which is the inlet couple with flange to bolt to the gasifier, a pipe nipple to extend the nozzle about 1/3 the way into the gasifier and the hexoloy silicon carbide nozzle held in a threaded holder. The nozzle is glued into the holder with furnace cement. The nozzle diameter is 1" which is good for engines up to 18 hp or so. Thats enough for now.
Thanks so much for the information Gary. It answers a lot of questions I still had. I am starting out with a unit pretty similar to Don’s. He says this nozzle system was your plan. I like it. Maybe not as simple as a nozzle coming in from the side but it does provide a way to keep the grate clean. I’ve cut out most of the components for the hopper and reactor. I should be able to weld them up in a few days. I’m going to wait to finish the whole thing before I post any pictures. I am welding a bushing into the side of the tank incase I want to experiment with that kind of nozzle configuration. I like to play around some. As I have mentioned several times I am busy a lot of the day now trying to put up the food from my garden. I have two dehydrators running 16 hours a day and I run 14 quarts of something through the pressure canner. Wah wah. Still, going hungry is not a good plan.
Is the hexoloy nozzle tip the only part that is subject to intense heat? Does the pipe itself need to be protected in any way? When I was planning to use a nozzle like that I considered centering the pipe in a toilet paper tube and filling it with refractory cement.
I saw in one of your later videos that you were using a filter media from a water filter. How is that working out and is it cost effective compared to other materials you have tried.
I’m a little unclear about the cyclone. Is the last picture one showing components of a non-coned cyclone. Looks like a piece of exhaust pipe with some pipe test end caps. Is there any advantage to having a cone shape? I could make one but obviously straight pipe is less work.
How high above the combustion zone is optimal for placing the thermocouple and How helpful is a pressure gauge for a gasifier that is not going in a vehicle.
Again, many thanks to you and Don for all the advise and help.
TomH,
One of the ways to sort all of this is too accept that a raw wood fueled gasifier is actually self heat making, deficit. Needs More heat energy.
Why all of the best of systems are somewhat complex, layered, to be heat conserving, and recycle back in, all made heats. And outside putting in more heat like from the engine exhaust.
A pre-charcoal made fueled gasifier is very much self-made heat surplus. Excessive. Why you can metals forge with wood charcoal. That excessive heat energy can then be utilized with water/steam to make a bit more engine fuel capable gas.
Another huh? why? Many of the designs you see put up, the Designer falls in love with one factor. Like air pre-heating. Like water injecting. Like variable nozzle adjustability (me!). Like variable restriction opening (me again!).
Or are single system component haters. Ha! Like me with exhaust turbo chargers, cyclone separators, and four stage filtering elaborations.
As OrCarl and others say: most single factors drop out in favor of better overall system balances needs understanding. Understanding truly only learned by hours and hours of operational using.
Hey! If it was easy everyone would be doing it. Skilled experienced, always make the complex look simple. But they are actually observing, calculating, minute-adjusting a mile a minute.
And hardest of all to learn - when to just keep hands off and let it roll on. Good enough. Accepting batch system dynamics.
Regards
Steve unruh
Now if I’m reading you right Steve you are saying that I should actually learn by doing? What a radical concept considering that I have had my WK gasifier sitting out back doing nothing for the past 6 years.
I’ve always been more of a builder than end user and I have have to resist the urge to going to extremes, like the methanol injector I talked about without ever actually seeing a charcoal gasifier in operation. Did I ever mention that I’m 73? I usually break out the addled old man card when I get over my head. Not quite there yet but I am going to actually run this charcoal unit when I get it built. Really amazing how much simpler it is the my first one. I had a lot of man hours in that. Should be able to get this all done in a few good days.
what a amazing idea using a car disk brake rotor as a heat absorbing plate around the air nozzle i would not have thought of that in a million years then you put the water tube through the side of the rotor into a welded deflector plate to send the water into the reaserve around the 3 inch pipe to let it boil and make steam. that i see comes out on the edge of the pipe to mix with the air. simple … what i am wondering do you fill the stud holes with weld to keep out the ash or do you weld the rotor to the bottom if it just sits there would the charcoal tip the rotor or not? i have all my spare rotors have a 3 inch hole in the centre. now i can have a use for them. i must have 20 or more . how long do you think the cast iron pulley and the rotor will last. from what i can see that gasifier could have a self feeder at the top a small screw or screw and plunger then when the thermal coupling gets to a certain tempature it will feed material until full then shut down . i have been looking for a gasifier for furnace heating (to boil water) for some time many ideas but all have problem this idea may solve them thank you so much . i was thinking up draft i have looked at hundreds of designs came up with hundreds etc. do you mind if i try this idea.
I drilled 3 pins thru the rotor to fit tight around the air pipe which keeps it in place.
I forgot to keep track of the hours so far but it still looks the same as the first hour.
That is what we are here for. Maybe you could even make some improvements!
Good TomH.
Out of the closet finally, eh?
Proceed then and actually this time do-use something, in-the-real. Builds are unproven frou-frous’. Wedding cakes. Can’t live long on just fancy party cakes. Now a meat pie, or stew nourishes. Sustains.
And too clarify: BenP’s book system is a raw wood fueled gasifier. Why the so called over complexity. Making it’s own internal charcoal. Converts the majority of the woods volatiles into gaseous fuel too. It is not a charcoal fueled gasifier.
It was his Mustang car system that was the dedicated charcoal gasifer for the reduced space and stealth capability. He built than as his I can too gasifiy vehicles statement. And do it stealthily.
I’ve never seen him offer up the plans for this.
S.U.