What do you learn from the sight glass? I’m wondering if you could mount a piece of pyrex in a drill press vise and use a diamond edge hole saw to cut it and then mount it in a modified pipe cap.
3 Likes
Hi Tom, looking at the charcoal glowing in the gasifer, if it is white hot or a bright yellow glow at is in the range of 2000 degree F. Temperature. This melts things down and causes clinkers to form not good. If you see a reddish orange glow that is better.
Kristijan, Matt, Koen, Don and others know the importance of running the charcoal gasifer at the right temperature. Kristijan adds water the the charcoal to keep from getting to hot in the gasifer, I have tried it and it works great.
Bob
5 Likes
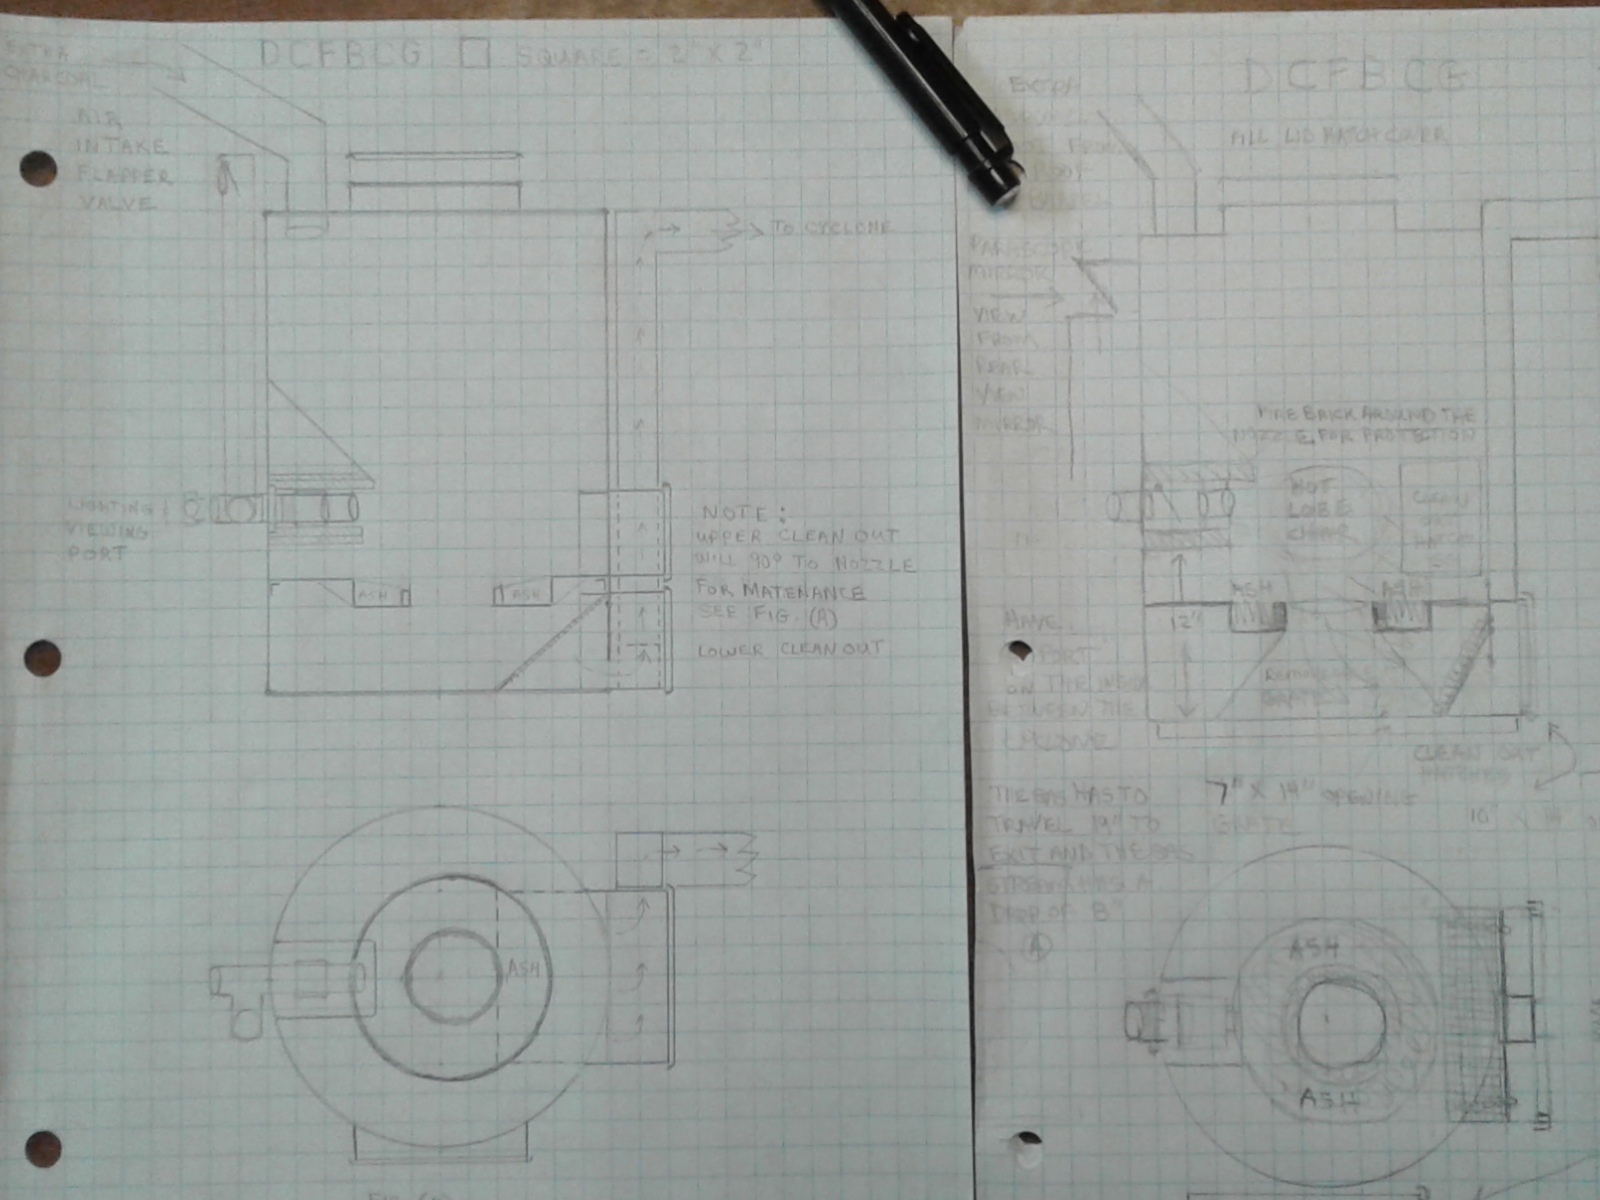
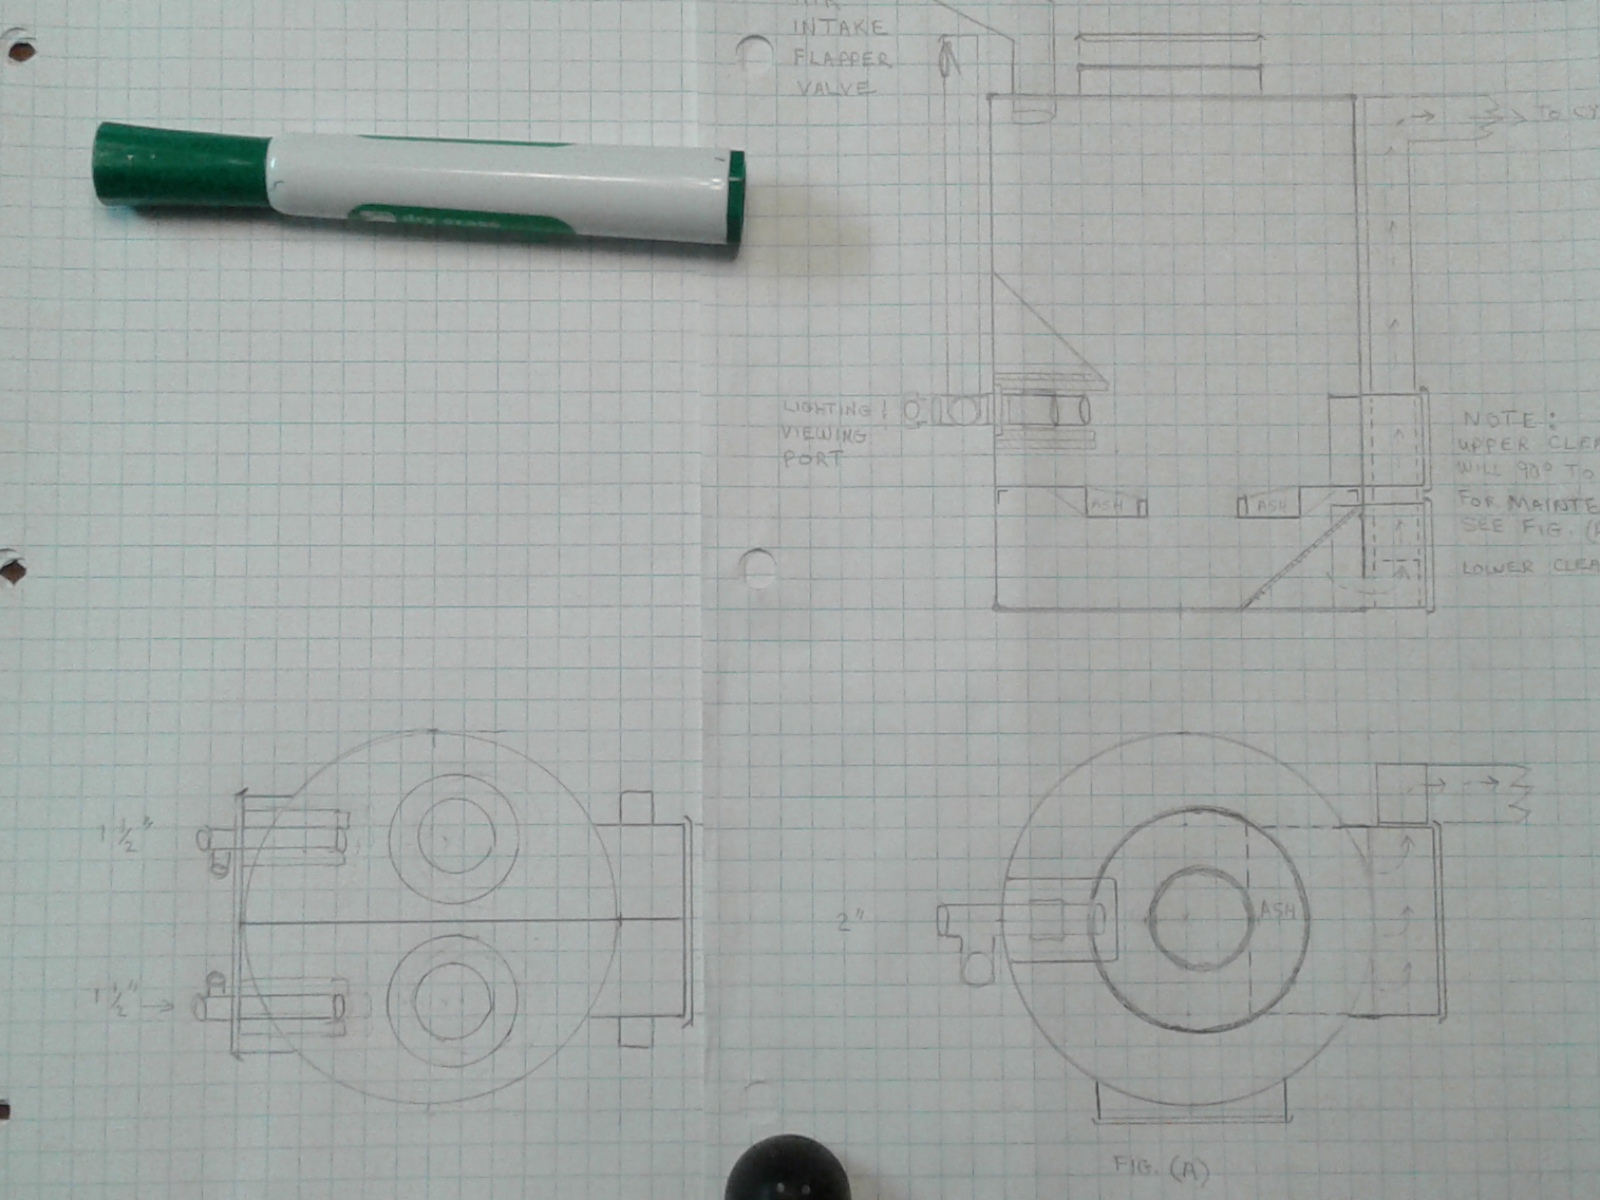
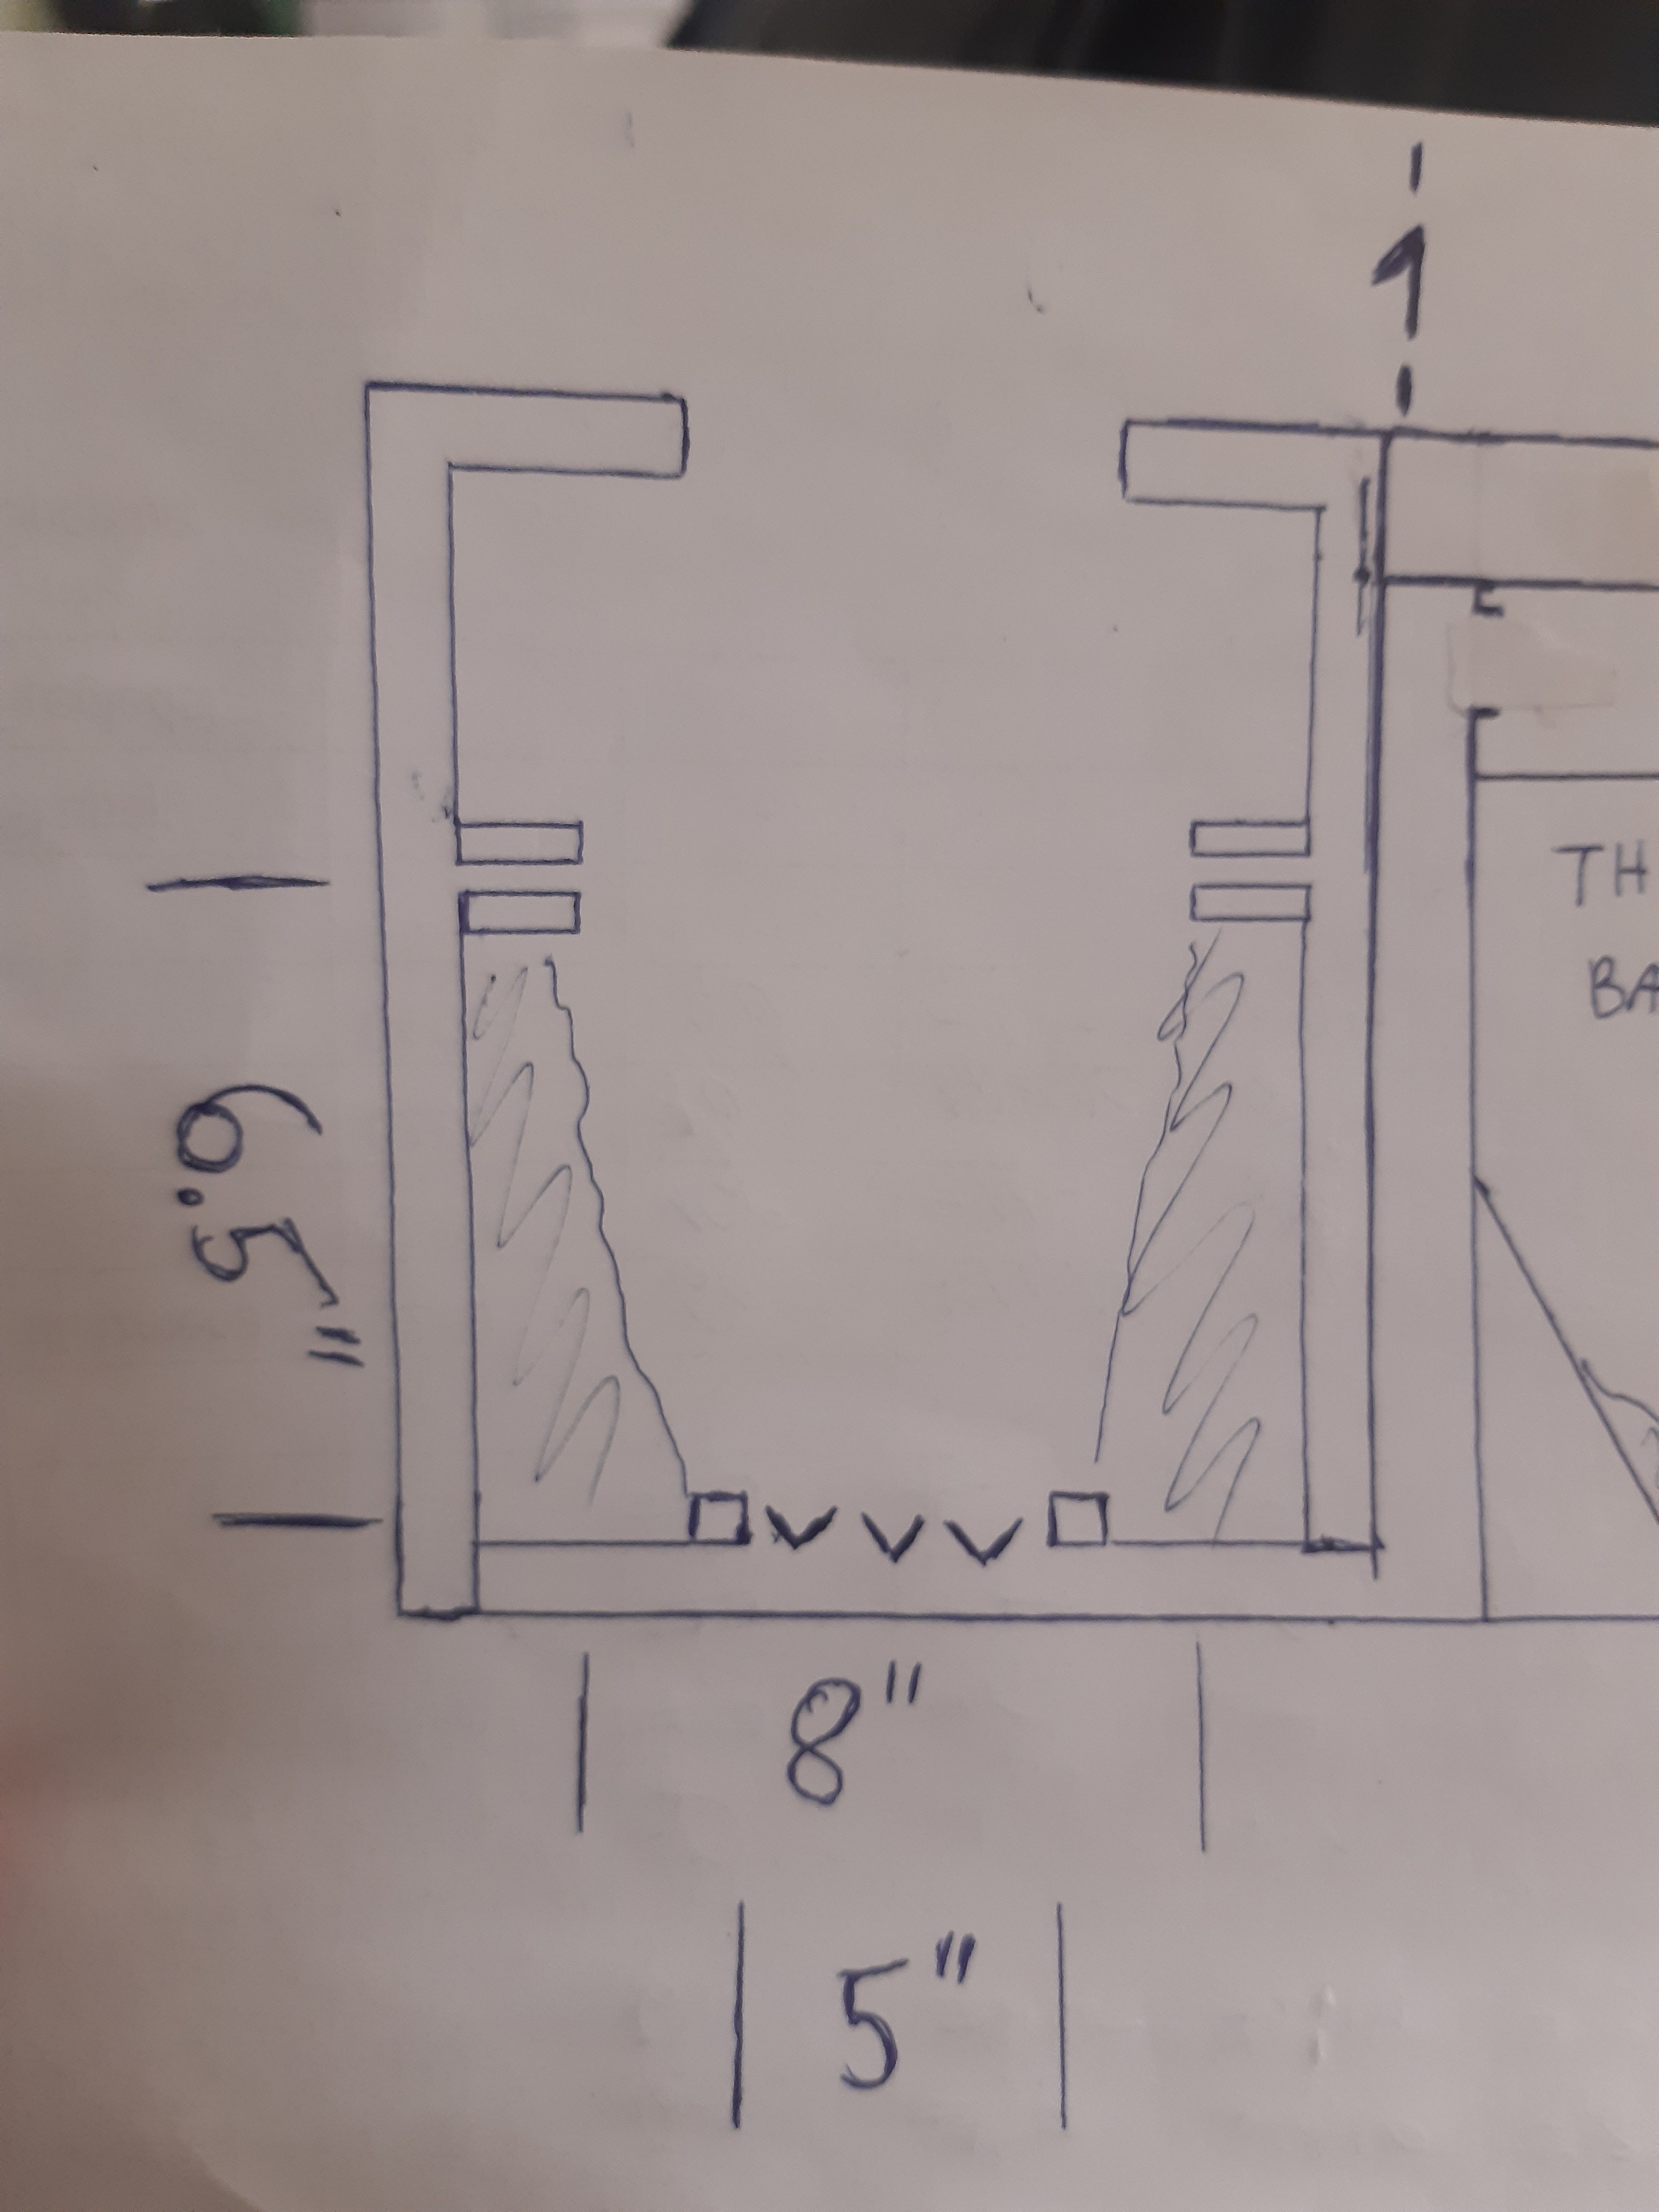
Okay the new piece of paper hot off the drawing board. Just the DCFBCG side and top view. I had to move the upper clean out hatch 90 degrees to the nozzle assembly, my arms are not that long for maintenance oops I misspelled that on the drawing, corrected.
I off set the reduction zone away from the nozzle and closer to the grate for a diagonal path for the oxygen and gases being formed.
Bob
1 Like
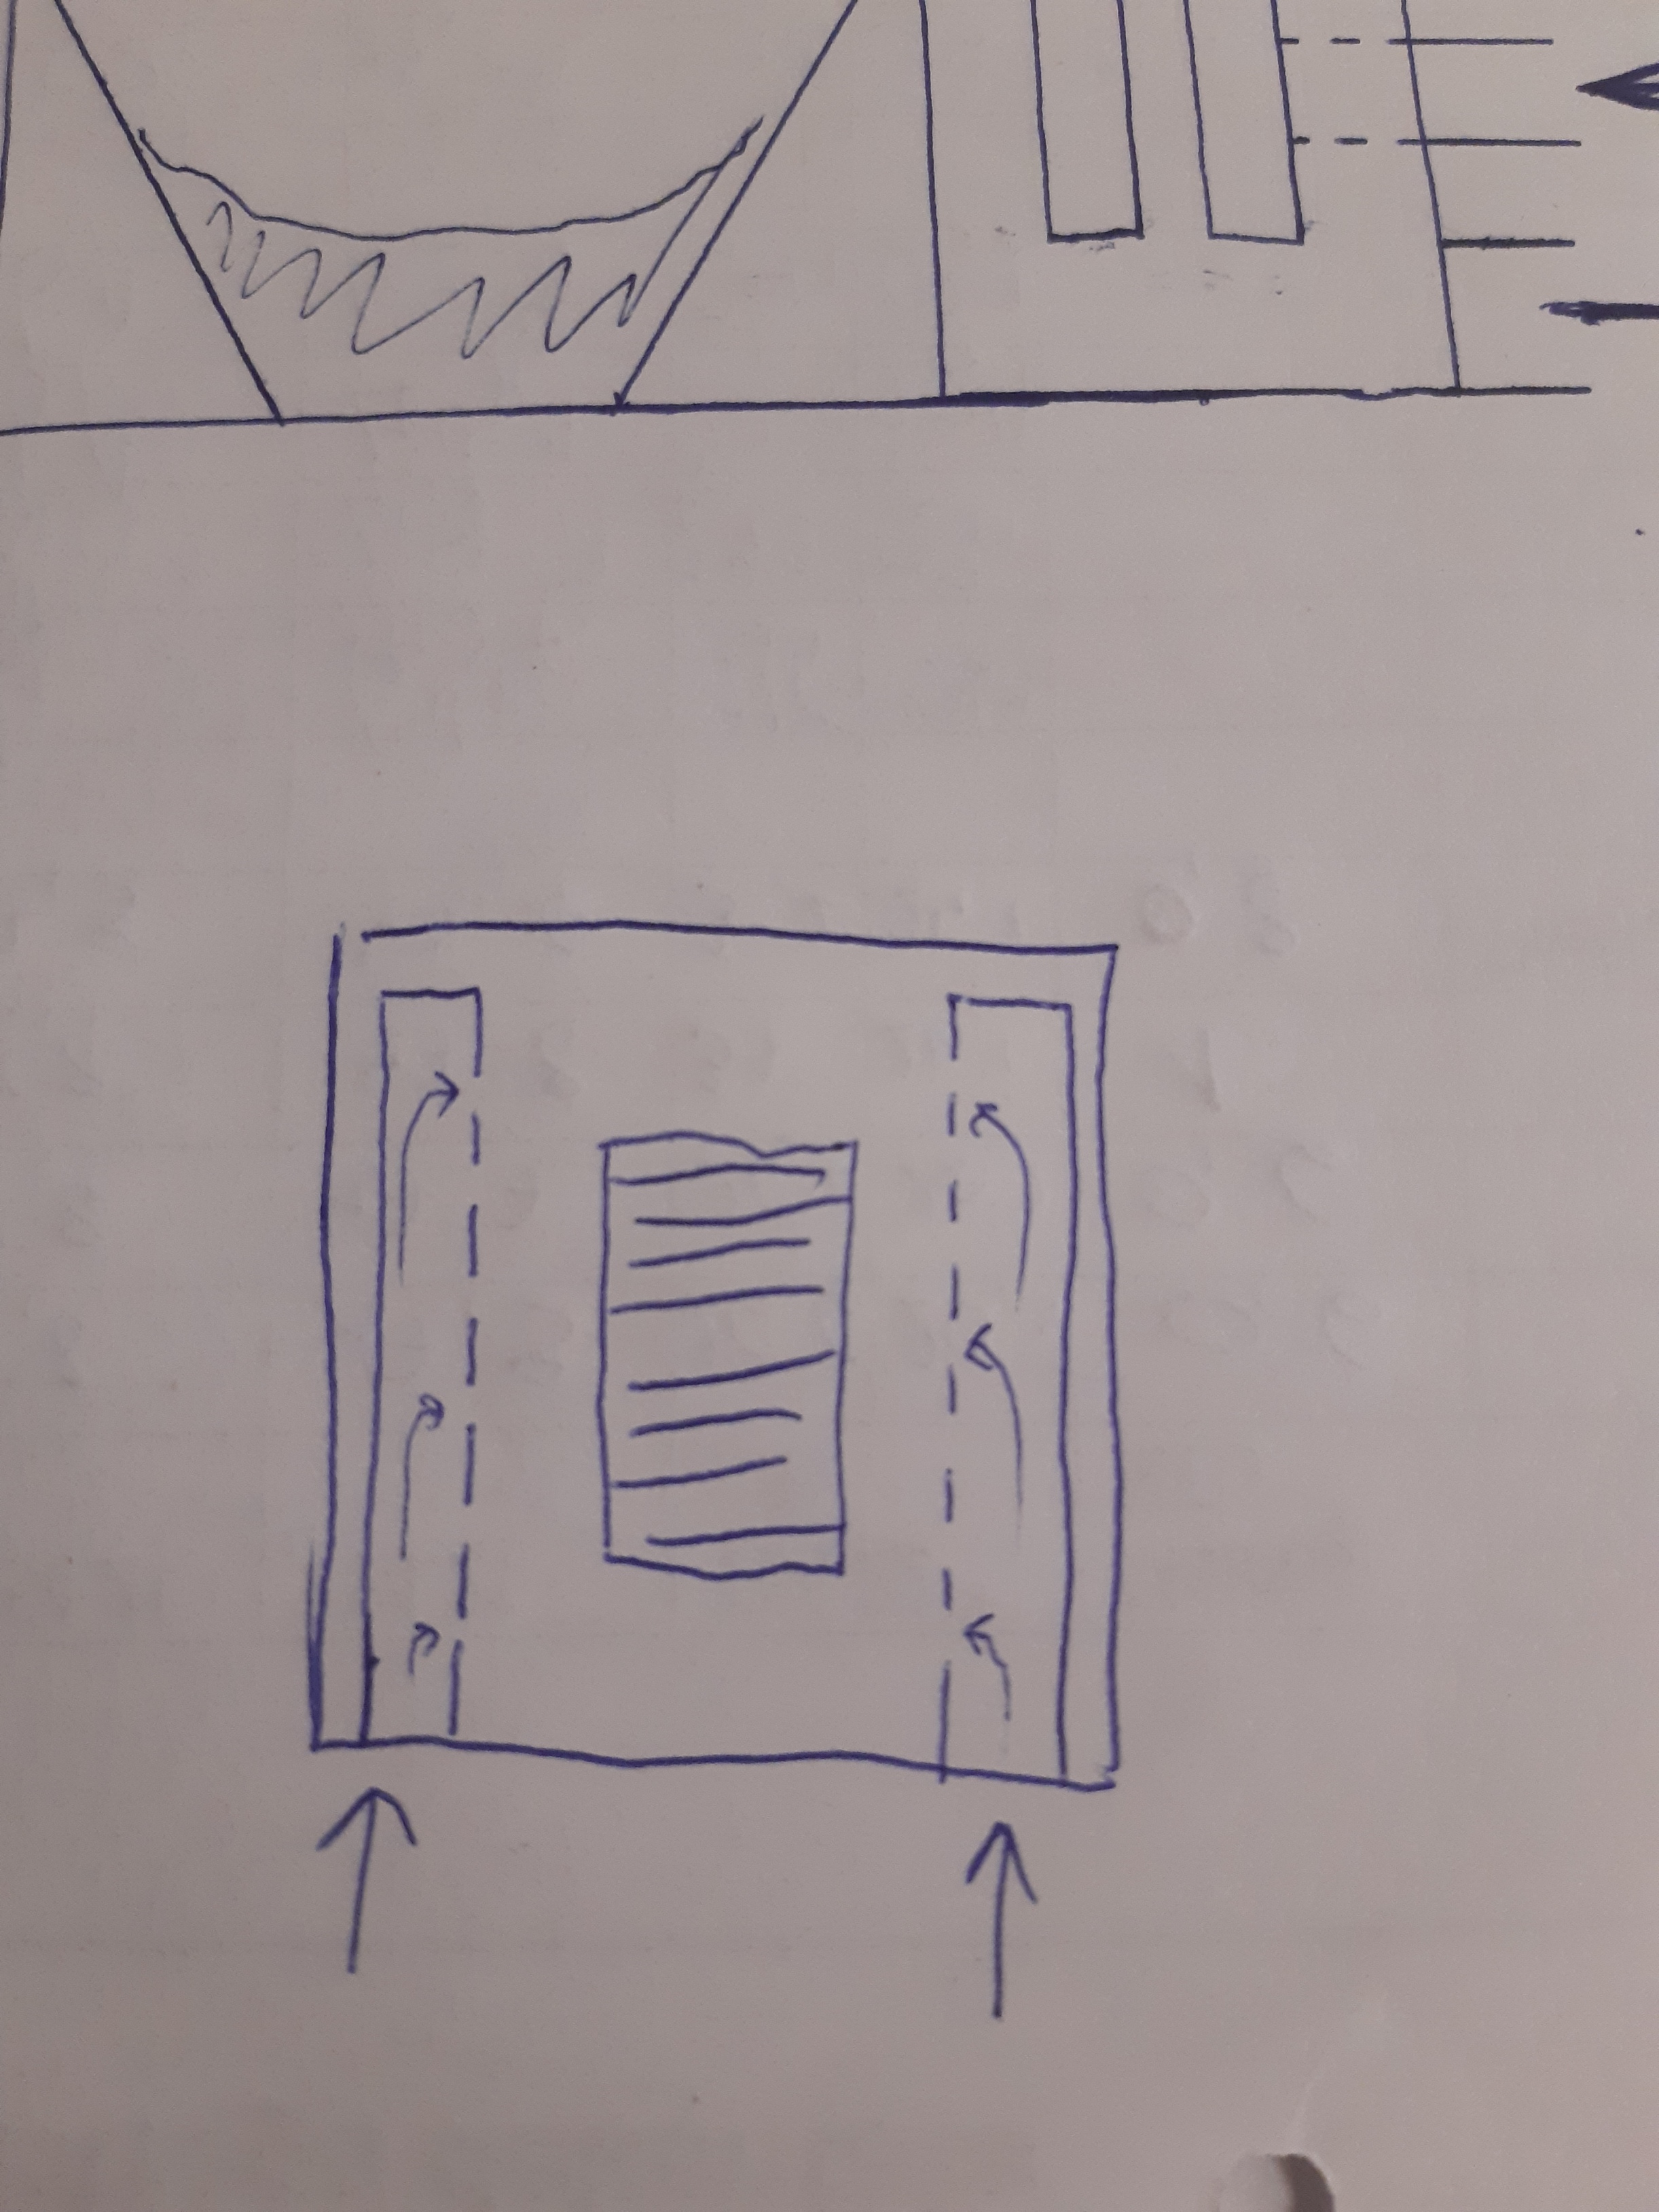
Here is another possible design concept, two is better than one.
In that big barrel there will be a lot of charcoal that will never make it to the nozzle to be burned and converted to useable gases. It will just sit there because it does not have a 60 degree slope or steeper slope to move downward to the hot lobe and into the reduction zone. The best hoppers have a 60 slope or greater for charcoal to move. One other thing I noticed in my other gasifer hopper is the charcoal right above the nozzle is where the charcoal is used up the fastest forming a crater. I do need the charcoal in the barrel around the wall of the barrel for heat shielding and that is good. So I decided to make two charcoal gasifer in one container with a dividing wall in the middle. I will use two 1 1/2" nozzles that have shut off valves on the intake side. This will give me more out put of gases on the delivery end to run a larger engine if I want to, like a 318 cu. in. V-8. I think it will give me more useable fuel to be used in the same size hopper. Also filling on the fly can be done with a Y split in the guager tube to each hopper from the extra charcoal suppy the barrel. I can use 2 ammo cans for the top lids for filling each hopper.
The question I have can I use a common cyclone filter? I can’t see why not. I can’t see why I can’t use a common intake with one flapper valve. As long as I can isolate either side of the gasifers intake to either nozzle.
One other thing is the 2 maintenance hatches will be attached to each nozzle for easy removing and inspection and maintenance if needed and clean out of the hoppers.
Making this DCFBCG as efficient as possible is my goal.
Bob
1 Like
Bob, l read trugh the thread today. I see you are in the brainstorming mode. Thats nice to see!
Before we get to the gasifier design, alow me to throw my 2c in the pigibank of knolidge.
First, l have bad experiances with flaper valves. They mess up air seting, specialy at idle where there isnt enaugh vacuum to open them. You just suck the offgas from your gasifier without sucking in any air. The gasifier will cool down and make takeoff hard. Allso, tar vapour will make it stuck and require you to poke it open when at lightup. This tar film will atract dust and soon the surface will fail to seal completely.
But what you say is true! I learned the hard way that having a open air inlet in a in-the-car gasifier is dangerous! Charcoal sometimes spits out. I belive it is best and easyest to just close up the lighting port then have the air suply from the outside/under the car.
Then there is filtration. A cyclone will not hurt anything but it allso isnt nessesery. In fact, my advice is to ditch it and rather install a sack filter after the cooler. You need a secondairy filter anyway, and making it just a tad biger to be able to take the dust that falls down will solve all your problems. I used a sack made out of one medium size towel.
Now, the gasifier. I took the time and emptyed the drawers. A huge pile of old skeches dating back to my Chevy era. Found what l was looking for.
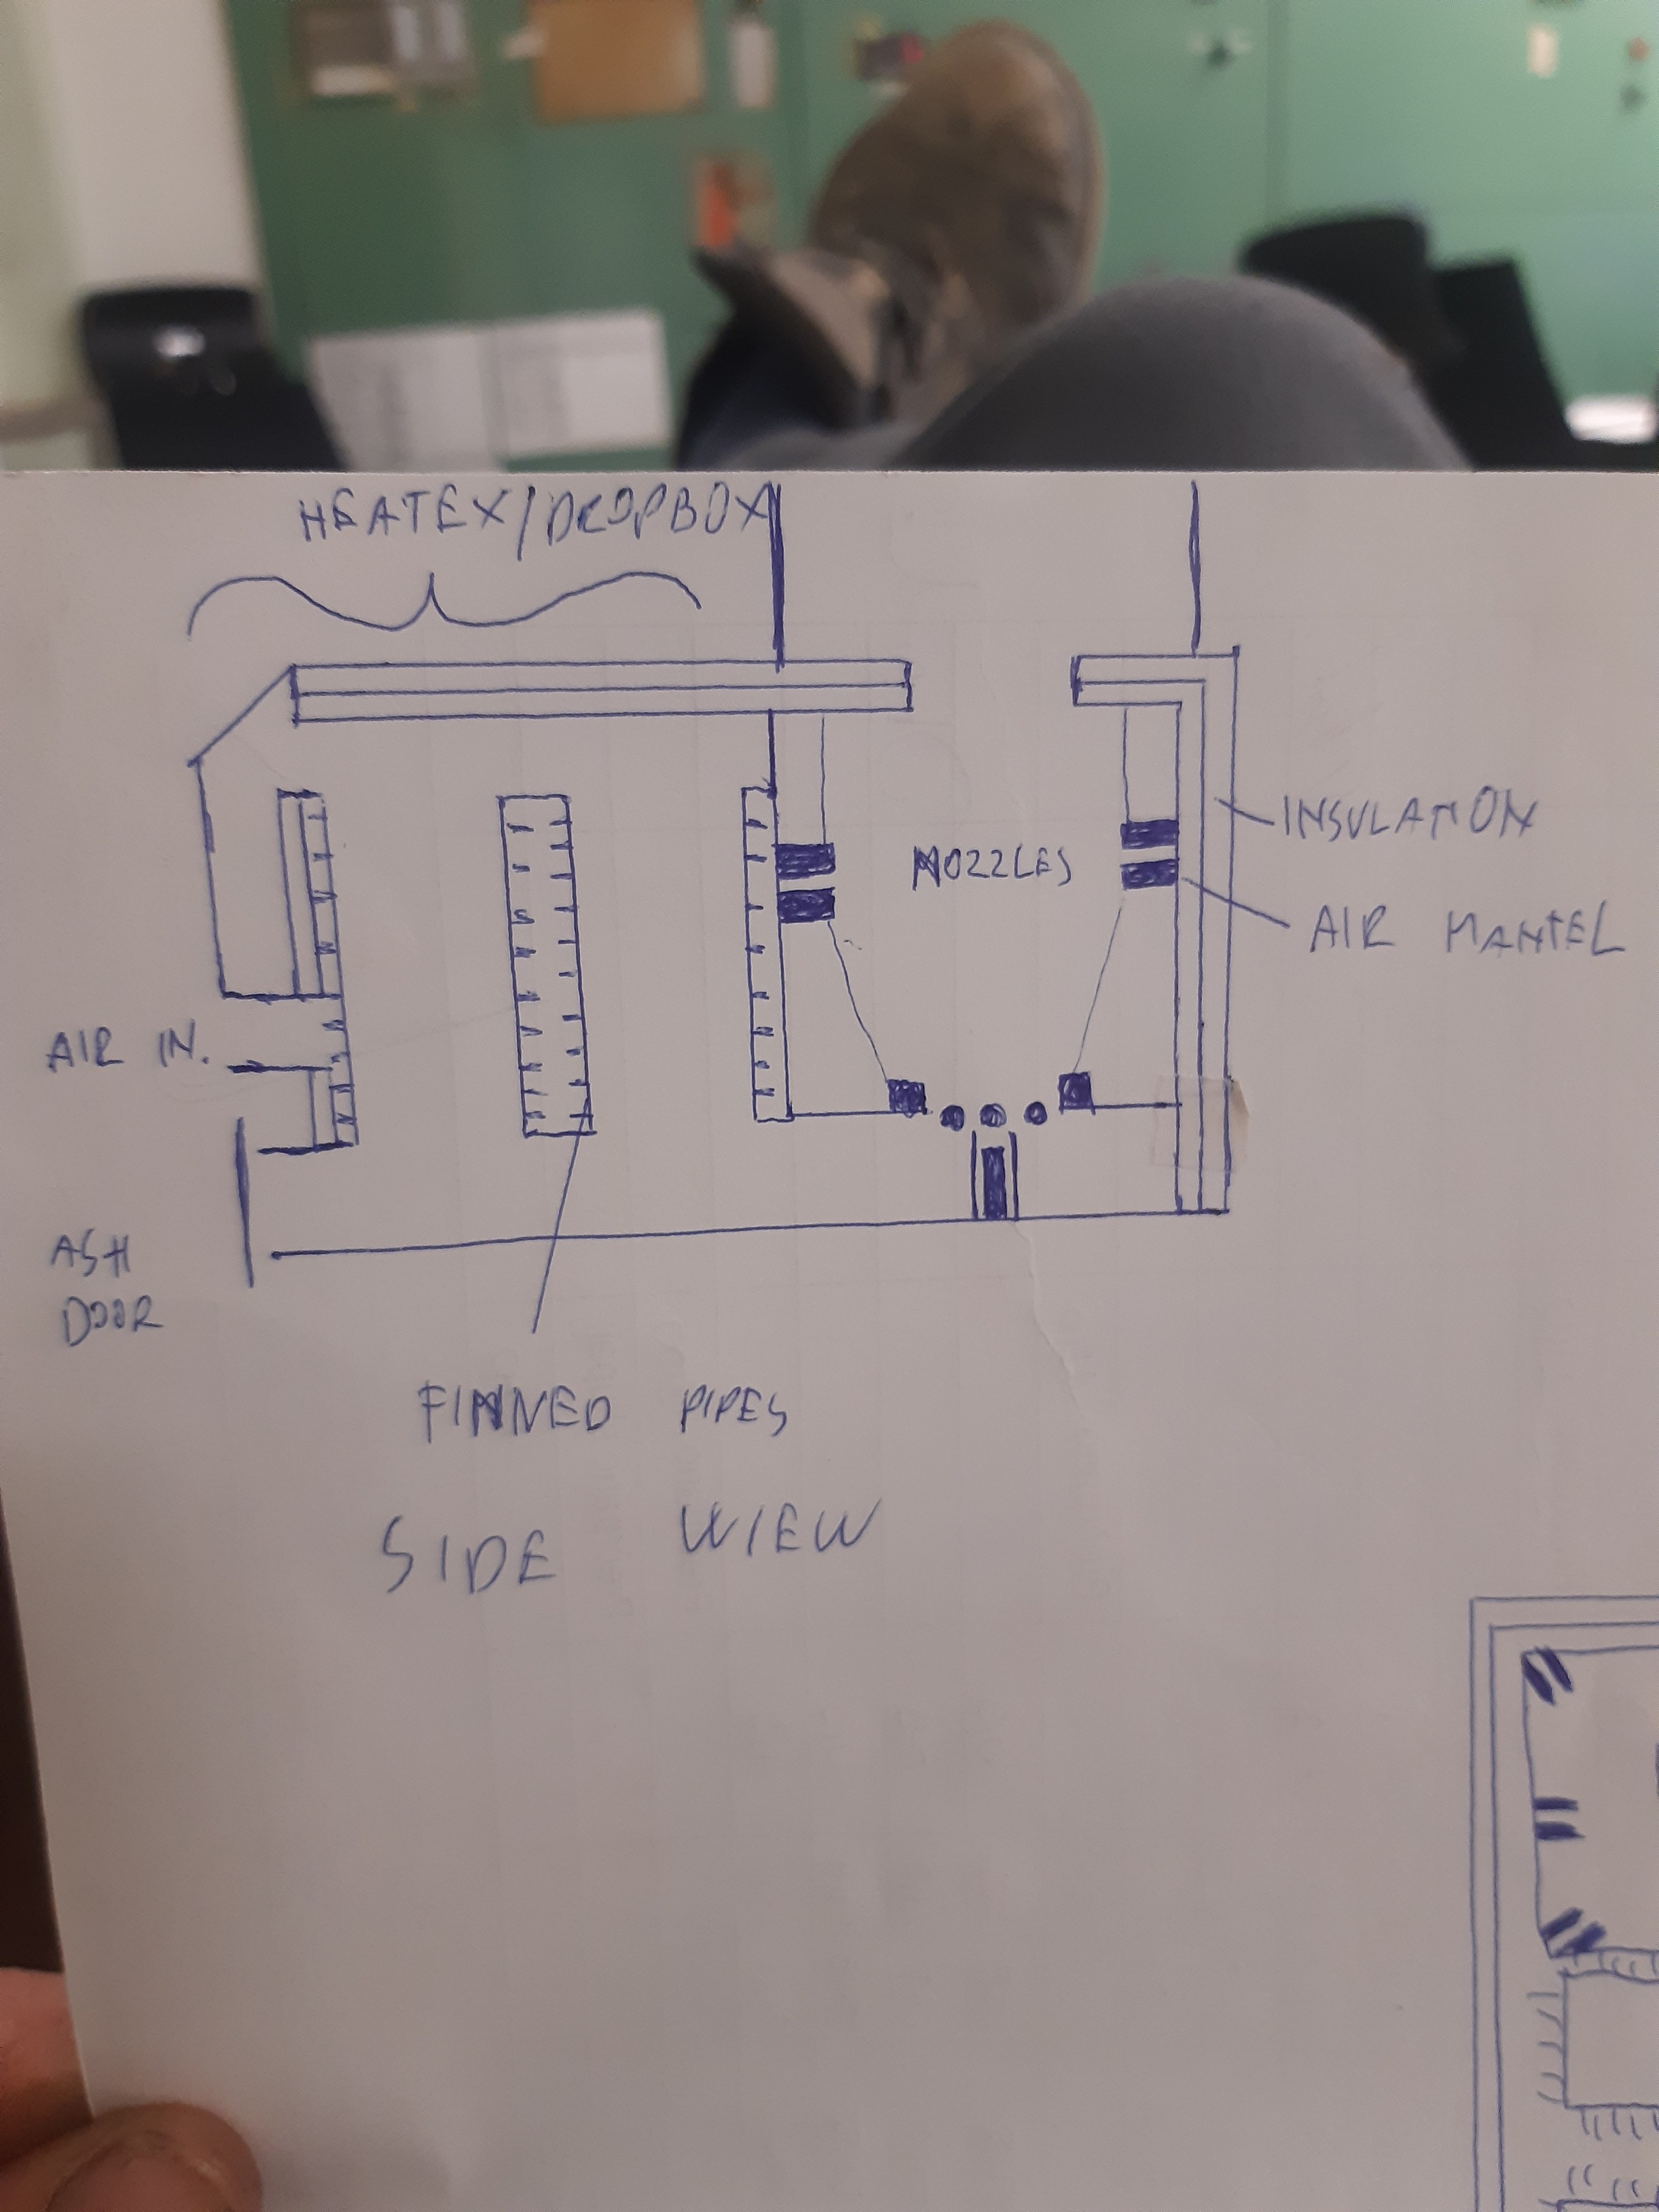
This is how my “shoebox” gasifier looked like.
Nozzles were 1" ss rod drilled trugh with 9mm? drillbit. Wery solidly welded on the housing with fins on the other side. All but one were intact when the gasifier was cut apart. That one was facing the lighting port and got more air thain the rest so thats a mistake that culd be avoided.
Note the restriction on top. Its ment to block heat riseing from the hell lobe up in the hopoer. Important if you plan to put it in the trunk! This has proven to be a sucsess. But it was a inch or two too low and this is where the gasifier failed! The weld cracked.
The buty of downdraft charcoal gasifier is it doesent need a hearth restriction so it causes less drag. Here some restriction is present but from other reasons thain usual, mainly space limitation.
Unfortunaly l dont have exact measurments but this old skech is a rough estimate
Note that this thing is TINY. And yet it made a 2.3l 1.5 tone car go down the highway like it was chased by tax collectors  why? Because, unlike wood gasification, charcoal gasification is preety much instant. The oxidation zone is allso the reduction zone, all hapoens on the spot because of the extreme heat involved. This means 2 things. The gasifier has to be built to withstand the heat and the reaction must NOT be cooled down too much with EGR or steam.
2 things make chemical reactions happen, time and/or heat. Matt sayd it right, gas dwell time on the charcoal is one way to go. Its how a WK does it. But like you sayd, Bob, not much space and weight capacity on such a vehicle. So, it is best to go the other way, small and hot!
But as l understand you have it better thain me on my Mercedes. More space right? Since you have the whole trunk.
8 Likes
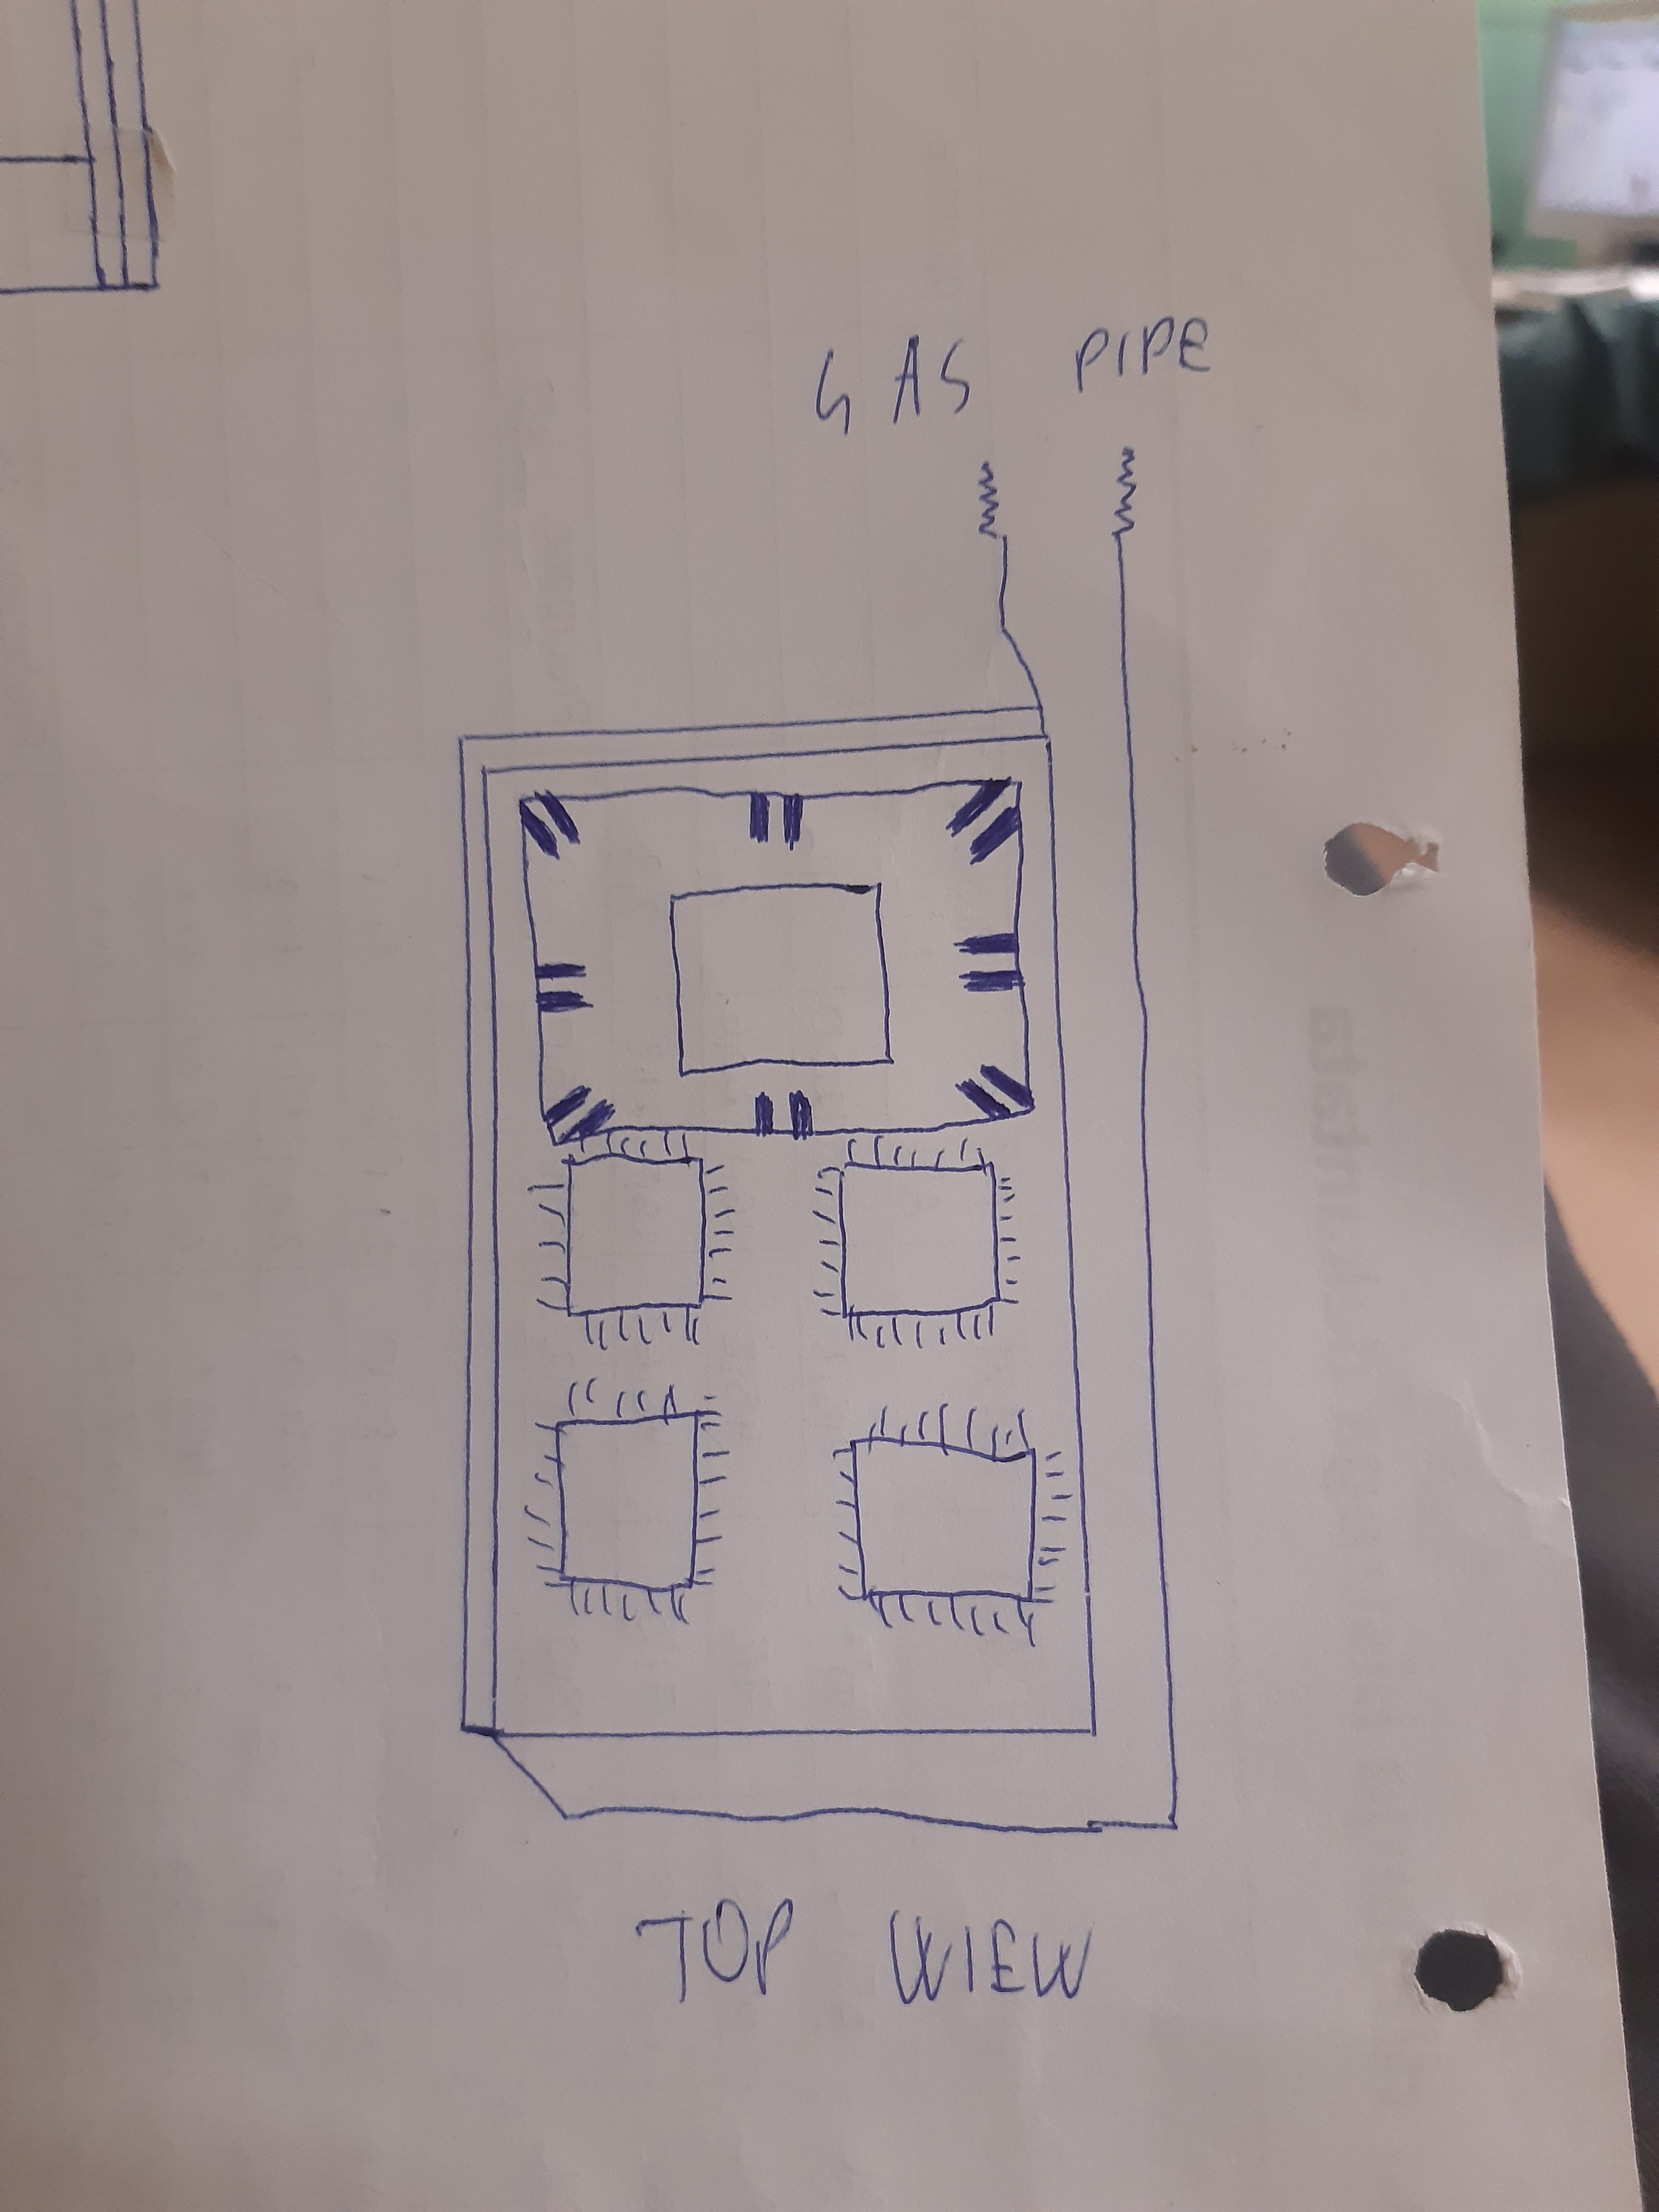
This is a nozzle idea l allso had but ditchet for some reason l cant remember right now. Probably space limitation related.
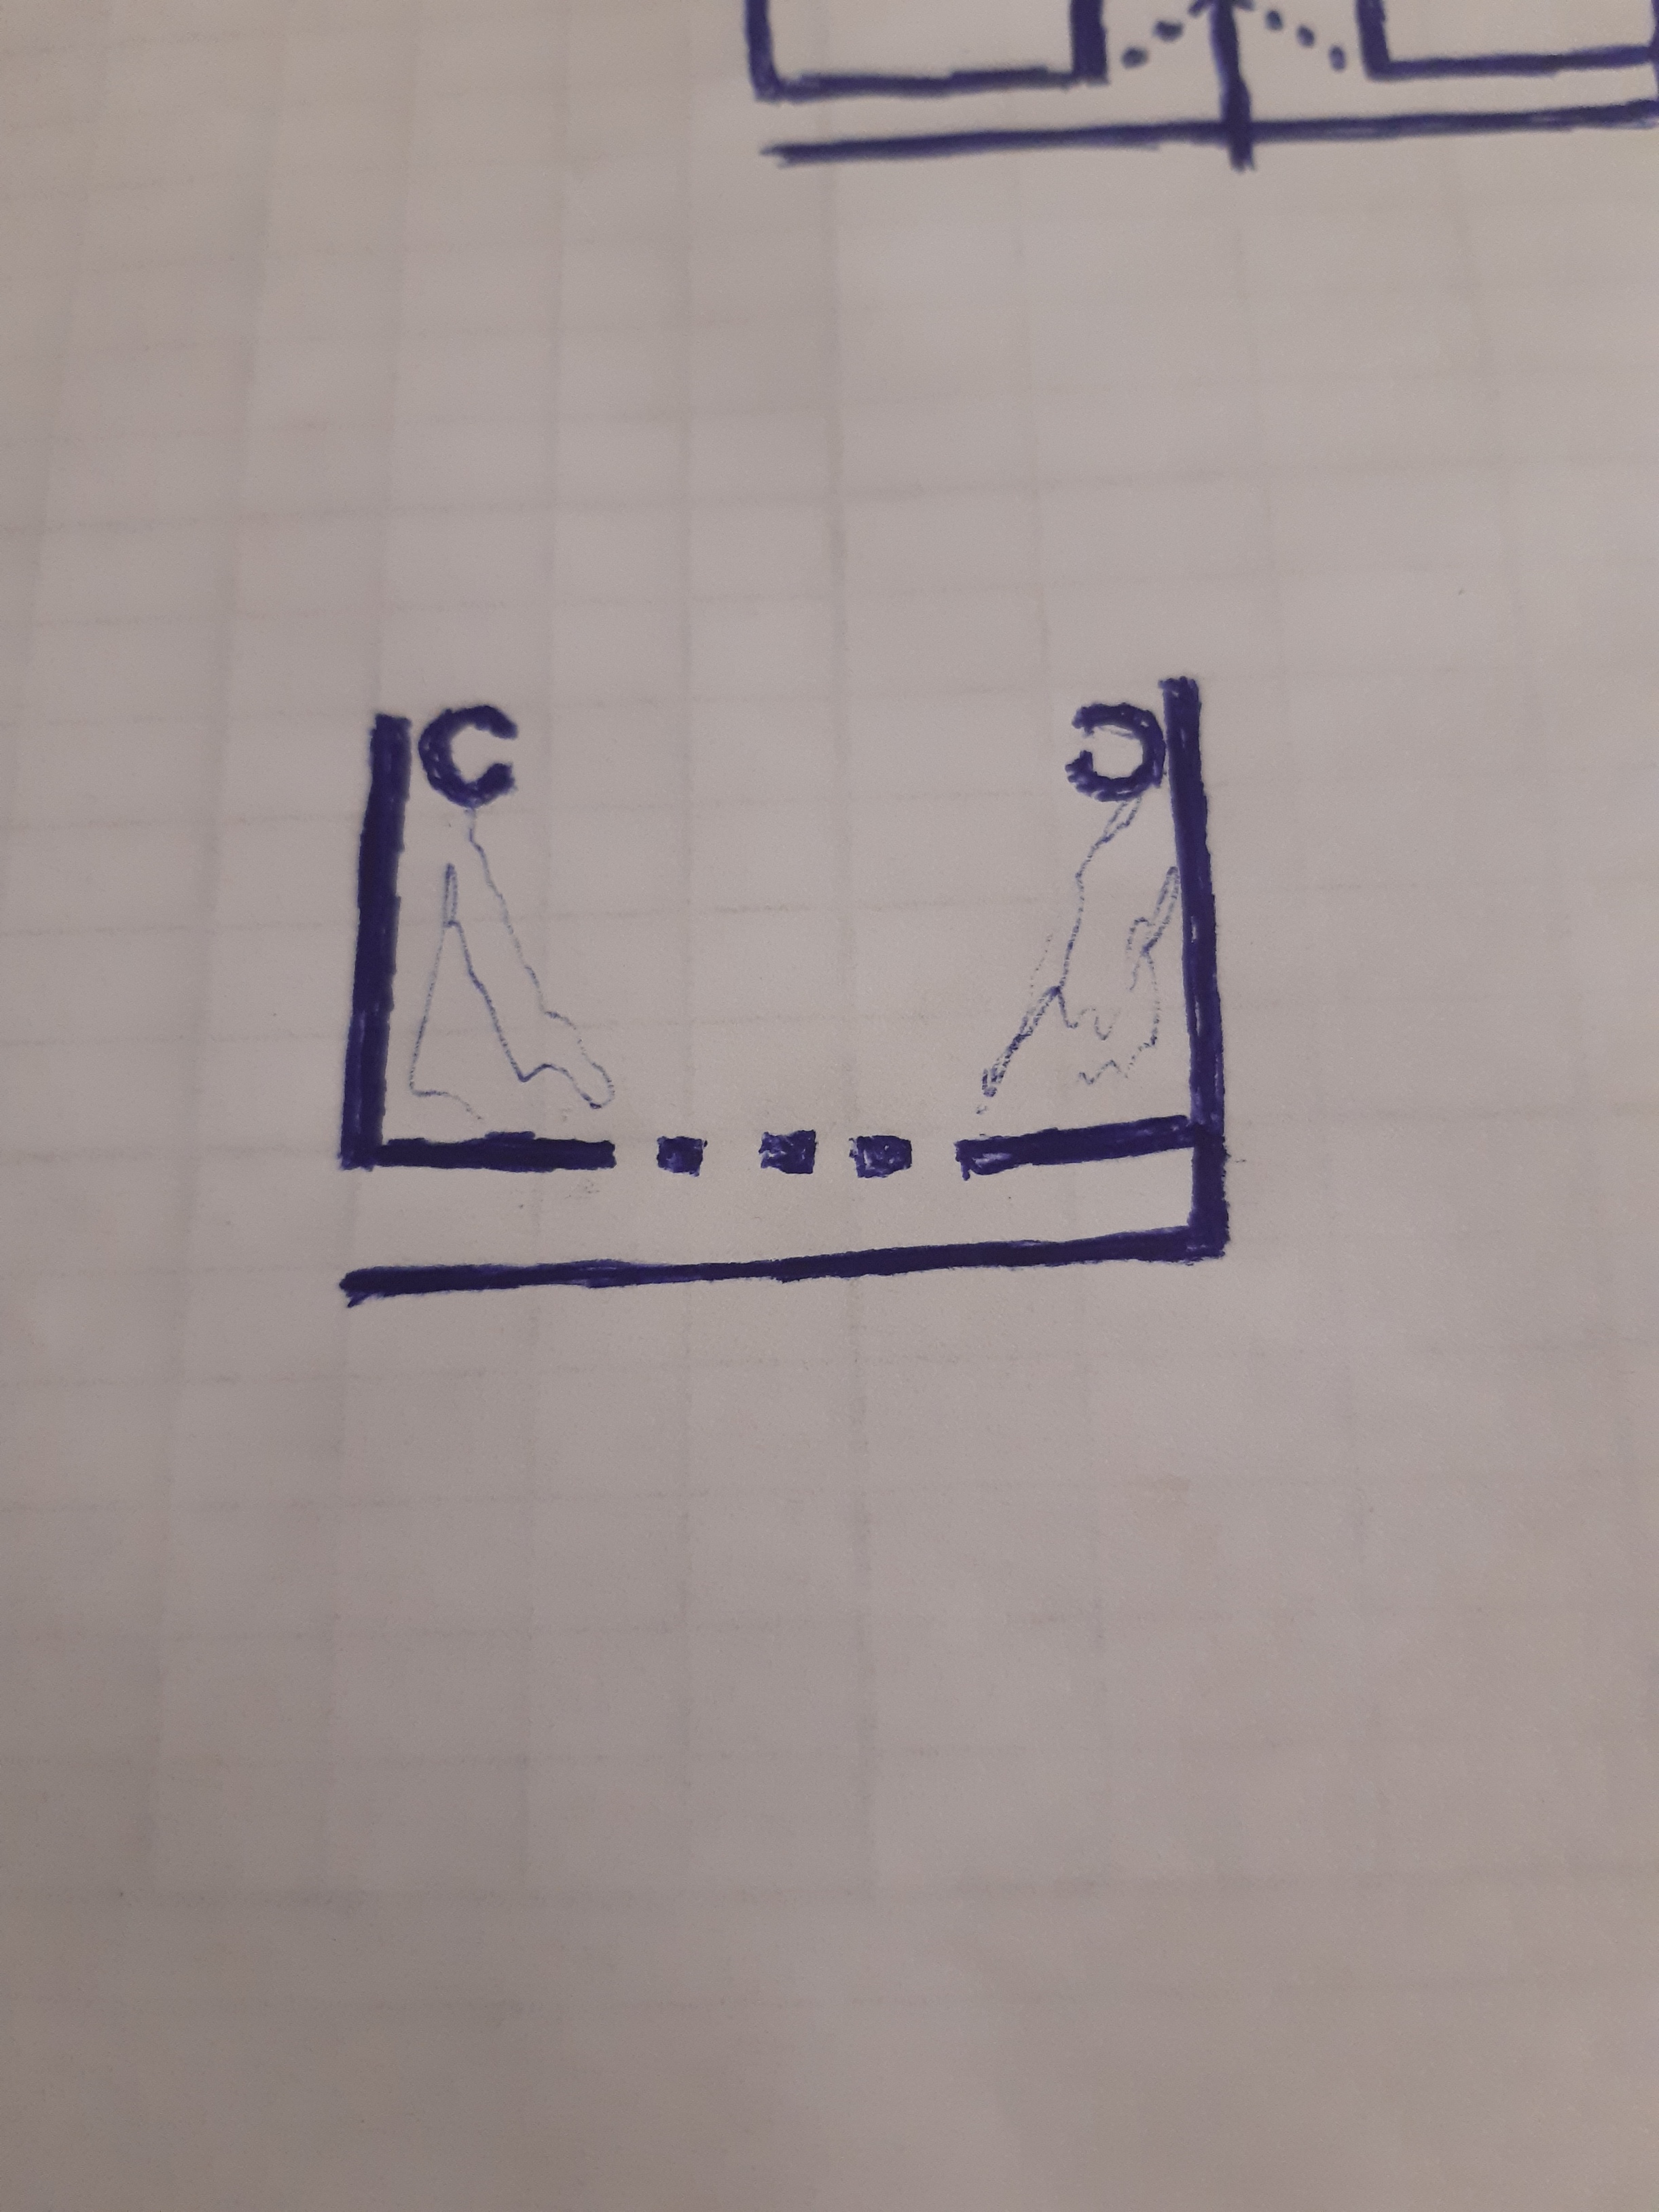
Imagine the prooven flute nozzle rotated 90°. I do not know for sure if it is gona work as well as it does in the upright position but l am about 87% sure
The way l wuld do it is have 2 of those flutes facing each other in paralell, with the grate underneethany gas or solid will first need to go thugh the plane of insane heat.
And in a way its still a crossdraft  or shuld l say, 2 cross drafts facing each other in one housing.
6 Likes
First of all thank you Kristijan, for digging out your old drawings. I had forgotten how small this charcoal eating beast was, what a complex creation you welded up.
My Gasifier will be going on the back bumper or carrier hitch design because I have no trunk it is a station wagon style. I am still looking for that Dodge Dakota also.
You powered a 2.3 L and my Subrau is a 2.5 L . Okay I need to think smaller and get everything as hot as I can get it, with out melting things down.
So I need a heat shielding above the inferno of hell… Also to guild the charcoal in the hopper to above the nozzle and hot lobe with heat shielding below it. This will also create the hot gas vapor under it. I see now why Matt said he is using a box shape for his diagonal gasifers. Well back to the drawing board. Lol.
I did notice I now can idle my truck longer now that the flapper valve is no longer on my intake on my WK gasifer. I still have not replaced the pusher blower on the intake, I have not missed it. Just been using a old rolled up sock to plug the hole. Need to build a WK tennis ball valve. Yup check and flapper valves due not mix with sticky tar vapor.
Thank you again for all the input. I am going to try to build a small gasifer and see what can be run off it.
Bob
3 Likes
Okay everyone, I am working on “The Gasifer That Wanted To Be”. It has been changed over to a Diagonal Cross Flow Barrel Charcoal Gasifer. So go and check out what is being done and changed there on that gasifer. That one is not on paper.
I will still be trying to design a smaller unit here so this will be a on going paper project for now.
For those who have cross flow charcoal gasifers you might be able to modify them to make them work like a Diagonal Cross Flow charcoal gasifer.
Bob
1 Like
Hey Bob, I have been following this thread with interest. I thought I would throw out this design concept that I had thought about, but never built.
Kristijan almost beat me to it, as he came up with a similar design using 2 flute nozzles.
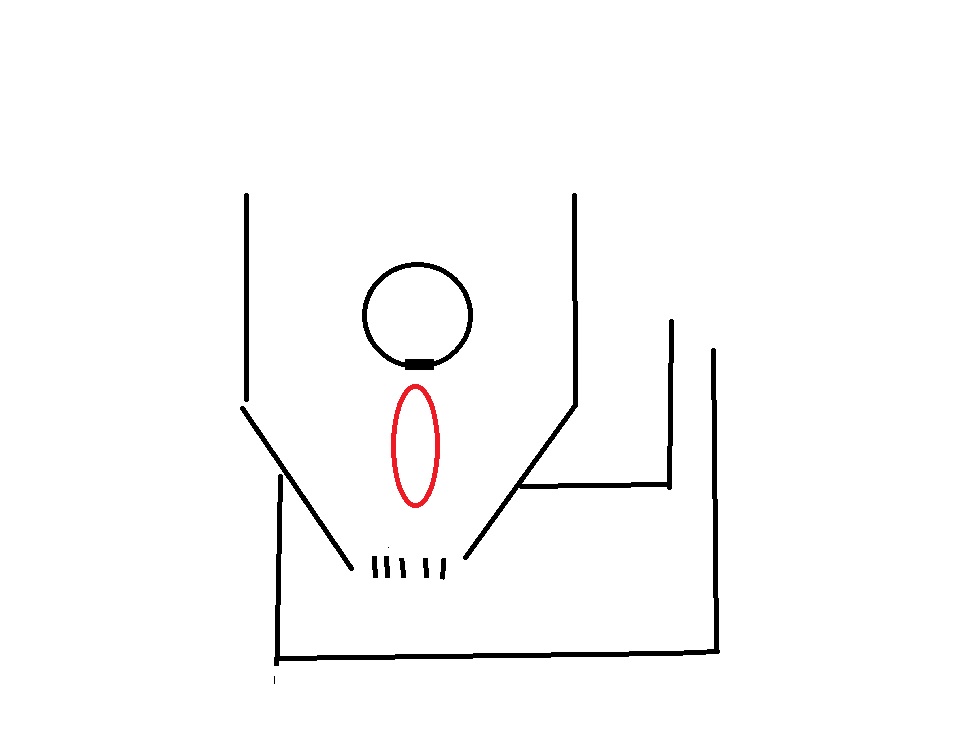
My design is simpler - use just one flute nozzle, and point it straight down towards the grate. The char should roll right off the top of the nozzle tube, but you could put a steep hat on it if not.
Anyway, when I finish a couple of big projects I am working on, I am going to try something along these lines. using damp charcoal and not fiddling with water drip sounds pretty appealing. Also, a grate to help keep the ash moving seems like a good idea.
4 Likes
Hi Carl, if that pipe or flute material could be made thick enough it might survive. The problem is the white hot charcoal burning and touching the metal by the blast of the nozzles, It melts as it oxidizes. This is why my nozzle is shrouded by fire brick. Now if that nozzle could be water cooled that might be a way to go. The reason the flute pointing up works is the heat is heading up and away from the metal by the air blast. It might work sideways no one has tried it. The best way is to try it out. Some of the members are having great success with tungsten nozzles. The way the Kalley gasifer nozzle worked is that it had a cone above the nozzle preventing the white hot charcoal from coming in contact with it. But it was a up draft gasifer and the heat still would do its toll on it. Maybe a metal V hat over it would work. It would be worth trying.
Yes there are so many things we can try in the world of gasification.
Bob
3 Likes
Hey, I might be wrong, but my theory on why the flute nozzles does not erode is that the heat is being swept away by the high velocity air stream. Heat moves by conduction, radiation and convection. While convection is the only one that cares which way up is, I think it would be completely irrelevant compared to the blast of air being sucked through the nozzle. I believe the flute would work regardless of its orientation - but I might be wrong. They do tend to form a bit of a crust of ash around the nozzle, and that might be part of the secret to their success.
2 Likes
Yes the ash clinker cone does build up on the nozzles, and it has to be knock out or it will plug up. But if it is facing down and there is no contact of charcoal on the nozzles how would it form. Also if it is designed right the air will be moving downward and away heading to the reduction zone and grate. Like Kristijan said with charcoal this process happens very quickly.
Putting a V roof with a little over hang on each side of the pipe makes sure the space between the nozzles do not fill in with charcoal. You would also want a V shape above the flute to let the charcoal funnel down and land right on top of the flute then go on down to be burn up. The narrow opening blocks the heat from rising up and getting into the hopper making it to hot. That was a big problem on my unit. All heat needs to be directed to the reduction zone.
Bobsee
2 Likes
Hey CarlOr,
What you are describing is the oxi-acedalyne torch head effect. Works. The outflows velocity keeping the hot, out, and away. The flows made drawing past the head tip air cooling flows.
Now stuff that brass/bronze/copper assembly up in a tight space . . . .goes overheat south really, really quickly.
Single outlet nozzles are stuffed in. Why in the realistic past they had the special name of tyweers (sp). Meant used in materials melting operating environments.
Now the “flute” air nozzle system is just like all of the modern below smoke shelf secondary SS air tubes in modern certified wood stoves. The many small in line row of holes spreading out across a distance the oxidization heats made, split up across a wider area. Less localized stresses.
And the very best of stoves like my QuadraFire that heavy thick smoke shelf works just like a Pederick system fire plate.
Pederick plate BobMac and Kristijan; hint, hint, hint. For compact making.
Regards
2 Likes
Wow, Steve I have been thinking about that. It is added weight but it is good weight. Just like the heavy heat shielding in the WK gasifer. How about a heavy square tubing with a thick plate of steel welded to it for mass and nozzle holes drilled into the plate?
Bob
You mean a whole hopper top of fuel push down weight, right?
Tried that. Sucks. The guides to keep the weight straight then glues even worse. And then something hot dirty sticky to have to set aside to re-fuel.
Top across fuel stack weight then forces tarry upper system gases up around the weight cooler weight edges . . . yep . . . more tar sticking.
Nope.
Rods Bob.
Thru the top, retractable rods.
like a double seating pressure tanks valve. Fully opened (rod-up) it welded washer seals.
Valve fully closed down (rod fully dropped down) it welded washer seals.
S.U.
1 Like
I was talking about the Psderrick fire plate in a small gasifer. Using the square tube behind the plate for the air supply through the plate.
Bob
2 Likes
Carl - I have a downward facing air nozzle in mind as well. The crossway tube will creat a small void of charcoal beneath it so at least the white hot fuel isn’t touching the nozzle directly.
I have a few brainstorms I wanted to offer up and this is one of them… put a wider, pitched “roof” above the air tube creating a good sized void below the air nozzles. That extra distance should protect the nozzles even more. The roof will also protect the air tube from any weight or mechanical force coming from above like from filling or stirring or some bridged fuel coming loose.
I was thinking the air tube would be so protected by said roof that you could make the it out of a cast ceramic or other refractory material. That type of material would hold up really well to heat but would be too brittle without some kind of mechanical support. A “roof” would take the weight of the charcoal charge above resting above.
Lastly that crossways air tube could have a second tube inside the outer one (“co-axial”). The inner tube would have its own set of air holes. By moving that inner tube in and out or by rotation, a varying set of air holes would line up or be obstructed. In that way one could hit different parts of the char bed in a cycle or change the amount of air restriction / gas speed. You might even be able to safely pulse the air blast to expose fresh char as air is alternately choked off then allowed to surge out.
The extra complexity may not be wanted or needed for this purpose but I thought I would share in case it solves someone else’s problem.
2 Likes
I feel like this might not be a useful contribution, but I cant help but litigate this comparison a little bit -
First off, an oxy torch is north of 3000 degrees C, and if you are not making clinker, your gasifier is probably not exceeding half that temperature. Also, the problem that the nozzle on the torch experiences is “torch pop” which is because you are feeding a flammable mixture through the tip. Again, this is just my speculation, and when I get time for another build I will maybe give it a go to see if that ash layer really is the secret ![]() Also, I will say that I have only ever tried powering small engines; what works on 200cc might not fly when you step up to 2.5 liters.
Also, I will say that I have only ever tried powering small engines; what works on 200cc might not fly when you step up to 2.5 liters.
A lot of people have experimented with ceramic materials, and the consensus seems to be that they all eventually fail by cracking. Ceramics tolerate high heat, but they have to be heated evenly, as they tend to be brittle. That being said, there are some materials that will hold up, like tungsten carbide for example (is a carbide a ceramic?). The beauty of the flue nozzle that Kristijan developed is that is can be made out of scrounged junk. Steve Bowman made one out of schedule 80 pipe that was working well (as an updraft). You should check out both the threads on charcoal nozzles.
Anyway, I am looking forward to seeing what comes out of this project. Its fun to see how much collective progress has been made when you go back and read some of the earliest posts on the topic.
2 Likes