First Gasifier - Take Two

With my original plans shot down in flames, I’ve had to regroup and head in a new direction. I’ve been looking at all the information I can about Imbert based gasifiers for this time around. Along with changing from FEMA to Imbert, I think I’m also going to start looking for a new engine.

I had thought my original engine plan would be adequate, but the more I read the more I find that is less than desired. My Wisconsin-Robin is designed to give a maximum output of 16HP at 1800RPM. I never really gave it much thought before but part of the engine is a 2:1 gear reduction housing, so the engine is actually spinning 3600RPM internally. I know that some people have successfully run small engines on woodgas at 3600RPM, but my understanding is that with the long burn cycle of woodgas, a slower moving cycle of the pistons is more desireable. The Wisconsin-Robin also runs a 6:1 compression ratio. I read that higher compression engines are more desireable - I haven’t actually found the reason in print yet, but I’m thinking that drastically increased timing coupled with low compression makes for very low power? If I’m wrong, could someone help me understand the issue with low compression ratio? Anyways, it looks like the Wisconsin-Robin will probably be tethered to gasoline for the time being. Since my original goal was a 5000-8000 watt generator, I’m going to start looking for a slightly larger engine to run on woodgas - probably something around the 30HP range. It’s hard to say whether it will take me longer to build the gasifier or find the engine I want, but I doubt either will happen overnight. To me, owning a working gasifier is no more important than having the ability to design and fabricate it, so time isn’t critical.

Even before I started looking at Imbert gasifier designs I came across the All Power Labs site and their GEK design with the free plans. I’m sure this is a great setup, and may well be on my list of things to do in the future, but at the current time I think it’s a little too much of an undertaking since I’m doing this one all from scratch. There is a lot of custom fab work and special hardware to it, and for my first build I am trying to go a little simpler and cheaper. This isn’t to say that I can’t take a few lessons from the GEK: The first thing I noticed were the stainless steel tubes wrapped around the reactor tube. After learning that these were to help preheat the incoming air, but would be a rather costly addition to my first attempt I thought about how I could do something to preheat the air a little, and decided that if I couldn’t easily implement the wrap-around tubes, I could still run them vertically inside the gas jacket to at least absorb some heat.

It wasn’t too long after I sketched up my first design with the air preheat tubes that I came across the drawings of Richard “Pepe” Lemieux. His sketches were pretty much identical to what I had started planning. The fact that he has taken a build-it-yourself approach to everything including gasket making mirrors my philosophy on many things. Many thanks, Richard. This has given me something to look toward when I don’t know what to do, but even though I can see the answer I sometimes still have questions about how to get to the answer. I’ve got a tentative sketch in progress, but there are a few spots where I am unsure.

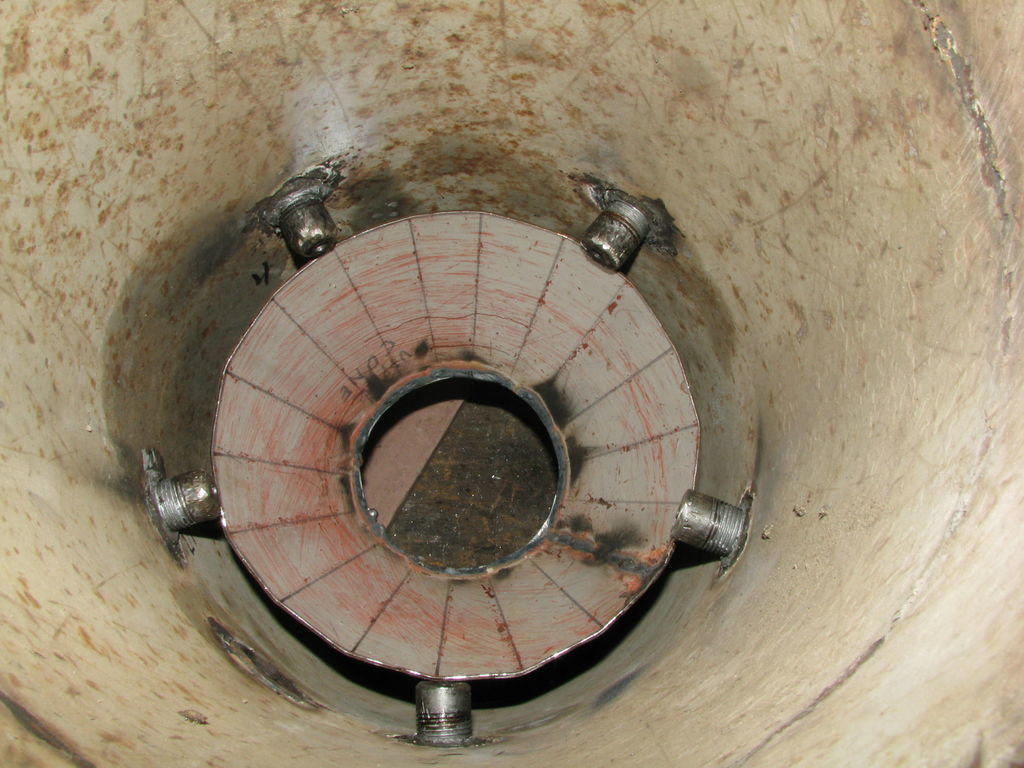
I am tentatively basing my design on the table 5.2 Imbert dimensions, with a hearth opening of 4" and a reactor diameter of 10.5", and I have the following questions, most of which are from table 5.2 in the Handbook of Biomass Downdraft Gasifier Engine Systems.

  1. Table 5.2 shows a simple inverted V hearth. I assume that if you use this, you need to close off the area around the hearth opening to direct the fuel toward the hearth opening? I also make the assumption that this is why people use the hourglass shaped hearth? If so, are there any special dimensions, angles, and clearances required for this?

  2. Table 5.2 shows the bottom of the inverted V flush with the walls of the reactor. Is this critical? I’ve seen another sketch on the GEK site that says the diameter of the bottom of the cone should be 2x the top diameter, or 8" in my case. Is anything in this range acceptable?

  3. Table 5.2 shows dimension “H” as 10.125" from the bottom of the hearth to some point slightly above the nozzles. What is this dimension for, and where does it go to?

  4. Dimension “R” is from the bottom of the hearth to what? Is that the dimension to the grate, or the bottom of the container? if not to the grate, what is a good dimension from the bottom of the hearth to the grate?

  5. This is somewhat related to question 3. Is there a minimum and maximum dimension from the center of the air nozzles to the top of the reactor? I assume there is not any hard number for this, as it is just the fuel storage hopper, or am I not understanding something?

This is all I can think of at the moment, and I’m sure I am probably overthinking some of this, but it’s always easiest to do the measure twice cut once approach, especially with metal.

I have built a GEK with all the TOTTI add on’s, as the stainless steel gas lines used are not available here in Australia I made an additional steel cylinder for the fresh air heating. If you can get the parts cut by computer it is really easy to build and in my opinion would be much easier than building something from bits and pieces. Also it is proven design which gives you a much better starting point than you may otherwise end up with.

Just a few hours ago I saw on Ebay someone over there in USA is selling some Lister Gas engines (that is they run gas which is a gas not liquid). They would be perfect for running your generator http://www.ebay.com/itm/Lister-HR2-G-Industrial-Natural-Gas-Engine-Cores-/180448183293?pt=LH_DefaultDomain_0&hash=item2a038cc3fd

Hi MarkB
I’m going to put up a directed link to your first proposal and the exchanges there for anyone reading this to get your background story:

To recap from there; your members page; and even a few things you’ve now put up on others topic threads about your requirements:

You are AMERICAN. For when you slip and say gas and minus something degrees readers can figure you mean gasoline/petrol and you meaning -10 degrees Fahrenheit. Ha! Also you live in the “Land of many engines”. Skys the limit for choosing as long as the US-EPA blesses or can be ignored.

You are a Maine’er. You already full home and shop heat with wood. Important because you know COLD. Come from a state with actual trees - lots and lots of trees. And you know well how to source and supply enough fuel wood to keep your spaces warmed in the cold.
No matter how efficient your systems are, you are now buring through the wood fuel. Yep. You know about woodashes, eh?
For just how much work to generate a home 5-8000 watts electrical you will have to wood sweat cut and supply, just be like adding another BIG woodheater to have to hungry fuel feed.

You want to use an existing PTO chipper to process for your gasifer fuel wood. Important this. This will greatly determine your gasifier design and build. The hopper type and configuration. Internal fuel particle feed dimentioning flow from the nozzles down through the restriction. Your grate type and grate activity.

The last major requirement is you want to build up from pre-proven/calculated knowns and not hobby experiment or Idealize.

This sound about right?

OK then. For my take on your current questions and the future questions first I will advise you to always measure reponces and your own efforts by, “Will this help me to make my wood fuel gnerated 5000 to 8,000 watts of electricity?”

For your 16 hp Wisconsin-Robin this was why you were advised only expect 4-5 Kw generated at best. With it’s low compression you’d derate 16 shaft horsepower to ~8 hp on woodgas fuel. Pulleys, belts use up 1/2 horsepower of that. Gen head at 60 to 80% conversion effinceny use up some more of your 8 at the engine. So then your actual kW electrical possible generated.
Your IC piston engine direct compression ratio answer is: as you can fuel tolorate raise this the engine itself will be more fuel heat/and pressure to shaft power conversion effiencent. Woodgas is like a premium grade gasoline fuel or a diesel fuel. Can take more compression squeezing initially and so produce more power the higher the compression ratio versus lower in the same engine sizing. Just like those, though at what costs then? Other fuels useage inflexiblty not able to tolorate this then higher compression ratio. No more regular unleaded gasoline running capabilty. Really high woodgasing maximized compression ratios then the whole engine for stationary get much bigger, heavier and bulky. A 17 to 1 compression ratio ListerCS engines at 950 hopping, jumping, walking around, POUNDS for just ~3kW/el of woodgas fueled generated power.
So smart to realize just go with a larger, more standard multi-cyclinder engine to begin with. Keep It Simple. Derate to want you want.
Big Kohler and Brigg and Stration V-twin air cooled are out there just a phone call away, new, used and take off surplus. Water cooled also in the Kohler or a Kawasaki V-twins. You’re American so parts are at worst overnight UPS easy then.
Go with a more “seems” to be optimal European, Japanese industrial or marine engines and you will really find the expensive, dificult to get parts.
Go with old industrial, marine and tractor and you will fine just how rare parts can be be to fine.
Have to become very friendly with rare engine owners clubs and the custom parts makers.
Go Chinee’ new clone engine - then best to figure from the get-go to just buy 2-3 complete engines to be your own parts source.
I know. Done these all to get to the first, sensible go Kohler V-twin easy answer.

Engine sizing derating, RPM speed derating, woodfuel gas loading, gasifier sizing and elecreical generating style you will find are unaviodably linked together and will push, pull and drive each other.
You can make your life very complicated, and “intersting”.
Or. Keep it easy to mange and simple.

Bulk wood fuel for your space heating should have taught you well that easy woodfueling is a variable output batch affair.
You want heat output consistancy then you go with commercial auger in fed wood pellets.
Armstrong fuel controlled works just fine in manual fed woodstoves and boilers.
Or electronics/electrical dependencies as in woodpellet stoves and furnaces.

Easiest way to fuel feed wood gasifer is to also just bulk fuel feed it in cycle batches. Even on wood chips.
Fully expect to have varing quanity, even quality of wood fuel gas.
No big deal. If you engine oversize. You will always have your minmum shaft power needs.
If you go with a DC electrical producing cycle as I, Matt Ryder and I think? David recommended you will not care if it is running at a loaded 2000 RPM or a loaded 2600 RPM or somewhere inbetween. These the best speed down loaded ranges on the aircooled V-twins I listed.

Going this way ALL of your seems to be critical points asked in 1 to 5 dimentioning just falls out also. Oversize a bit here too. Just as long as the gasifier system will average batch cycle you through the range you want for your system minimum fuel quantity needs.
Bluntly even a rigidly RPM controlled engine system the actual fuel gas needs will vary 3 to 1, even 10 to 1 from same RPM but electrically unloaded to fully loaded. So calulate and set up for minimum woodgas flow? Calculate for maximumn woodgas needs flow? Split the down middle and then not get either? Naw. Just moderatly oversize. You’ll be able to adjust down with fuel sizing, added and removed insulation and internal flow rates adjusting. So all of the fine dimentioning is idealizing and does not reflect actual real world operating needs and conditions.
No different than having a woodstove or a boiler that could only ever use one species of wood; always cut and split just “right” and dried down just “right”. What a PITA that’d be. Might as well just buy pellets.
You will want and need flexibilty.

Again!
Make your 5000-8000 watts of electrical.
This is the proof of it prize!

The inverted V reduction hearths self form 60 degree ash slope build up that the internal gas and hot char particles flows flows down.
This WAS how the orignal GEK I and II were designed. “Popular demand” (the customer is always right) drove to the hourglass hearth on the later versions.
For your oversizing, ash sloping will work just fine and last longer without direct HOT char and internal gases metals contact.
The earlier than GEK I’s re-designated then as 0.7, 0.8, 0.9? DID use vertical piping for air preheating. Worked.
GaryH shows that an enclosed air housing will work also.

You, anyone, wanting a set of five of the twisty SS GEK tubes with fittings message me here and I’ll send you mine for free for just the shipping/mailing costs. Serious about this. I’m trying to clean up and narrow down now.
These will air preheat just fine. These will also externally soot build up just fine also. With the original tight internal gas housings space didmentions this can easily lead to blocked lower to upper produced gas flows. Become the perfect operator. Use always perfect fuel so this never happens. Go with the later full up GEK IV controllled system. Or . . simply increase the woodgas byapssing space on the original build dimentions. Then R&R to burn off and clean only when the air preheating becomes too tube soot insulated weak for performance.

Same offer to your GaryH.
Just have to figure out how to ship those “obviously nuclear producer making quipement” from home of the hydrogen bomb, nuclear Washington State down to Nuke-free sensitive AUZ.

MarkB being a NE states Mainer’er really close to Connecticut? StephanA you should be looking really, really seriously at his system.
He does now offer CNC cut kit for his hearth base core. Soup it up with ArvidA’s pre-heat housings and (confidential) grating.
Just about the simplest proven chip fuel system out there. And expreineced based on your regional fuel woods types.

Regards
Steve Unruh

Thanks for the offer Steve but I am happy with the preheat as I have built it. I pulled apart my gasifier yesterday and there is a very fine layer of soot on the preheat after over 200 hours run time. The only downside I have come across with my design is if the engine is stopped and started the preheat chamber can give a small but very sharp explosion. This due to tar gas being pushed through the nozzles into the preheat chamber. I did drop a thermocouple down into it once and I was getting over 400 degrees C in the preheat chamber. There is 12 mm clearance all round for the gas to travel up from the char bed to the cyclone. From my calculation the surface area of mine is about the same as the tubes.

So need to worry about Nuclear and non nuclear countries.

Hi Mark,
Sorry it took me so long to get to this. You are not over thinking this. I had much the same questions when I first looked at the puzzle. Let me give a few answers as I understand the chart. Also check Pic 1 of my design for dimensions/locations. Question 1, PIC 2, 3, 4. No, you don’t “have to” close off the sides, they will eventually be filled with ash. I used the hour glass hearth to direct fuel because it made sense. I back filled that space with sand to insulate it. You could just let it fill with ash as you burn also. Clearances, etc. Start with the REFerence line 1" above the center line of the nozzles. The important dimension here is small h 4", the distance from the center line of the nozzles to the 4" restriction. Next dimension H starts at the REFerence line and goes down 10 1/8" which will be the bottom of your firetube and also the bottom of the inverted V or in my case the bottom of my hourglass hearth. The top of my hour glass is 3 1/2" above the restriction and comes up just slightly under the nozzles. It has a 9" dia. There is about a half inch space between the top of the hour glass and the firetube wall. Question 2. Bring the cone down as shown. This will form your glowing bed of char through which the oxidation products CO2 and H2O will be drawn and reduced to CO and H2, your woodgas constituents. This char bed rests on top of the grate which is 4" below the bottom of the inverted V or my hourglass. This is not the bottom of the shell, there is a cleanout space of your choice of depth. Mine is about another 8" deep. Can be more but I wouldn’t make it too big. Yes, the 2x would be 8" but you would have to close the space up to the firetube wall with a flat flange to direct the gas flow through the restriction only…Gas that can by pass the restriction is called an internal leak. You must avoid these to get high temps and quality gas. I brought my hourglass out to the firetube wall ( 9 3/4" dia) added a flange and bolted it(added a rope gasket also) to the bottom of my firetube. Works well in operation. This also allowed me to move to line D hearth dimensions just by making another hour glass. I have since gone to the bigger hour glass for a higher HP rating.
Question 3. Starting at the REFerence line and measuring down 10 1/8" brings you to the bottom of the inverted V or hourglass… I put 2" sides on my grate to contain the char bed. I left 1" between the grate sides and the sides of the shell. Question 4. Yes, this 4" is the distance to the grate from the bottom of the inverted V or hourglass. Question 5. I think that at or a little above the REFerence line the hopper can start at a larger diameter. My firetube extends 4" above the nozzles to incorporate the single port air inlet manifold. By the way I operated this without the SPAI manifold at first but added it so I could easily preheat the incoming air, a big plus for better temps and gas quality. Start where you feel comfortable but I’ve backed up to do these refinements and it takes a lot of time to do it later. PIC 5, 6. Then my 15" dia hopper is above that. My hopper is 33" tall. Too tall is counterproductive. There some discussion about the ideal height. I hope this helps.
Pepe

EDIT 3/23/14 These air inlet tubes do offer some preheat, I also put an air inlet shroud around my cyclone to pick up some preheat there. It’s a bit of work but it works well. The GEK go further down then “J” up through the bottom, I felt at the time this was a bit more than I wanted to tackle. A good while back, Steve Unruh offered me the same SS j tubes. I wanted to be able to swap out hearths and the J tubes weren’t right for that.
I found this vid that shows a GEK type hearth with just plumbing parts. Shows good detail of how it goes together. Remember air tight as you watch and see what not to do. There is a real serious omission of a pressure relief lid for backfires. Also smoke in your flare could indicate an internal leak. I don’t mean to put anybody down, this is a good learning opportunity and the burner unit is well done. That J design certainly will provide some great preheat for the incoming air. I came in through the side walls, not so much preheat. So it became another project for me to add a preheat shroud on my cyclone. hmmmm? Another thing is that the cyclone looks like a cylinder. Actually there is a cone inside that cylinder.


1 Like

Good explanations Pepe…Dan

1 Like