On my next restriction model l will try to make eaven less char/metal contact, and go stainless. The fact that the restriction plate with about half a inch thickness of iron got so hot it got deformed tells mee this is a huge heatsink (expecialy at startups). I might eaven consider a non metalic restriction, l had some great resaults with superhot enviroments and white foamy insulation bricks. We will see.
If it had a little lip or ring on top to fill up with ash it would protect it more. This how Wayne cut the rotor out on mine. It left a ridge for ash to collect on, and help form a ash cone inside the fire tube. Lots of little things that add up in a gasifier design to help protect it from the high heat.
Bob
I can’t take credit for my reduction tube setup. That was Arvid’s and Max’s idea. But I’ve given it some thought and I think the way my restriction sits on top of the tube takes advantage of the heat in the restriction area. Heat conducts down the tube into the reduction area where it’s needed the most and help keep things going during short low loads - WK’s flywheel effect in miniature.
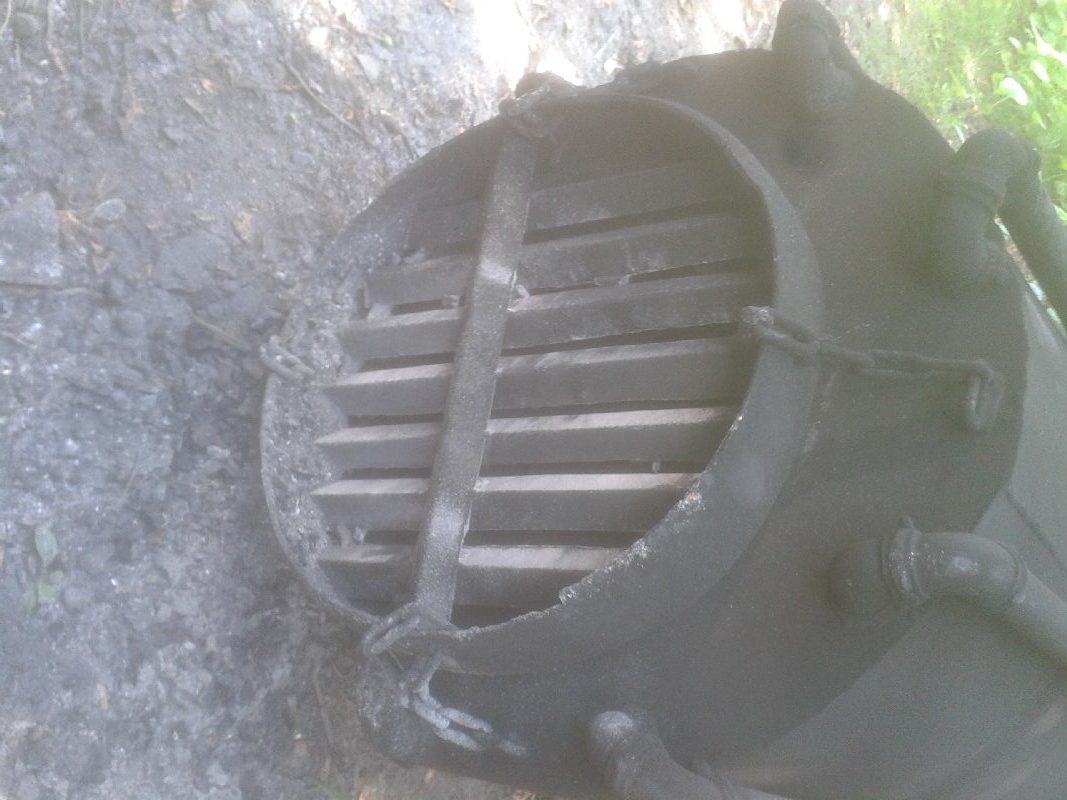
I don’t know if the outer edge of your grate is tight against the firetube. If it is, a reduction tube could actually sit on the grate and the void towards the firetube filled with ash all the way up into the oxidation ash cone.
Hmm interasting thinking. Just the opposite of myne.
You are saying have more metal char contact so the metal heats the char in low loads?
The grate is tight. In a way l do use that effect. When l lift the restriction l see the center (reduction char) and only ash on the rim all to the top of the restriction.
Yes. A little bit, for a little while. That’s the flywheel effect. Works the same as preheat. Both good for ideling when already up to temp.
The other route is saving heat. Insulation and no metal contact. Good for fast startups but less accumulated heat to use at redlights.
What way to go depends on what you’re looking for. Most of the time you really don’t need any of them. That’s the route they went during WW2. Less complexity, but will still take you from A to B.
Kristijan, if you added preheated air off your exhaust system, then you could have both. With extra warm preheated air going into your gasifier intake it would help at idling. I notice this if I start my truck up and warm the engine/exhaust system first, to just starting the gasifier up on the suction vacuum. And then start up the truck, idling is better once the truck exhaust heat exchanger inside warms up the incoming air. After the whole gasifier system is up to operating temperature at the grate around 1100*f and hotter, the flywheel effect kicks in. I think at that point I could just run ambient air into the gasifier by, bypassing the exhaust preheater and it would not matter. Colder air would give me better performance in certain conditions. Lots of different ways to do this wood gasification and make the vehicle go down the road with a SWEM.
Bob
The differencies are not so dramatic, if you keep the “blow through” area on the grate near matching the restriction area and the reduction volume less than the oxidation volume.
Using one dimension of tube from the nozzle-roots down to the ash-pan.
This type of flow will be rather swift whole the way trough.
It usually blows it free of ash after a while on idle when giving full throttle.
In GMR Imberts the grate area is as wide as the outer shell. It has very slow gas streaming through it; part of the gas never goes through it at all.
In this case shaking or sieving has its clear place. Without it, burn through from the restriction downwards or sideways is common. Too much shaking causes side-blowing as well…
just going to poke this back up top, and see if anyone who played with some of these designs has any more to report on how well it worked, or things they changed to make it better
When using the angle iron design, it is important to remember to. weld the angle iron on only one end. Expansion will cause things to buckle and warp. TomC