New gasifier project giving me troubles

Hi everyone, I have toyed with the idea of building a gasifier for several years now after seeing one for the first time on an episode of “Mountain Men” several years ago but finally decided to do it with the high cost of gas.

The primary reason I wanted to build a gasifier was to run a couple generators if my power ever goes out since I live rural and when it goes out it has been known to stay out for a few days. However when considering size and horsepower requirements, I decided I wanted to go bigger in case I ever wanted to power a vehicle with it. I figured a bigger gasifier should be able to meet the power needs of a smaller engine, but a smaller gasifier could not meet the needs of a larger engine if needed.

Plus, I had a lot of big “junk” lying around to use (55 gallon drums and larger metal canisters to start out with. I watched a ton of Youtube videos which made it look so very basic and I did a lot of research and reading online, but there were so many variations and options. I wanted to stay basic so I was aiming for a simple downdraft gasifier.

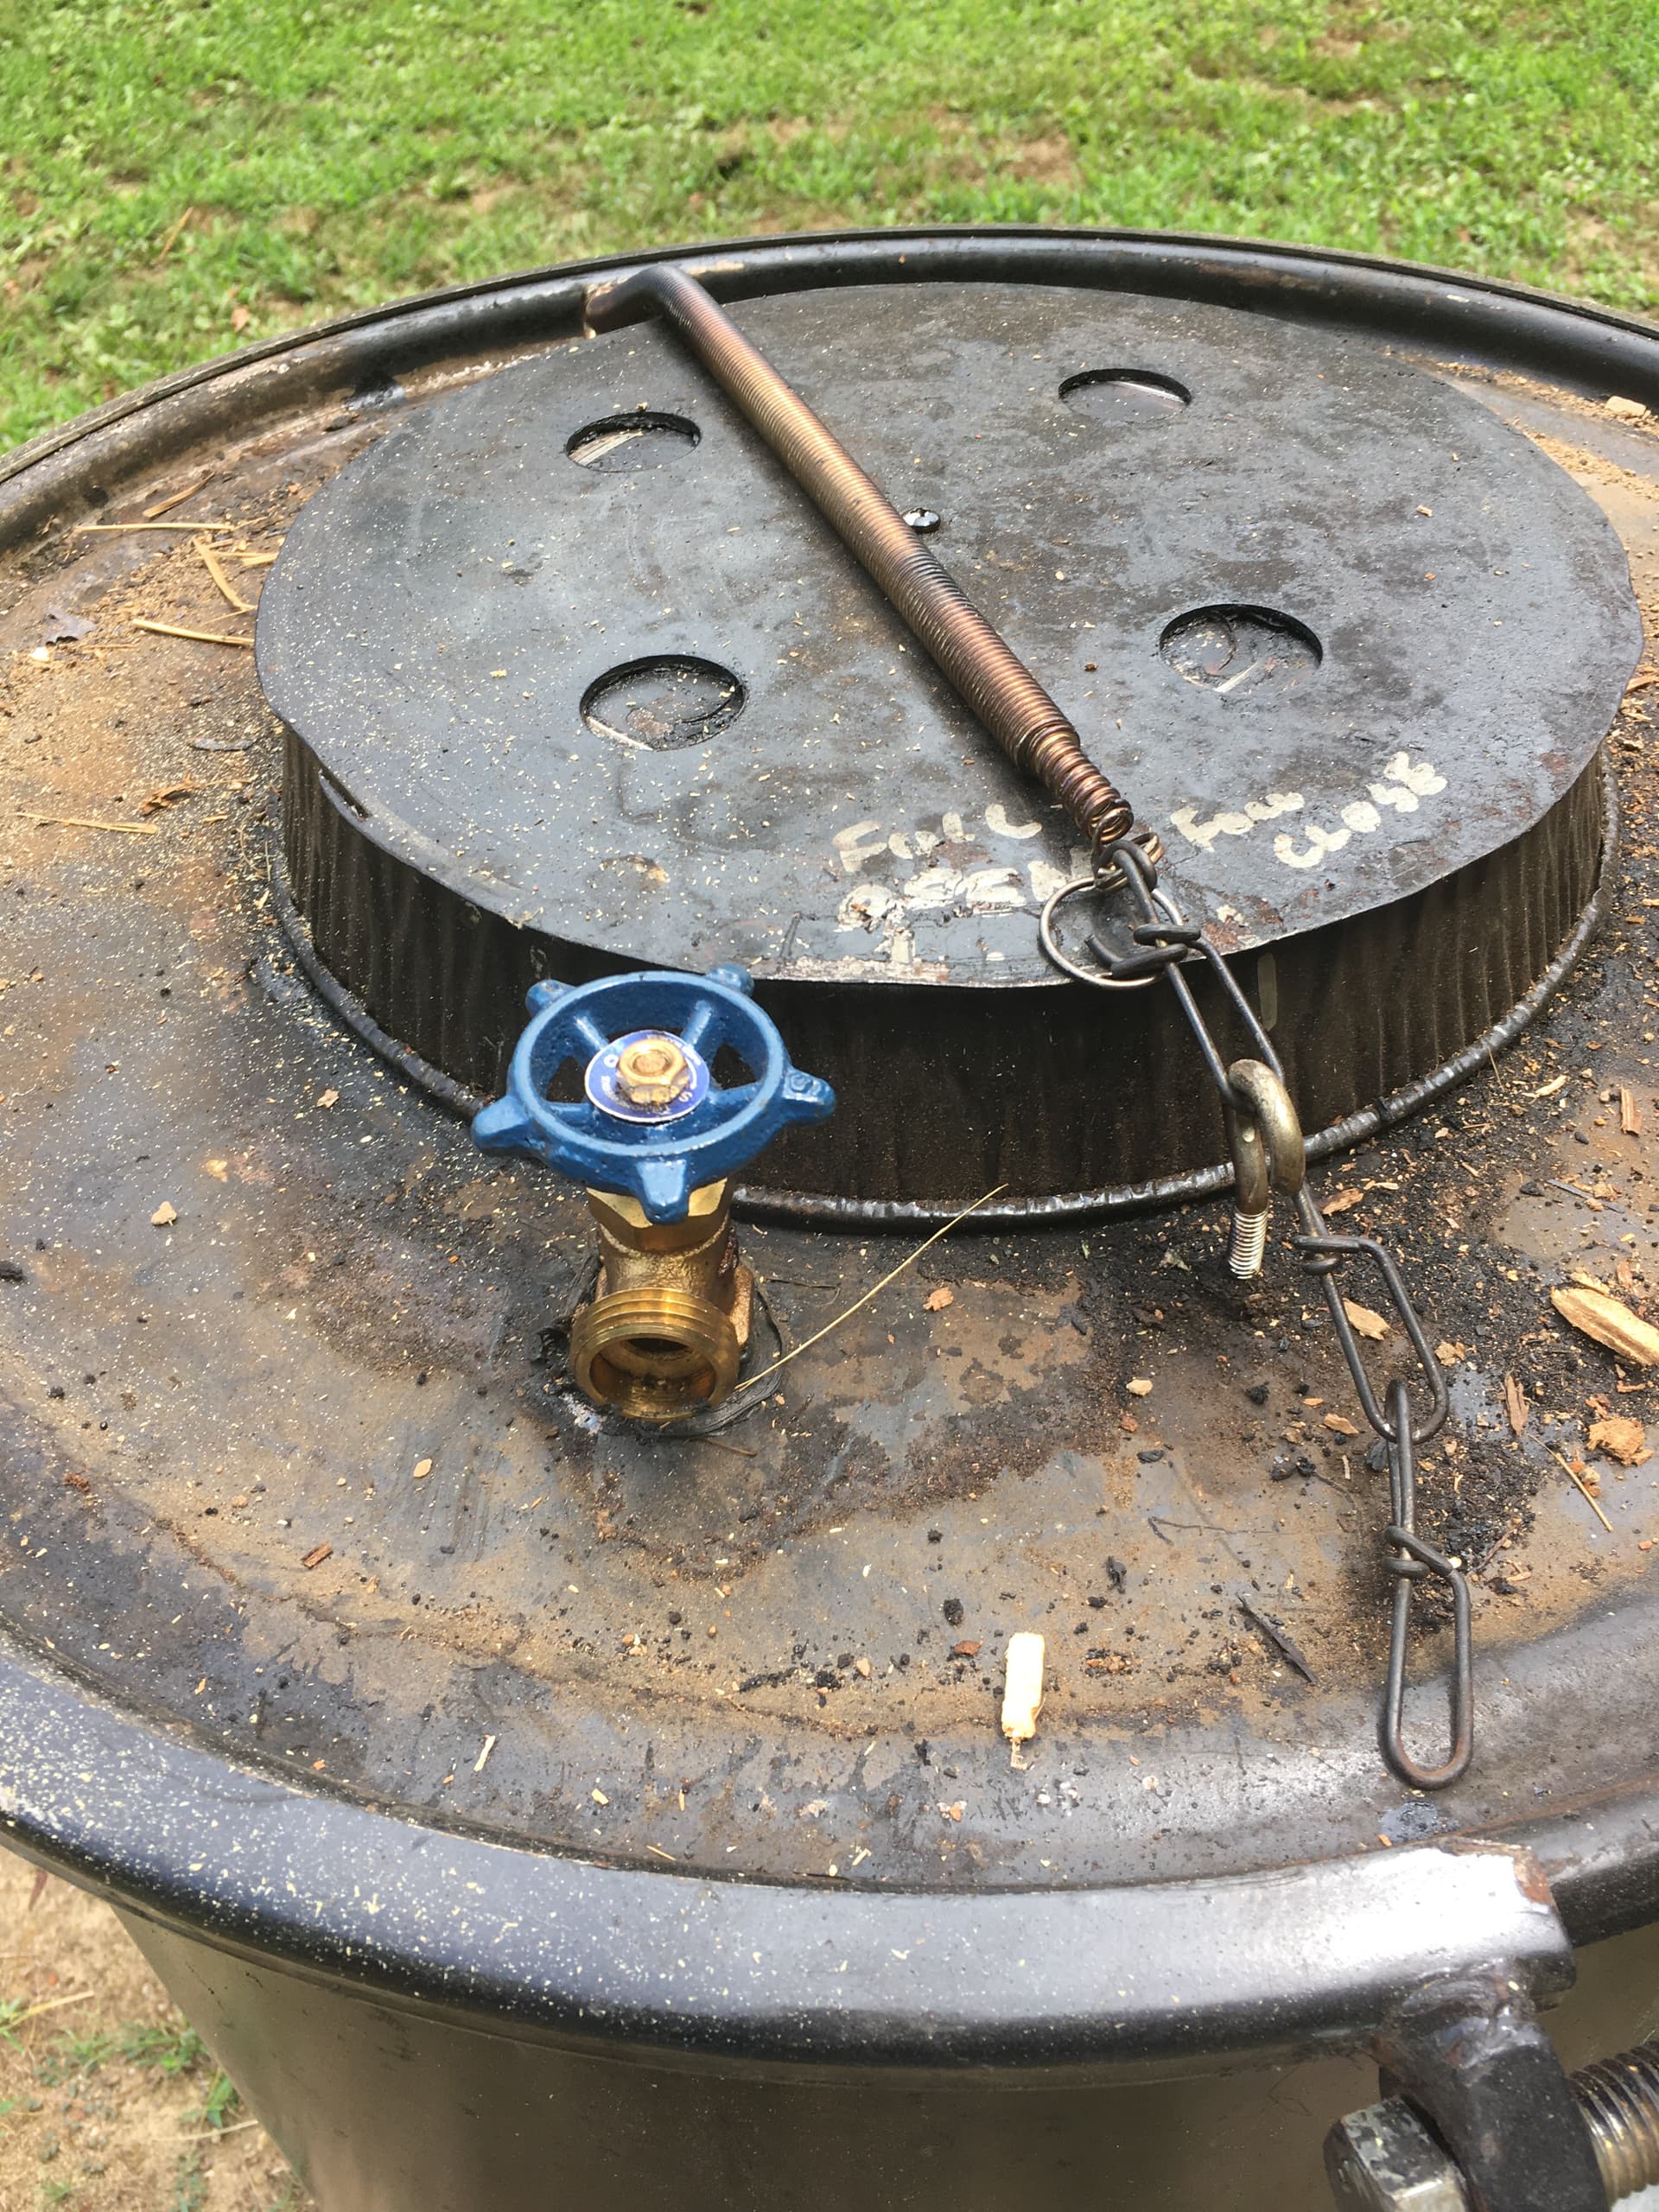
I started out with a 55 gallon drum and an old craftsman air compressor tank which became the fuel hopper and beginning stage of the fire tube. The tank is about a 12’ diameter. I reduced it to a 10” diameter by 4” drop, which is where I put my ignition port and eventually a couple of air nozzles thinking this would help my situation (it didn’t) I also added another reduction zone going down to 6” diameter by 2” drop. Shaker grate about 1/2” below that.

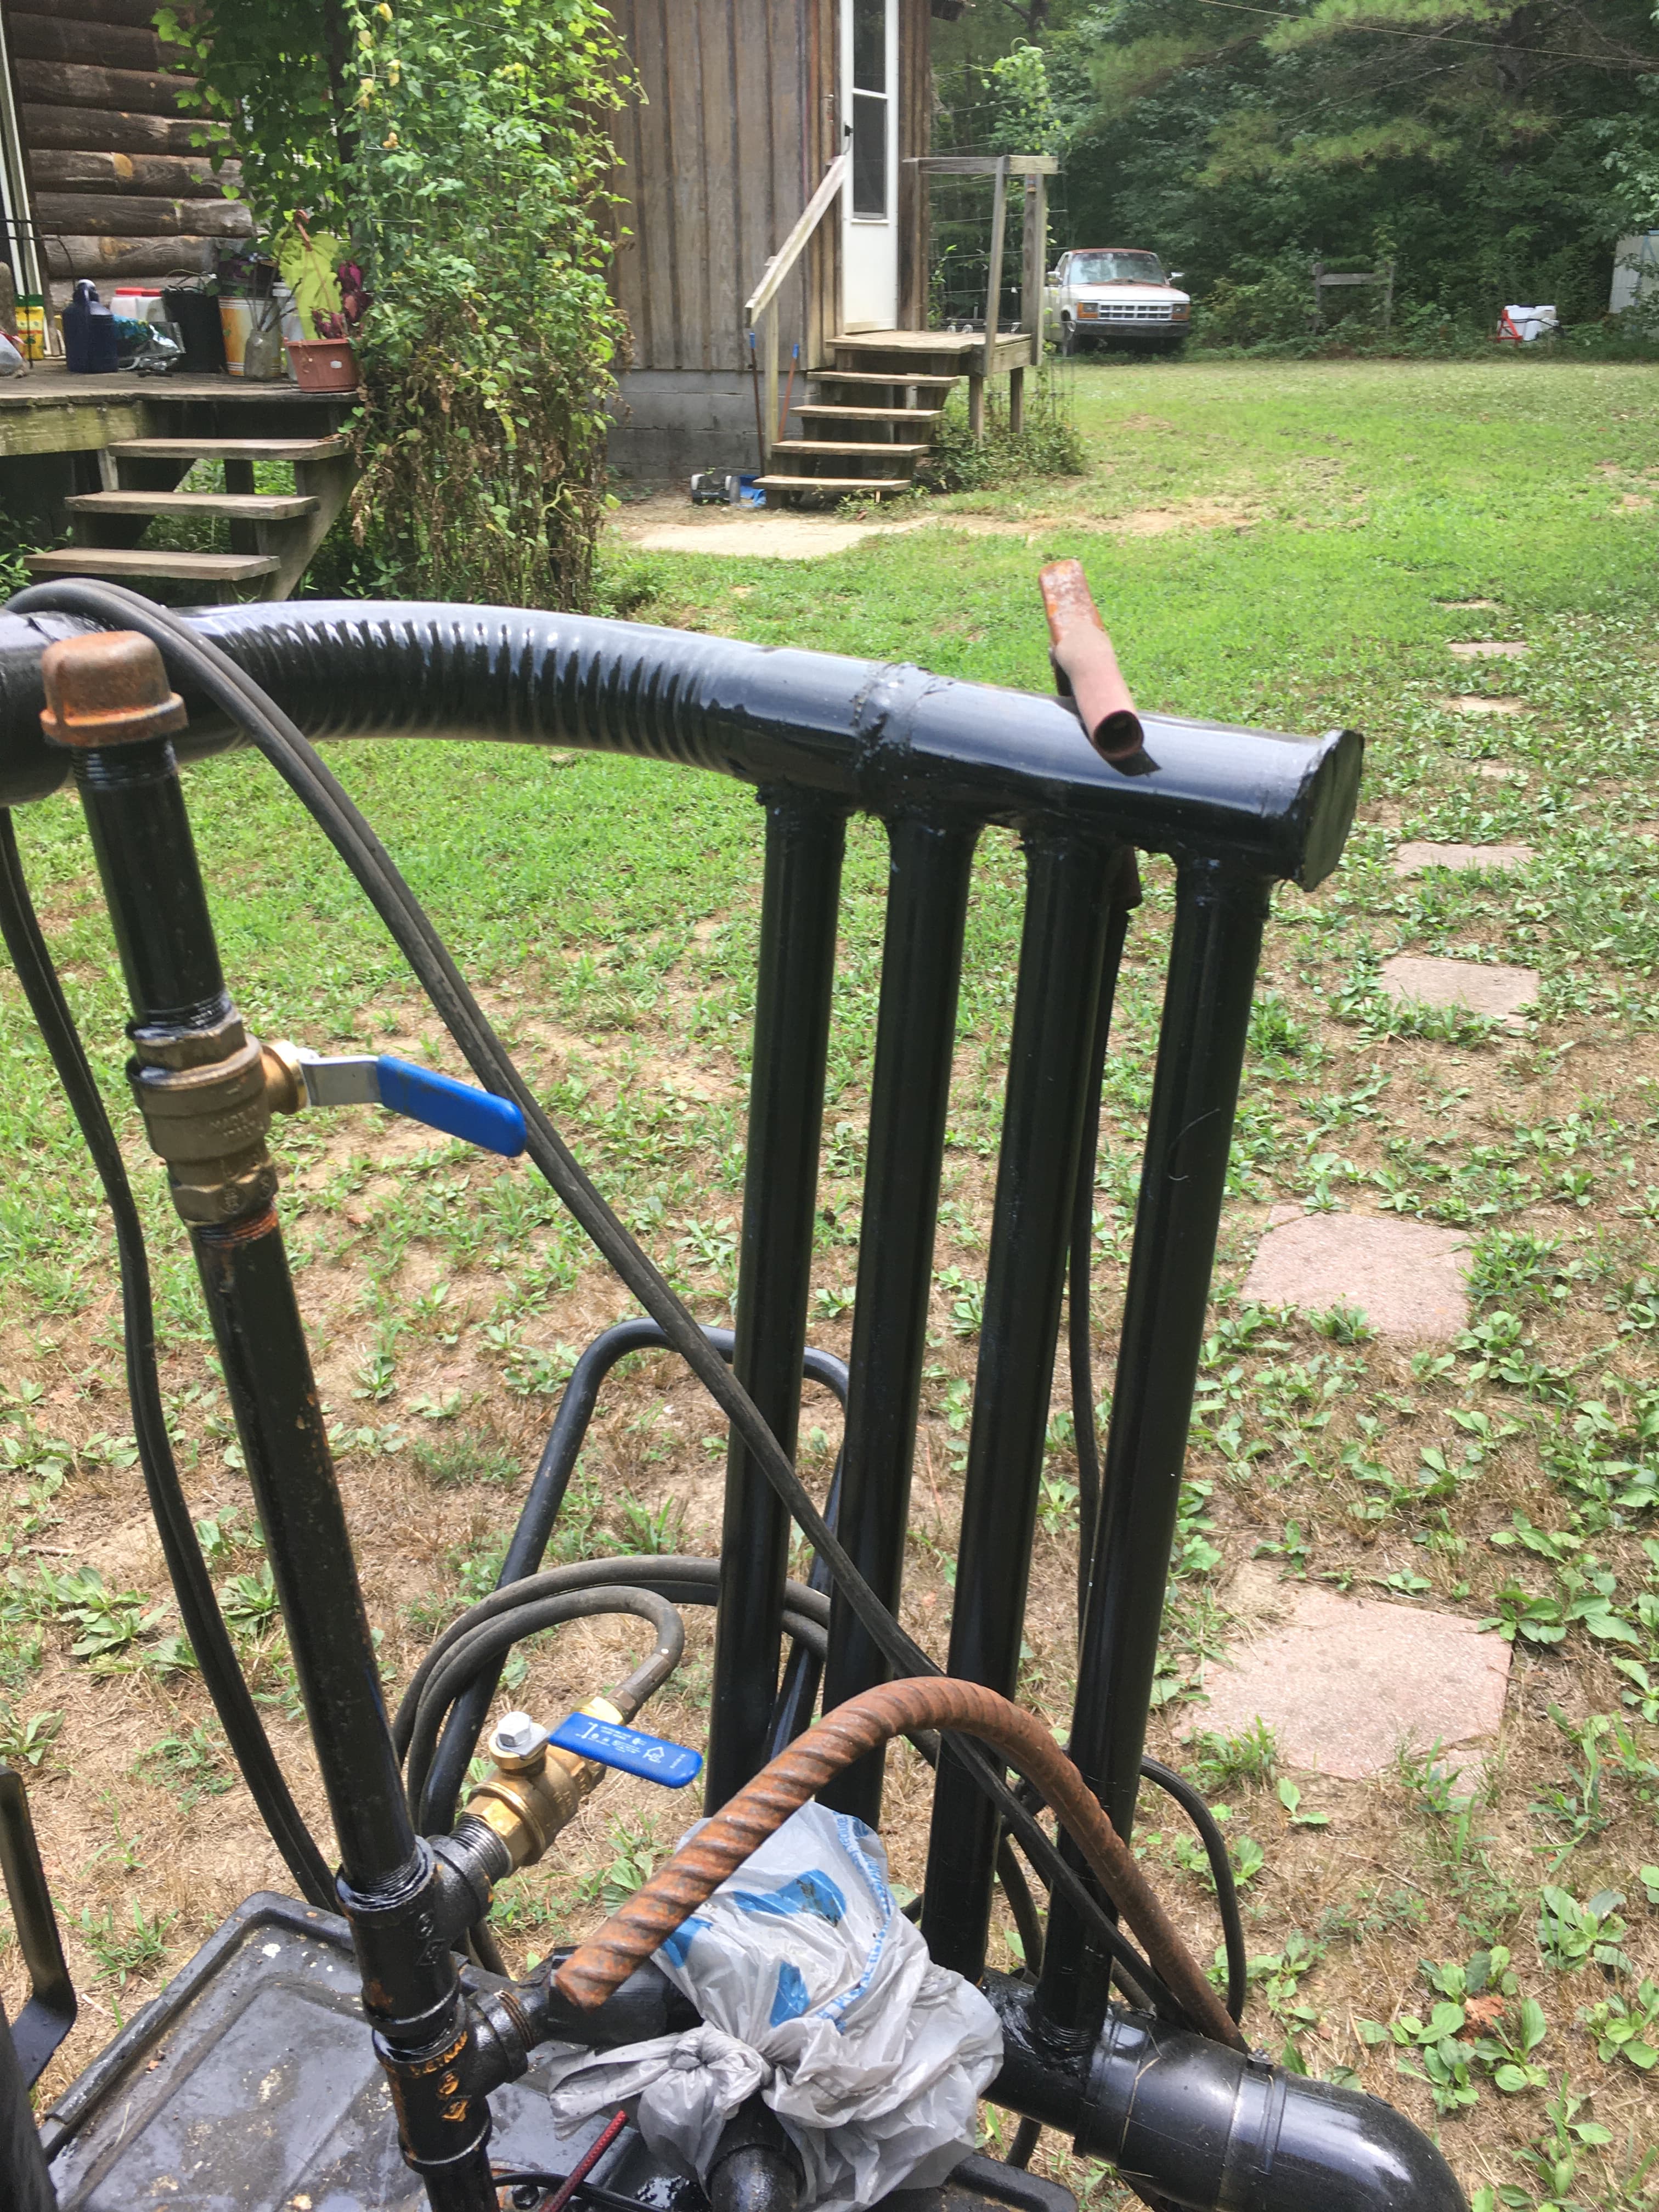
Leaving the reactor I have 2 1/4” pipe welded to the 55 gallon drum going into a cyclone filter, then passing into a radiator, finally going from the radiator into a filter medium box inlet of 2” and then output to 3/4’ pipe 12 volt air mattress pump is plumbed inline in the 3/4” pipe to create the suction to draw through the system.

Airflow/suction seems great, and everything is airtight - I’m not the best welder, but anywhere I had doubts I coated with high temp stove cement,
I started with lump charcoal and my fuel has been wood chips and chunks, these are admittedly irregular sizes because I have a lot of it from my wood splitting for house firewood and this was another big attraction to me is that I ave plenty of wood scraps to use.

No matter what I try all I produce is a bunch of smoke that will not ignite at all past the blower. I am getting something because occasionally the hopper will “burp” with a little backfire, but nothing I can ignite that is useable,

Any tips from anyone or something I can check into ?
I am thinking that it could be one of 3 things

  1. FUEL - I see a lot of people using wood pellets, but if I have to go out and buy wood pellets I might as well keep buying gas, I was under the impression I could throw any kind of dry wood or biomass in the hopper and like I said I have plenty of it, although it is not all a uniform size - so I hope its not my fuel.
  2. BLOWER FAN - maybe I need something bigger? Or maybe it is blowing too powerfully and making too great a draw? I couldn’t find a lot of direction on this subject so I not sure. -or- finally…
  3. MY REDUCTION ZONE
    I feel pretty confident in my cyclone filter, radiator and medium filter, but the reactor is a different story. Like I mentioned there are so many different variations I wonder if my problem lies within the reactor and or the reduction zone - I’m just struggling to figure out what the “secret sauce” is.

This seemed like such a basic project, but after 3 or 4 attempts I’m not getting anything usable - also as a side note - how long should it typically take for a warm up, start up before you convert from smoke to useable syngas - I know there is a warm up period necessary, but I have gone 1/2 hour without anything useable and I’m thinking that by 30 minutes I should have gone from smoke to syngas.

I appreciate anyone who looks this over and can offer me some tips and get me pointed in the right direction again.

Welcome to the forum Derrick.
What do you mean when you say lump charcoal? Not barbeque briquets I hope. A good char bed is necessary in order to make gas- not too tight and not too loose. 3/4" and down to 3/8" should be about right.

4 Likes

What don said, I believe the worst gasifier in the world would make clean gas in mere minutes if the proper charcoal is used for the first light up. As Gary Gilmore has said and many others here, 1/8’-3/4’ char is the go to size. As long as your air tight this should produce char gas very quickly, and if some form of condensing hopper is used will run wood just fine. Though each gasifier has its own preferences, I would make a guess that you need to start with a good char bed like I just described filled from grate to nozzles, and see if it makes clean gas. If so start adding wood. I have only done one truck but I think it would be harder to find what a small gasifier wants for fuel to run well on a small engine. Could you post some pics of the fuel you are using and your build?
And welcome to the forum!

6 Likes

Can you take some pictures of the gasifier?

5 Likes

Hello Derrick and welcome to the DOW ( drive on wood )

If you are producing smoke where you are trying to flare something is not right .

If all is right you should have usable gas in about 5 min after light up.

Below is a video from a couple days back from my V-10 Ram work truck .

4 Likes

Thanks all for the warm welcome and the replies and suggestions.
No BBQ briquettes, although admittedly that was my first mistake the first time, a few BBQ briquettes and a lot of wood and one big tarry mess.

Then I started doing some research and learned not to use those so I tried with lump charcoal as a starter, all natural wood - but they were big chunks - so it sounds like if I want a good starter I need to take this and pulverize it down to small pieces 3/4” to 3/8” for a good starter. It also sounds like if I do this right the charcoal alone will start making syngas within a few minutes and then I can add wood? This is good to know because one of the more frustrating things about all my failed tests is loading the hopper up and having to wait for it all to burn dow and cool off before I can try something new.

It will probably be the weekend now before I can get some pics and run my next test, due to my work schedule, but I will get some pics up for you as soon as I can and let you know how my next test goes. The way I built this was to have the reactor easily removable in case I needed to change or service anything, I built it with one quick link attaching to the shaker rod and a removable ignition port, both easily accessible from my ash clean out door, so this weekend, I will pull it apart so you all can actually see what I did for a reactor in case anyone has any suggestions - or just if you’re curious and want to see. Even if my problem just turns out to be charcoal that is too big to start with (hopefully) its the least I can do to show you the whole enchilada since y’all are being so helpful. And Wayne, thanks for the video, I have watched a lot of your stuff on Youtube and truly appreciate you and everyone else who posts for others to learn. This technology is a hidden gem, I am surprised it is not more widely known and I sure hope I can get it working fo me.

7 Likes

Derrick did you build this gasifier in the FEMA style?

2 Likes

Derrick,
Welcome to DOW. These guys give good advice and are eager to help as you are seeing. They will steer you in the right direction.

5 Likes

Yes, it was originally based on the FEMA style downdraft - although I will say, I downloaded the FEMA pdf and the pictures and drawings were dreadful - just a basic rudimentary idea, but left a lot to be desired.
I did not have a good set of plans to go by so I started out with the principles of the FEMA downdraft but I have a much smaller reduction zone than FEMA calls for. This was for two reasons. First I wasn’t even sure how necessary it was basically because there is some guy on Youtube who makes a gasifier out of two propane tanks with barely any reduction zone, so I did not feel likeI had to stay strictly to the FEMA guidelines. However the second was lack of planning on my part. Since I had no measured plans that I was working on, I realized that after I welded the reactor up and located it in the drum, that I did not have much more room to add any more length to my reduction zone if I wanted to since the shaker grate was already getting might low to the bottom of the barrel and I needed a few inches left for ash clean out. You will be able to see much better in a day or two when I can get some good pictures and post them. I’ll try to get some pics up before the weekend if my works schedule permits.

2 Likes

Looking forward to seeing what you have built Derrick. Unless you are building a Simple Fire you can expect to have some glitches before you get a reliable unit, especially if you are redesigning a FEMA. As long as you can scrounge some material and can weld those are just bumps in the road. Many give up after a few failures. You don’t seem to be one of those.

8 Likes

Have you thought about buying The book " have wood will travel " That has the best plans for tar free gasifier, with lots of good building design ideas, The design has run small 4 cylinder engines and V10 engines with a few changing in the choke areas for smaller engines. and or smaller heat exchangers on smaller vehicles.

5 Likes

Ok, hopefully this works, I took a bunch of pics today and after watching Wayne’s video have a couple more questions I thought of - here’s the pics, hopefully I do this right.


This is the unit overall

The reactor

Up top, the valve is an air intake to a couple of air inlet tubes that I can close off or adjust

Inside the hopper

Looking in the ash door to the reduction zone and shaker grate.

The cyclone filter

The radiator that I built

The medium filter box, blower fan and torch.
The medium box is an old large ammo can - I built a wire rack to keep the medium above the gas inlet at the bottom, then there is a light duty house air filter, some hay, some sawdust and lastly a piece of aluminum screen on top to keep any sawdust or particulates from getting sucked up the outlet pipe. Also the torch is disconnected because I keep a cap on that pipe when not in use in case it gets caught in the rain I don’t want the torch pipe turning into a rain gauge down to the shut off valve.

Now the questions I thought of - Wayne one thing I found interesting was that you reversed your fan to push he oxygen out of the hopper, I am not sure if I can do that with my fan - I will try reversing the polarity on the battery clips and see if the fan motor will reverse, but if I can’t reverse the motor would you suggest after I get a burn started, shutting the fan and opening the hopper and just letting the smoke build in there before closing the hopper and restarting the fan?

This leads me into another important question and one that I have not been able to find an easy answer for - so I know that gasification is achieved in a low oxygen environment, but obviously not a “no” oxygen environment, it needs some. The question is how much is too much and how little is too little?

I am starting to wonder if one of my problems is too much oxygen also. After my original build which only allowed for oxygen to pass through the hopper lid, as I understood the FEMA design, I thought maybe I needed more direct oxygen, so I piped in two black pipes down to air inlets in the hearth, connecting to the air inlet valve up top in sort of an Imbert hybridization. I reasoned I could close the valve if there was too much oxygen. However the thing that has me wondering if maybe my hopper lid needs to be a little more airtight is after my several failed attempts when I shut the pump and close the lid and close off the air valve, the char continues to burn for several hours and at least once even into the next day - so I kind of figured if it was oxygen starved it should go out and just leave a bed of cold char. But since it continues to burn and leaves far less char than I would expect, I am wondering if I misunderstood the FEMA design and need to make my hopper lid more airtight.

That leads me to your comment Kevin, I probably should have bought a book with some good plans but I’ll come right out and say it I’m so durn cheap! I figured if a set of plans called out for some material thatI had to buy rather than the junk I had laying around I probably wouldn’t build according to specs anyway and would try to use the junk I already had available. By the way, if anyone is wondering at this point I only have about $300 into this project, mostly on exhaust pipe and plumbing fittings. I am a tightwad and really wanted to do this to save a little money on generator gas and figured I’d be defeating my own goal if it cost too much to build. :grinning:

3 Likes

Think of it as initial investment to fuel savings.

But first and foremost that wood is way too big. Cut them down to golfball or Jenga block sized pieces. Maybe tennis ball at the biggest.

5 Likes

Ill tell you right now from one cheap ass to a tight wad, Wayne’s book was the BEST 50$ I have ever spent. Not just for the design, but the knowledge that is in that book, the experience, and on top of that a premium membership to this forum where folks the world over chime in with their knowledge and details. Well worth the price of admission. Secondly, cost me under 600$ in scrap steel to build my first truck, which including the book price paid for itself in less then a month of daily driving. You really cant beat that!. A thrifty guy with a large scrap pile can build for far less then that. i think im about 300$ into my v10 build right now, probably having it running on wood around 500 total

the reversing of the blowers is a saftey measure to prevent a bang or hopper fart from woodgas coming up into the hopper and mixing with oxygen which can spontaneously combust at the correct temperature. truth be told there are a lot of guys that dont do this and have been fine, i myself very raely ever get a hopper fart but it helps a lot when you completly fill the hopper with wood to prevent this, adding just a small amount of wood leaves a lot of oxygen that was not displaced further inviting the bang to happen.

Hard to say, with many designs it is almost completely dependent on what the motor is asking for and if the fire is hot enough. The correct amount of oxygen is what will kindle the fire to the correct temperature to make clean gas, without diluting that gas with oxygen making it past the grate at low temperatures ( aka TAR) ideally we want to see between 2-3000 degrees in the fire tube to make clean gas using wood. This changes using charcoal, the extreme temps are not need to rid the wood of impurity’s and moisture, to then even further refine the gas while passing through the white hot glowing char cracking tars into my usable fuel. I see Steve is coming in the comments behind me here, I believe he will have a even better educated answer then i do

9 Likes

O.K. Then. Pictures really helps a lot.
Welcome to the DOW DerrickD.

You’ve now made something that can be the basic to be made to work.

The FEMA works to restricts the air by being filled all of the way up with small woody particles like out of a wood chipper.
Too many problems going that way.
Go back to your air in down tubes.
YES. Get the top then airtight. Use the white fiberglass woven stove door rope then goo-impregnated with the red HT silicon. Plastic wrap the downside edge while that is clamped curing. From then on HT grease that removable edge.

The lower air outlet will set your basic active zones height. A one tube down to an inner perimeter holes drilled ring would be the ideal. Cody has picture of factory system made this way.
For now Tee-pipe down into into a four 90’s made square ring. 3/4" down pipe. Or 1/2" pipe. Start with three holes, say 3/16"- 1/4 " on the inner horizonal pipe legs. About 20 degrees angled upwards. Space for even gaps.
Set this ring about 3 inched from the bottom. Round dome?
Pre-fill from grate tube up with pea to almond sized screened wood charcoal up to the air ring level. (make in a woodstove- hatchet chop up)
Then fill from the air ring and up to at last 4 inches above the air ring with walnut, to ping pong ball sized wood charcoal.
Fire her up and let her suck and heat.
You will get gas and a flare. Only then add a bucket of actual wood chunks. Sized so they will become more walnut, ping-pong ball sized charcoal.

To make actual reliably safe engine grade woodgas you’ll have to do more internal walls modifications to further refine your zones controlling.
Just the nature of the beast.

A $25 dollar Mother Earth News set of plans; or a $40-60. Ben Petersons book plans system would be worth it for just the zones illustrations and core inner dimensions.
U.S. Federal free is worth just that. Nothing.
Regards
Steve Unruh

10 Likes

Hello Derrick and thanks for the pictures ,they help a lot.

I’m not sure I understand your gasifier , it is much different than mine.

I did notice as Cody that looks like the wood might be a little big.

Looks like the holes in the grate are too big. Also a bad sign and know something is wrong if you see white ash. Also I like to have 1.5 or 2 inches between grate and burn tube.

If using pine I would expect your fire to last about three hours after shut down and with oak 4- 5 hours .

I am not aware of anyone restricting the flow of air to the gasifier . I try to do just the opposite .

Gasification happens when biomass burns in an oxygen restricted environment . This happens not because oxygen has been restricted from the gasifier but because the glowing char upstream has consumed the oxygen .

8 Likes

Hey Derrick .

This is kinda what Marcus was talking about .

If you mix gas ,flame ( or super hot gas ) and oxygen you may get a hopper fart .

Below I am making it fart on purpose .

I knew I had the video somewhere and I ran through 889 vids but I found it :grinning:

10 Likes

Thanks Wayne, its good to watch some real educational videos! And thanks to everyone who is taking the time to try to help me out on this. Part of my problem I think was watching too much stuff on Youtube that might not have given me such a good education. I watched a few by a guy named “Mr Teslonian” that was making a simple gasifier out of two propane tanks and it made it look very simple. That’s where I got the idea from the shaker grate with the big holes. I think a simple fix for that may be to cut out a piece of 1/4” hardware cloth to size and line the bottom of the shaker with that to “shrink” some of my big holes down.

Truthfully I have learned more good knowledge from this post and all to contributors who have shared of thier time and thoughts here than all the Youtube stuff I found on my own. I think my plan of action is going to be to try with the simplest solutions and progress on to the more complex.

The first thing I am going to address is my fuel, starting with smaller charcoal starter and also smaller wood chunks - does anyone have any tips how to more quickly or easily process bigger wood chunks into smaller?

The next thing I will try if this does not work is to fabricate and airtight lid and see if that solves it, but it might be as simple as my fuel, so I’m looking forward to fiddling around with it a little more this weekend and see what it will do with improved fuel.

4 Likes

I think you are going to have to make a completely new grate Derrick. The hardware cloth will last about a minute and the bowl shape is problematic. With smaller holes and even with the grate shaker it will tend to clog. Flat is better, reinforced underneath. With out some kind of chunker your best bet is to find limbs about inch and a half to two inch in diameter and cut them on a miter or chop saw. I did six hundred pounds that way a year ago and it took me about three hours of cutting, not including the time to gather the material. Look for old dry limbs that are not punky. Later you can take the time to dry some fuel stock. Some guys are finding it beneficial to add some charcoal in with the wood. If you have access to some pallets then you could cut those up for fuel. That way you are guaranteed very dry wood to fine tune your system with until you get more experience with it.

5 Likes

Hello Derrick

I don’t want to toot the horn too much for DOW but compare the below videos with Mr. Teslonian .

What part of the country are you . It would be nice for you to take a ride with some of the DOW folks :slightly_smiling_face:

7 Likes