Easiest way to repair that ignition hole would be a reducer bushing the size of the hole, reduced to 3/4 with a nipple and a cap. Weld the bushing to the barrel. There is enough flange to make the welding easy.
1 Like
I would plug that ignition hole in the burn tube, just one less thing to worry about. I think he has the pipe permanently welded to the side of the barrel so it would be more trouble to add another coupler for a twist in lighting port.
3 Likes
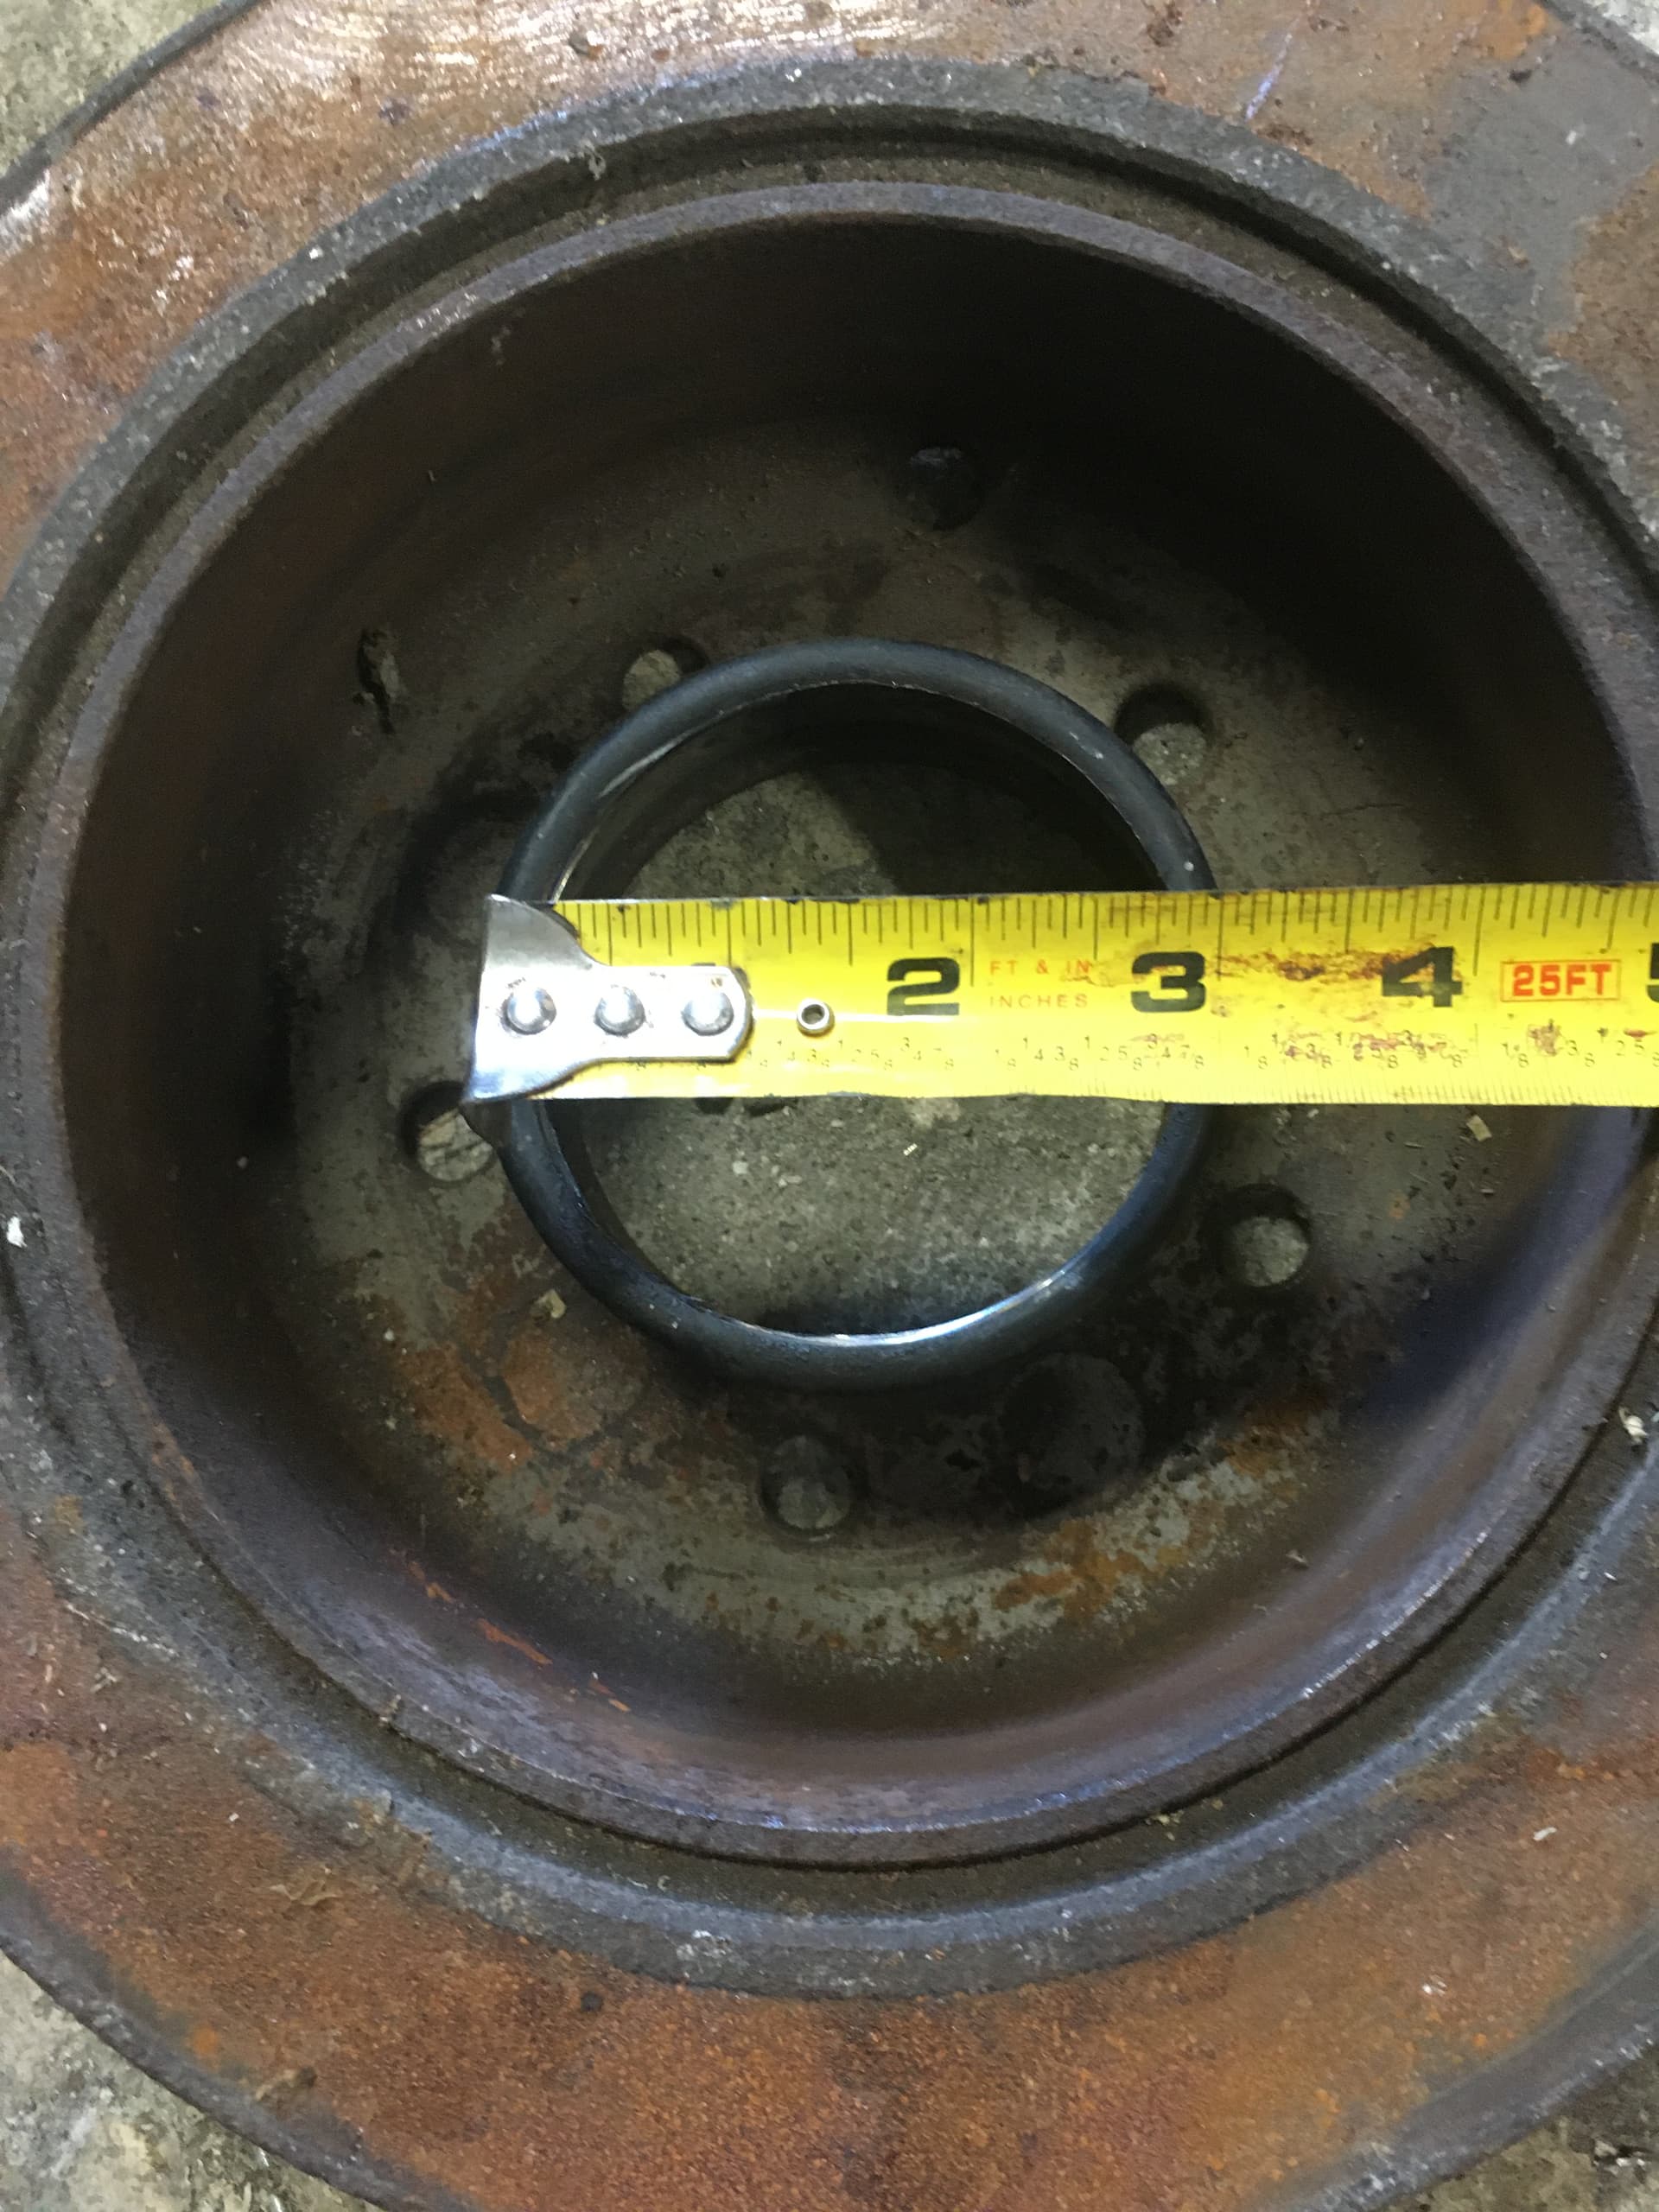
Ok Cody, so before I start welding or fabricating anything permanent I wanted to take a few pics to show you and see if you think this will work per your build above. So this is the brake rotor I have and I found an old steel pulley tensioner that I cut the center out of that nearly is identical to your bearing race it has an opening of about 2 7/8”. I will have to plug the lug holes but it will drop right in my reduction zone. There is about 5/8”- maybe as much as 3/4” gap all the way around, but not pictured I have a very thin tapered stainless steel sleeve that will take up that gap very nicely and I think the ash will do the rest.
Of course I still have the task of what to do with the ignition port, sealing up that hole and remaking my shaker grate but both of those will be pretty simple tasks, so what do yo think of my brake rotor and pulley center - do you think this will work similar to what you have?


6 Likes
I would flip it the other way around if you haven’t welded the pulley to the rotor yet.
It will add to your Recovery Zone.
2-7/8" would be in the conservative range of a 2 liter engine to probably a 1500cc engine. But you can always change it out. With that size of a choke I would use 7 nozzles, use 1/2" couplers and get some 1/2" nipples sleeved down at the end for your nozzles, sleeving down adds velocity to the air coming from the nozzles and helps penetrate further.
Most big box hardware stores sell 3/8" black iron structural tubing and you can cut them down to press fit into 1/2" pipe.
An odd number of nozzles helps to ensure they are pointing at an empty spot, but plenty have used an even number with no issue it’s just a point of preference really.
4 Likes
Cast iron will stress crack from welding heat, use bolts to plug the holes. Just tack weld the pulley for the lip, or weld a smaller ring to the pulley so it nests into the center hole.
6 Likes
Excellent, no I haven’t welded anything yet, that’s why I figured I would check in with a few pics before I got started. I will fiddle with some of the rework this week and hopefully by the weekend have something I can test and check back in again. I still have to cut up some small fuel suitable for it also, unless I try a bag of pellets just for the purpose of the test.
3 Likes
Also, you could make a replacement grate out of rebar, or use angle iron with the V facing up to cup the ashes. Use a 3/8" gap between the bars in that ballpark.
For your light up port I would just weld some steel over the old hole, and plug the pipe at the coupler end and just ignore it, or see if you can make it line up with the grate and you could use it as a lighting port at the grate side.
Before you do your next run prefill the bottom with ashes to get a head start on the insulation. Just fill it up to the choke hole and it’ll do the rest.
7 Likes
Instead of the bag of wood pellets get a bag of real hardwood charcoal instead.
Here it is sold as “Cowboy Charcoal”.
Hacket that up and pre-fill with it. Grate up thru the restriction hole to above the waist expanding out.
Once you do chunk up real wood . . . it is to replace and make in place this needed wood charcoal converting bed.
S.U.
8 Likes
Hey Cody or Steve, or anyone else that wants to take on this question…. So I have had some time to fiddle around a little and do some rework on my gasifier, so my question is, as I begin the reassembly process - before I place the new choke reducer (made from the brake rotor) into the hearth zone, should I fill the larger recovery zone below it with crushed charcoal first so that it will be already “primed” and full before placing the smaller choke area above it?
4 Likes
Hi Derrick, I would assemble everything clean, add fly ash to seal any gaps or voids and then pour in marble sized charcoal to above nozzle level. A small amount of ash mixed into the charcoal doesn’t hurt either. Helps keep the char in place, not to slip too much off the grate, until everything settles.
8 Likes
Thanks so much Jan, I am almost ready for another test, I’ll be taking pictures and reassembling everything soon. I have my charcoal ready, but still need to cut up some more fuel into small chunks before I am ready to test again, probably this weekend. Is softwood ok for fuel? I have a couple of poplar and pine branches I’d like to cut up and get rid of, but wondered if its too tarry. I will post more pics when I get ready to do my test, or even if this test does not prove successful, I’ll still post pics later so you guys can tell me where I went wrong if it doesn’t work this time. But I am cautiously optimistic that I have addressed all issues and am looking forward to a successful test!
7 Likes
Softwood is okay for fuel it just gets used up faster. Do you have a wood moisture tester? Ideal would be as bone dry as possible but I think for an Imbert style it’s alright up to 12%, if I’m wrong someone else will correct me on that.
Do you already have nozzles added or just have it in the FEMA style with a restriction added?
Pics would be nice before it’s all filled up.
4 Likes
Well here’s what I’ve got so far - I did keep the ignition port because it was a very simple fix and with my upgrade to the hearth sone with the brake rotor, i think it actually lines up better anyway, so I welded it into the reduction zone and added a union to easily join it to the pipe that is welded in the side of the barrel already.

One place I took a shortcut was my shaker grate, I didn’t have any scrap steel laying around suitable to making another one, but I did have some steel grating mesh, so I lined it with that, as you can see from this view looking down. I think I will hold up fine to the high temps and will hold the fine char nicely. I figure if nothing else it will help me run a few tests on the new configuration and then I can always fabricate a new one a little later on when i have the steel on hand.

Next I dropped in the brake rotor wit the 3” pulley center tack welded in the middle to give it a lip.

Here is the char I saved and chopped down fine as my starter.

Then I added a good 2” layer of ash all around the brake drum for insulation (I did not plug the lug holes because of my next addition after this.

Finally, I had a nice stainless steel bowl, tapered at a darn near perfect angle to help keep everything moving towards the more narrow choke point. Since I have a couple of piped in air inlets welded to the side of my original reduction zone, I cut several metal slits for even airflow into the hearth area, also tapered downwards to keep the char moving where it needs to. Not pictured, there is a small gap between the original reduction zone and the stainless steel bowl, but the rim of the bowl, cut right, made a nice snap ring to not only secure the bowl in place but keep the char from getting in between the bowl and the airspace behind it.

So anyway, when I get a chance to cut up some dry limbs and make some quality fuel over the next few days I’m going to give it a try and let you know how I made out. The only other additional modification I might make is depending on the performance of this next test, I might add a simple center nozzle as someone suggested above if the existing air supply that I have piped in already or simple downdraft FEMA action isn’t sufficient.
2 Likes
The issue with not having nozzles is the air doesn’t have a lot of velocity, Wayne before designing his own gasifier tried to make the FEMA work. Was a lot of modifying until he had something you couldnt call a FEMA design.
If you do go central nozzle, instead of a ring of nozzles what I would suggest you plug the end and drill out some holes. Maybe 1/4" or 5/16" diameter holes. On the end where you plugged it drill out just one 1/4" hole. You can do this with a cast iron coupler and male threaded plug screwed on the end of the pipe. This way you can experiment with different jet sizes or combination of holes without making holes in the pipe itself.
Whatever nozzle design you decide on it helps to make the tip of the nozzle a smaller diameter than the pipe itself like a carburetor venturi. Adds air velocity. Since you don’t have a monorator hopper you need to use really dry wood to keep the reaction hot. In that little gasifier I built I used a 3/4" pipe but welded in a piece of a piston wrist pin that has a 10mm bore at the tip.
5 Likes
I will definitely use as dry of wood as possible. I have lots of deadfall around here that has seasoned out over a long time and we have been through about 2 months of drought, although recently, thank God, we have had a little rain, so I will pull some of this stuff out of the woods today and keep it in the woodshed for a day or two in case we get any more rain and cut it up and test it this weekend.
That idea about the center nozzle, drilled out like a jet seems pretty good - what I am hearing is that the FEMA style just never really was a good option I guess. I really would like a ring of nozzles but just don’t know how hard or expensive it would be for me to fabricate. Originally, before I did my two cast iron inlets I was thinking of making a ring out of some copper tubing and drilling equally spaced holes in it, but I didn’t know if it would hold up as well as steel to the heat, and also when I went looking for some at the hardware store, I couldn’t find any. I guess everybody is using PVC and Pex these days.
Thanks again for the advice, y’all don’t know how much your feedback is appreciated - I’ll keep you posted as I continue to progress.
3 Likes
Pipe rings. check out this guys site. He has many ways of making them.

6 Likes
Ok so I finally got a chance to cut up some test fuel, hopefully this works out ok, it is a mix of pine and a few branches from a dead wild cherry I think. The largest piece is probably about 2” diameter by about 3/4” thick, and then they get smaller from there. I have some thicker pieces mixed in but they are much smaller in diameter. I tried to go with golf balls and Jenga block size stuff. Whoever gave the idea above of using a chop saw, that’s exactly what I did and worked great. Processed this bucket (an empty cow mineral tub- for those of you who know what one of those is) in about 45 minutes out of 4 or 5 good sized limbs. Will probably light it up tomorrow or Sunday depending on what else I get in the middle of tomorrow. Will let y’all know how it all goes - hopefully good this time.

8 Likes
Yes Derrick , I know what those lick tubs are and unfortunately I also know what they cost ![]()
3 Likes
You have to preheat the cast iron slowly before even trying to weld it to mild steel. 400C sticks out (I don’t recall if that is celsius or not…) or a soft glow. Then to avoid the cracks, you need to cover it with a blanket to slow down the cooling. It is the fast change in temperature that causes the cracks. It isn’t super easy to weld, but it is possible. I would be happy to look up what the welding book says about it. But I assume it is too late for this particular weld.
2 Likes
I have even welded a cracked engine block while it was still in the car and it held for another 10 K miles. It took two of us though. As Sean said, you have to keep the metal from cooling quickly. On the cracked block I drilled holes at each end of the crack to stop it from spreading. Heated the area to a cherry red and used 7018 for the weld while a helper kept the torch heating the weld, slowly backing off the heat.
5 Likes