so I built a simple fire and used pepe’s tin can log to make some charcoal in the wood stove. I have about 10 gallons. now the work starts. how do you size this stuff? I have a piece of expanded metal over a bucket, trying to mash the charcoal through.Well this don’t work for a guy with my level of patience. how do you guys do this? I find this to not be worth the effert. It seems to me I am taking perfectly good charcoal and turning it half to dust.I thought this may be a way to get my feet wet but now i’m thinking what a pain an the ars why even bother? does the charcoal really have to be less than 3/4 " or will 1" pieces be ok. it takes 3 times the time to make the charcoal as it takes to cut the grass 3 more tiems the time to process the charcoal to size . so now I have 6 hours into making enough charcoal to spend 1 hour burning it to cut the grass. what am I doing wrong
Around here, a ton of chips can had be had for 40 to 100 dollars.
That will run a small gasifer for alot grass cutting 
Unless you have a WK Gasifier and using the slipped charcoal from it…
Or have some readily available source of suitable charcoal?
Making Charcoal is too much time and labor.
Eventually, I would like to build a Gilmore for a Quad project I have.
I would use the char from my WK and run it through a rotary trommel
http://search.yahoo.com/search?p=tromel+&ei=UTF-8&fr=moz35
And bag the remainder for the garden.
I have found with the chunker, There is plenty of smaller bits that would run a mini WK, I will likely pursue that… As I am already dealing with the wood and would have mess with the Char other than clean out of the full size WK.
My 2 cents
TerryL
Well I got through the processing and had the engine running! very cool!! It started on gasoline as was running on charcoal by the time the float bowl ran dry. What an awesome feeling. Drove it to a neighbors and it ran great, drove in high gear and ran the mower. After about 20 minutes running unattended over there it quit and only wanted to run choked, I’m guessing a vacume leak developed in my stovepipe air filter.There was also water dripping out of the filter. either the charcoal was not cooked enough or the 40 degrees and rain was not favorable. It was fun but will probably not use it again till I get a wk done and can use the waist. I will not burn wood outside and waist the heat that is in such demand here 9 months a year
Jim,
Need to checkout Gary Gilmore site go to forum he will show how to make and process .I will be at ARGOS with different kinds of equipment to make and process wood char trying to get all of the final touches done if you happen to come look me up I’ll try to be in the area where Gary sets up with any luck at all maybe we can get some pics and videos.
Dan
Thanks Danny, I hope to make it To Argos but at this time I still don’t know how. I belive that if one is going to make charcoal it must be done on a large scale and the heat used to make it worth while except in an emergency. and that leaves you with storage issues. It just seems to scream work to me at this time to get set up With a a new heating system designed around charcoal producing and a gravel screaner I think it could be profitable with proper marketing and logging waists that i’m looking into chunking now.
Jim, do you need a ride? If so, are you close to I94?
Jim,
I have built a small unit that I can fun a 5000 watt generator on I had a chance to buy a 250 gal. vat for mixing clay with a motor but it was to big for my need I plan on storing in 55 gal. plastic drums I am working on a new tank with wheels on it much easier to move around if I get it done it will come with me I am using a cyclone and cooler that I bought from Matt he builds some great equipment check out his site .Dan
Thanks Bill, at this time i’m planning to go to New York to see my mom for mothers day and stopping in on my way back.When I say idon’t knowhow i’m getting there I mean I don’t know what i’m driving at this point. Everything here needs love and i’m not in the love making mood. A little warm weather would help. I better get a load of scrap ready to start refilling my piggy bank, it’s been a long winter and I just had my biggest job of the summer get shutdown.The state and county are having a dispute about the water level in a nearby lake that I have a permit for shoreline restoration. Until that battle is over I can’t do my thing. I should really take that money making thing more seriously, but I just leave it to god and it always works out.
Hi Jim, I have to laugh because the way you feel about processing charcoal is the way I feel about making wood chunks. Guess it all comes down to perspective. Here is a video I made about two years ago showing my charcoal processor. I now have it mounted above the inclined screen so the charcoal coming out of the bottom is already cleaned of fines.

You may lament the portion of charcoal that is converted to fines but I love those fines. They are used in my shop urinal, in the horse’s stall and in the compost bin. These fines are the foundation for increasing my soil health for growing food. Charcoal is a highly processed engine fuel that makes it easier to gasifiy. BUT, you lose some energy in the process of making it. This is one reason I built a stove to heat my shop which also makes charcoal. Capture the heat and make an easy to use engine fuel (if you can get it sized easily!) Nice to see you got your engine running. What a great feeling that is. I can still remember the first time I got an engine running on charcoal gas. Hope that video helps. There are other ways of grading the charcoal and I’ll see if I can move that information from the Yahoo charcoalusergroup to the files section of this forum.
Until later, Gary in PA
I was very impressed at how easy it was to build , light ,start and run the engine on charcoal. Everyone was very impressed .But being I was not set up to make or process the charcoal that part was a pain. It is heating season a full 9 months a year here so I will not make charcoal without using the heat for either home or shop heating and or water heating. I am just not ready. I am sure I will be making and using charcoal in the future. I have seen your shop heating system and am going to set up something along those lines when I add on my shop and have to upgrade heating system. I am also working on a solar hydronic system for the home and would like to incorporate a wood boiler in to it as well. I’m starting to see the possibilitys of grid free living in the near future. I like that little grinder you have made. how maney rpm’s does your drum turn?. I am sure I have every thing on hand to build one of them . Is condensation always a problem with charcoal or was it because it was raining when I was playing? How does one know when his charcoal is done? does the charcoal all turn to ash as it is burnt? My mower ran about 20-30 minutes then it quit and I was not able to get it to run on charcoal again. I had air leaks at filter, fixed them and still no luck on the coal. I dumped the simple fire out and charcoal all looked unburnt. I sifted the fines and have not tried to fire since. I have no temp gauge ,nothing to melt and felt no heat anywhere but a little at air inlet height. my unit is built from a 10" diameter air compresser tank about 24 " tall. the outlet is a cast iron jet pump housing and filter housing is a piece of 6" stove pipe with paint can lids on backwards.I used flexable stainless steele radiator hose connected to a sink drain to attach to my carb. and 3/4 " ridged copper for exuaste recirculation Coolest thing about it is I had every thing on hand to build it and it cost nothing
i followed the advices from Gary and a few others, added a few own experiences and arrived at a point that the results are repeatable and keep putting a smile on my face every time…
1: try to use small grain charcoal, any thing smaller then 1/4" and bigger then dust.
2: Try to use a smaller nozzle, for me works between 6 and 10 mm
3: try the above, run with bone dry charcoal first.
4: put a transparant tube in line with the gasifier and your engine, look at any “coloring” in the moister, put a piece of white cotton wad inside the tube.
( my gas stay’s bone dry even with water injection equal amount as tha charcoal consumed 1l water per 1 kg charcoal )
The gas coming out of my gasifier has “ambient” temperature, max 40°C if stationary, temperature above that indicates a low level charcoal or to coarse, passing more CO2 unconverted… The water also can indicate a to low combustion temperature ( i toggle that with the smaller nozzle)
Being able to adress the issue’s and adjust the outcomings was for me a must before i could move towards the “raw wood” gasifiers…
I am still far away from that point  I do SWEM and added LWEM ( learning with every minute )
One learning aid i did discover was using the gas cooker… it gave me an visual indication on the gas quality before i connect to the engine.
For the charcoal; if you can crush the charcoal between your fingers without hurting them, the charcoal is fine, you’ll notice the difference after a short period.
Once you established your way to make an constant , uniform quality of useable charcoal, nothing will stop you after that…
To have some comparrisation, you also can use some commercial available charcoal, from the local supermarket, just as an reference…
A visual indicator to test your charcoal-skills;
Light a barbeque with it, using a propane torch to light it, after it glows, put a fresh pile on top, it should stay “smokeless” and the heat should make gas that burns pale blue. any volatiles in the charcoal will give yellowish colors.
Use the barbeque heat to dry your batch of charcoal prior to do your next run ( large paint can with closed lid, small hole in the lid for the escaping gas. if no more gas escapes on the full glowing barbeque, vissible gas, then the charcoal is ready for use…
Hope this little info helps you for your next run…
( forgot to mention, in my opinion with the water vapor contents, the lower temperatures in the gasifier will accumulate the watercontent in the above layers off charcoal which results in similar situations, engine getting weak, shuts down. )
thanks Koen, my charcoal is all 1/4" + up to 1" I tried it again today with the same charcoal. It ran but not well, the system seemed to choke the engine, seemed very restricted, as in would not run on gasoline when pulling through the system. At this point I am blaming that on filter mods. I added some crumpled up balls of news paper in filter canister. I removed the paper, same thing. will have to make fresh charcoal and try again. So much learning to do, going to try to get to Argos. if I can’t learn something there then it is true that you can"t teach an old dog new tricks
I have good news for you…
Gasifying charcoal works…
Now, since you know that, next trick…
1/4" + up to 1" does exactly what it did … To big for the small gasifier-/-engine
The charcoal at start will be dry enough, but will saturate itself with the moister from the inadequate conversion, to much Co2 passes trough the spaces, to little carbon getting converted. They also refer to this as being the reactivity of the charcoal…
I think using the charcoal up to 1/4" and nothing above will do the trick. I did that several times on many occasions, always had the same outcome.
Thanks to Gary G and others i was able to adress this and bring it to the point where i am now.
An old dog teached a trick by an even older dog
My wife say’s i am stubbern, (coz i never give up ? )
Hi Jim, there will be water in the filter canister, so paper probably won’t work for long. The stove pipe might not be air tight, either. Might find another really air tight container and put a mesh screen in the end, with some charcoal after that, followed by another screen, then some open cell foam, and finally a layer of wool, like from an old army blanket or wool shirt, and then another screen. Make the container so you can take of the end and check the foam and the wool. If necessary, you can swap out the foam and the wool, because it will have some ash/soot on it. One of Gary’s earliest filters was made in a grease barrel (he has a You-Tube video on that one). His later filters got smaller and smaller as he switched more to the foam and wool. With the 1" charcoal and nothing smaller than 1/4", I doubt the charcoal reactor is causing the restriction so it must be in the filter. I found 1" charcoal to be a bit large, and sometimes pieces this large contain wood that didn’t get converted completely to charcoal. Look at those carefully, and if you see any brown, or unconverted wood, don’t put them in the reactor. (We label them as “brands”, and they go back in the charcoal making system, or get used in a TLUD cookstove.) On some of my experiments, I managed to suck a bunch of charcoal out of the reactor and into the filter, which created sort of a plug. How are you nozzles holding up? Good Luck…you are so close to getting this perfected. Ray
Gary,
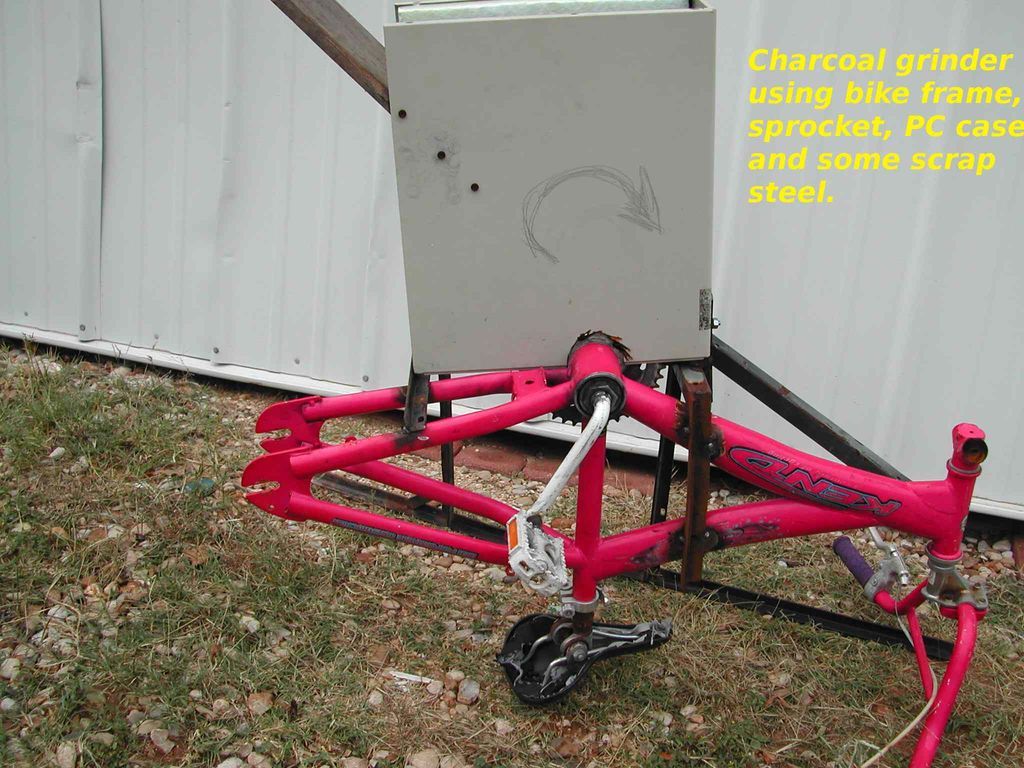
I’d like to try to make a duplicate of your charcoal grinder, but I was wondering if you’d be kind enough to clarify some of the dimensions. See screen shot below.
You said that your pipe diameter is 3" and the “teeth” and “fingers” are 1/2". I have several questions:
- What is the width of the opening that the rotating pipe fits in (dimension “A”)? Is it a uniform rectangle?
- What is the length of the pipe (dimension “B”)?
- How far apart are the fingers (dimension “C”)? Are the teeth uniformly between the fingers, or are they staggered?
- If you had it to do over again, would you have made it any different?
- What lessons learned can you pass on?
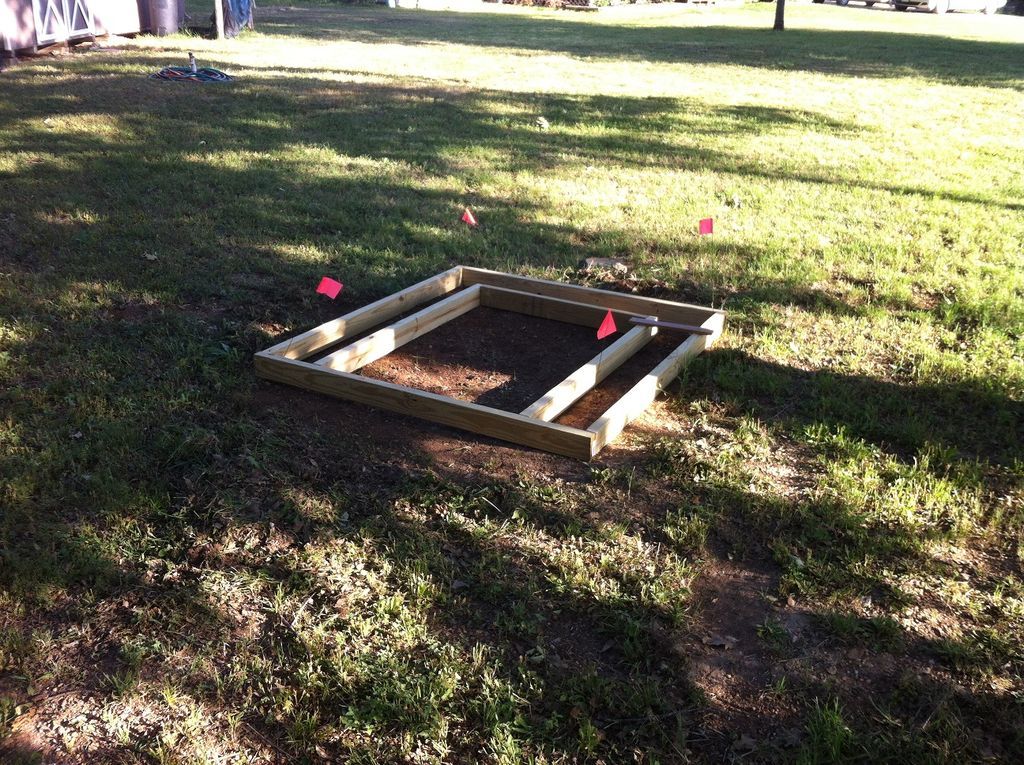
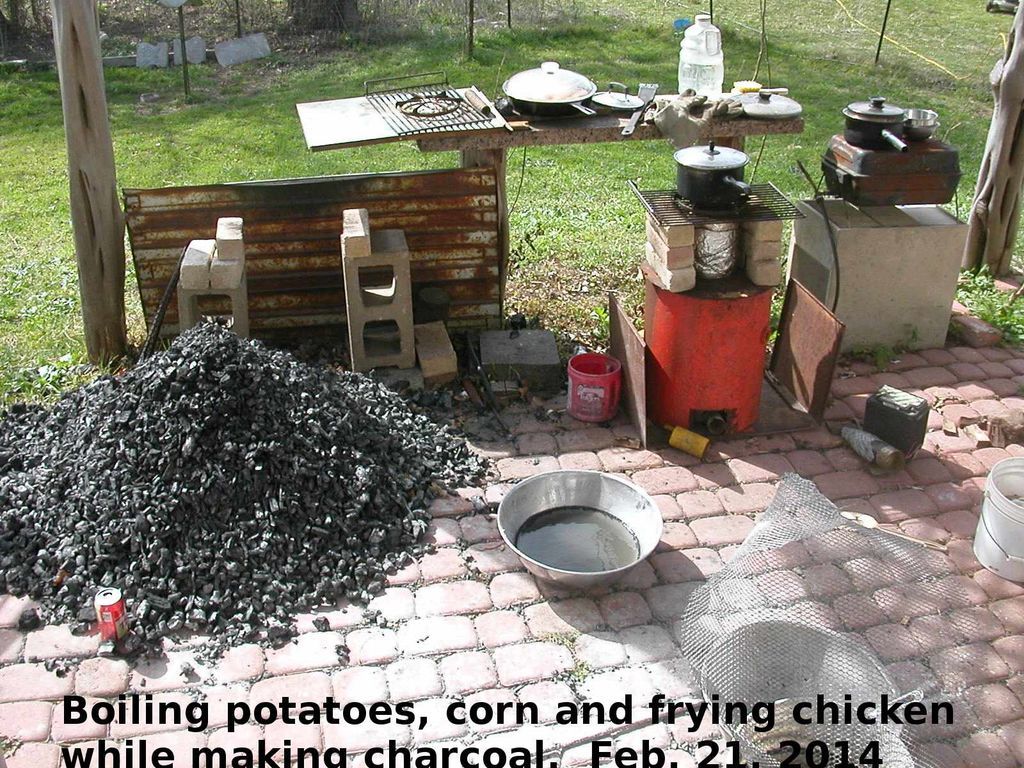
Thanks for all your help! By the way, on the topic of capturing heat from charcoal making, the second picture shows the forms for the concrete slab foundation of my “brick oven afterburner” that we talked about. I am planning to make it the centerpiece of an outdoor kitchen, complete with a three-compartment sink with hot and cold running water, a charcoal grill, and a TLUD burner element. I live in a house with a wife and three teenage daughters, so have to maintain a high WAF*. :-).
*Wife Approval Factor

Alex, here are some photos of my copy of Gary’s charcoal grinder. The first one shows the cylinder teeth (Railroad spikes) staggered around the 3" cylinder in three rows. Four spikes are welded to a heavy duty angle iron. I welded the cylinder to the sprocket of a child’s bike. (Photo 2) The hopper is an old PCAT computer case. The last photo shows the beginning of the whole unit. I have another photo of the finished unit, but I can’t find it. There is a board directing the charcoal toward the teeth. I pour the charcoal to be ground into the hopper and put on a paint respirator and crank away over a large sheet of old tin roofing. Then I use a scoop shovel to run it through my screens. I have run 143 fifty-five gallon drums of junk wood to charcoal, but currently my very best charcoal comes from my outdoor kitchen. Small wood goes into the TLUD stoves, and even smaller well done engine grade charcoal is dumped out at the end. The last photo shows the pile of charcoal made in the outdoor kitchen. (Dear Wife finally asked me to clean it up!) This charcoal literally falls through the grinder. Shade for the outdoor kitchen is important so the wife and girls can sit in chairs and watch you cook. I have been given my own set of pans and kettles, and when I bring them into the indoor kitchen, they must sit on a cardboard square “pot holder”, and not touch any part of the kitchen counter or sink, because of the tar.

Alex, over on the Yahoo charcoal site, George Adams showed this grinder made out of 7-1/4" saw blades with wood spacers between. He put an upside down cover from a square plastic bucket on it and then he cuts the bottom off the bucket for his hopper. He says it works good.
Less dust than some methods.
Edit
On second thought-I’m not sure he cuts the bottom out. He probably mounts the grinder and then tips the whole thing over and grinds away - dust free.

Ray I agree with every thing you said about the sizing ,conversion, restriction, filtering and all . It was my first run put togather with what was on hand and a wonderful learning experience, I’m hooked !! I also like the outdoor kitchen and using the heat rather than just waist it in charcoal production… Wood is fairly plentiful around here but never wasted. we useuly need some home heat for nearly 9 months a year.
Jim,
It’s exactly the opposite here - we use air conditioning for 9 months of the year. Got up to 91 yesterday. Anyway, even though we don’t need the heat most of the year, like you, I hate to waste it. Instead, I’m going to use it to fire a brick oven a couple of times a week, and convert that heat into pizza, sourdough bread, and slow-roasted chicken. By-products will be lump charcoal for grilling, engine-grade charcoal for grass cutting and wood splitting, and bio-char dust as a soil amendment when we’re done.
“. . . Let nothing be wasted.” (John 6:12)
“If you don’t know what you’re doing, don’t do it on a large scale.” - - Anonymous
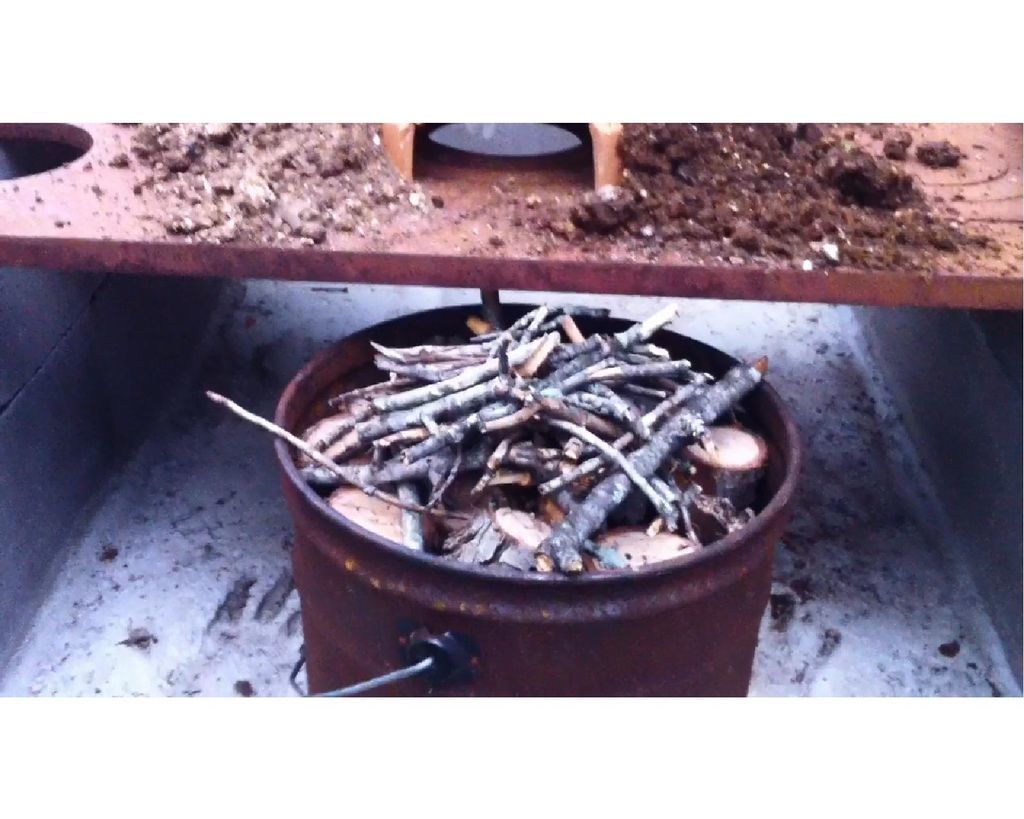
Here is an update on my earth oven charcoal retort, which is intended to create a useful means of capturing the otherwise wasted heat of charcoal making. My plan is to build a concrete block enclosure, within which will sit a 55-gallon Gilmore-style charcoal retort, and on top will be an earthen oven with hopefully enough thermal mass to store much of the heat.
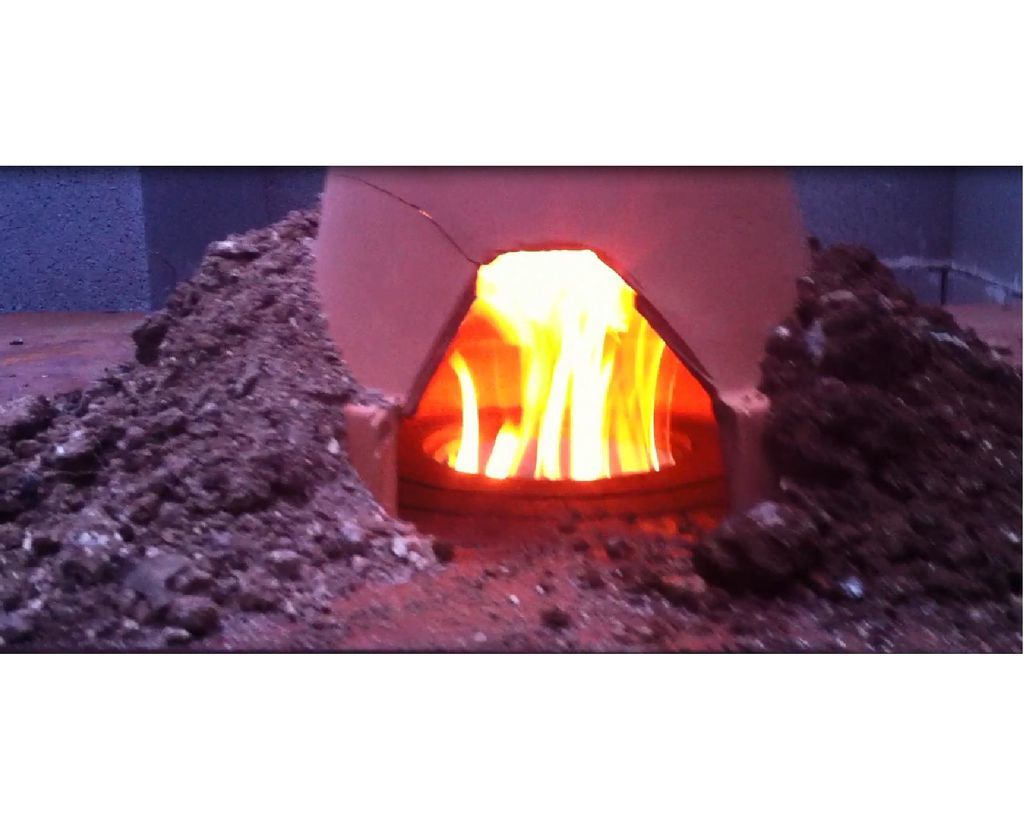
This experiment is a smaller test version of said oven/retort. Instead of the 55-gallon barrel, I’m using a 5-gallon can, and instead of a 32” diameter earth oven, I’m using a 10” terra cotta flower pot. I have a ¾” thick 40”x24” steel plate top off of an old rusted out wood burning cook stove that has various removable “eyes.” I plan to use this as a structural span across my concrete block base, and build the earth oven on top of it. I am using the steel plate in this experiment. I piled dirt on and around the terra cotta pot to seal off air, and lit the fire in the 5-gallon retort underneath. The gases and flame pass through one of the “eyes” of the stove top, and into the upside-down pot.
The purpose was to see if the clay pot would act as enough of a “chimney” to draw the gases out of the retort, and provide a complete burn with very little smoke. The experiment was a grand success! With essentially no insulation around the clay pot, the internal temperature inside got up to nearly 600 degrees, and even after I pulled the retort out and snuffed it, the pot was still nearly 200 degrees inside after 30 minutes. I think with enough thermal mass, my planned oven will work very well.
The first picture is the inverted pot before lighting.
The second picture is the 5-gallon can of pecan wood.
The third picture is my redneck fire starter.
The fourth picture is the flames being drawn up into the “chimney” – again – almost no smoke.
The fifth picture is the finished pecan charcoal – a few brands, but definitely good enough to cook my father’s day steak.