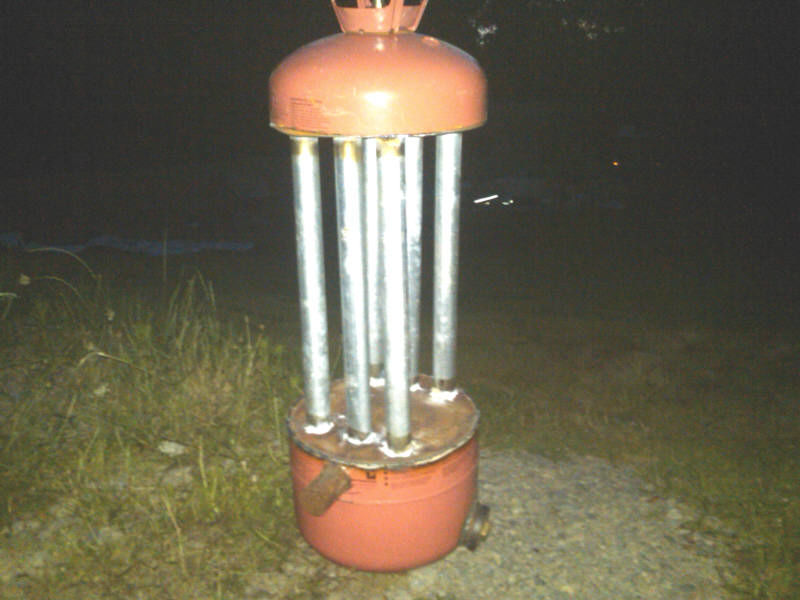
I started building a new filter / cooler over the 4th of July and have gotten far enough along that I can show the project with pictures rather than a concept drawing. Keep in mind that this is experimental, but should work ok as a cooler even if it does not work well as a filter. If all goes well, the bottom half of the tank will separate and hold charcoal dust, the tubes will cool the gas and the top tank (may or may not) catch some condensate.
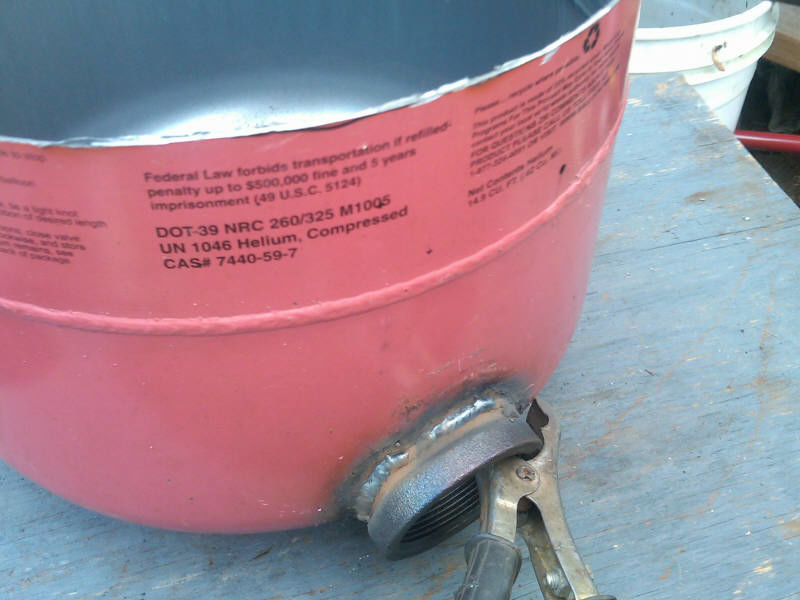
I started with a helium tank that I got form the local transfer station (for free). I cut it in two, making the bottom half a bit taller than the top because I want to capture particulates in the bottom half. I added a 2" pipe fitting with a plug as a cleanout port. Then I went shopping at the local home improvement store and blew $40 on a hole saw and arbor, some cutoff wheels and a 10’ length of EMT conduit.
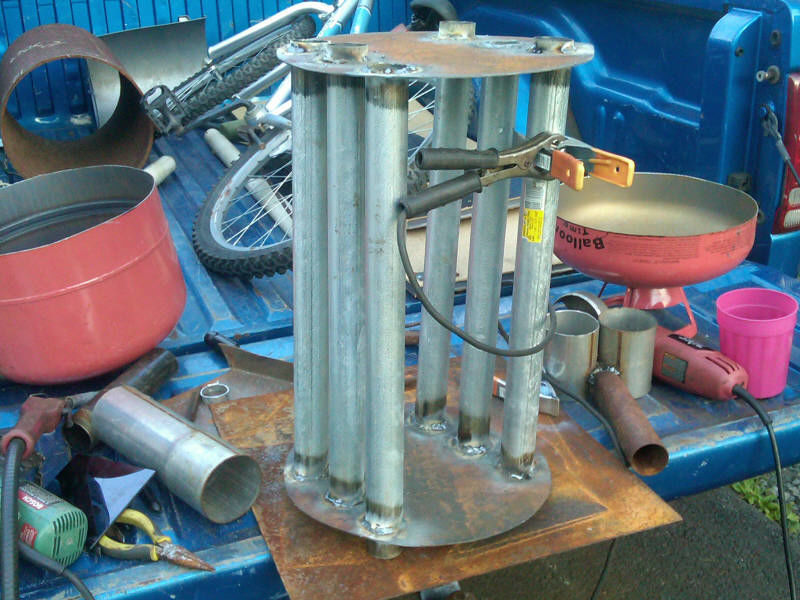
Next, I took some sheetmetal scraps and cut out a couple of disks to fit inside the helium tank. Then I used the hole saw to cut (6) holes in each of the disks for the cooling tubes. I took the conduit and chopped it into 19-7/8" lengths (if you use 20" one piece will end up being a shortie). Then I started assembling the cooling tubes - making sure that 1" of tubing was sticking through for the “Top”. I welded the disks to the tubes being very careful not to breathe any of the fumes and gassy junk that comes out of burning paint or rust or zinc, etc…
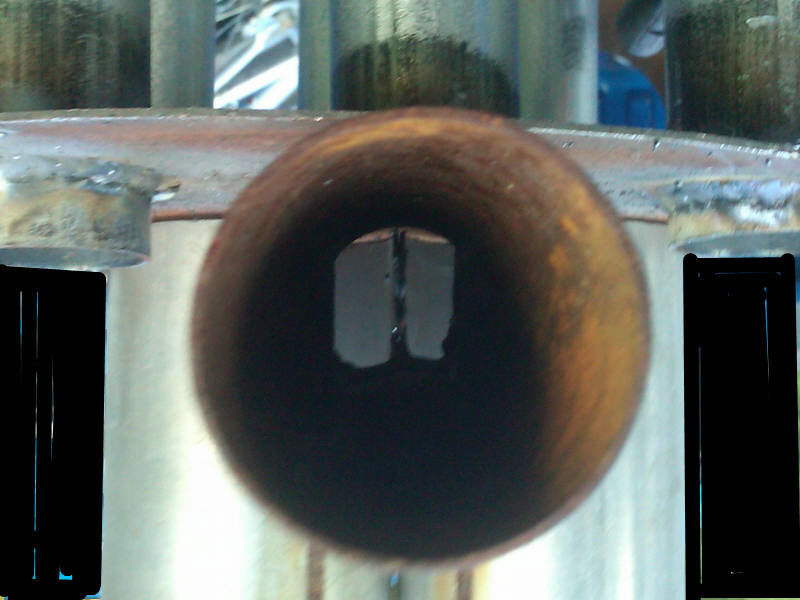
After welding the tubes, I started on the twin swirl cans. I cut two 4" pieces of 3" exhaust pipe and put them side by side and made a hole and put in a input pipe right in between them to make two swirl cans (kind of like the cylinder part of a cyclone separator). These dimensions are kind of a compromise, but I wanted to get some cyclone cleaning action without the difficulties of making a cone and to have a relatively low profile (I needed the inlet port to be as low as possible). There is about 5" below the swirl cans, so if this works, the bottom tank will hold a good bit of char particles (I am burning pellets).
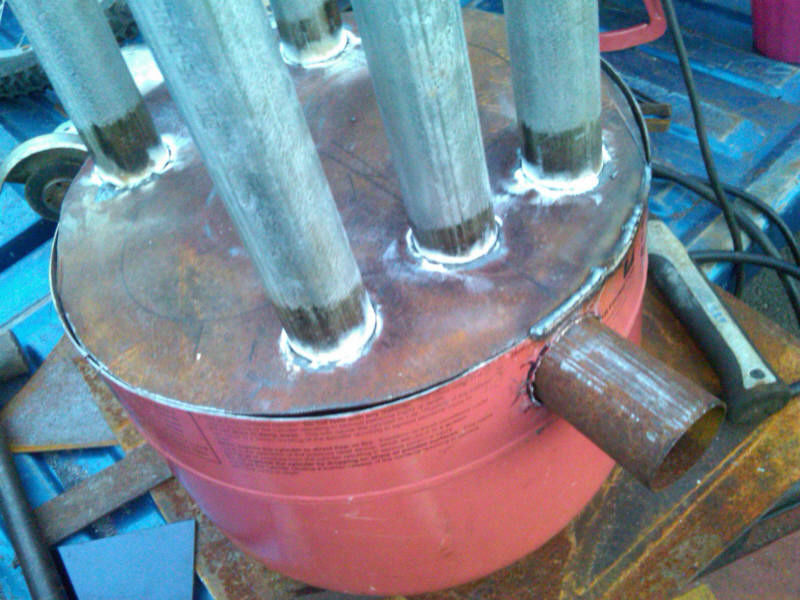
Next, put a hole in the side of the bottom tank and put the cooling tube array in place. I found that the thin metal of the tank was not too difficult to weld if I made the disk about 1/16" lower than the top edge of the tank wall. That way, I was able to lay a good bead and the tank metal melted right into the base sheetmetal where I was putting most of the heat.
The last couple of pictures show how the top will fit and the way it looked today when it got dark on me. Should be able to try it out soon.
I welded the top on tonight and was able to assemble everything for a test run. The bad news is that there’s lot of small leaks to mark and fill. The good news is that if I force air through the system, I can see where they are. But alas, most of the bottom half is too hot to mark with a marker.
The first photo is everything put together on a garden wagon. I am starting to think about some mobility options for small engine testing.
The second photo was a bit of a surprise, but my Wife Aida came down to see how it was going, and she saw the flare go out and then lit it again for me. I burned a couple pounds of pellets and took some temperature readings.
Third photo is temperature readings from around the bottom section of the cooler. In the large space between the tubes where the swirl cans are, I measured a max temp of 525 F.
Fourth photo is measuring around on the upper section.
I did not see any “fireflies” coming out of the flare, so particles seem to be staying where they should be collected. I did see a gush of tarry black liquid spit out a couple of times. yucky stuff.
This thing puts off a LOT of heat, and I am not sure if I would want to sit close to it on a tractor. .
HEY GARY, VERY INTERESTING DESIGN. GOOD WORK. I HAD A LOT OF LEAKS ON MY FIRST GASIFIER TOO. CHECK OUT MATT,S COOLER ON THE VULCAN CASIFIER, HE HAS A BLOWER ON HIS I THINK THEY ARE FAIRLY CHEAP AT THE AUTO PARTS STORE 12 VOLT. IT MIGHT COOL YOUR PIPES DOWN ENOUGH AND IF YOU ADDED A HALF MOON SHAPED HEAT DEFLECTOR ON THE SIDE FACING YOU ON THE TRACTOR YOU MIGHT NOT FEEL ANY HEAT ??
The blower does help but the mild steel tubing does’nt disapate the heat like I was hopping. I only get about 20* cooler with the blower and that thing really moves a lot of air. The tubing Im using is 1 1/4 and 16 ga wall. so just thin enough to weld.
I wish aluminum wasnt so dificult and expensive to work with. Aluminum has a unique property, it will disapate heat faster than it can absorb it.
This is why Im looking into liquid cooling. Im not going to have a vessel with tubes in it. What I am going to do instead is have the tubing inside of there own tubes creating a water jacket for each tube. This will increase the volocity of the water flow and I can still air cool each tube. This should be very efective. Im going to use a race radiator for race carts to cool down the water. These are on Ebay for about 80 bucks.
The fan I got was about 50 bucks at auto zone. and like I said work very well.
I heard that water is 30x more efficient than air during the heat exchange process. I have a intercooler that would make a nifty radiator for some water exchange experiments (one day perhaps).
I was relaxing out on the boat today and started thinking about using a fan too - I have one of those 12v GM squirrel cage blower fans that I made a sheetmetal housing for a few years ago, and was thinking about trying to recycle some heat, by wrapping a piece of sheetmetal around the pipe area, attached to the outside of the top and bottom tank halves using a band. I could put the fan inlet at the top, and take the outlet at the bottom so it could be piped into the gasifier inlet to scavenge some preheat. That would make the unit into a heat exchanger as well.
I noticed some interesting differences in temperature on the top tank on the first run, the top of the tubes were close to 130 F, but the 2" gas outlet elbow was over 230 F, which I think means that the hottest gas is making a b-line to the gas outlet rather than swirling around the full surface area of the top tank. If I were to build another one, I would o some kind of baffle to force the gas to swirl around the tank cool the gas even more in hopes of condensing in the top tank.
The bottom tank with the swirl cans did a really good job catching the spent charcoal. I dumped it out and ptotos of the inside of the bottom tank and top tank are shown below. Also moving on to leak testing and fixing. I verified I have some aluminum flashing that I can wrap it with to try some forced heat exchange stuff with… : )
Nice Job Gary! I like thought provoking experiments like this. I have a question about the swirlies (not the kind we used to give kids in school). Did you happen to notice the drop pattern below the swirl pipes before you dumped the spent charcoal out? It would be interesting to know if the char formed a cone below each 3 inch pipe or sort of dropped in rings and how far around the built up rings formed, Most cyclones remove the gas near the top, but here everything must go down. I wonder what would happen if you had just a downward pointing elbow instead?
Don M
PS The first thing I thought of when I saw those two 3 inch pipes was DJs twin cyclones on his Chevy pickup.
Don,
Actually, I was toying around with an idea for a flat spiral separator, and kept seeing those dual cyclones each time I got on the forum… so the idea for the swirly cans came from the photos of DJ’s 454 build. I actually used a piece of header pipe for the inlet - it was thin enough that I could hammer it into a square shape, and I took advantage of a slight bend at the very end of the pipe so that the char stream is directed to hit the thicker metal disk, then it takes the ride around the swirly cans, then does whatever it does in the bigger bottom tank.
I did not get a photo of the char pile this time, but can imagine the char swirling around just like it would in a cyclone along the vertical plane for a couple of turns, then where the swirly can ends - the velocity drops rapidly (entering the much larger space of the lower tank) and the solids free fall or blow randomly all over (?). My guess is that only the really small dust will make it upstairs to the top tank.
In the flare, I could see some tiny orange sparkles, but think we can take care of that too… I am already thinking about how to put a paint can or some other container in the top tank - full of char (Gilmore style) or hay (Keith style) as a media filter. It just needs to be thick enough to weld and have a removable lid that is gas-tight. When I add the media can, I have some ideas to improve the heat distribution issues that I saw on that top tank.
I did some welding and painting on the cooler today (thanks to David O. for a good idea with paint technique) and made another short run.
I burned about 7 lbs of stove chow, and made some temperature measurements and photos and a couple of videos. I am still not convinced I am ready to run a motor until I get all the particulates out of the gas… gonna have to use some kind of media filter because I still have “fireflies”. The unit is working nicely though, I measured a 250-300 degree drop in temperature.
Here is a video of some temperature measurements after everything got up to temperature. http://youtu.be/85xktkASJaY
The photo below is near the end of the run… I had put in the last of the pellets, and you can see the lid of the gasifier is over 800F and starting to glow (red in person, but purple-ish on an iPhone) from the heat of the char. The flare continued for another 4-5 minutes, and then things got interesting again. Apparently during the burn down of the char, more and more char (or larger pieces?) are being pulled in and the bottom tank of the filter/cooler started to heat up until it burned my new 500 degree paint job. Those tiny pieces of charcoal are no joke. they add up to a really hot problem wherever they end up until they are put out.
I was using a 1/4" gap where the char exits the gasifier because I noticed on the last run I had used a larger gap (like 3/8" to 1/2") which is good for making charcoal pellets, but also a lot of tar. (since the char is not staying around in the gasifier to do its job). For the G3 design, the gas is much better and the char should be finer using the smaller gap.
Gary,
Let me see if I can describe what I am thinking might be the “cats meow” for this style of filter/cooler IMO. Do the same thing with the two tubes like you are doing to make duel cyclones but instead of the gas exiting the bottoms with the char have the gas exit the tops of the two tubes. This of course would call for you to put a couple of say 1.5 in tubes down inside your two 3 in swirl tubes. Then you would also have to add another chamber between your 6 up cooling tubes and your two top dischage tubes coming up out of the swirl cans. I believe(IMO) then that you would get a much better fall out of particulates having a two direction flow I guess you would say. I still think you would need some kind of a small final filter, but would greatly effect the efficiency of this thing. You would in esence have almost what DJ has in his duel cyclone design just no cones on your collectors, just a catch basin.
I look forward to seeing more of your results.
David S.
Hi David,
Think I would need some transition on the swirly tube wall near the bottom to help the gas tighten up and spin upwards (?) I think I saw a thread on vortex tubes somewhere here, so I can study that a bit more and learn how they work to get the gas to stay swirling in a long tube, because that would be a good trick for more heat transfer.
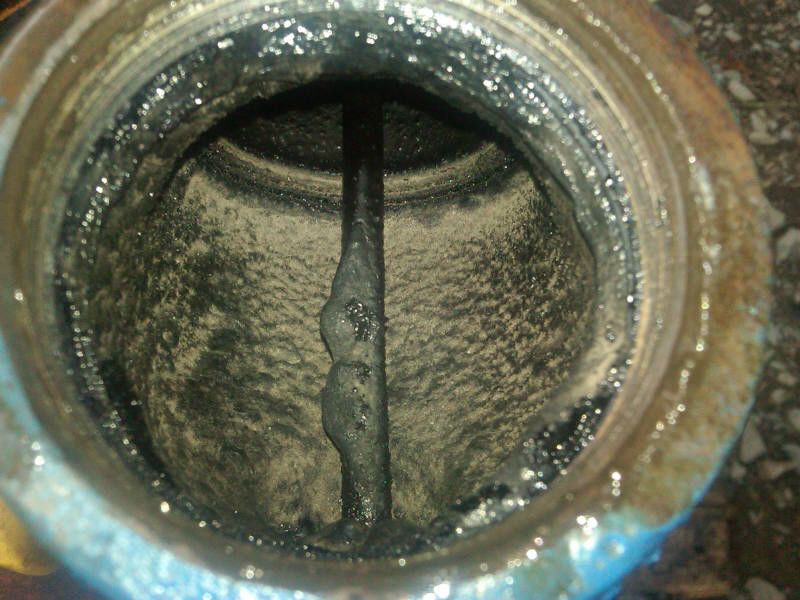
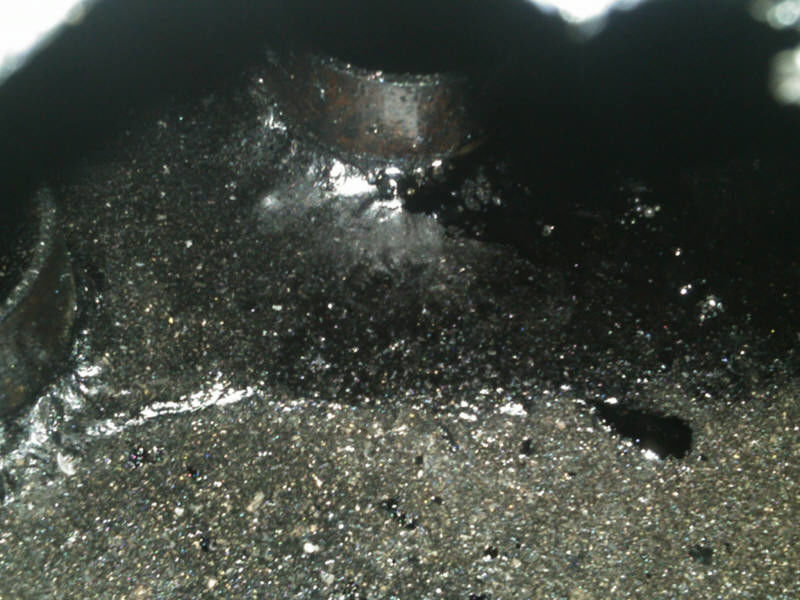
I did an exam on the cooler today to see how the char (or ash) is being deposited, also checked for tar buildup in the ejector and found some condensation in the top tank. Photos below…
[1] Burn marks where the swirly tubes are… this happened when after the fuel burned down and the unit started pulling the char through instead of the ash.
[2,3,4] inside the ash cleanout port… this is all that is left of 7 lbs of pellets. mostly tiny ash particles and small char there at the end. No pointy pile, but it looks like it may eventually pile up if I run it longer.
[5] Looking into the flare cup on the end of the ejector… there was a spit or two of black liquid in the early startup, but everything burned off after a while.
[6] Looking from the bottom inlet of the ejector. There is some tar there. Probably normal for tar to collect somewhere in the system.
[7] Liquid collecting in the top tank… I put a stick in it, and it appeared to be clear instead of black goo.
Gary
I have used this type of a setup in fire tube boilers to increase heat transfer. It is just a piece of twisted steel strap that we inserted into the fire tubes.
Dave