The Kirby Vacuum To Blower Conversion

Okay fellow wood/charcoal Gasification members. This thread will be all about the Kirby Vaccum Cleaner Conversion to a Blower for your Gasifier.
I know many have done this so if your want to share what you have done it would be appreciated. The more ideas and ways to do this the better for everyone so they can use this powerful reliable motor and blower.
The weak part on the Kirby unit is the complicated switch with all the safety features that you do not need when converted over to a blower unit for your gasifier.
So it just makes sense to by pass the switch all together and replace it with a variable on/off dimmer switch, so you can control the air velocities coming out of your blower, per @TomC.
First of all my Kirby was found at the recycling junk yard. The electric cord was cut off and I got for free because I was buying some metals. He just gave it to me to get rid of it. Score!
I tried to repair the switch and gave up, it not needed any.
Here are the steps to by pass this switch.


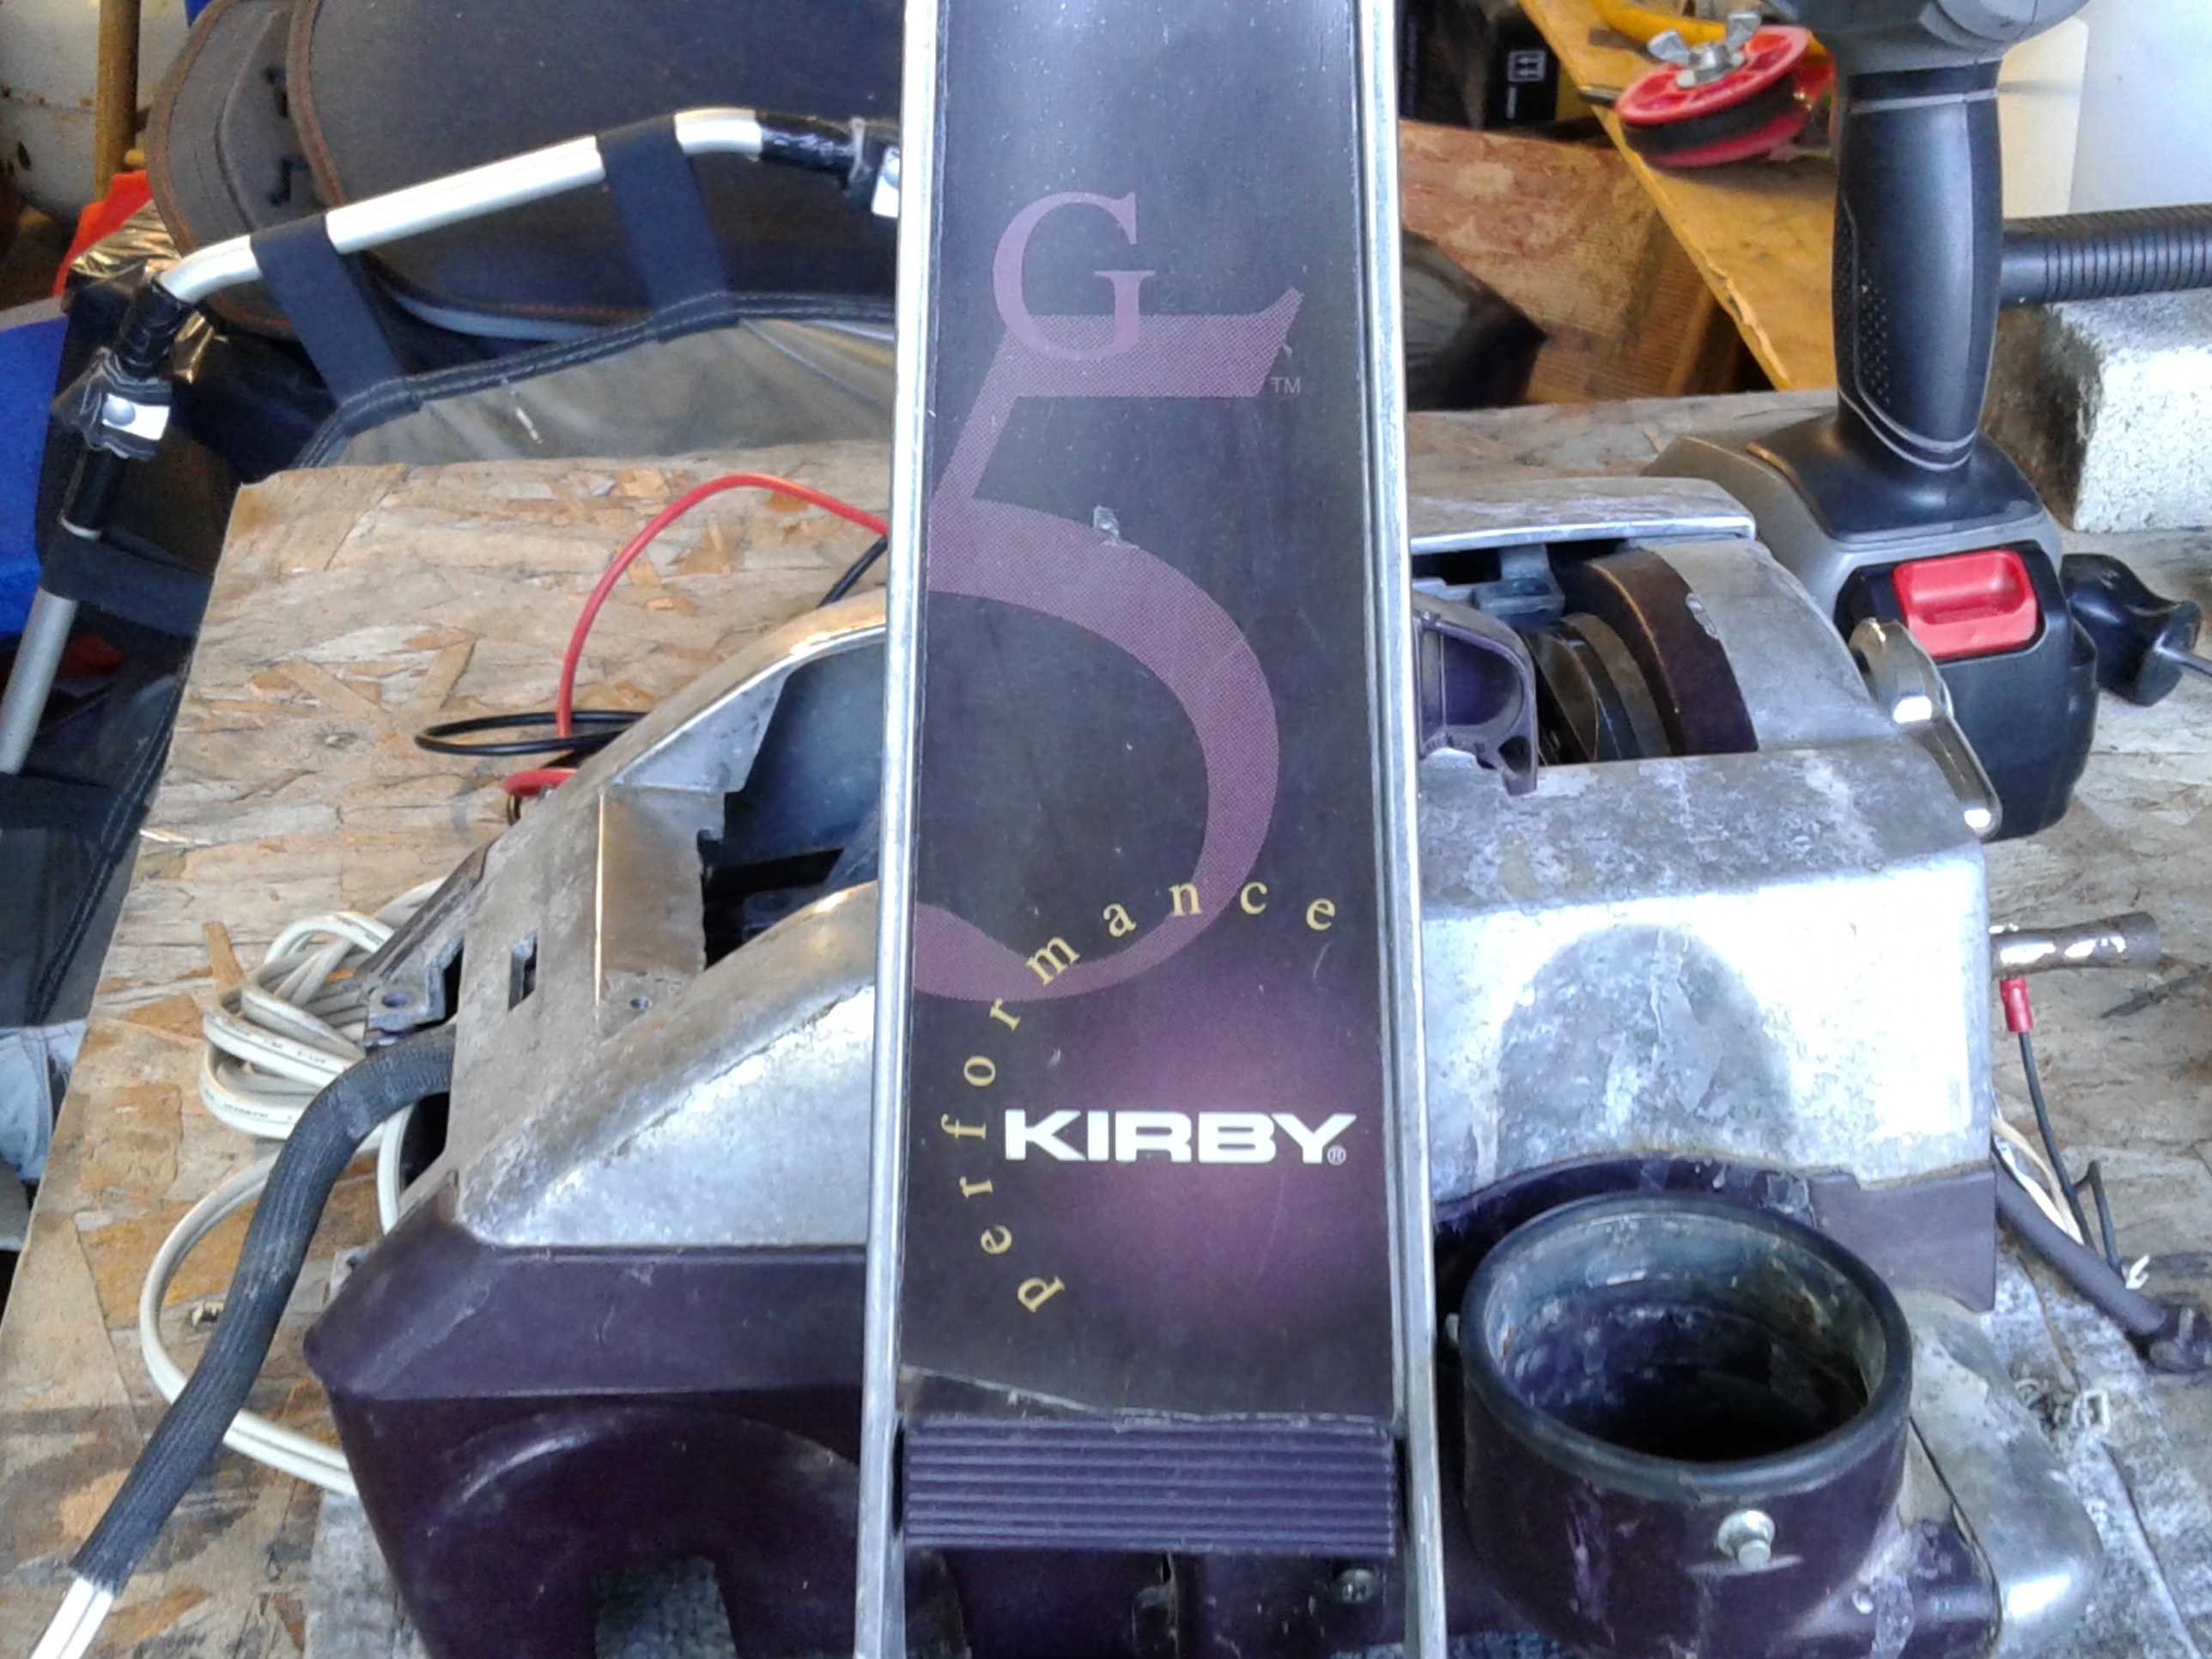
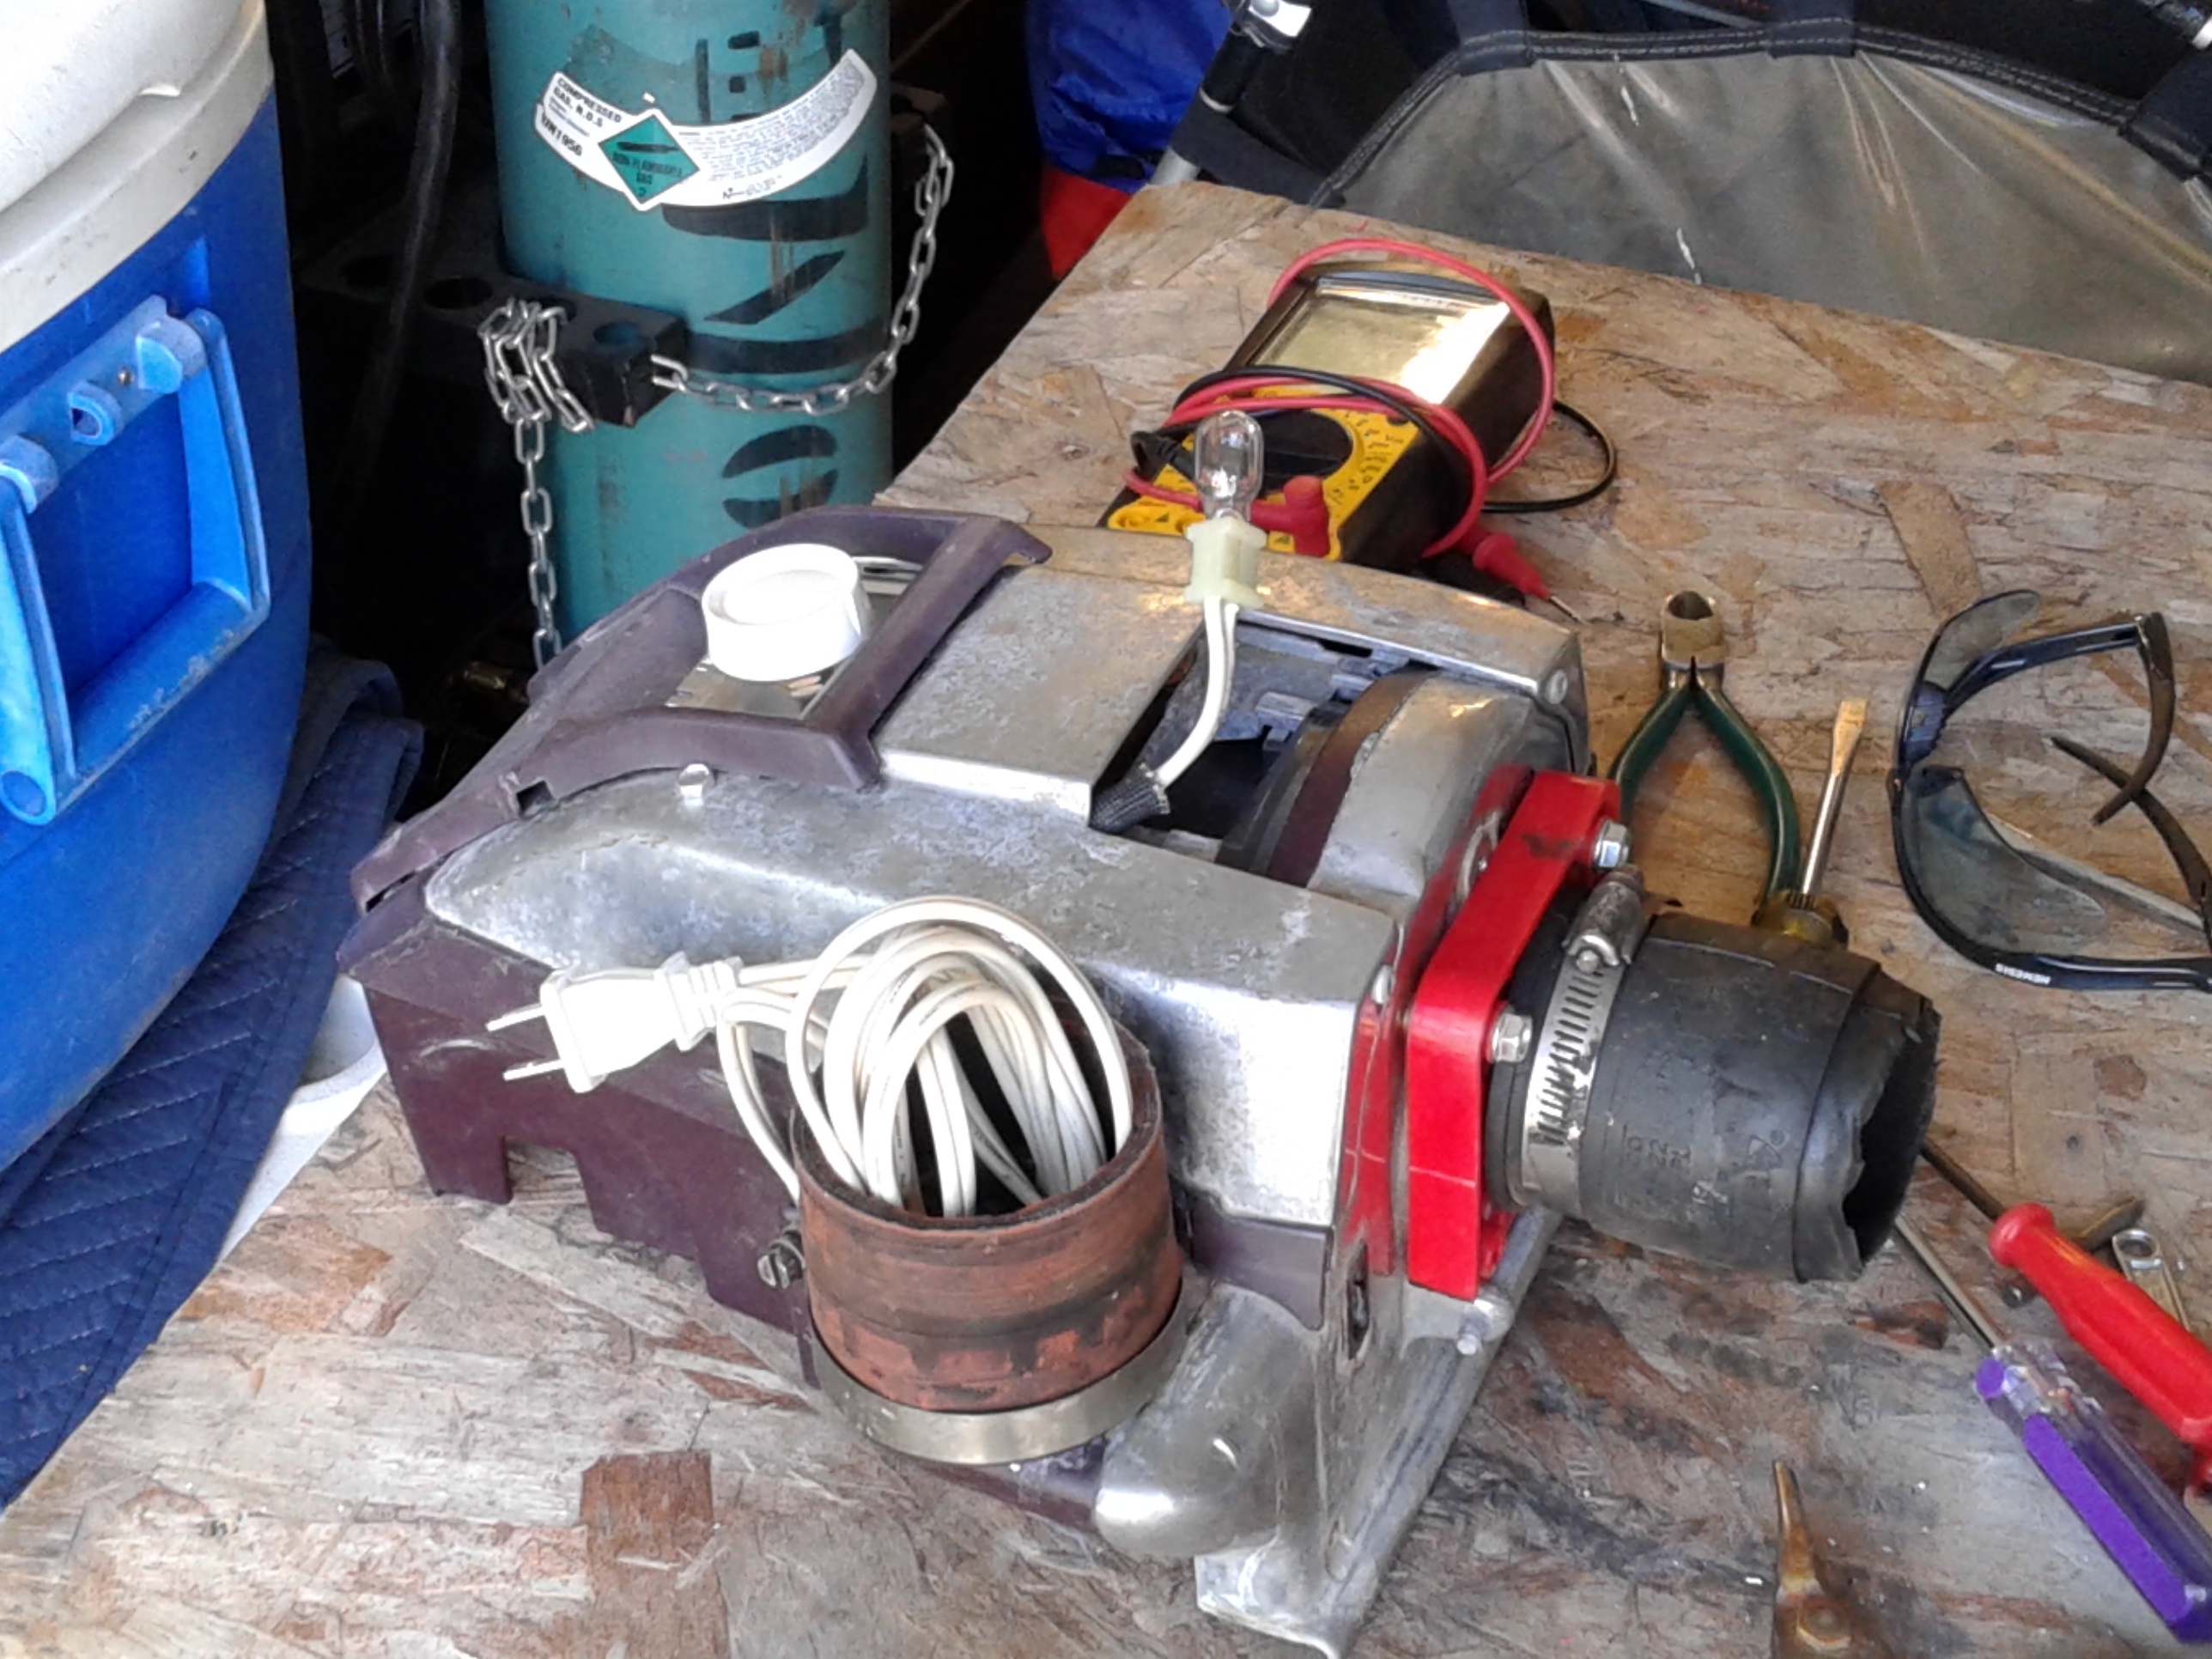
This unit is a G5 Kirby most of the newer units use the same plug in switch block.

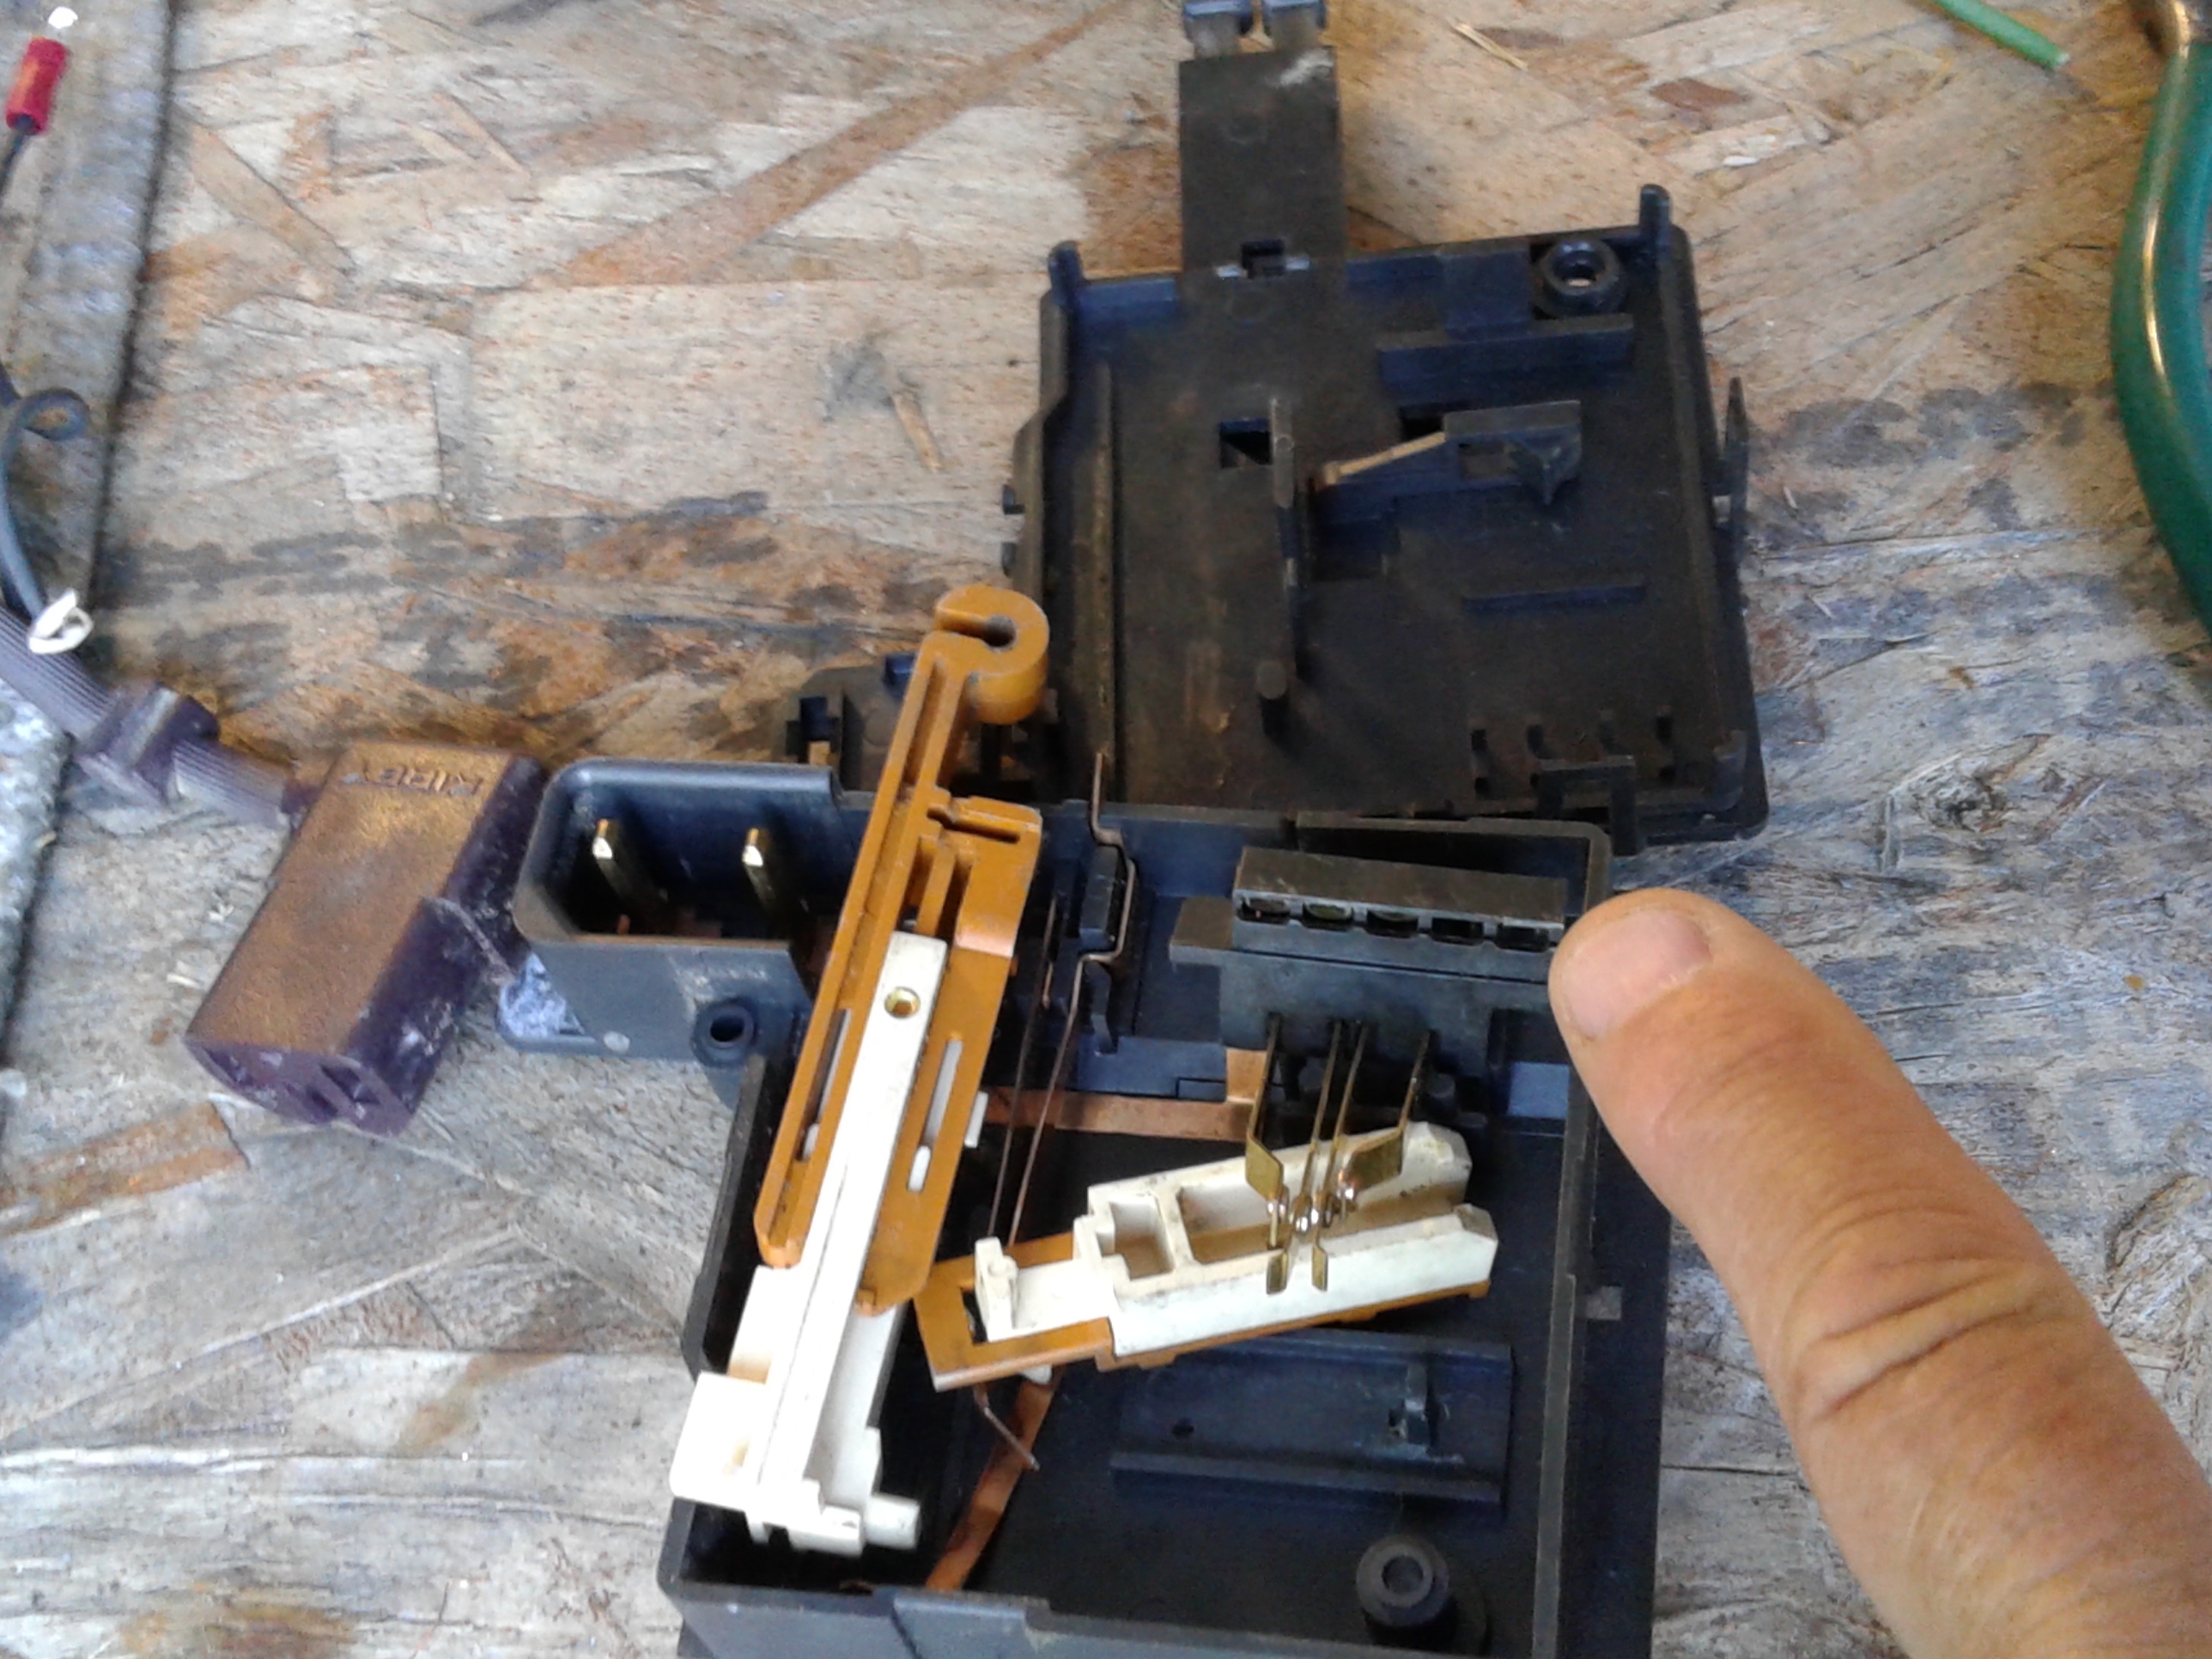
Here is the switch open up. I had to study it for a while to see how it was supposed to work and how it was electronically hook up and routed in the switch buses to the connections on the out side of the switch.

This is the buses connection tabs to the motor windings, brushes, light bulb, and 110 volt power cord plug. I looked on the Kirby web sites and could not find a wiring diagram for what I wanted to do. So it was a lot of volt/ohmmeter work and scratching the head.
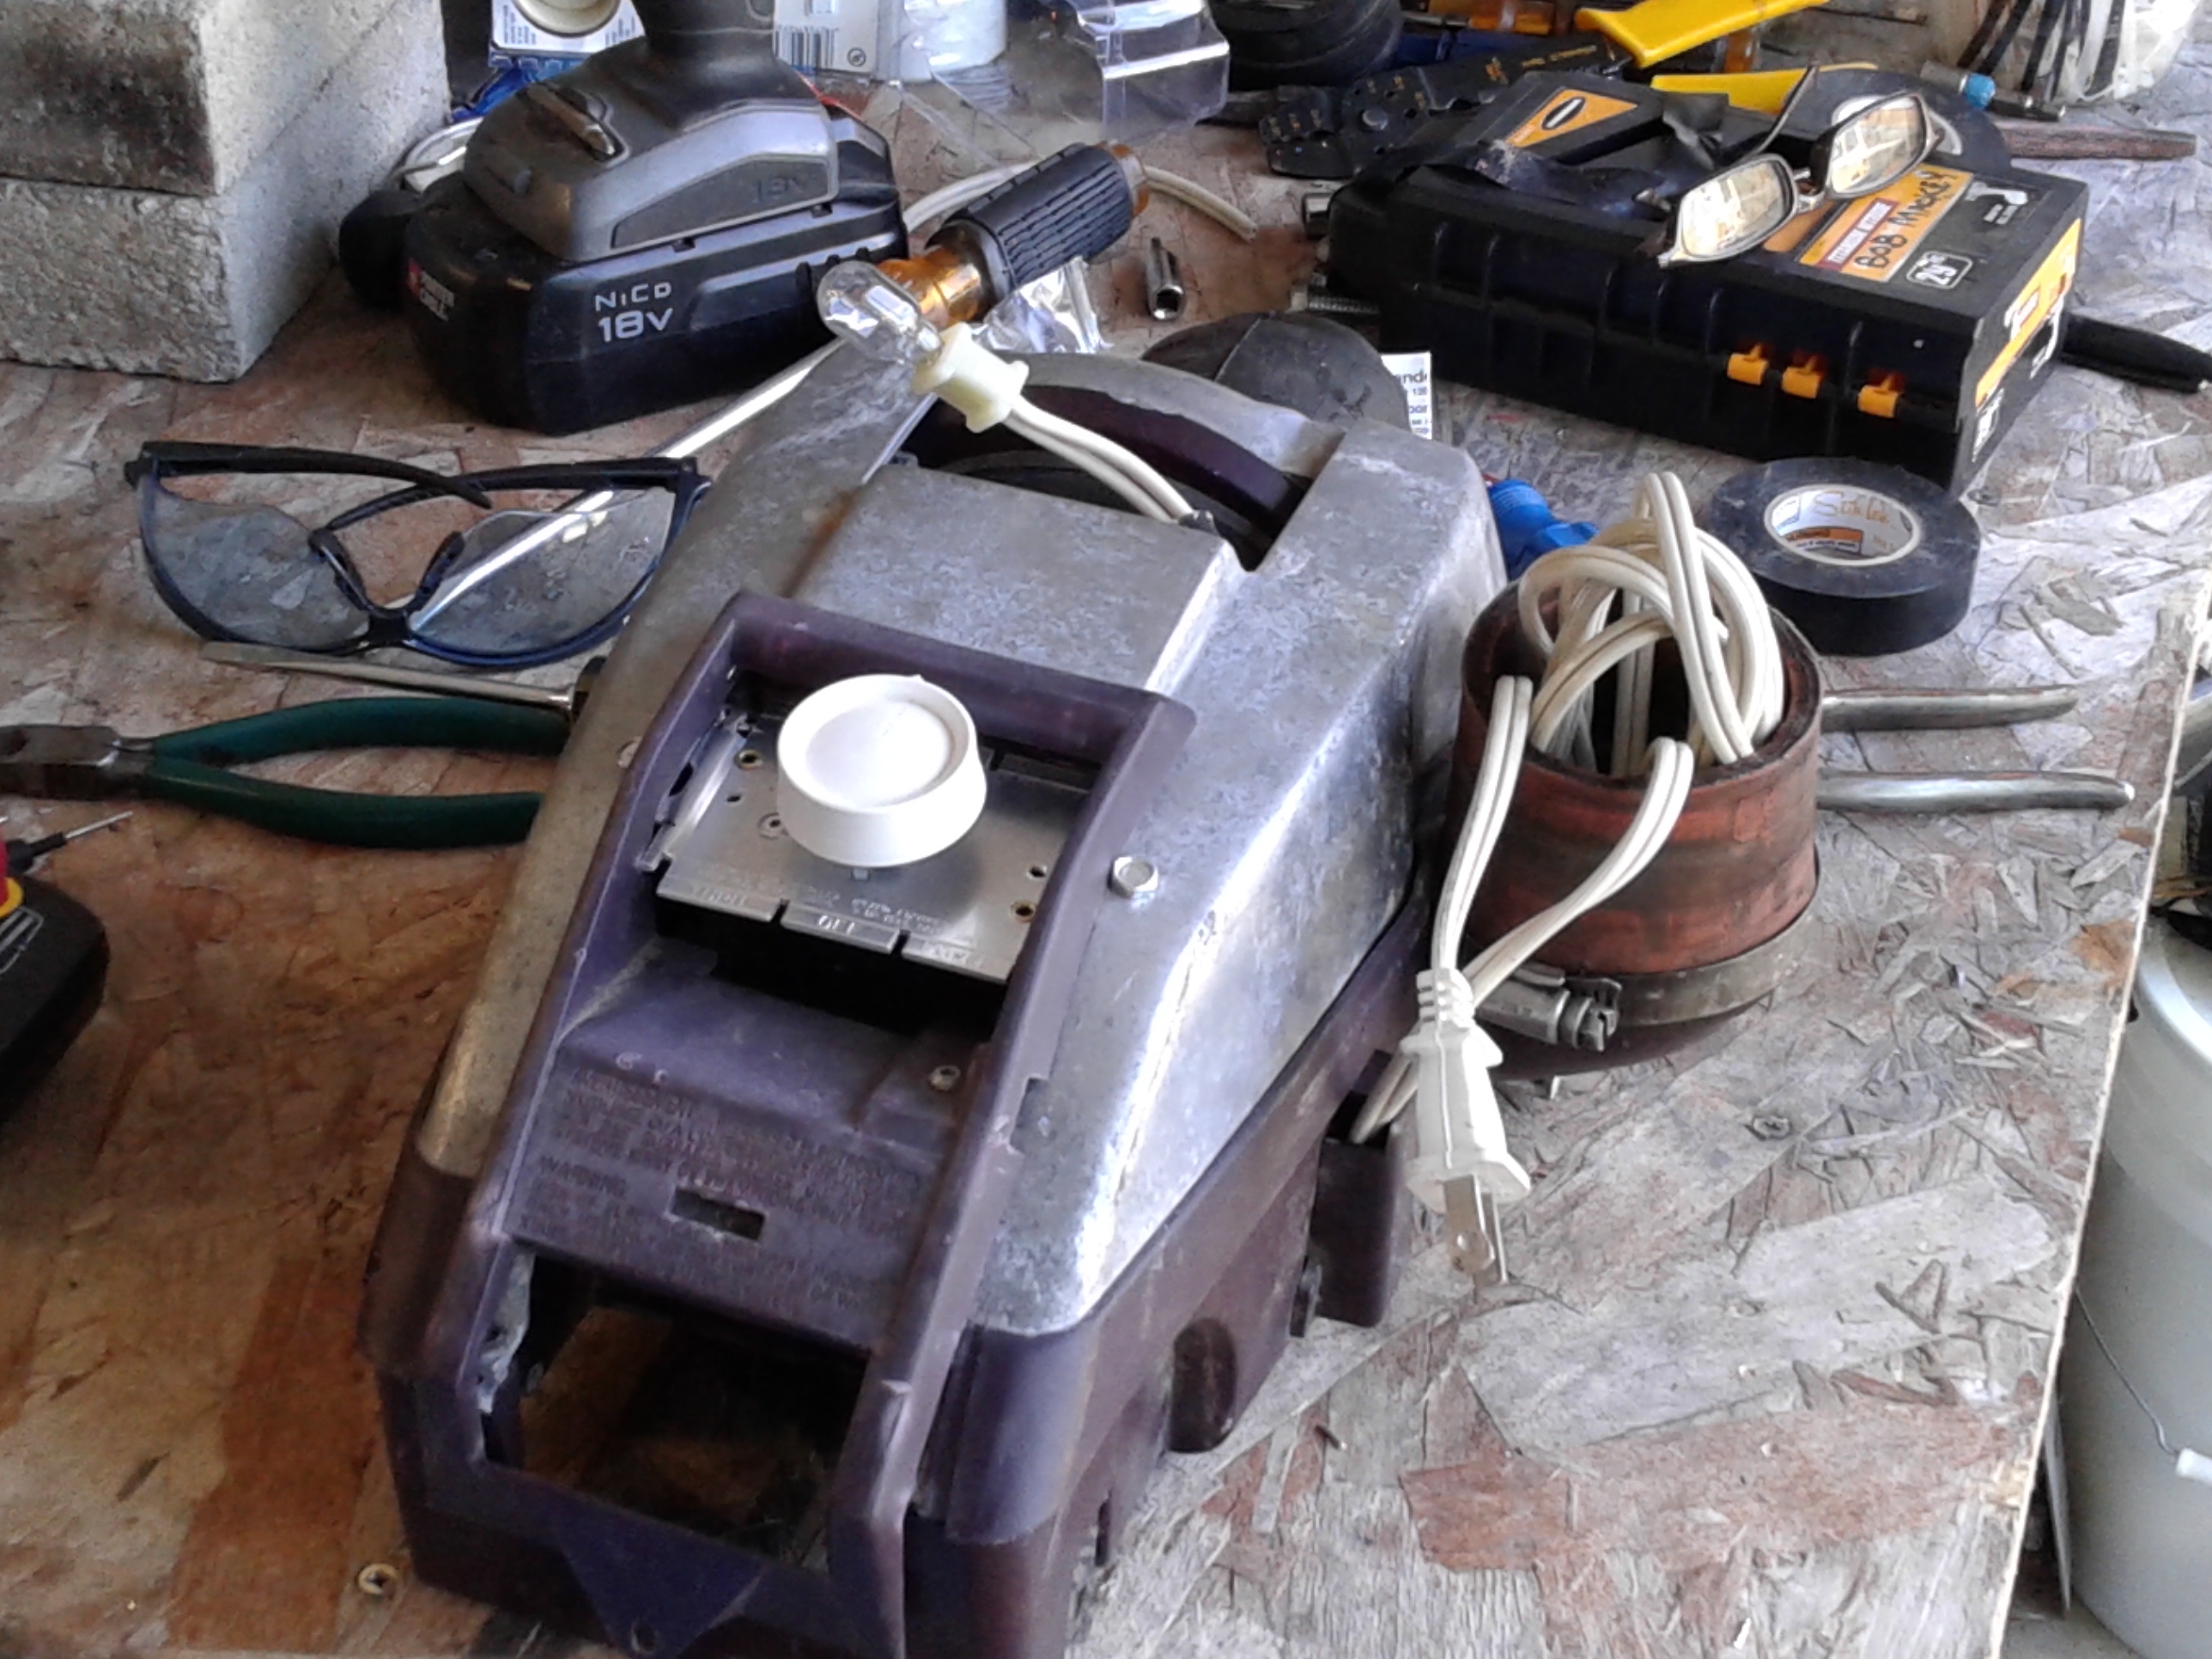
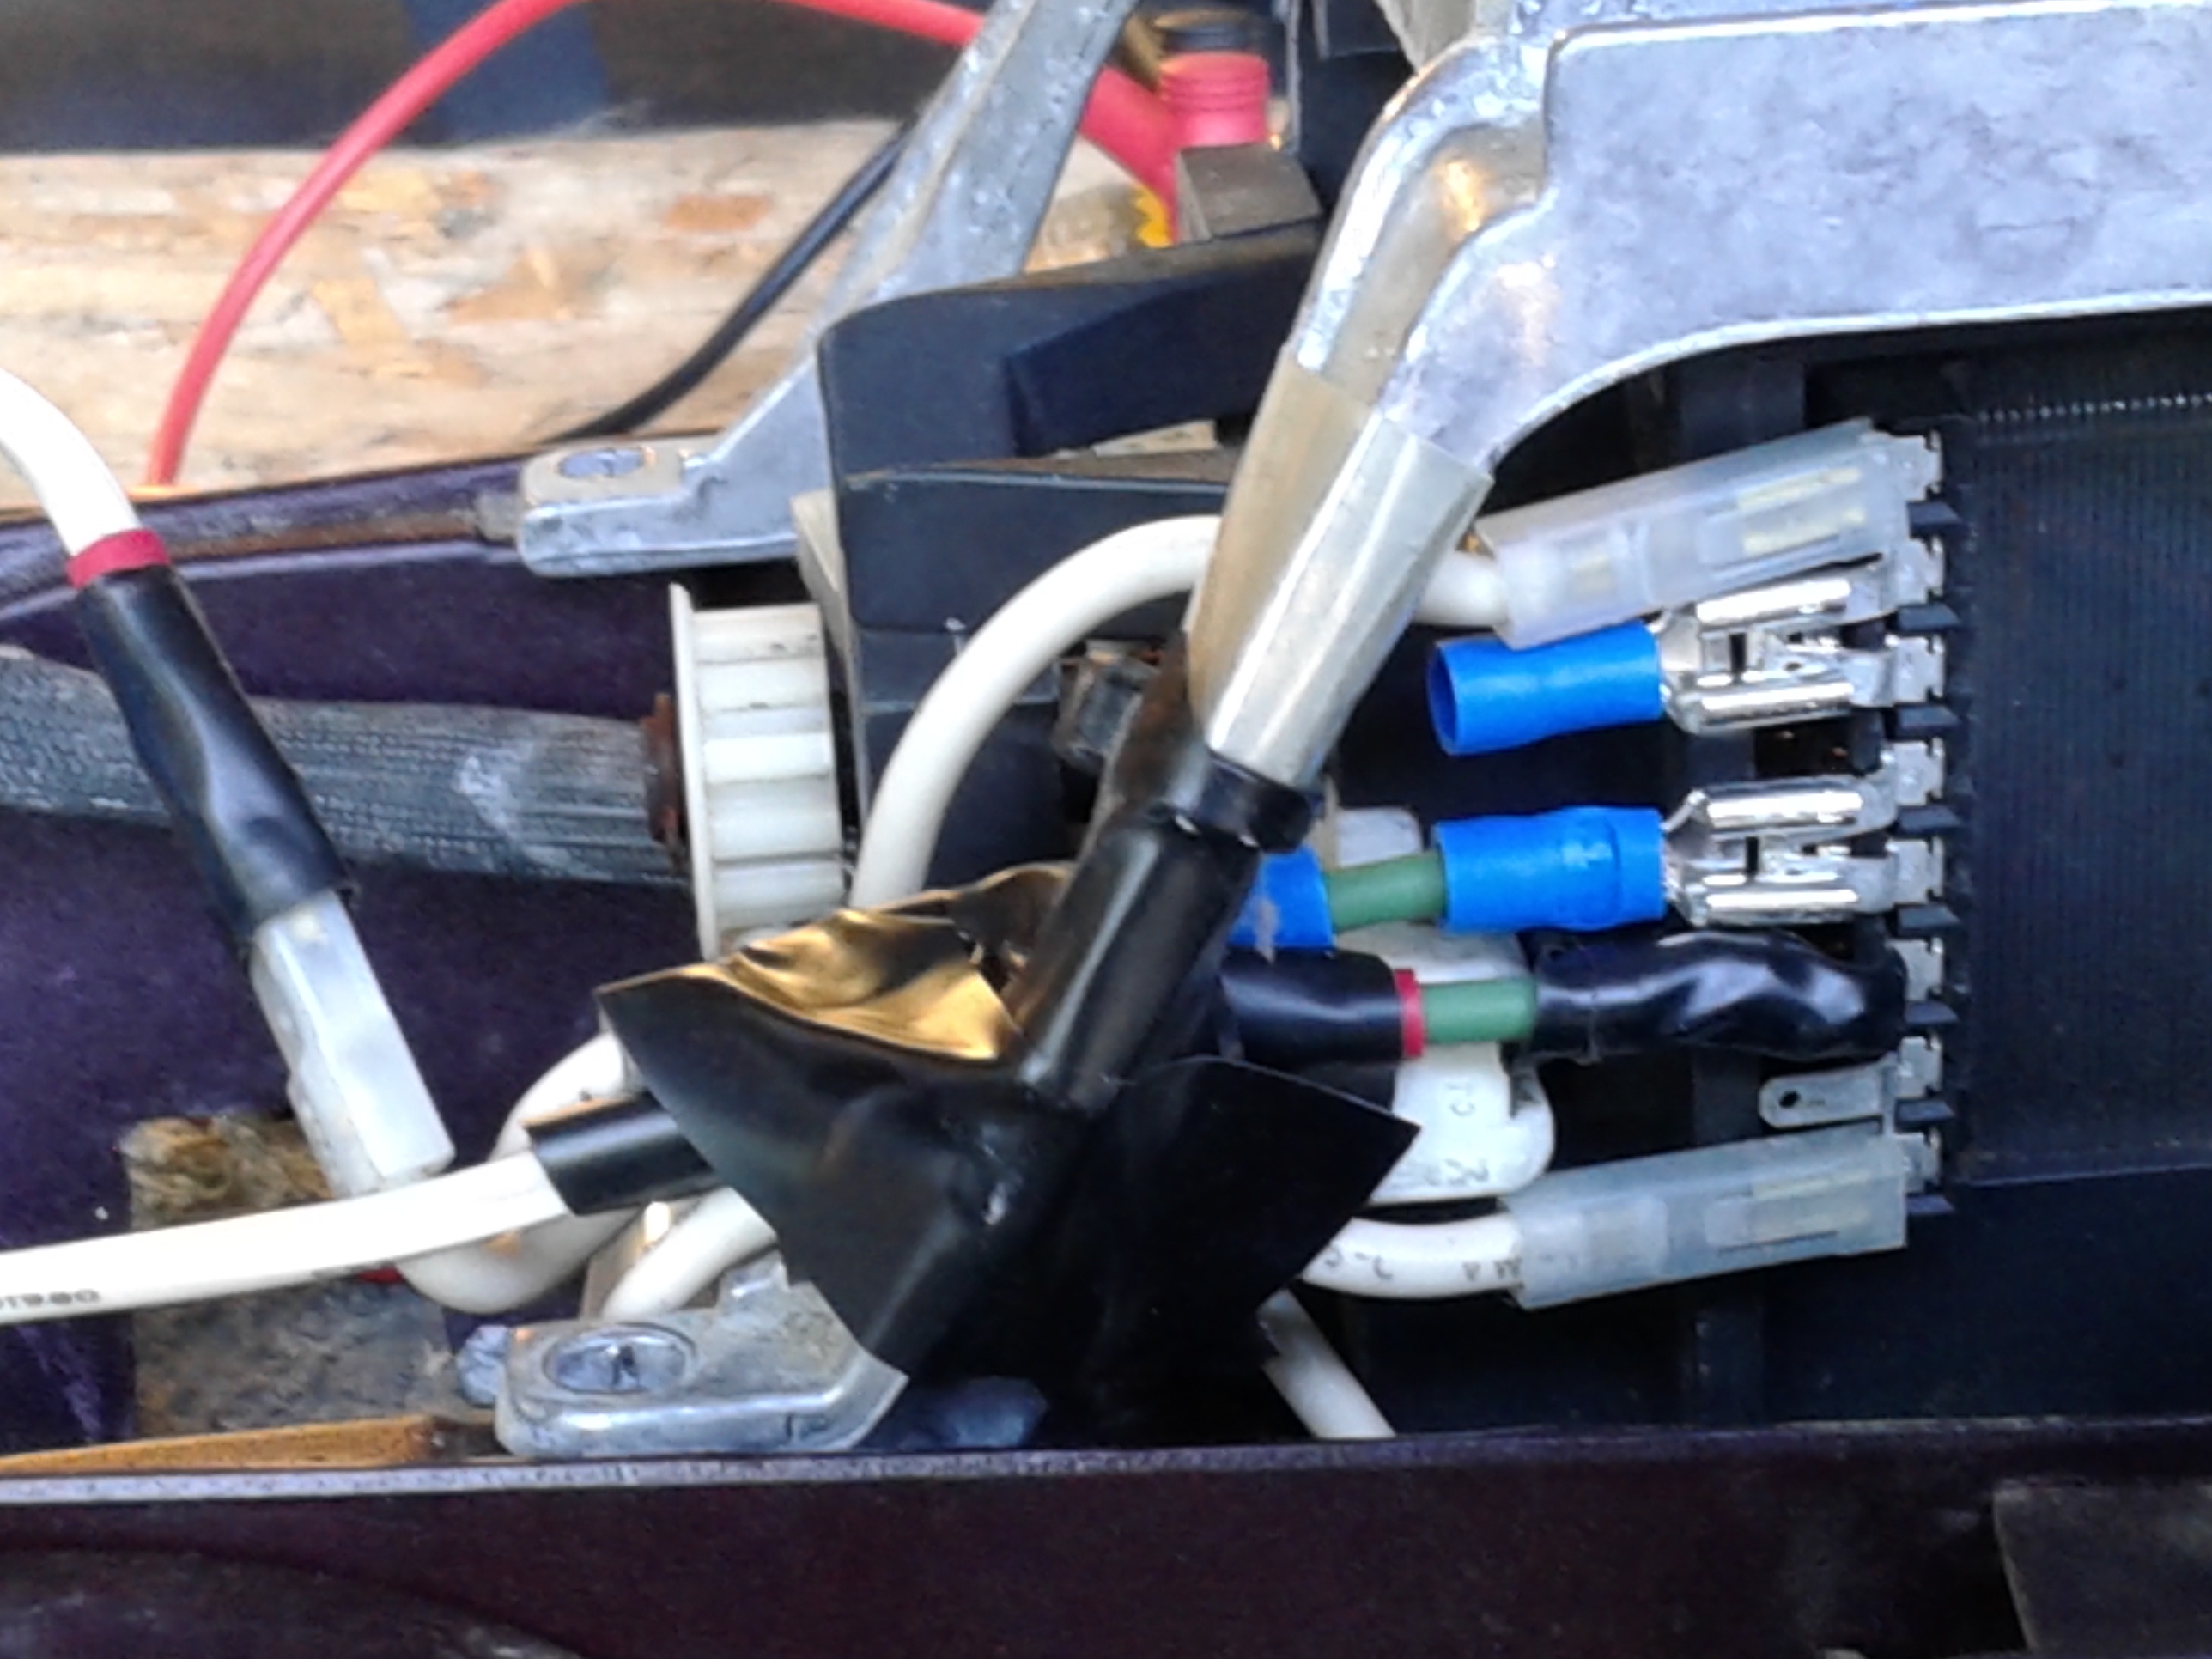
Let’s start at the very top of the plug in block tabs of the last picture.
Tab #1 is where one lead of the light plugs in. Tab # 1 and # 2 are linked together already internally.
Tab #2 and #3 needs to be linked together, just used a blue female clip.
Tab #4 and #5 needs to be linked together, just used a blue female clip, and also this short green wire with a male blue male clip that is connected to the long wire brush lead connection. You will have clip this connection down by cutting it in half so it will slip into the narrow female brush connection.
Tab #6 is connected to the 110 volt power cord. I had to make a connection by cutting a red female clip long way in half, if you can find the smaller connectors that would be better.
Tab #7 and #8 are internally linked together. The other end of the light connection is clip on #8.
The short brush wire lead is connected the ground lead on the power cord.
This has no on/off dimmer switch wire in yet. I will edit this later when I get the switch.
And there you have it. Thanks again to @TomC I am hoping he will post the pictures he has sent me on messages.
Again lets try to keep this thread on the Kirby conversions to a Blower for gasification. Remember you are all invited to join in with your Kirby ideas.
Bob

8 Likes

Hi BobMac,
Mine is and older G4. Yep. Then had a phenolic blower wheel too. Be ok for blowing. Sucking you’d best pre-cool the gas some.
I believe you have to go back to a G3 and earlier to get the aluminum metal blower wheels. (kids marbles sucked up these grenade’d. The plastic was considered safer.)
Hey! G3’s are still out there. Keep looking. Always on the eye out.
Couple of good Net service/parts sites with models histories on these Kirby’s
S.U.

2 Likes

Hi Steve, here is the finish G4 with a dimmer light switch mounted on the vaccum blower case.


A $7.00 dimmer switch is all I spent on my Kirby Vaccum blower and my time working on it. That would equal if I used just $10.00 per hr. - 3 hrs. $37.00 total. I can’t buy two new blowers less then that.

It works great, hight setting down to a lower setting for air movement.
Yes I still have my eyes looking for a older model.
This G4 is the opposite of the Craftsmanship vaccum blower, that was all plastic with a metal fin turbine. The Kirby G4 is all aluminum with a nylon fin turbine.
Bob

3 Likes

I bought a utility box to put my blowers in about a year ago or so. I guess now I am reconfiguring everything I might as well put them in the box.


If I mount the vaccum blower in the box like this the old piping will line up very nicely and…

There is still room for stuff like flaring tubes, glove, tools and the normal stuff we all need, like a machete. You never know when you might have to do some Bush Whacking when looking for a big log to cut and haul home. Right Jan? @JO_Olsson.
I think I will also put a outlet in the box, so I can unplug the vaccum blower and have power for other things.
Bob

5 Likes

Great job on your front inlet adapt too BobMac.

I did a lot of agonizing trialing on woodgas suction/blowers. A lot of false-hopes, and dead-ends.
I was late finally conceding to the MikeLaRosa/Tom Collins way.
The Kirby/Rainbow/Filter Queens all have excellent motors and blower housings shaping.
ONLY the Kirby has the short, nearly direct, large diameter into the filter let-out flow pathway. An important lesson here!!
IF you long paths, with small tubing, with many 90 degree turns, restrict the blower downstream it will not work any better than others.
Had to learn that one the hard way. VesaM could have said this. Shows this on his own books designs blower systems. Why the European systems are mostly all direct coupled blowing into the hearth air/chamber/manifold. Has to do with effective air-watts. An engineering term I’d never been exposed to.
S.U.

3 Likes

Yes Steve, this hook up with the Kirby will shorten the connections even more. I still need to make the all metal flapper check valve. The red piece on the front of the suction side is half of the melted check valve that couldn’t hold up to the very hot exhaust leak heat in the Muffler Preheater Box. The new check valve will be ahead of the blowers with a gate valve in line with the chech valve. I will Close the gate valve for across country driving when not driving on wood.
Bob

hi BOB MAC good project too post i have about three of the older aluminum perpeller units i bought from 15 too 25 bucks at auction houses.Not sure if switch wireing is same as newer modles, though the one i have working now i just use the original push button switch, I think i could try a standard dimmer high power lighting if could find one with enough whatts. Or Pwm ? my first kirby vac unit i had too rewire around a broken switch and it is hard too remember how it got rewired though it was tricky too make work , ithink i had wires proper due too no heating of the windings.

3 Likes

Hi Kevin, I just used a new $7.00 dimmer switch I bought at Lowes. A round dial for speed control. Push on and off. Wired in on the power side in line hooked the green ground to the vaccum ground . My unit is a double insulated unit. Those older aluminum turbine impeller Kirby Vaccum are bulletproof.
Bob

1 Like

Thanks bob on the switch detail, i know them old aluminum peller kurby vacs had too be well built too still be running good over 40 years sume of them. not reallt sure when they built the first one of those type , anyway i install mine after the hay filter and that cuts back on the slug till burner gets cooking hot enough for clean gas. Happy wood fuel transporting.

2 Likes

Ah Ha! Took me awhile to fine this most excellent DIY topic for some pictures to post up:


A used ROYAL vacuum I found at a Thrift store, now stripped down to send to a gasifier friend needing.
These do have separate blower from motor. DO HAVE a metal turbine. This one an actual made-in-USA Highland Heights, Ohio.
The later made-in-China knock-offs are O.K. too.
I forgot to picture the whole assembly. Looks old simple 1930’s, 1940’s.

BobMac showed well how to put these h.d. vacuums into gasifer service.
Oh. ROYAL model #880. 3.5 amps at 120 VAC. USA’s are external brush types with a red pop-up button thermal breaker. The China ones have internal motor brushes.
S.U.

11 Likes

That is a good one Steve. Would love to find one of those at the thrift store.

7 Likes

I don’t remember who posted this Kirby setup with the 3 way valve so it both sucks and blows, but I like the clean look.

11 Likes

That almost looks like Tom Collins’ blower, I know he has a 3 way valve on his Chevy.

9 Likes


Ha! Ha! I did not intend to strip out the cord and switch to send too.
But the eight year old was hitting on her 9year old, a week away from 10 year old sister and needed separating “punishment”. So marched out to the shop and watch the Papa do “boring” stuff.
She got her anger out beating on an old chain length with the hammer . . . .
Then the vacuum handle end was freed and look just like a pirates pistol. Mine! Mine! Mine!
Sure. O.K. But no shooting the sister, No shooting the dogs. No shooting the cats. Huh. The tube handle switch hole on its underside was just like an Ithaca shotgun loading-injection port. So I gave her old paint pens for cartridges.
No-No Noelle! Do not beat on your pistol with the hammer or your cartridges will not fit anymore. Darn artist-girl got the white pain pen to working so PaPa got in big trouble with GrandMa then!

Anyhow he now gets sent an included motor rated H.D on-off snap switch and cord too.
S.U.

9 Likes