Toyota start up.

Toyota start up.
Great job, on your charcoal gasifier build and with the trunk lid in place it just looks like you are hauling barrows down the road.
I sure saw a lot of SWEM on your faces. Lemons will help, but only last a couple of minutes and then you have to treat the SWEM again with more lemons. A good sour lemon drink on ice would be great in your situation and just keep sipping on it as you drive down the road.
Bob
Greetings Everyone—Here is this week’s update:
Thanks Kyle for posting videos of today’s visit. They are a great addition. If you come again and the full startup works like it is supposed to, you can do a video of that as well. As you now know, I gave him the grand tour including a ride in my Toyota CharCar. He left with renewed motivation and “ideas” for his anticipated wood gas project. I could see the wheels turning. Fortunately, Kyle’s videos don’t include the embarrassing moments. I learned a lesson today—don’t try to drive on gasoline with the air valve closed and a plug in the gasifier air intake. I haven’t noticed any permanent damage, but my convex drum lid was sucked into a concave shape. I stepped on it to pop it back out. Put it on, finished starting up the gasifier, and away we went. Apparently my gasifier is very tight.
If any of you ever come near Oxford, NC, exit 206 on I-85, consider stopping by and I’ll give you a ride, too.
I made several slight alterations in the gasifier last week, but no test drive due to a week of rain. I added a larger container which is made of plastic for water and a cut off valve for the drip mechanism. Also located the drip “glass” so I can see it through the rear-view mirror. Made slight mechanical improvements to the reactor lid lock down mechanism. Replaced the A/C size pool filter with the larger B size and made a sack filter out of a bath towel to go over it which ties only at the top. I replaced the flimsy AutoZone control cable on the gasoline valve with a much sturdier one from NAPA. I have plans to add a large grill thermometer to the final filter container, positioned so I can also see it through the rear-view mirror.
Thanks Bruce for the threaded rod idea for your charcoal grinder. I hope to start on it before the end of the week. Thanks Gary for the advice about adding water and exhaust gas. I think it ran cooler today. I will add both from now on. Thanks for the encouragement Koen. Eddy, thanks for including my project in your drawings and thanks for the much-anticipated drawings of Leitinger’s Mercedes.
Finally, I have some questions for you folks: Can anyone recommend an internet source and specific wool material product for making sack filters?
Kristijan, with your style nozzle, how do you monitor the reaction temperature? How do you know when and what adjustments to make to the water drip and exhaust gas? I would like to try your style nozzle, but without a viewing port or temperature guage in my reactor, I am wondering how I can control the reaction.
Bruce, is there a cone shaped collector or some collection container inside your MGB cyclone?
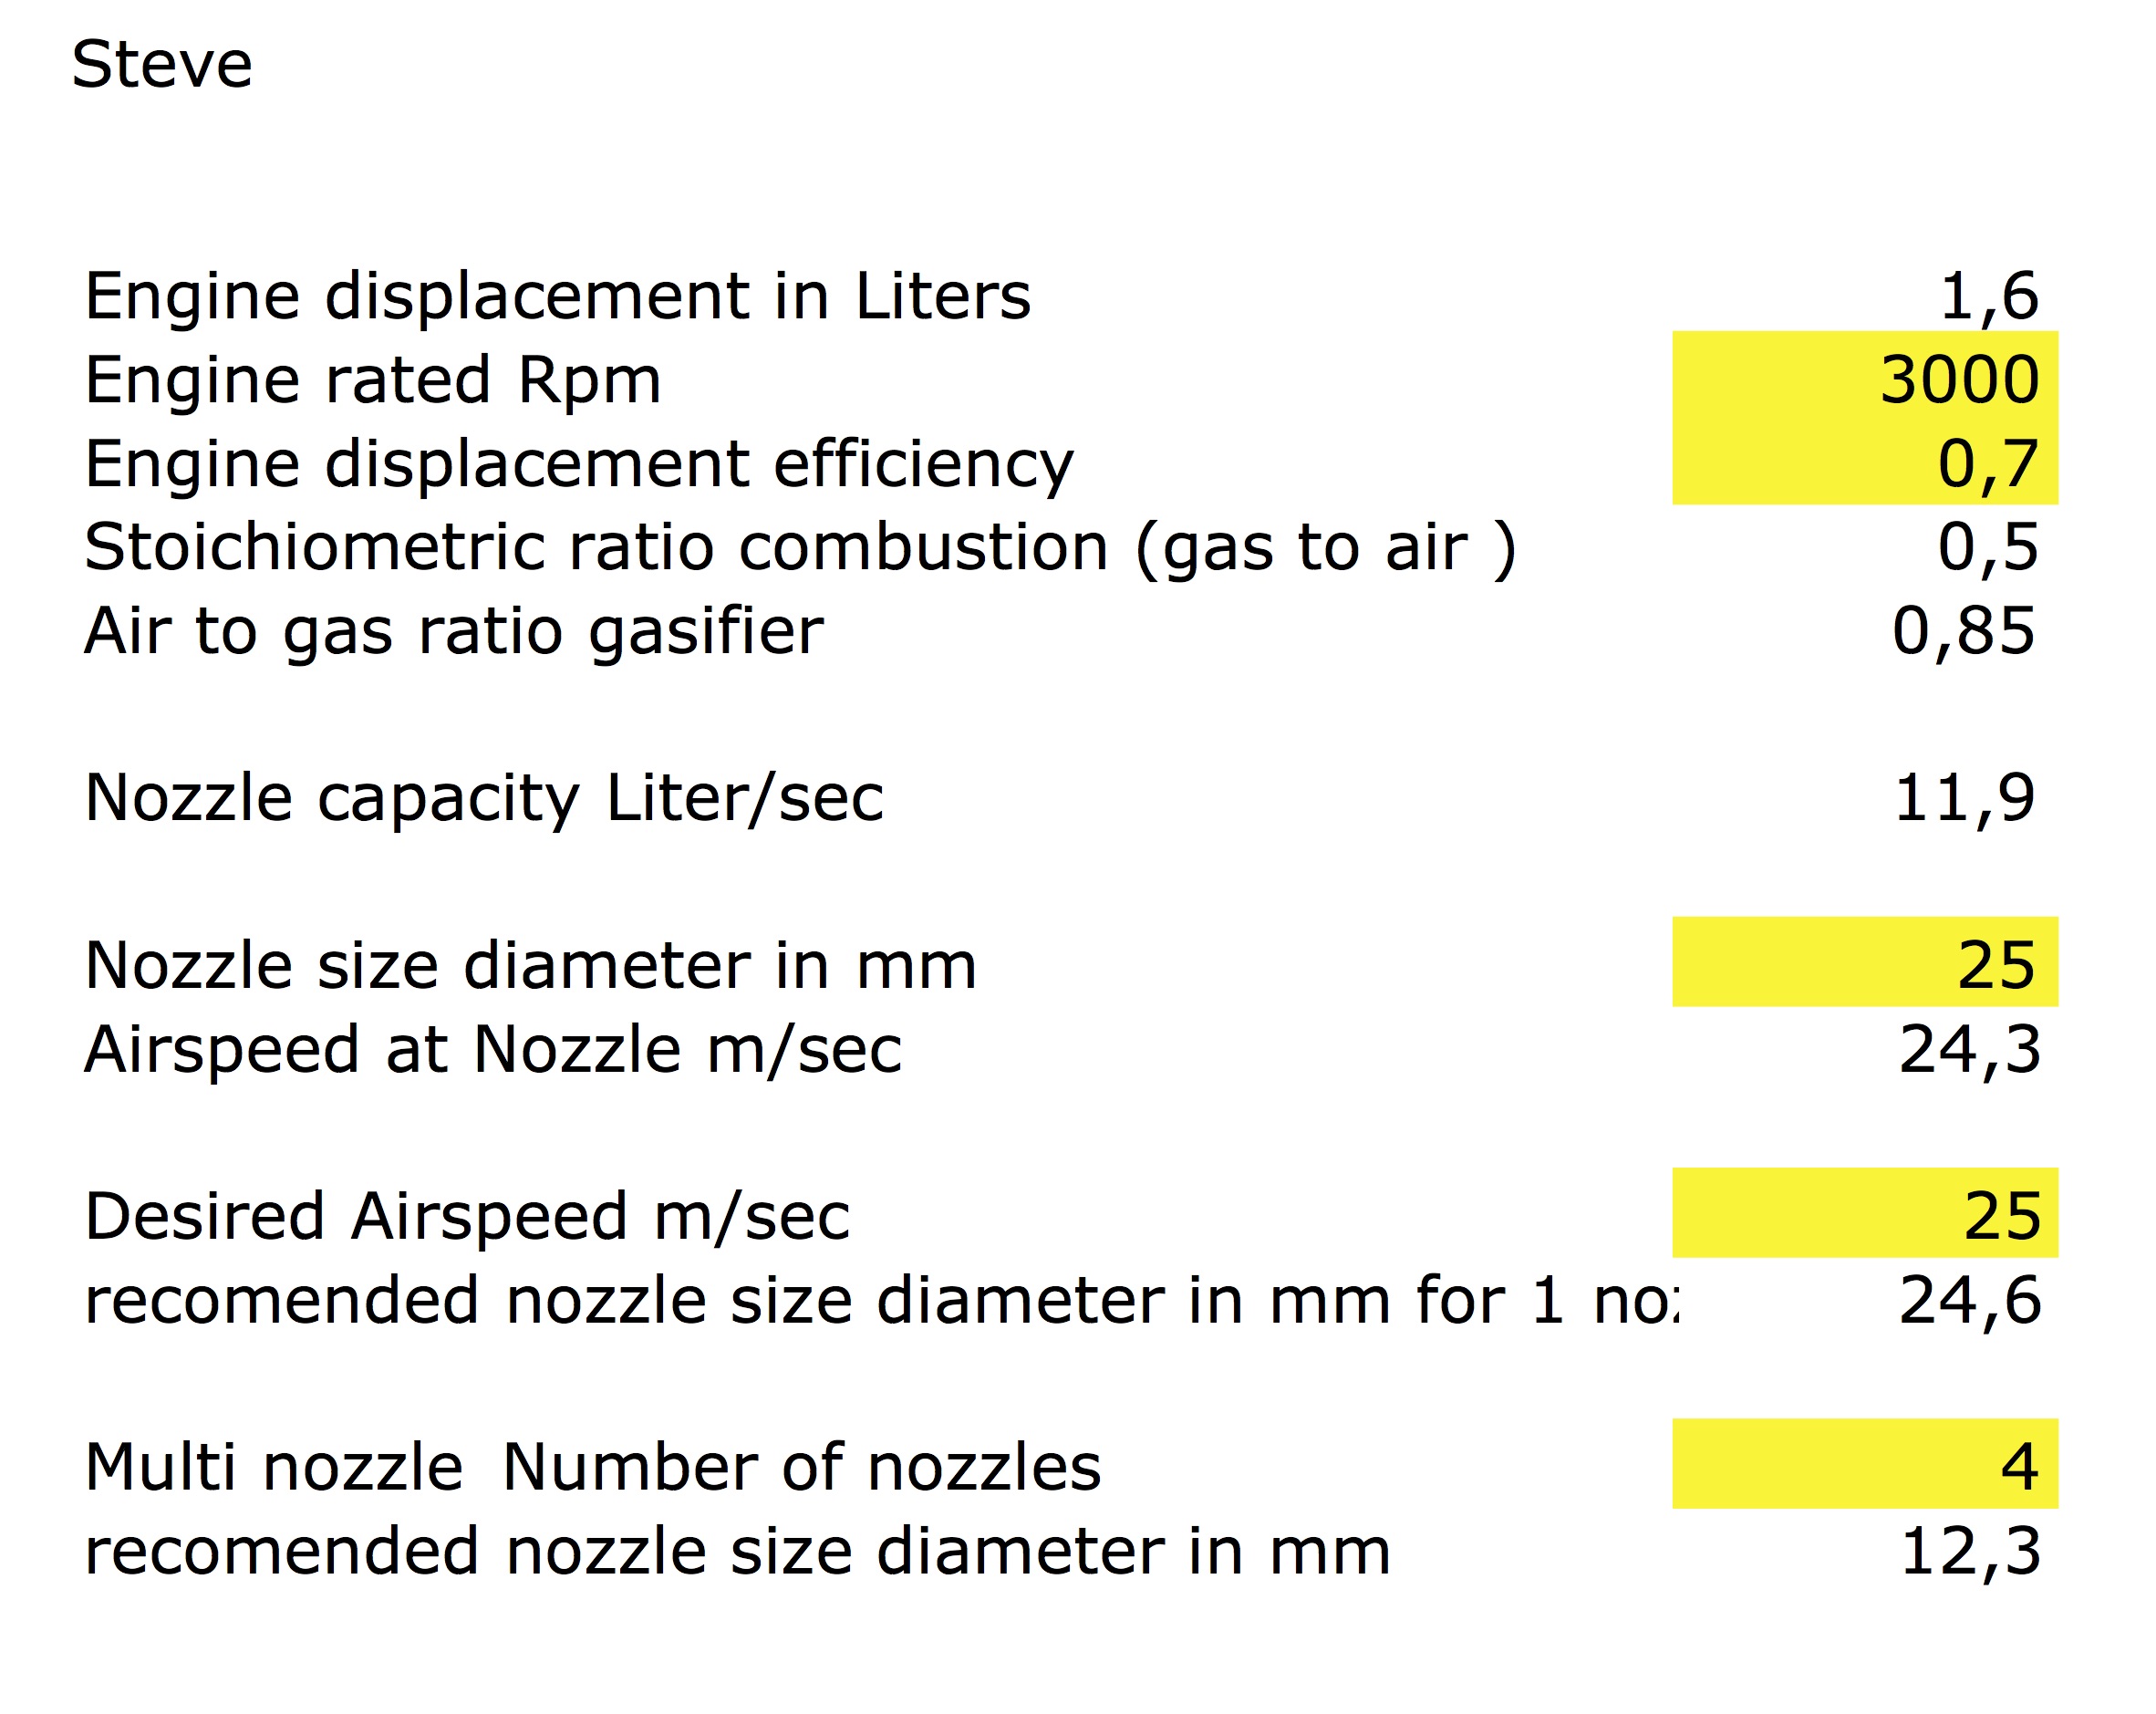
Koen, please help out someone who doesn’t like to work formulas and suggest a reasonable diameter for a single-nozzle and also a four-nozzle arrangement for my charcoal gasifier (my engine is 1.6 liters.) I know I will need to make some change soon, so I’m trying to decide what to try next. You may have provided the nozzle specs for a similar sized engine somewhere already. Just point me in that direction, if you have. Thanks.
Steve and Kyle .
You boys are having just too much fun 
“cruisin along in my automobile”! Nice.
Hi Koen
In the case where the air is strongly preheated enlarge you the sextion of the nozzle?
Thierry
Steve,
My straight-walled cyclones have an upside down shallow cup with a hole the size of the inlet to capture the dust.
Hi Thierry,
It depends the whole setup, plus it also depends the charcoal used.
The given numbers are a guideline for starters. Just to have a “correct as possible” baseline, to get on the sweetspot as easy as possible.
Greetings All,
Thanks for responses to last post: Koen for nozzle size info, Bruce for info on the cyclone, and yes, Wayne, a good time was had by all, after I popped the lid back out to its original shape.
Not much new. I added thermometer to final filter housing which I can see in rear-view mirror. Tried to build hand-cranked charcoal grinder. Didn’t work out too well, so decided to go back to crunching up charcoal through expanded metal with shoe power. I just need to get expanded metal with smaller holes and I’ll be all set. I am including a photo of my fines eliminator. It works so much better than shaking a screen by hand, I expect it works almost as good as a powered version. I can screen a barrel of charcoal in about one minute. It is so fast I usually do it two or three times for super-fine results. Thanks, Gary, for that idea. I am also including a photo of several nozzles I want to try out as time permits. Have tried to tie up loose ends before it gets too hot to work in my shop. The Corolla may need a new starter, battery, and the carburetor still needs a good going over by an expert. The main thing I need now is to get more experience operating this thing.
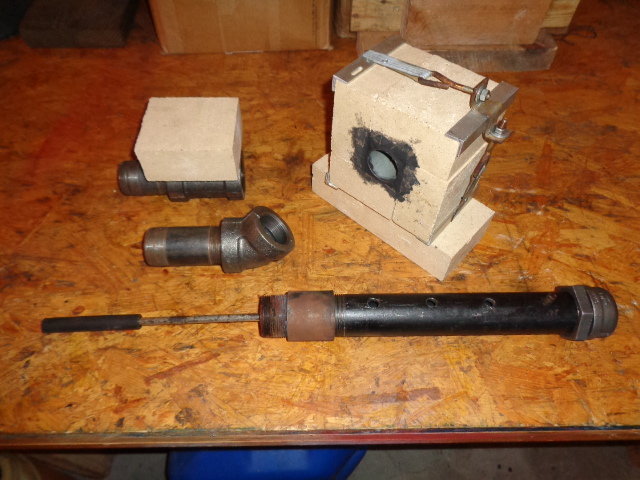
Nozzles for Testing
Great work, Steve, Any updates for us?
Bruce,
Several issues with the Corolla need to be addressed before I will feel comfortable driving the car very far. The car had several problems before I added the charcoal gasifier. Some have been dealt with, but others need attention. Now that I’m convinced that this project will be successful, I’m willing to spend the time and money to deal with the other issues. I have a new starter ready to install on Monday. Next I’ll go shopping for a new battery. Then there is the matter of the cooling fan which runs continuously. There is a brake fluid leak. Finally, I may look into replacing the carburetor, though what I have works fine for now with chargas operation. Once some of these things are dealt with, I’ll have more confidence driving it out on the highway. It hasn’t left me stranded yet and I’d like to minimize the chances of that happening. The good news is the engine doesn’t seem to have any major problems. It is a 1989 model with 215,000 miles on it.
Thanks for the good update. We look forward to seeing and hearing more about this build.
Greetings All,
Here is an update. I have spent a month trying to improve the condition of the Corolla. I installed the new starter, a new battery, fixed the cooling fan problem, installed a new head gasket and spark plug tube seals (oil was getting into a couple of them). Also, noticing that the steering rack and pinion bellows or boots were falling apart, I replaced them, too. In the future I may yet replace the carburetor with a new “Latin” version available inexpensively on-line, if I can figure out how to tube it up properly since I have the Canadian version.
Today I turned my attention back to the gasifier, particularly my concern that the car is very lacking in power when starting off in first gear. So, I got brave and started playing with the timing. For my stationary experiments, I increased the idle, loosened the distributor and rotated it. I was puzzled that the idle speed with both gasoline and chargas increased somewhat as I advanced the timing up to the maximum the slots allowed–a 30 degree advance according to my calculations. I expected a decrease in rpms at some point. Perhaps that would be noticeable at higher engine rpms and/or under load. I went for a short drive on chargas and had noticeably more power starting off. I was amazed.
So, I would like some feedback from you experts in ignition timing. I don’t want to risk damaging anything due to an extreme timing adjustment. Also, I was thinking of making a variable timing adjustment, but since I seem to be getting the same result with gasoline as chargas, that may not be needed. For the moment, I have tightened down the bolts at that maximum adjustment and plan to try driving it some more on gasoline and chargas further monitoring its performance. Please advise. Thanks in advance.
I had the same experience with my Tracker. The only danger is kick back when starting on gasoline.
Same here with my Seat. I think once the engine is under load things get different.
My Mercedes however has a potentiometer in the engine compartment that alows manual timing seting based on fuel quality. It has 9 setings, manual sugests seting 3 for low quality low octane fuel, and seting no 6 for premium 95 octane. Since it wuldnt be practical to move the wireing to the drivers seat, changeing the potentiometer at each hybriding/dino run, l set the potentiometer on 9 (most advanced timing) and l just fuel with 100 octane, or 110 octane if l get it. Kind of a midle way for both petrol and woodgas.
Thanks Kristijan for sharing your experience and making suggestions. Sounds like what I need for a fixed timing advance. After the previous post I loosened and tightened the distributor bolts (mine is turned sideways) and it seems to me that it wiil be to difficult to rotate with a cable or spring/cable control. I thought perhaps to use springs on the mounting bolts which will allow me to grab and rotate it by hand without having to use tools and yet will hold it steady for driving. So I gather that there is no danger to the engine running with gasoline and the timing advanced to 30 degrees? Just use high octane fuel.
While waiting for others to have the opportunity to respond, I have another related question. The timing specifications for the engine call for setting to 5 degrees BTDC at 950 rpms. Since the timing does automatically advance with increase in rpms, what do you use as a guide for engine speed when setting timing for wood or charcoal?
What Don said on kicking back. Also engine knocking at low rpm hard pulls, which is not good for head and pistons.
I used turnable dist on wire with the Rabbit but a fixed slightly advanced timing with the Mazda. However I never experienced any difference in power on woodgas, stock or advanced timing. Every engine is different.
I’ve never used a timing light but as a general rule as long as rpm increases at idle when advancing and there’s no knocking pulling hard you’re safe.
I second what jan and don said, my timing is usually set by ear allso, addvance till knocks then back off till no nock under load. The newer vehicles with nock sensors might help some allso, my wood gas s10 needd newer starter too, the one thats on it i think is for the newer 4.3 trucks and jumps around when starting, had too shim too make work in t he first place. The older vehicles get harder too get right parts at times.
Thanks to Don, Jan-Ola and Kevin for your input on timing advance.
Had the best run yet last week—a 12 mile trip with hills, stops and starts—with good performance and satisfactory power. I noticed that it stayed in 3rd gear more than on previous runs. It was the second drive with the maximum timing advance adjustment (now estimated to be a 25 degree advance) and the first with Kristijan Leitinger’s nozzle design. I didn’t use any water drip and only exhaust return for the last 2 miles—after realizing that I had forgotten to turn it on. This week I replaced the 5 gallon steel bucket used for my cyclone filter with one made of heavier guage metal and designed for a lever lock lid. Although the dimensions are not ideal for a cyclone, it does appear to be doing its job of removing the heavier dust.
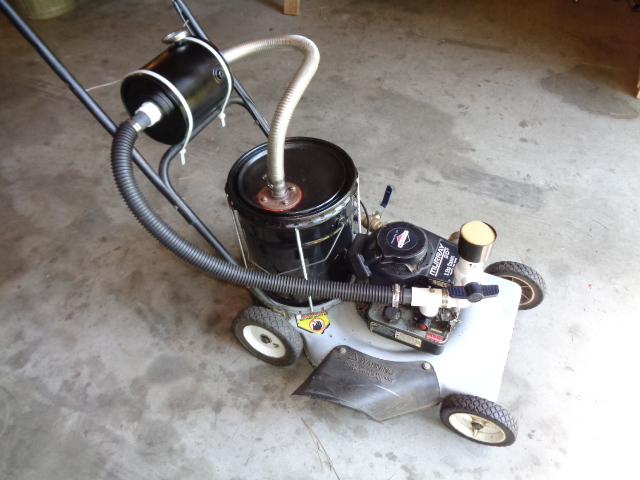
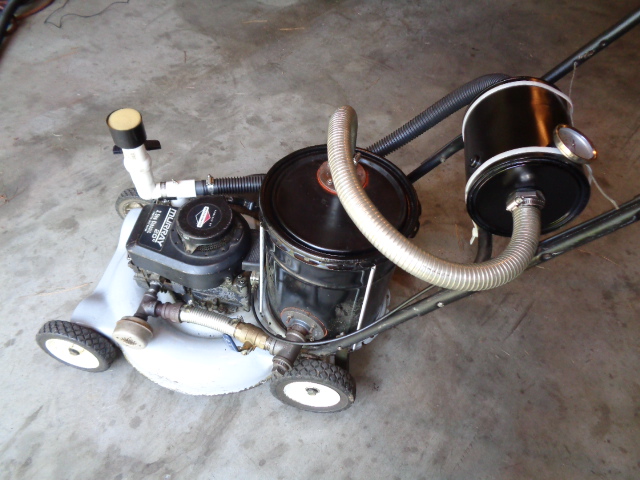
Also last week, I decided to eliminate as much weight as possible from my push mower gasifier (about 12 pounds) to make it more practical to use. I think the appearance is improved also, Here are two photos of it.
Some time back Eddie had asked for an operating procedure once I had some experience driving the Corolla on charcoal. Reflected in the procedure shown below is the fact that I use a blower to start the gasifier. Also due to problems I’ve had changing from chargas to gasoline and back while driving, currently the engine is started and run on either gasoline OR charcoal. With those details in mind, here is the current operating procedure:
TO START THE GASIFIER
NOTE: Make sure gasoline valve is off and float bowl empty.
TO SHUT DOWN THE GASIFIER
TO ADD CHARCOAL TO THE GASIFIER BEFORE LIGHTING
TO CHANGE FROM CHARCOAL TO GASOLINE FUEL
And finally a curiosity question—have any of you had emissions tests done while running on wood or charcoal, and if so, what were the results?