The tarm boiler I had worked best if you had a 700 gallon storage tank to dump the heat into. That tank was big enough that you could get a full load of wood to completely burn and store the heat for later. Also as nice as that stove looks you might hate the idea but building a insulation blanket and sheetmetal skin will help tons with keeping the heat in the mass of the stove making it start much easier when you reload it. The tarm has skins like that and if the boiler gets below 140f forget starting it that sucks. I actually had a oil backup boiler and would fire that up in the fall to pre heat the wood boiler. Tarm had a design where they would put a oil burner under the heat exchanger pipes in the back as a combo stove I always wondered how well that worked but at the time I bought mine I had two chimneys and the building inspector was a bear when it came to mixing wood smoke with anything else in the same chimney so I avoided the problem by buying a quick start oil boiler for the backup.
Hi good after noon Dan, thanks for the info on the tarm boiler, and the water storage, i was planning a water storage tank later on, though this unit i built seems too heat up a little slow from a cold start, though if i heat the water up too 210 f before bed or heading too working, and fill up with wood, dampers off fans off and then 8 or so hours later i still have enough char too get a good fire going too build the char up a little and its working in few minuts. 8 hours after i turn off all the air and fans the burner still has water temp about 150 too 160 f in the last week, and its been a cold week, allso my bottom burn chamber has 2" thick ceramic blanket and no water jacket on bottom too preheat, so that may be helping keep temps heat up quiker, and run hotter, That was my plan too keep bottom area dry from the watter jacket.BBB Though i need too add some extra water storage so enough too burn a full load out the wood hopper too save on warm up time and wood preheat time.
With the tarm the boiler was set with an over temp circular at 195F I think once I managed to get the boiler to 200F before the house was able to match the dump load to lower the boiled temp and I had both heating zones and the water tank as dump zones to make sure the boiler didn’t become a steam bomb. The best I was able to do with my storage tank was a temp of 190F the baseboard heaters would function down to 160 in my house below that it was useless you needed to allow the oil boiler to take over.
As far as reloading and restarting the tarm would hold enough heat to relight for up to 12 hours after the fire went out. Much like you describe the refractory chamber would be hot and the wood would smolder and the gasses light as they went through it starting a fire again. The pictures of the flames you showed actually looks to me like you have more primary air then you need and not enough secondary air in the boiler. The tarm would actually burn a blue flame down there if you could get enough airflow down low it has a damper to control the mix between primary and secondary air. But it sure does sound like your getting pretty clean burn if not perfect. I am very impressed.
Thanks Dan Allard in the last photo the fans were off for few minuts, but still glowing in bottom areas.Though as you menchened, i do need too add some secondary air, because when i crack the bottom door open it seems too burn faster & hotter, then i might have a foundery melting pot down there’ ?!!!
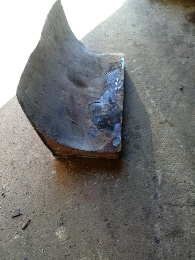
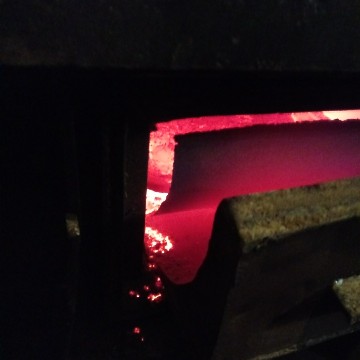
Too the wood heating builders on the fence, i am wishing i had the green burn type wood burner 30 years ago, so much cleaner burning, even with my 50 percent moisture wood mixed with 30 percent moisture wood, this type burner is cleaner by far. first pic is chimney before opening the the secondary burn chamber too see the flame shooting down in the bottom burn chamber. The flame pic is the bottom flame blowing down and hitting my flame ramp too help keep my bottom secondary burn chamber door seal areas cool enough too hold up too the red high temp silicone that holds the rope seal fit in place. I had too shut the top chimney off with insulation too keep dirty smoke from bypassing my attemped shut off trap door. now all i need is too put some sort of shut off on the 2 1/4" pipe air inlets, so when the fans shut off, the fire wont be feeding the hopper with air too create more dirty smoke at the shut down times.
second pic is my chimney before i blocked the inlet air from the fans at shut dow and the last pic is after i put bags over the fans too block inlet air at shut down too keep chimney clean at shut down. This type unit will be nearly no smoke at all one i fix the auto air closeing at shut down. P.S. My chimney temp stays below 185 f at max, so that is better than most units available. with a smaller heat exchanger the chimney heat waisted wood be more like the most units around 300 exit temps.
All you need too build this unit as i did is a heavy thick fire place insert double wall 1.8" or thicker if posible. A bottom burn chamber lined with ceramic blanket, one or two little fans too put positive preasure in the burn box too get the flame shooting down and out the bottom slot cut in the wood burner flore and any kind of heat exchanger too collect the heat in water before the heat exits the chimney, Thats about all.
cleaned out the ash in the secondary burn chamber, looks like it is plenty hot enough too burn up all the dirty wood smoke. and my ash pan is desolveing, so i put anorher layer of metal over hot areas till get some high temp fire brick located in the flame draft areas. back burning smoke free i really caint beleive, all these years thinking i need bone dry wood for the new type clean burn wood gasification boilers.
Kevin, I know very little about this way of heating, If you could slow the fans down, would that reduce the operating temperature too much? I’m thinking your components would last longer. Like you say, fire brick or castable refractory should help. I guess you need it hot to get rid of the smoke and volatiles! 
Hi mike yes like we now see the smoke is fully cooked if hot enough in the secondary burn chamber, I could slow fans down at times though the fire brick should keep the extensive or the extream heat low enough after the fire brick,. Working good with 40 too 50 percent moisture wood as far as keeping the chimney smoke gone. so any extra heat consintration is better, that was why i bought the ceramic blanket, too keep the heat highest with less lost too the rest of the burner metal.So like you say i can just stack a few fire brick too insulate the heat from the metal covering the ceramic insulate. should still heat up fast with 10 too 12 " box made from fire brick, maybe a cast iron plate on top of fire brick box too keep the ceramic blanket from damage and or falling down. So far over the top of my secondary burn chamber between the heat exchanger and the wood stove, temp stays below 200 f. my chimney pipe stays below 200 f at normal run times.Any quistains on how its built feel free too ask.Thanks. I would recomend this type gasification wood stove for shur. I got more tranny pans too replace the cooked one for now ’ THOUGH THATS MY LAST POWER GLIDE CHEVY PAN.
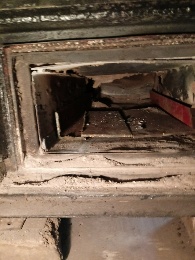
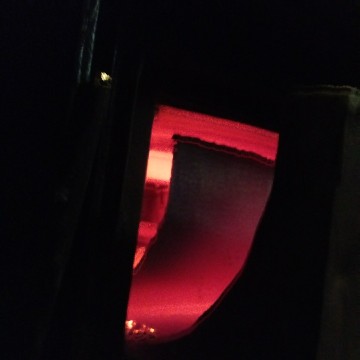
Its time for fire brick in secondary burn chamber,before next winter. I ran the wood heater down too 135 f over night with fans of, then ran it back up too 195 f this morning, by the time i got out too check the fire it cooled down 3 degrees f on water jacket probe. Any way about 4 or more minuts after that i pulled the flame ramp too check the temps inside bottom chamber, first pic is flame ramp and exillery plate slid out the bottom door a bit, and second pic is pointing too the top portion of inside the burn chamber, as you can see my ss 1/8" top plate is glowing red, was pure red when first opened bottom door.
 Probbly burning up any excess fuel, cause it cooking all the smoke too.I may even consider a pwm for the fans depending on wood dryness and breathing factors, adjustments.
I think instead of trying to master the shutdown of the fire while it is burning I would focus on building enough thermal mass (big water tank with edpm liner and copper coils) to store the entire burn worth of heat they you could simply fill the boiler and store the heat for later usage. Even the Tarm commercially designed boilers struggle with heating on demand and recommend that you have ample storage. It is amazing the difference a well designed wood boiler makes next thing you will notice is how little wood you actually need.
Hi Dan i need too try a storege tank well insulated, it would be nice too just shut fans off the flame at night and use the stored heat until morning times. I think thats the next project. After i finish up the bushel basket of lemins, seeing this thing burn lots of varios wood dryness combinations, all while viewing no smoke out the chimney pipe.BBB.
When you get ready to build the tank let me know I can probably save you some research on how they are built. I am looking at building my second on before long.
Hi dan what do you mean how its built’ or should i say how is it built. my tank heat exchanger is all ready built all i need is a plain old storage tank, THE heat hits the heat exchanger and obsorbs the heat into the water jacket. What exactly are the tarm storage tanks made like or is there design doing. Or are you talking heat exchanger storage tank, ? Thanks.
Kevin you can buy one of these tanks but they are expensive and they have a R16 rating I think. When I setup my system the salesman told me well you don’t loss anything with the low rating the heat is going into the space you heat anyways. But I kind of thought that while I wanted DHW all summer I didn’t really want to heat the house all summer.
So instead I built a wooden box with R50 on the sides and R60 on the top insulation. With a EDPM rubber liner and with heat exchange coils for the boiler and the DHW. The Tarm boiler called for 2 coils of 1/2 inch copper 150 feet long in parallel. They recommended 1 coil 1/2 50 feet long for DHW. The codes very from place to place but if you don’t have antifreeze in the system most places will allow you to put a DHW coil directly in the thermal mass tank some places require a second heat exchanger for double wall isolation if you have antifreeze it definitely gets complicated but I figured if my thermal mass freezes I have bigger problems in my heating system and home.
I choose to step it up to 3/4 inch k type copper myself that stuff is thicker but after about 30 years here on the farm the old copper was paper thin and failed also hard water can have minimal buildup which makes thermal coils slow down their transfer of heat. I am planing on ordering 4 coils of 100 foot long 3/4 copper for my next system here on the farm it is a little different but will require thermal storage. 3 coils will give me the 300 feet Tarm recommend but it will be 3 coils in parallel to remove the requirement connections in the tank and the 4th will be for DHW.
The insulation you use is important you need to make sure it is rated for 200F most of the foam board insulation is not. The yellow polysocyanrate is what I ended up finding locally. Dense yellow foam board with aluminum foil on both sides.
When I built my tank I built it outside poured a cement form for the walls to sit on and just stacked the foam board off the sand base building a 2x6 wooden wall and insulating the inside of the box. Then my solution to siding it was 1 layer of vertical boards then not having calculated the side force of the water column on the walls I simply got the 3 inch wide ratchet straps and put 3 around the tank putting some construction adhesive to hold them to the boards and the screwing the ends to the boards where the wrap finished and overlapped. Then I placed a second layer of pine boards over the outside figuring the if the tank ever bowed it would tighten the boards onto the straps against all the screws and lock it tight. I never say any bowing in the 5 years I lives in that house. I forget the actual measurements of the tank it was something like 4x5x6 feet for the cube it just fit under my deck between two windows in the house. It was almost exactly 700 gallons.
But here is the most important safety advice I can give you and it is critical. When you put an edpm liner into a space like that you just made a confined space. The air in there is not safe to breath the heavier glasses will force the oxygen out of the space and faster then you realize. My tank sat for about 3 days before it was filled and the plumber literally almost killed himself climbing in for a tool he dropped. I warned him before hand but some people never listen. Fortunately he had an assistant who was able to get him back out safely. But I was at work and he told me you where right I almost past out in that tank.
There is one improvement I will make on my next tank it will have a float valve from my energy free cattle water those floats are 100% PVC so the environment won’t hurt then basically the same environment the cattle waterer has anyway.
That way I can seal the top edpm liner closed tight i had a homemade door on the last one and it was nothing but trouble always venting.
Anyway hopefully that helps it saved me a ton of money I actually cut out all the lumber with an Alaskan chainsaw mill I will never do that again but it was a great way to get my first exposure to cutting lumber. But I was able to build an R50 tank with way more copper for about half the price of the tanks in that link.
The volume of the tank doesn’t really change the cost that much because the bulk of the cost is in the copper coils.
Good evening Dan nh, thanks for all the info on that tank design, that type design looks like well made too hold the heat in, with the coils, could be turned on or off for when not needed extra storege, spring and fall times. Thanks, you saved a lot of money and have a better insulated unit.Nice plan design too use.
That setup would provide my hot water all summer with a single firing of the wood boiler. I was single at the time so a family would definitely use more hot water. It was a great setup in my old house.
Update on my gasifier wood heating boiler, i am verry happy too have built this design, i know there are various designs of clean burn heating units, This type design with basicly a secondary burn chamber below the top burn box/ wood hopper, with incomeing air devided too get a good clean burn, not hard at all too addjust with two seperate exturnal air fans. my burn box is border line big enough, was a fire place insert with 3/16" thick plate, i could not pass up the idea of useing it for a water boiler, my bottom secondary burn chamber is a little border line tall enough too line the ceramic blanket with fire brick, but the ceramic blanket sure holds the heat in good, the ceramic is a little bit on the itchy side, i would recomend another 4 too 6 " taller on the secondary chamber, and cementing the fire brick over the ceramic asap when building too minumize the dust from the ceramic blanket, maybe the ceramic is not really needed either.Cleaned the ash out of the bottom burn chamber and on top of my tall heat exchanger, and too my serprize after about a month of burning allmost soggy wood on top of dryer 50 percent too 30 percent mosture wood, i see no tarry stuff in my tall 50" heat exchanger, just some white ash sitting on top the tube plate.photos later of the heat exchanger before winter is over. Basicly this type unit should be under stood that it dont need bone dry wood too operate smoke free or mybe 90 percent smoke free with 30 too 60 percent moisture no problems tarring any faster than a regular chimney, if any thing it is slower too tar up due too the hotter secondary burn chamber even with barely dry enough too burn wood.
All my neybers will be thanking Wayne keith this spring and years ahead lord willing, due too no more smokeing crap from the old style wood burner warming up, this unit has a little char in bottom its smoke free less the a minut after restart if shut down a few hours. but even then its only minumal smoke trail for few seconds maybe a minute, Thanks again for the wood boiler thread and helpers on design, and WAYNE KEITH for this web site,
What wood do you burn, 50% moisture is like a cottonwood here in the NW.
I have to look away when splitting or chunking due to sap spray.