Steve,
The spray adhesive I used once yielded the wrinkles you mention. So later in another vehicle I used the push pins. At least they could be readjusted to make it look uniform. My children thought it looked like the inside of a coffin.
11 Likes
The spray contact glue in a can by 3M worked for me. If it does come loose again the second try will work a lot better. Where double gloves on each hand it is real sticky stuff. Pull the first ones off if you get glue on them and with the clean gloves gently smooth the liner down into place.
11 Likes
Thanks for all the kind words guy’s ![]()
And yes, Jo, your drive around in beautiful Dalarna really inspired me to make my own video.
And when wifes say: “maybe later”, it could be a question: “Do i really need to watch it?”…
Some on the roof headliner: i really become painfully aware of how bad its sagging when watching the videos. I don’t notice it usually, when filming i have my camera phone in a holder on my cap, therefore the perspective becomes some inches higher.
I have “repaired” the headliner before with various old pins and needles, but where i sit, i often scrape them off with my head, or cap/hat, i really feel the age coming when its hard to bend my back to get in a car like normal people.
I’ve started searching for those headliner repair stuff mentioned above.
13 Likes
Hey Gorank.
Another option is to edges cut out and remover the detached fabric cover.
Then brush or spray paint the underlaying fiber board actual base.
Two oldie 1950’s sedans had no ceiling underlayment former. They had steel spring bows.
I’d Kid DYI’s naugahyde reupholstered the front bench seat on the first. I had no confidence sewing then many seam and bow pockets to make up a new cloth headliner. Then; why not contact glue stretchy naugahyde directly to the underside of the metal roof??
That did not work past a few sun and cold rains driven thermal cycles.
I spatter painted it then to disguise the glue residues.
That change really improved the headroom.
Regards
Steve unruh
11 Likes
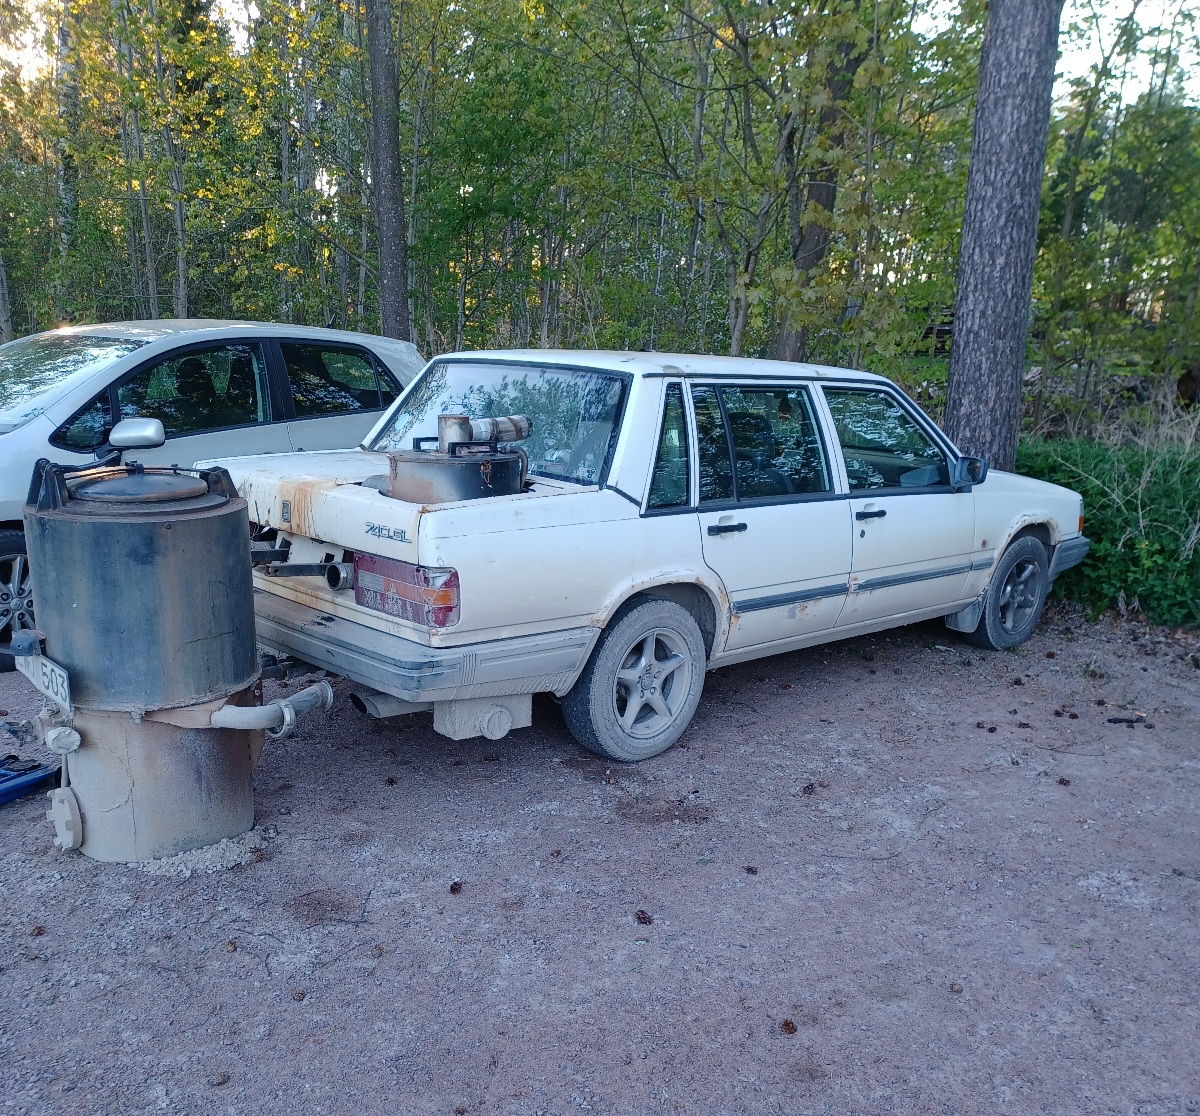
Yesterday i was driving home, sun was shining, the trees colorful, car was running great, so, i made a little video again, welcome, hop in for a woodgas ride

16 Likes
Goran,
Thanks for the fall foliage tour. Low sun really enhances the yellows.
13 Likes
Wonderful drive with you ,loved the fall season of colors. The car is running great and the your dog, I see likes to DOW with you. A great video again . Keep them coming.
14 Likes
Hi all, i’ve often thought about updating some here, but forgot it.
Now, Roberts post reminded me ![]()
The volvo has been running, mostly great, sometimes crappy, most of the year. About 60km every workday, and many other drives.
I would say it has been running 75% on wood, the rest on gasoline, this is most due to fuel wood shortage (as i have some limited space, and sometimes not the time to store away wood for proper drying.)
It has been running without much trouble, i may have forgot some troubles?, not much “woodgas service” either, some cleanings, and only four times emptying the filter, which im very satisfied with.
Planned improvements is: a way to empty hopper juice “on the fly”.
A way to operate the grate scraper when running, as i plan to use more screw-chunker chips in the future, and these seems to constipate a little more, on bumpy roads.
And maybe, but not really needed, some kind of insulating “fireclay” or like, to insulate the oxidation zone, and make it a tiny bit smaller (it is a little slow on getting up to working temperature) but this will probably not happen, as it works good for me.
Here is a not woodgas-related trouble some weeks ago
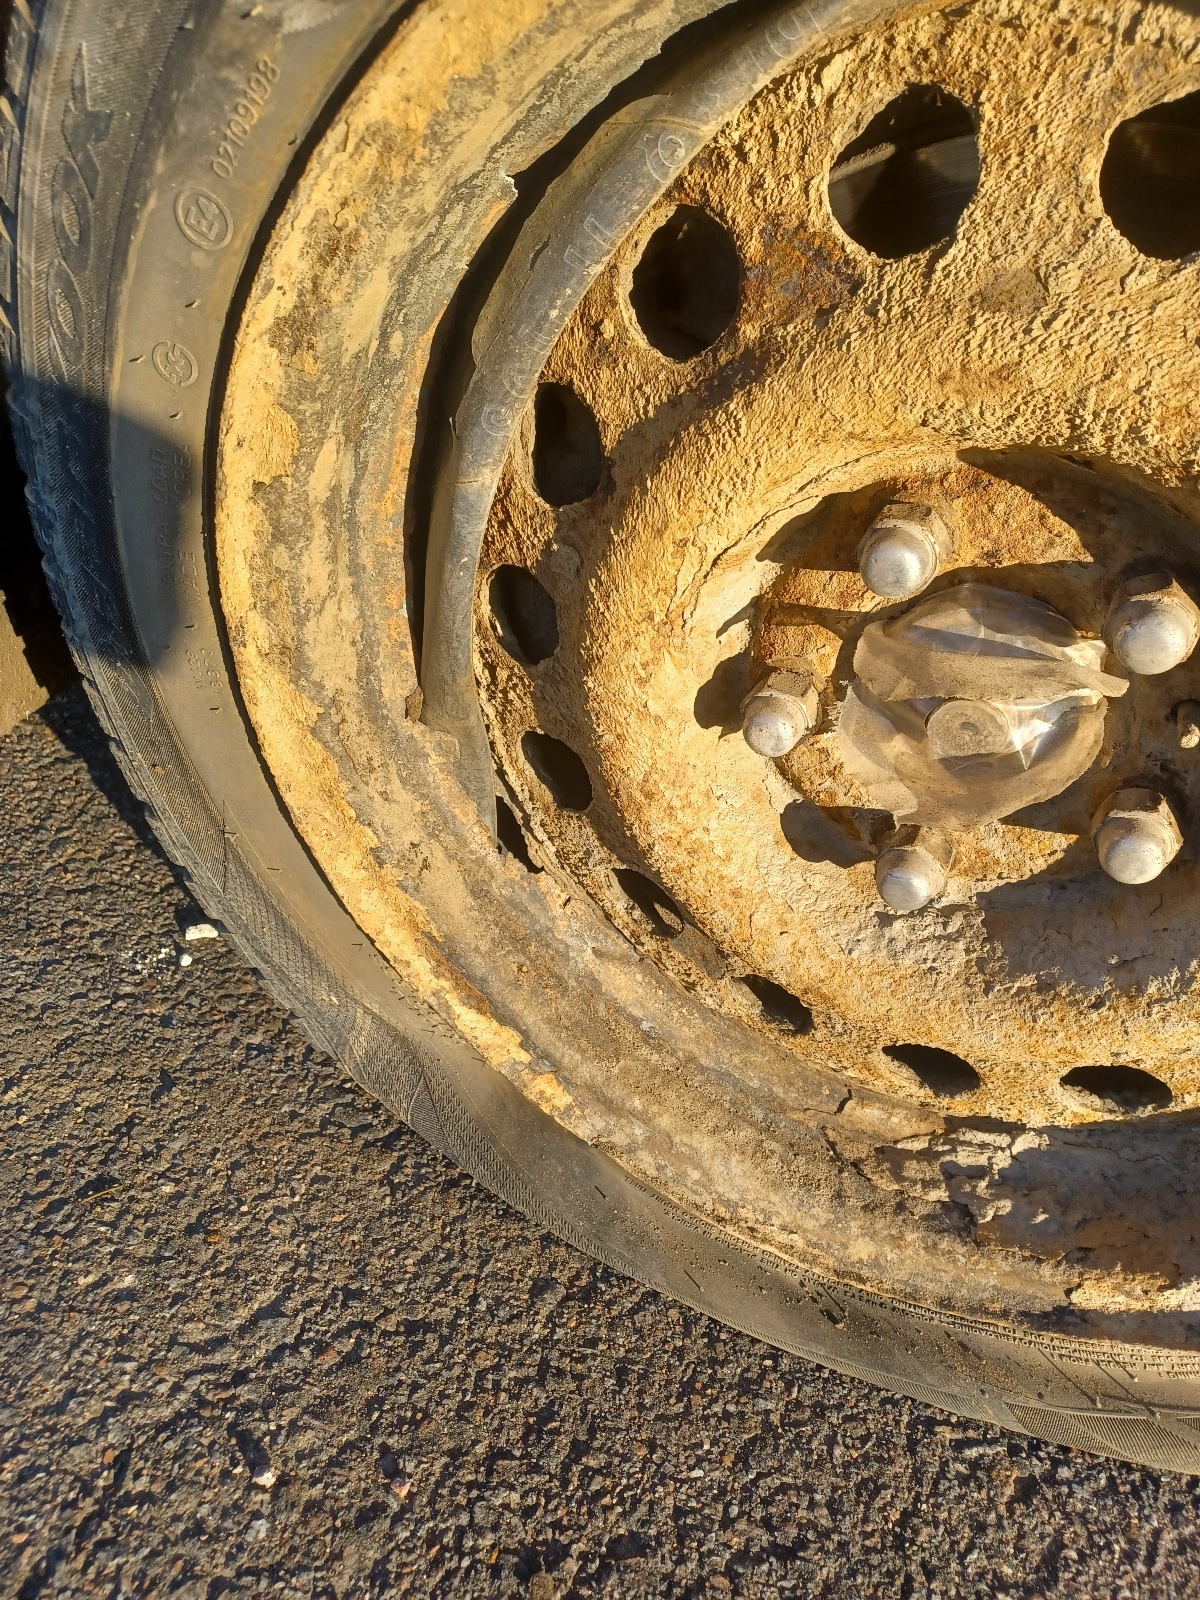
Flat tire on the way to work, the rim had rusted through..
As this is my winter-wheels, and i had been stored them outdoors because i had bags of wood-chunks in the wheels dedicated space, it is probably woodgas-related anyway?
The other woodgas vehicles?
The tractor is hard to reach, parked away wintertime, but the build will start again as weather gets better.
My Chevy truck will get a new flex-plate now under christmas vacation, it has been standing for a long time now, because the starter only “brushes the teeth”… then it needs new exhaust, and a repair of the gasifier, and a new brake saddle.
To be continued…
17 Likes
Thank you Goran, yes this is great news for us all. Thanks for the up date on everything, gasification related and not related it is all good to here a update of what’s happening. And now your thread is back at the top for others to read and enjoy.
11 Likes
Acording to GEK this is the fuel that doesnt bridge. Chips from disc and drums do![]() . Those are the types I work with. I know a guy that doesnt uese his Laimet any more, but he refuses to sell
. Those are the types I work with. I know a guy that doesnt uese his Laimet any more, but he refuses to sell ![]() .
.
8 Likes
Hi Joep, it’s correct, it doesn’t bridge much, i’ve used it some this summer, and works good.
My trouble with would be a little to over-dimensioned oxidation zone, it tends to “constipate” the reduction zone, by reduction charcoal excess.
This is very noticeable when i drive a lot on bumpy gravel road, on 2-3 days driving the pressure drop over reduction zone increases enough to affect top speed and accelleration.
Worth notice is i use a “tight” grate, directly after reduction (no charcoal drop).
All this could be fixed by some re-building, but im to lazy (don’t fix anything that aint broke)
Instead my solution has been to fill every other bag of chunks/chips, and that works better than ever.
Ofcourse, i’ve prepared it with a “Tone-reduction-nozzle” which still is’nt connected, but i have some ideas of controll the oxygen addition by a valve. (Then i can test by “trial-and-error” as im not a matematical genius as our friend Tone)
17 Likes
Goran, thank you for the kind words, which I don’t deserve,…
I’m glad that you’re still in the “saddle” with Volvo, I scrolled back through your topic a bit and found this:
Also, there are a lot of interesting texts and pictures in your topic, well, I’m currently building a gasifier that will prove or disprove certain theories,…
A wide oxidation range is good, now I call this area the pyrolysis range, where wood turns into charcoal, temperatures here reach up to 400°C, mostly oxygen and hydrogen come out of the wood, which immediately combine into water vapor, which further raises the temperature and this tears apart carbon atoms, thus forming tar gases. I plan to help this process with additional heating with hot exhaust gases, I assume that this process will require less fresh air, the gas will contain less nitrogen and more caloric gases.
The reduction zone should be densely filled with charcoal, which needs oxygen to change its state to gas, which means expansion, which lifts and loosens the tight area of ash and charcoal, which is acted upon by the force of the fuel’s weight from above and vibrations during driving, so it is good to have the nozzles near the bottom.
10 Likes
Hi Tone, i believe you are right about to use exhaust heat “in top of” oxidation zone, this is one of the most heat consuming places in a gasifier, just to “boil out” moisture/water from the wood takes a lot of heat energy.
Which im able to prove, as i drive a lot on raw or wet wood, the gasifier becomes really sensitive for decreasing load, gas becomes bad fast as temperatures decrease, and hydrogen production becomes very low, as can be felt on the sluggish throttle response, and the “dull” exhaust sound.
In my case, recycling of exhaust heat would “cost more than it tastes” (old Swedish saying for much work but not much gain) as i think the best would work with gasifier close to engine, insulated exhaust pipe, like on a tractor, or a old VW pick-up truck, with rear engine.
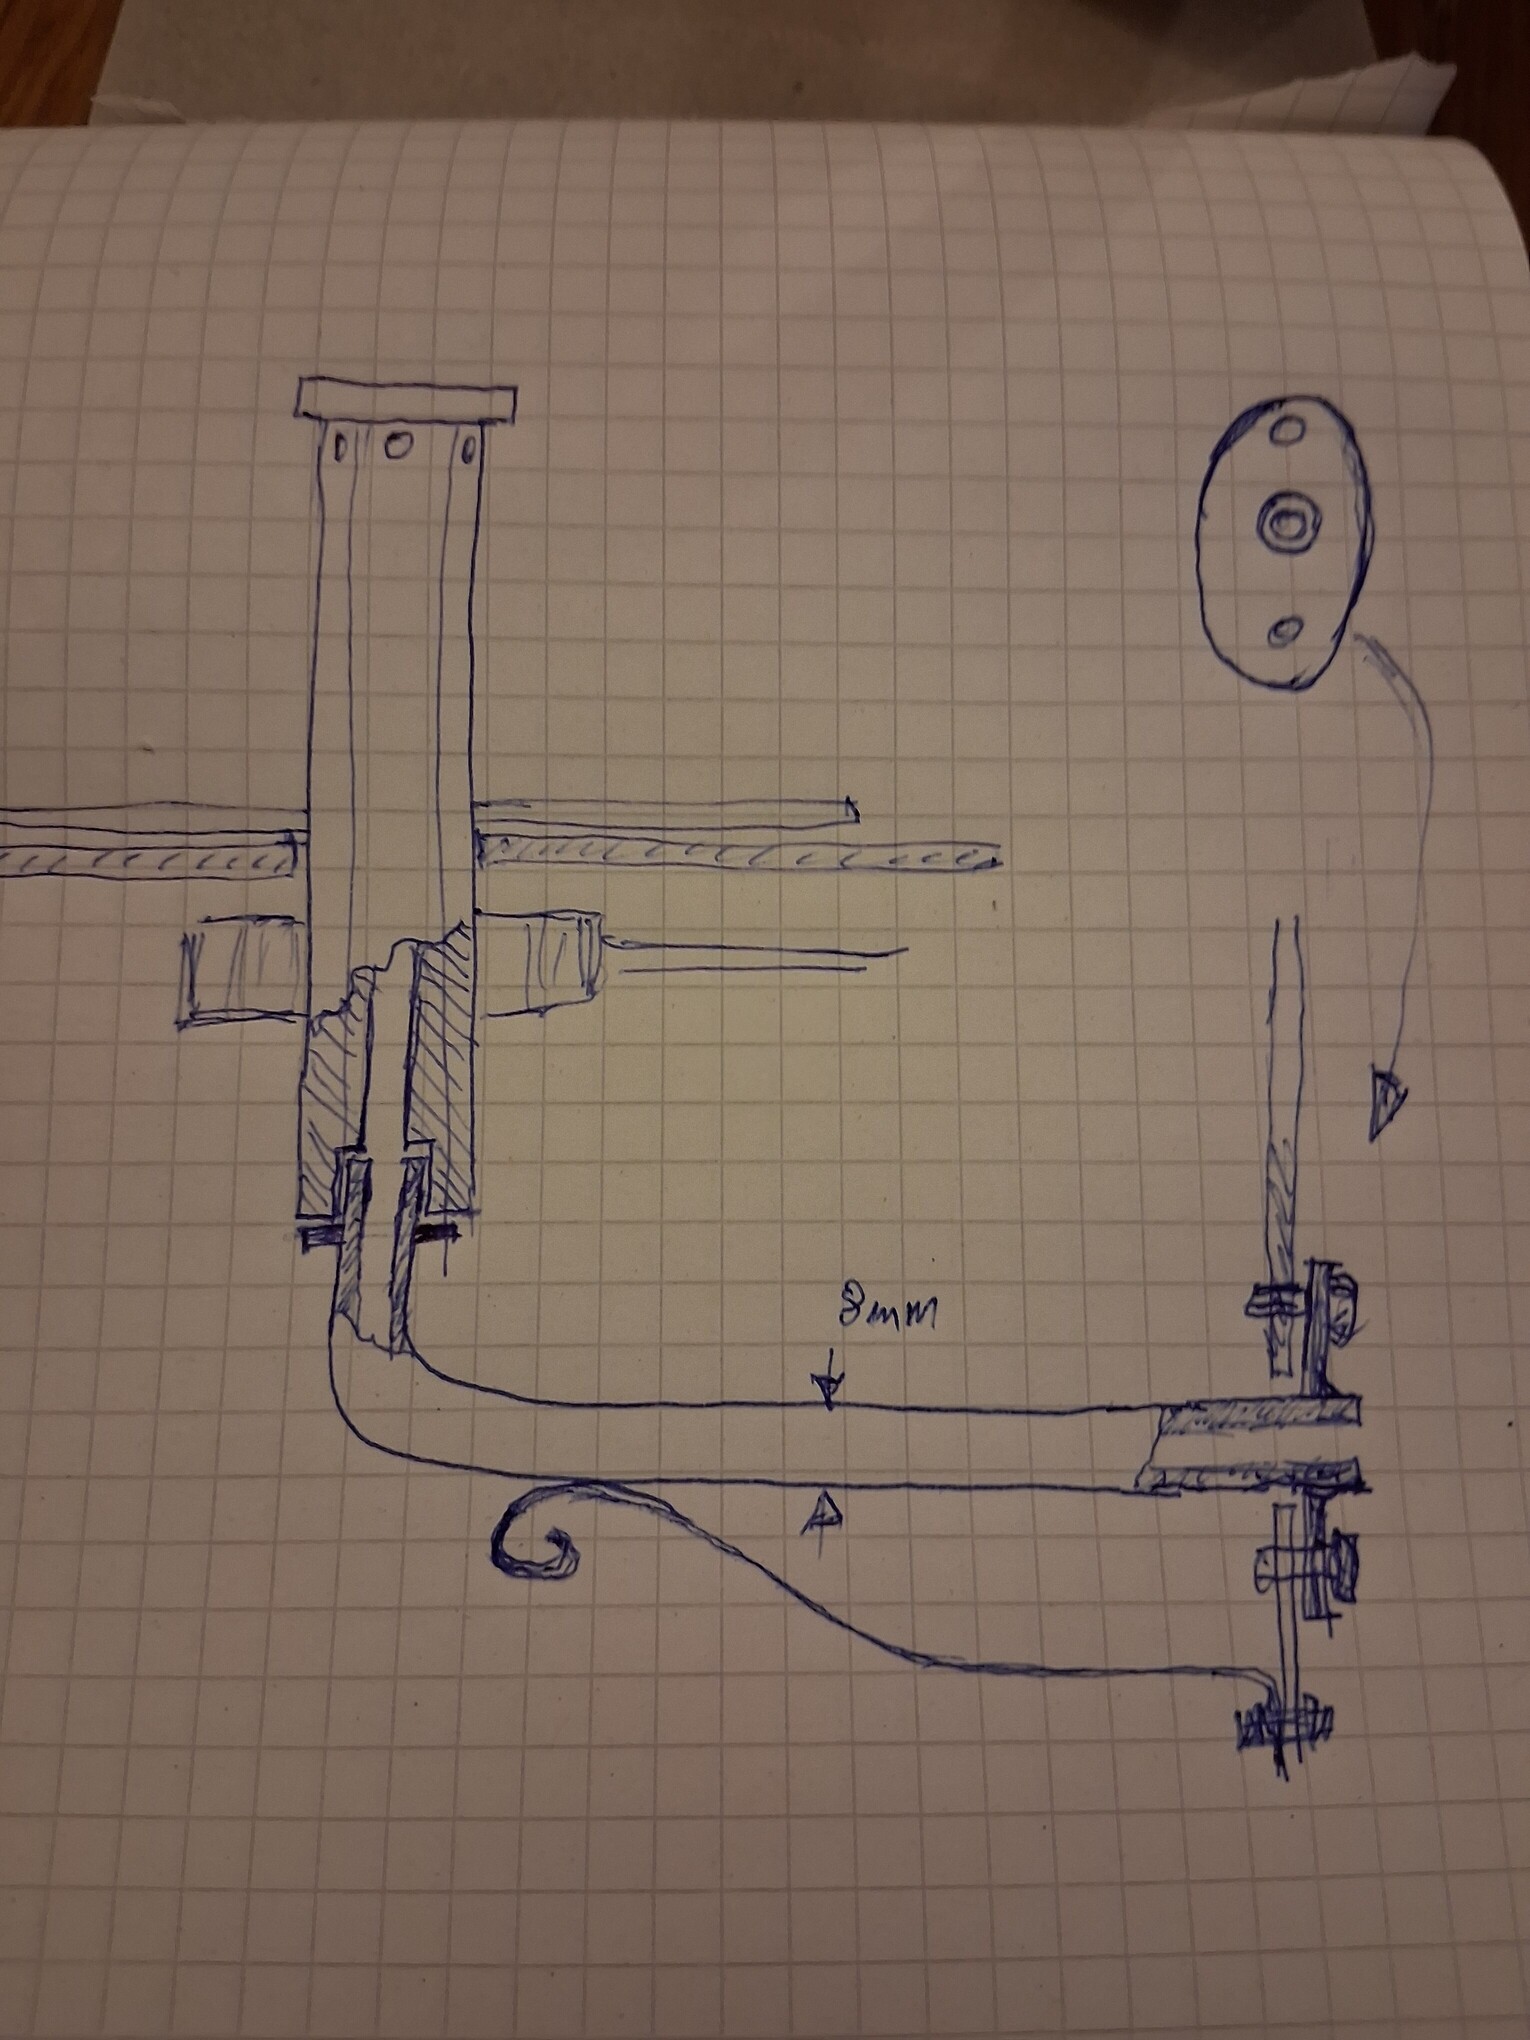
As im planning to put a windshield wiper motor powering my grate scraper, im going to test the bottom nozzle concept, as the shaft for the grate scraper is already prepared/mounted, a piece of rock drill.
I plan to build a air tight bearing in the gasifier bottom, with a 22mm long socket, as it fits the hexagonal shaft perfectly.
Through this im going to lead the air supply for bottom nozzle, and with a valve if i build it crappy, and it would’nt work.
As it work “as is” and only becomes to compacted on 2-3 days on bumpy roads, my calculations makes me believe a 2,5mm hole on every of the 6 flat surfaces on the drill may be enough?
13 Likes
If you calculate the area of 6 holes with a diameter of 2.5 mm, this is the same as one with a diameter of 6 mm, well, I drill 4mm holes with a vidia drill (I don’t have a 2.5 mm vidia drill).
You can easily make the air supply with a copper pipe (or even iron) with a diameter of 8mm (inner hole 6mm), which presses into the hole from the drill like a spring,..
8 Likes
Warning! Disclaimer!
Following post will show pic’s of almost criminal procrastination to take basic care of a daily driver, in conjunction with stubborness and forgetfulness on an almost dementia level… ![]()
Has been around -6 to -8°c for a while now, today -15°c ![]() but sunny, so time to show the Volvo some attention.
but sunny, so time to show the Volvo some attention.
A while ago we talked about frozen condensate collectors..
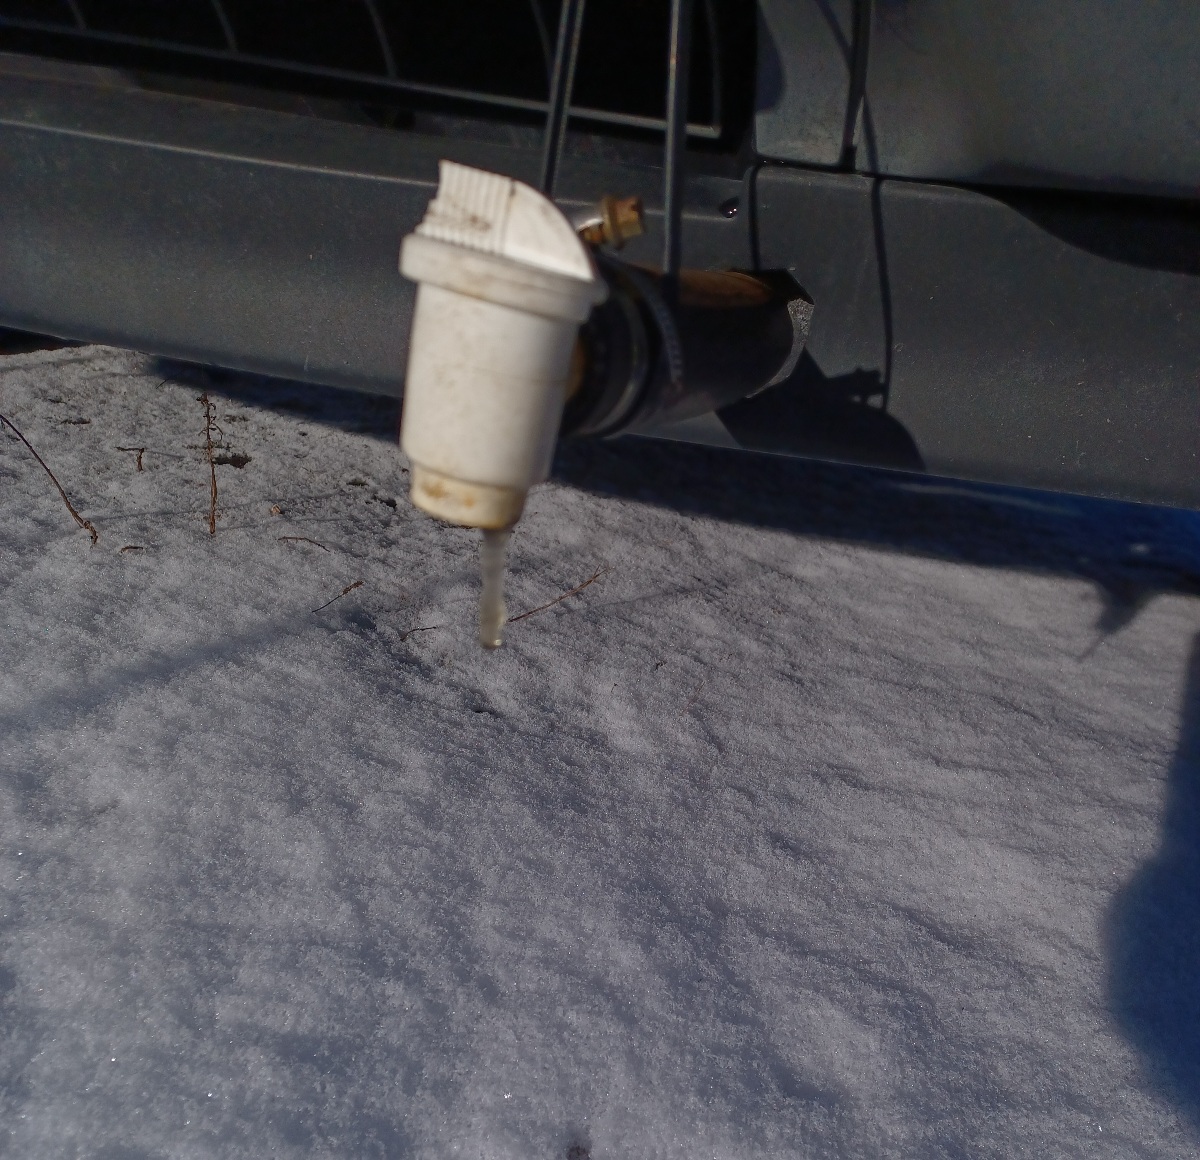
Tank up front is frozen solid, the valve is cheap plastic, so a new will be put in place when warmer temperatures.
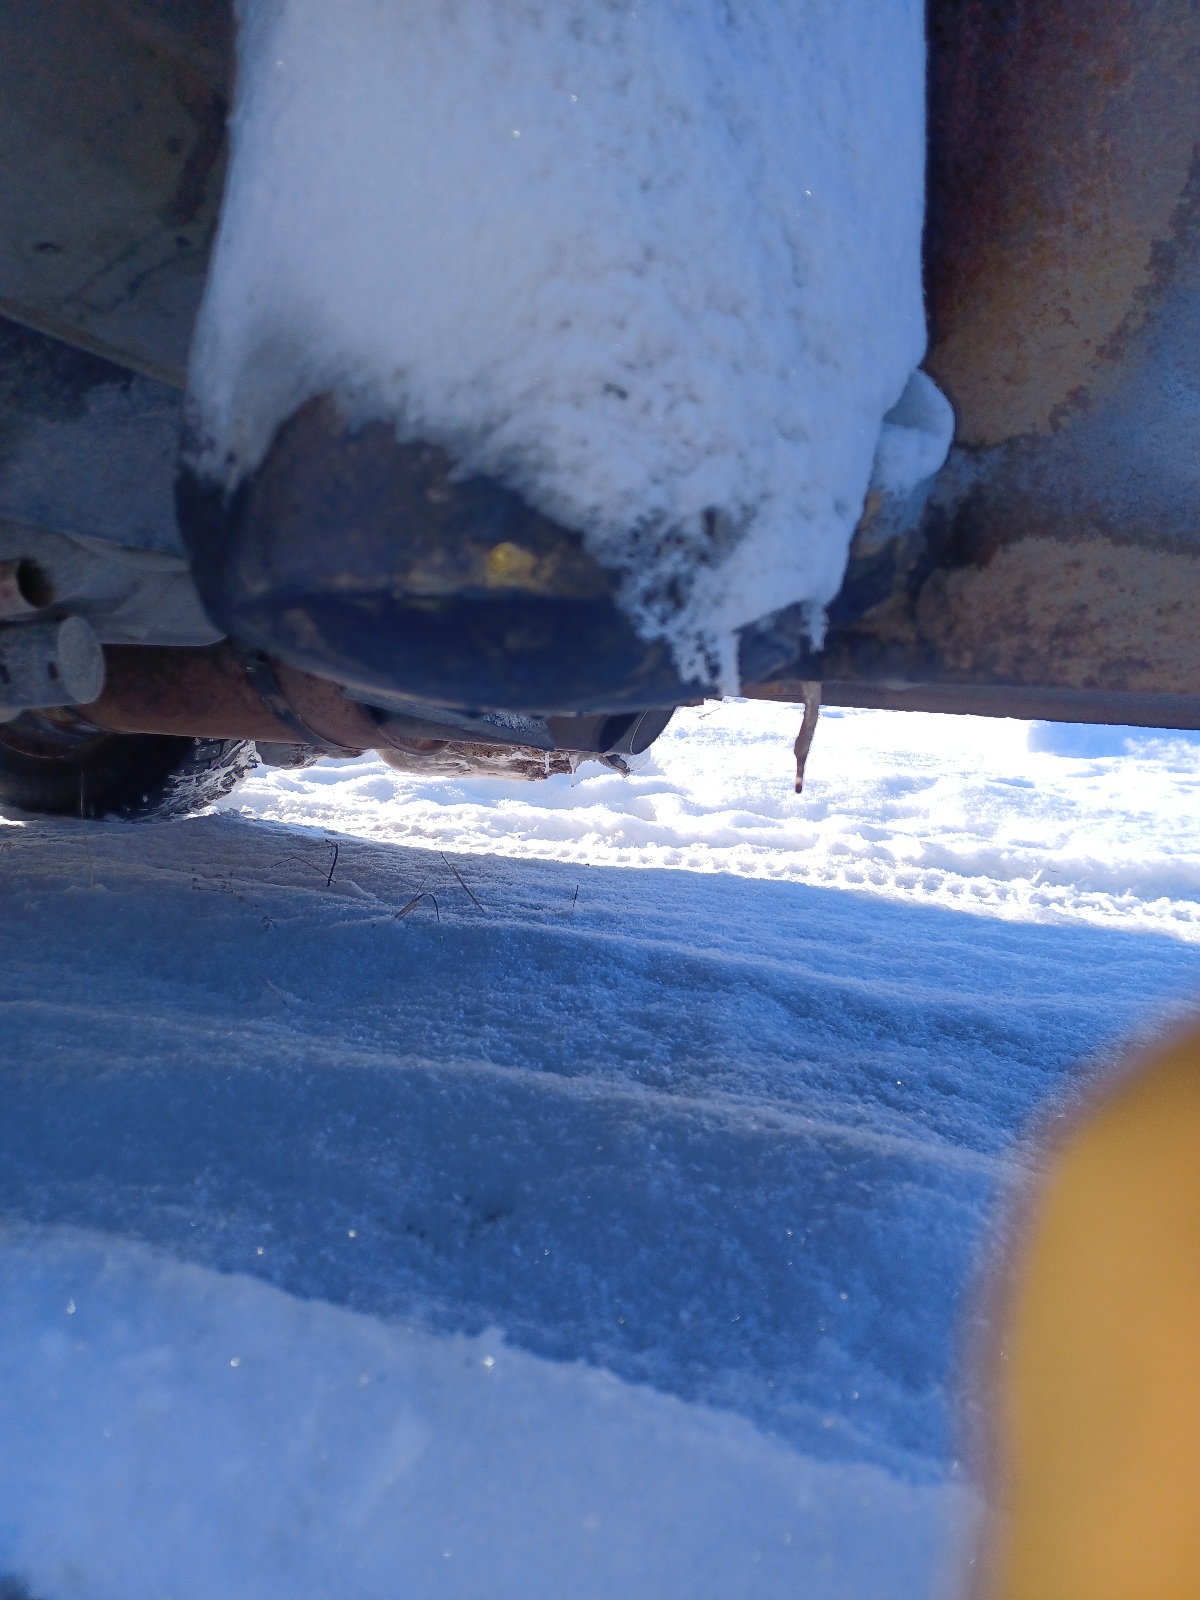
Hopper juice collector, look at the bulged bottom..
Nothing of this is a real problem at the moment, as i used up every chunk in my fuel supply, and have to drive gasoline
Some while ago my coolant thermostat broked, and engine ran cold (and driver ![]() ) today i finally replaced it.
) today i finally replaced it.
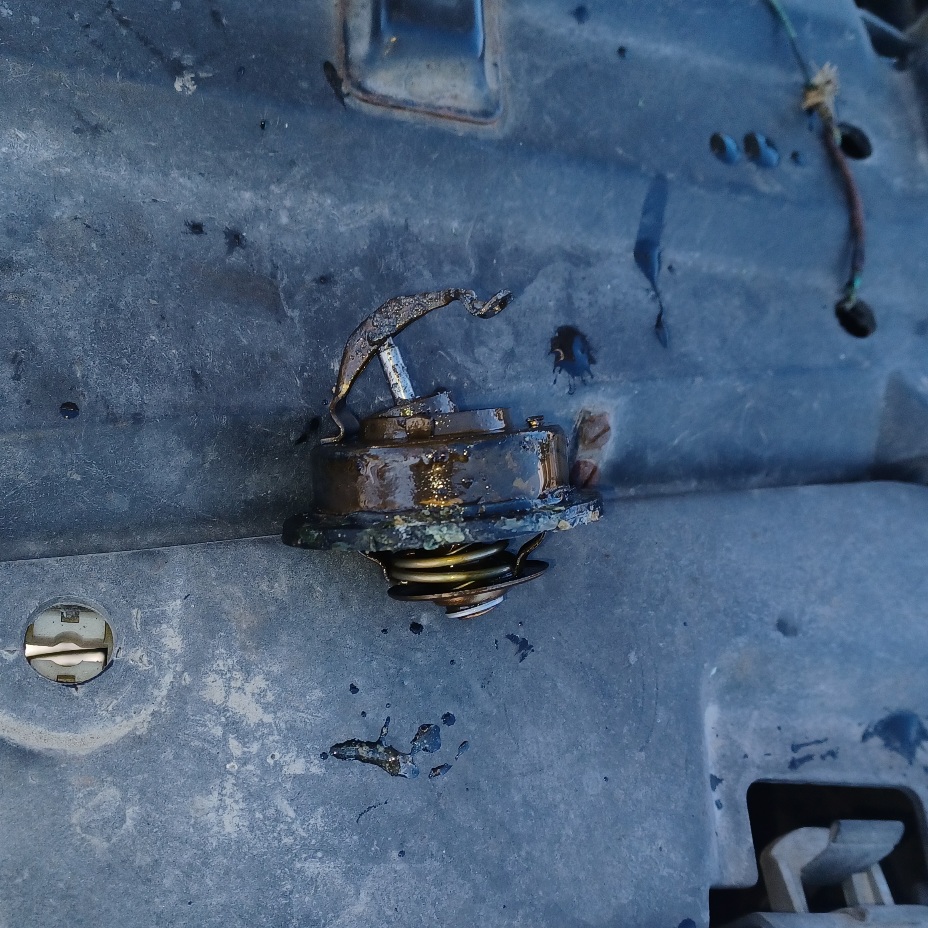
An engine running cold in this temperatures is real harmful for the poor engine. It also increases oil dilution dramatically!
This together with a ice-plug in a modified crankcase ventilation line, on an already worn engine, will do no good for oil seals, for example the upper one, for the camshaft..
In my case it lead to a minor oil leak.
Next job will be replacing those shaft-seals, and the timing belt (which hasn’t been replaced in 18 years, i hoped it would last atleast 20 years?
Well, good thing is it has been giving itself a rust-protection treatment that will last some years.
When i was at service’ing, it put in some very good used ignition wires i had for a while.
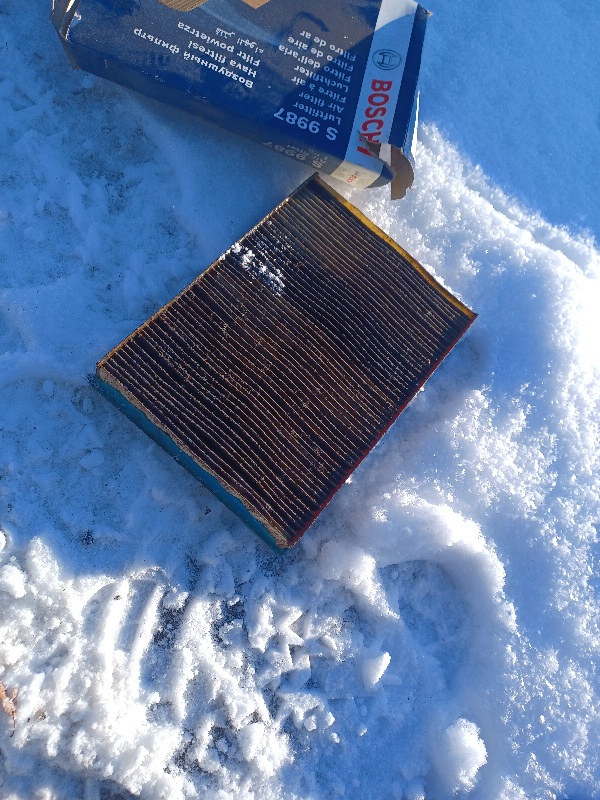
And a better air filter cartridge, this one was pretty dirty.
So, next report will be a demonstration how to replace timing belt on a Volvo B230.
19 Likes
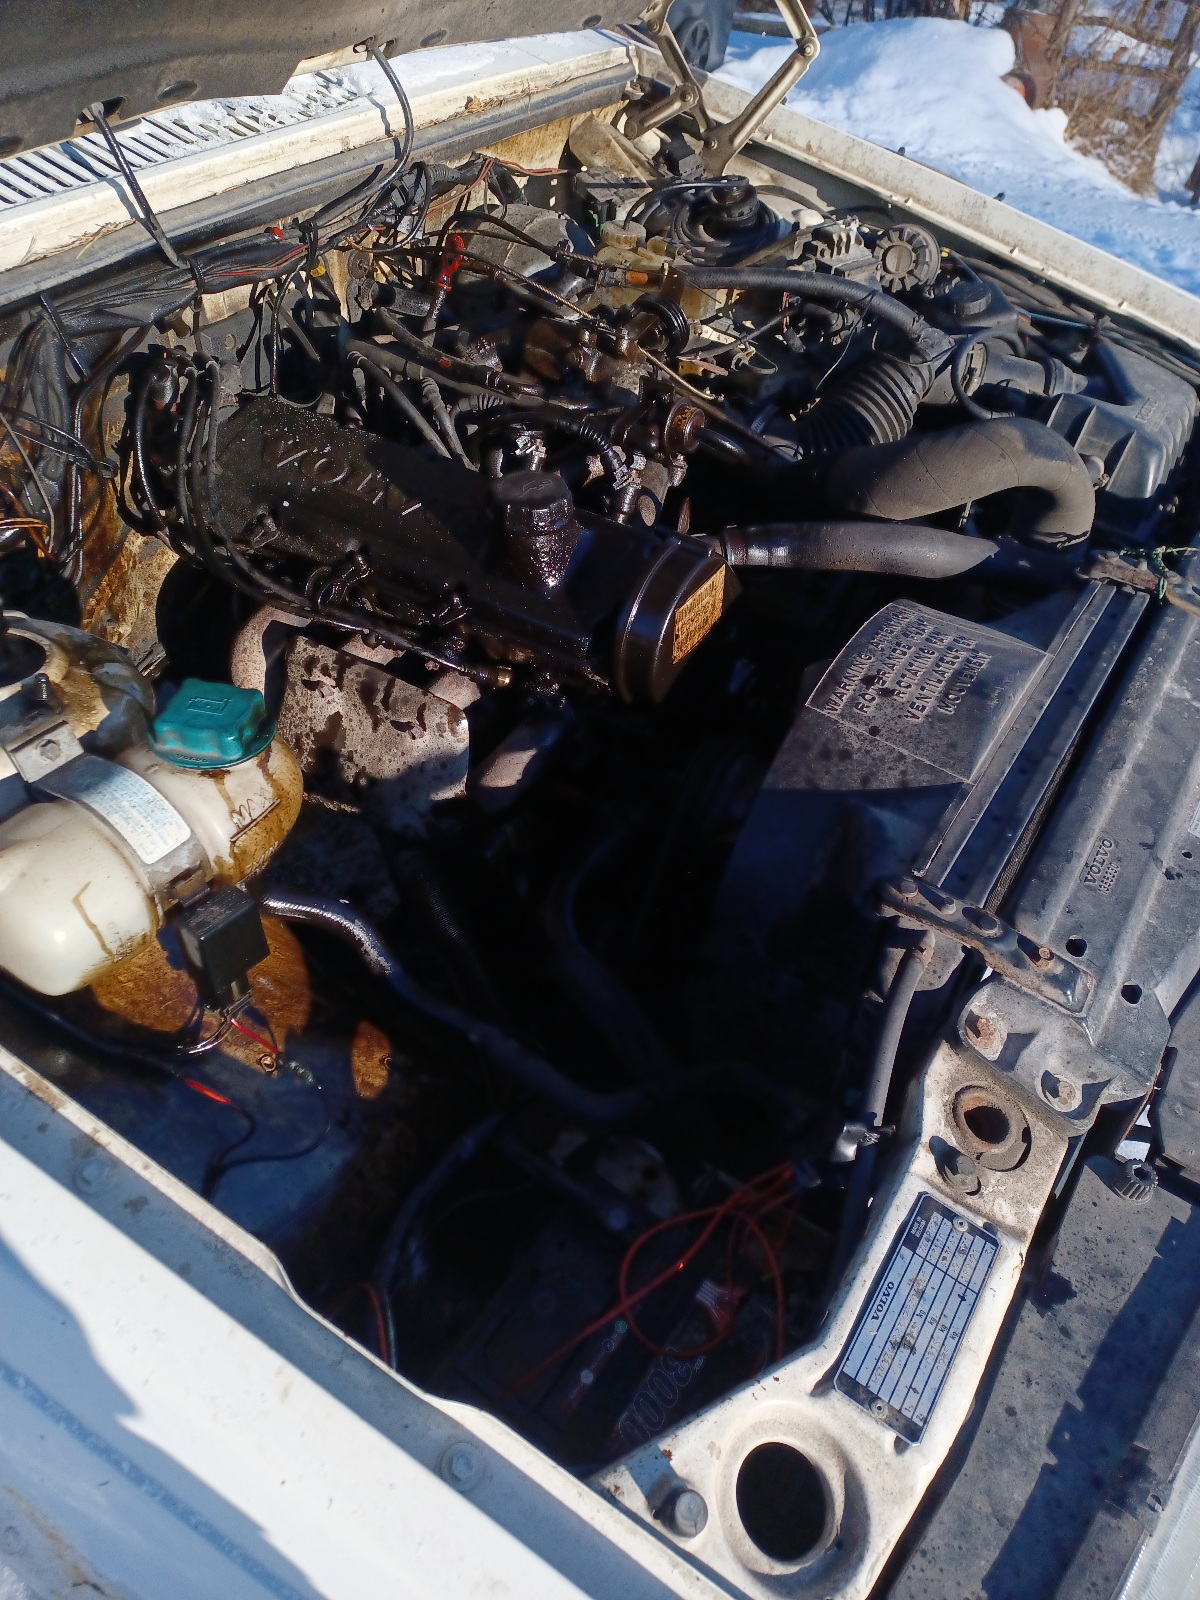
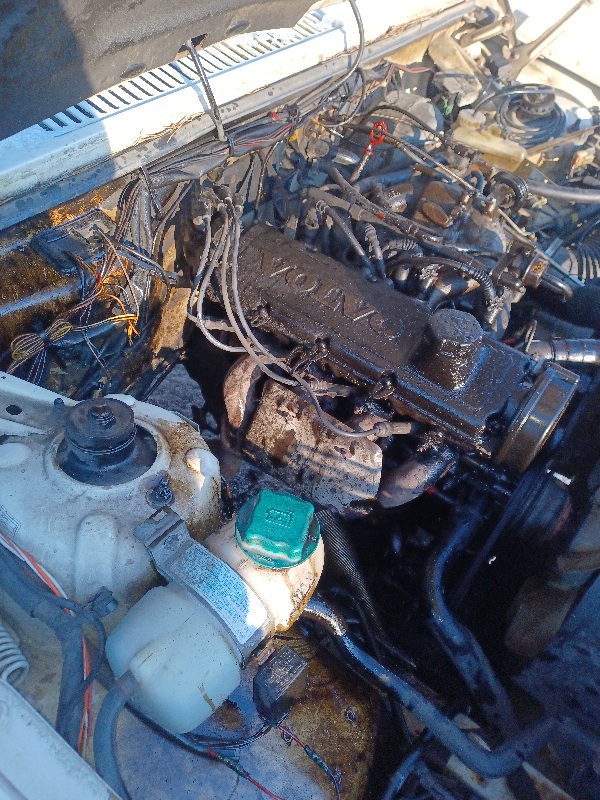
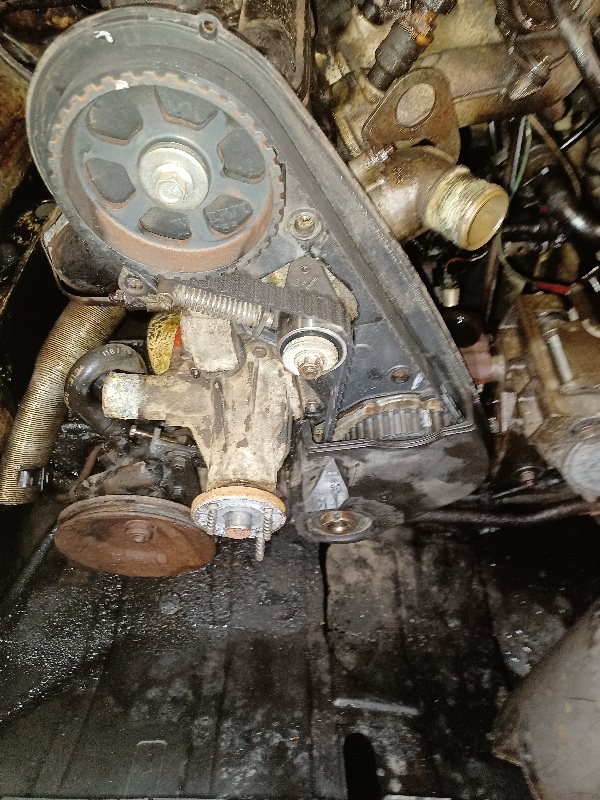
And here comes a step-by-step instruction how to replace timing belt on Volvo b230, in a slightly humorous way.
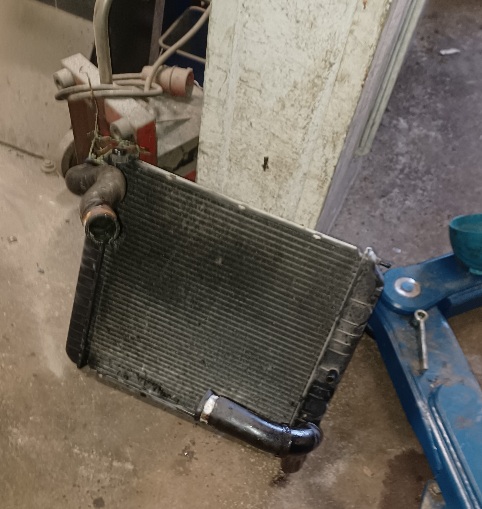
First, pull the fan shroud, and lift up the radiator, no matter how you do it, coolant will seep down your pants/pockets.

Then lift out fan shroud.
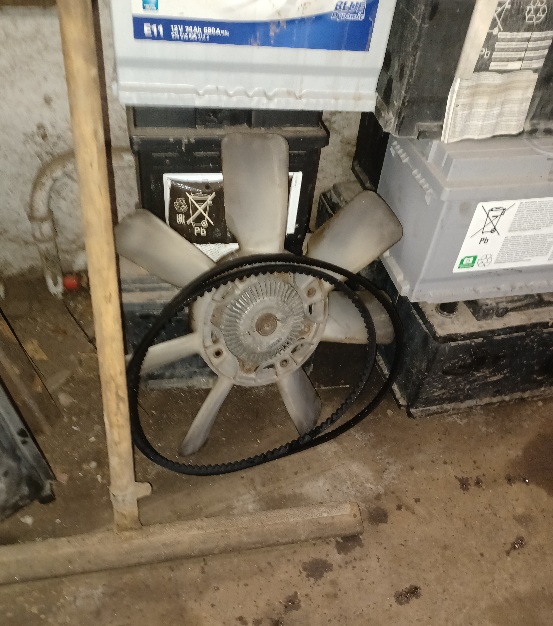
Next, pull the fan. Let it “stand up”, if not, oil in wisco clutch may get out of place, and your Volvo will sound as a jet engine until wisco oil runs back.
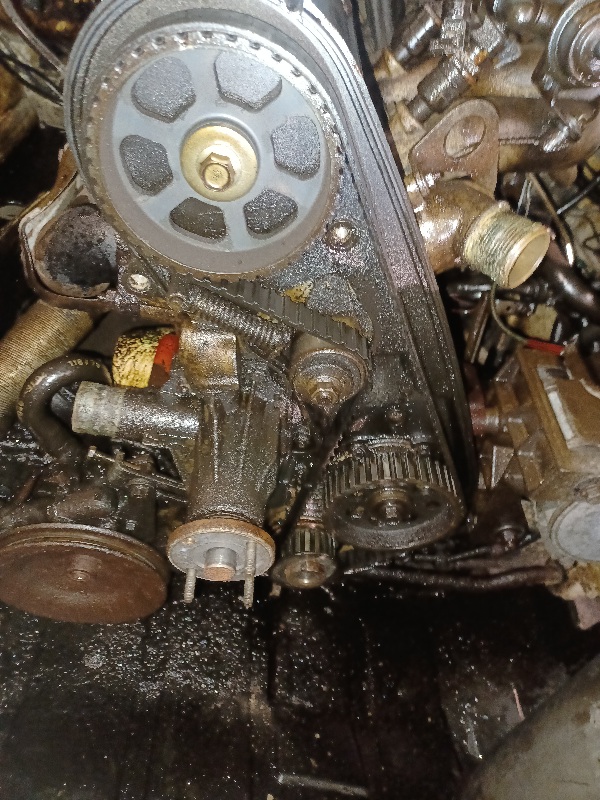
Pull belt covers, and line up timing marks, to be sure nothing is altered.
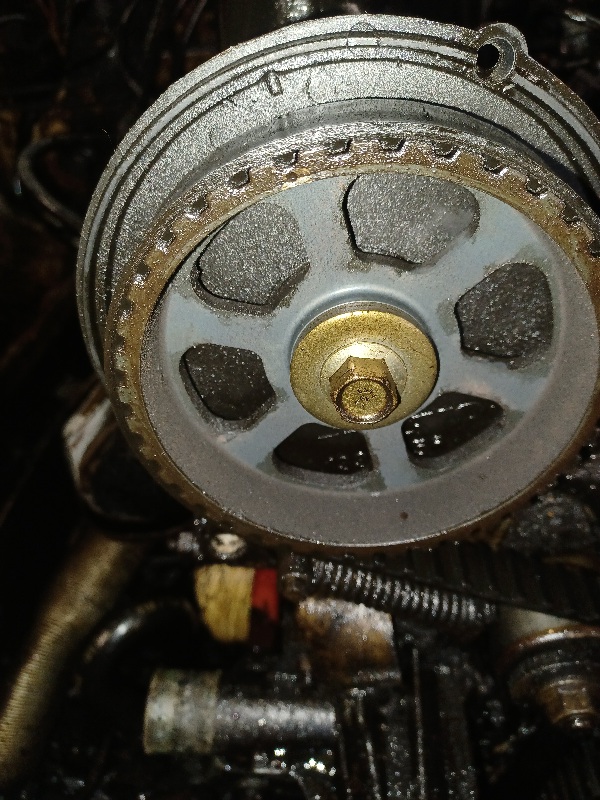
It has happened that parts had been replaced, with different marking, always better to check first.
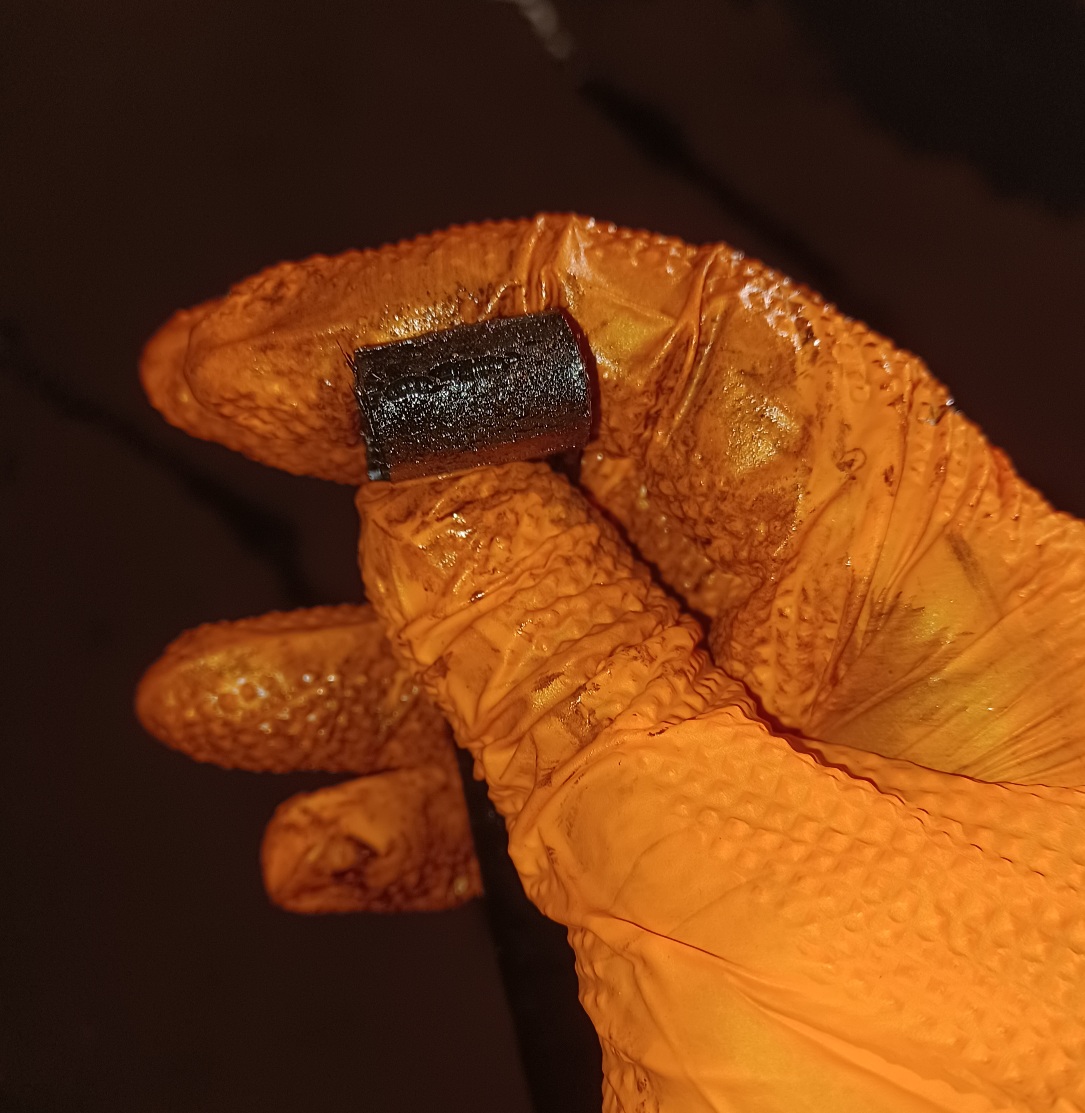
When belt looks like this, it’s not wasted money to replace it, it has surely did it’s work.
In my case the oil leak (1 liter/day) forced me to take care of this.
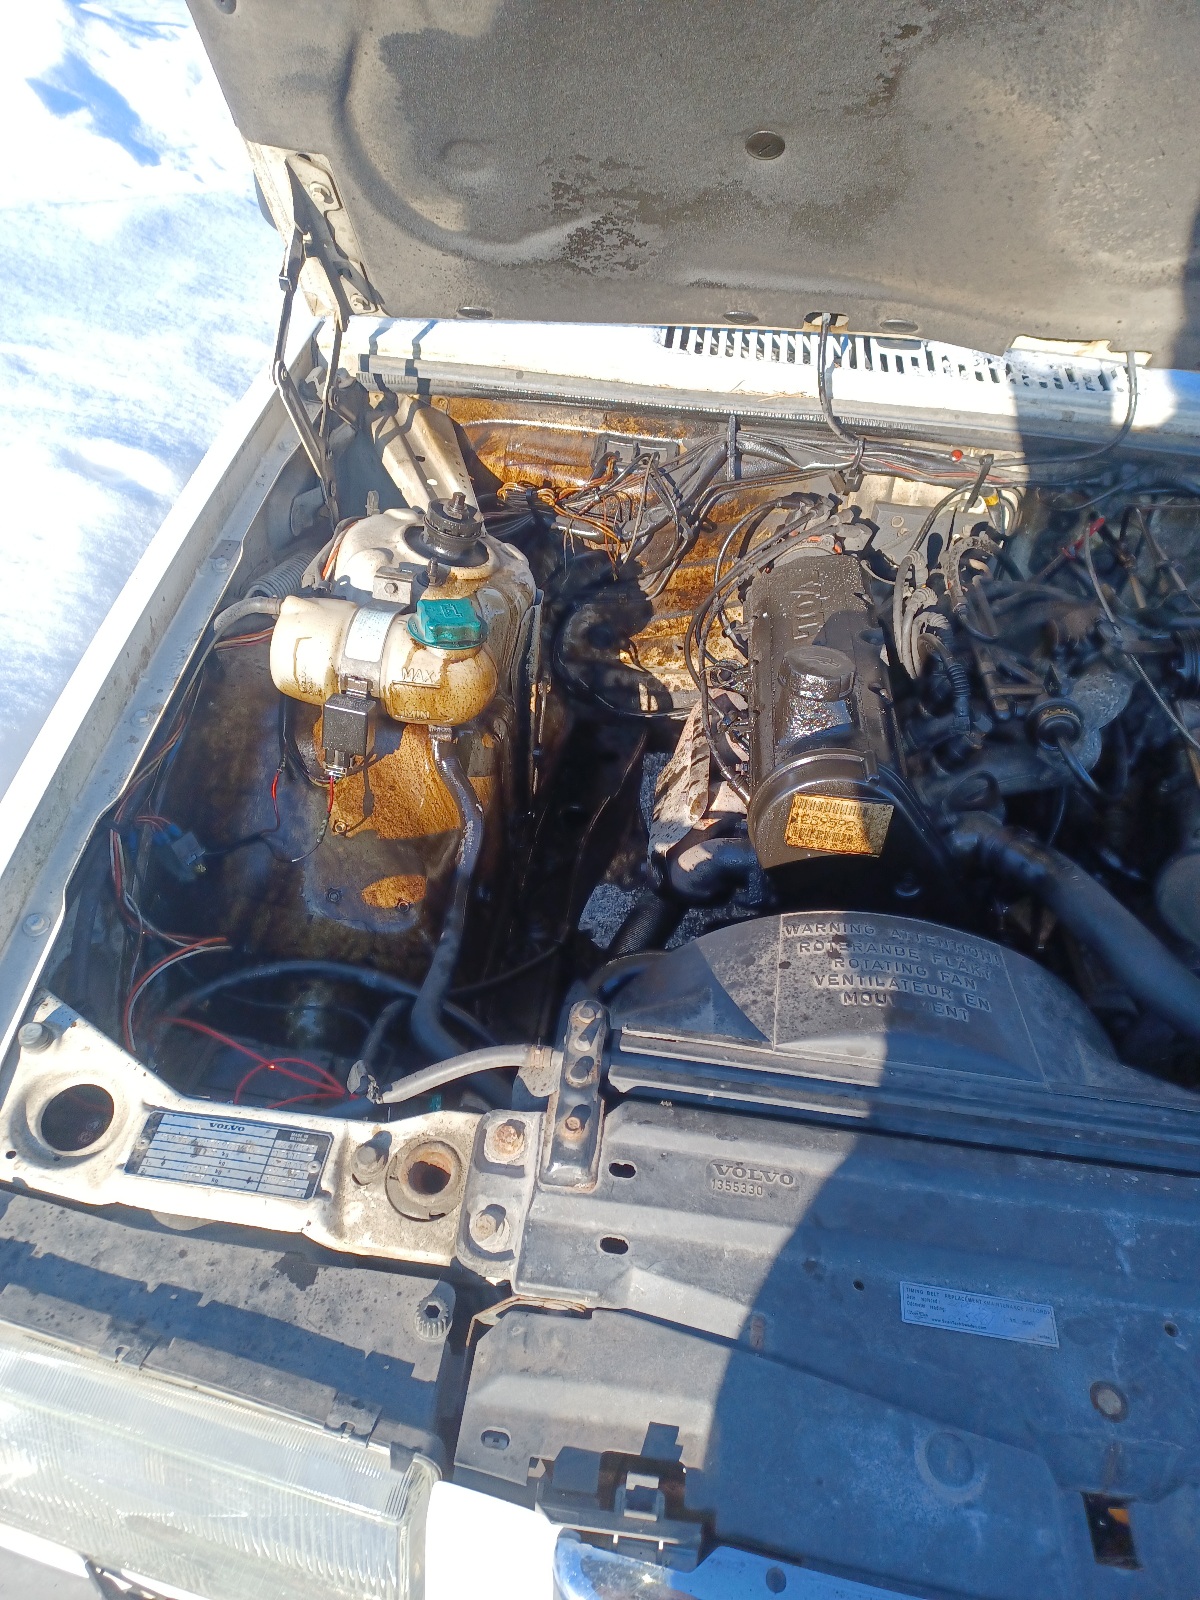
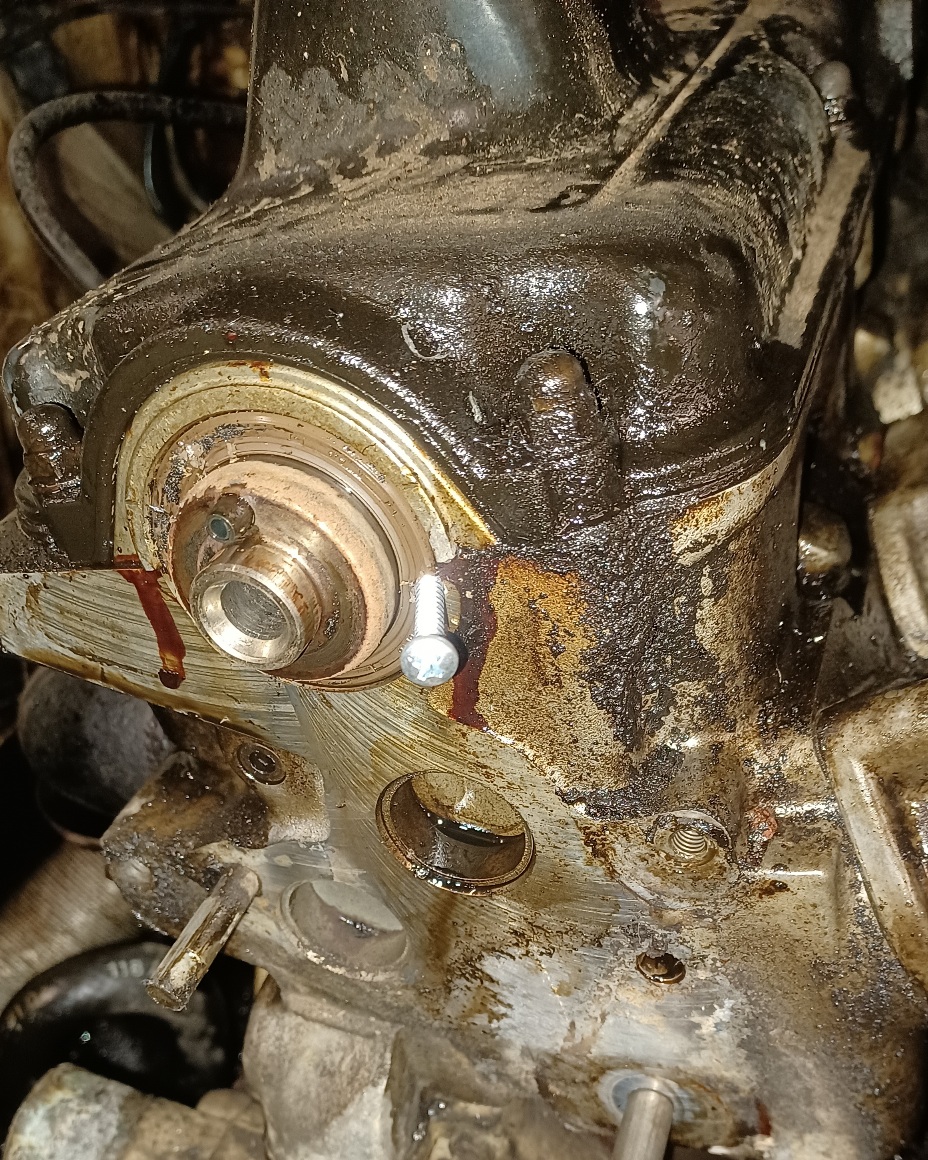
When replacing seals, drill a tiny hole in the steel-reinforced part of the seal (be careful, not to scratch the shaft) put a sheet metal screw in, as a puller.
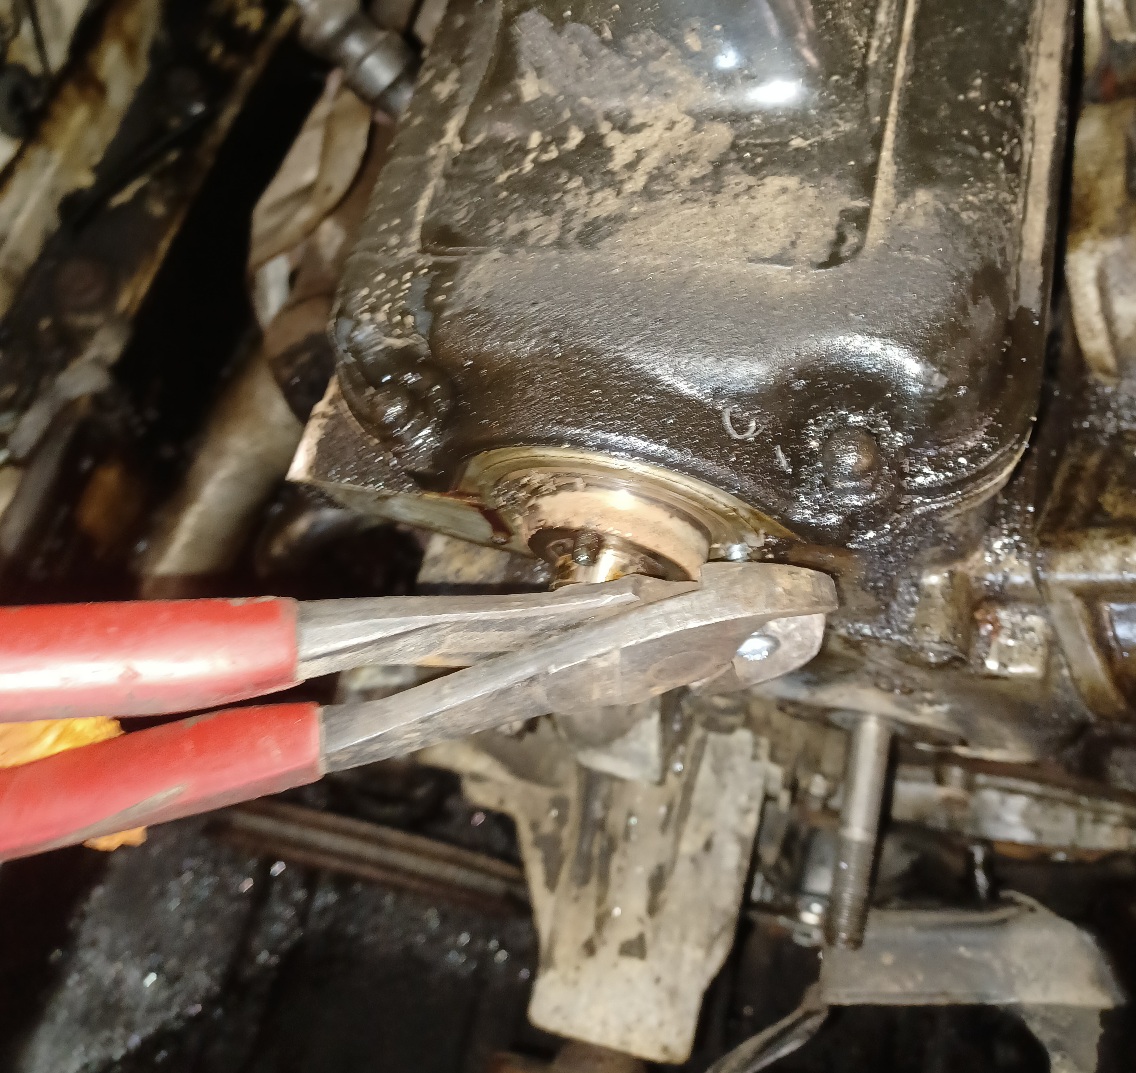
Use a sturdy “nipper”, take support against shaft.
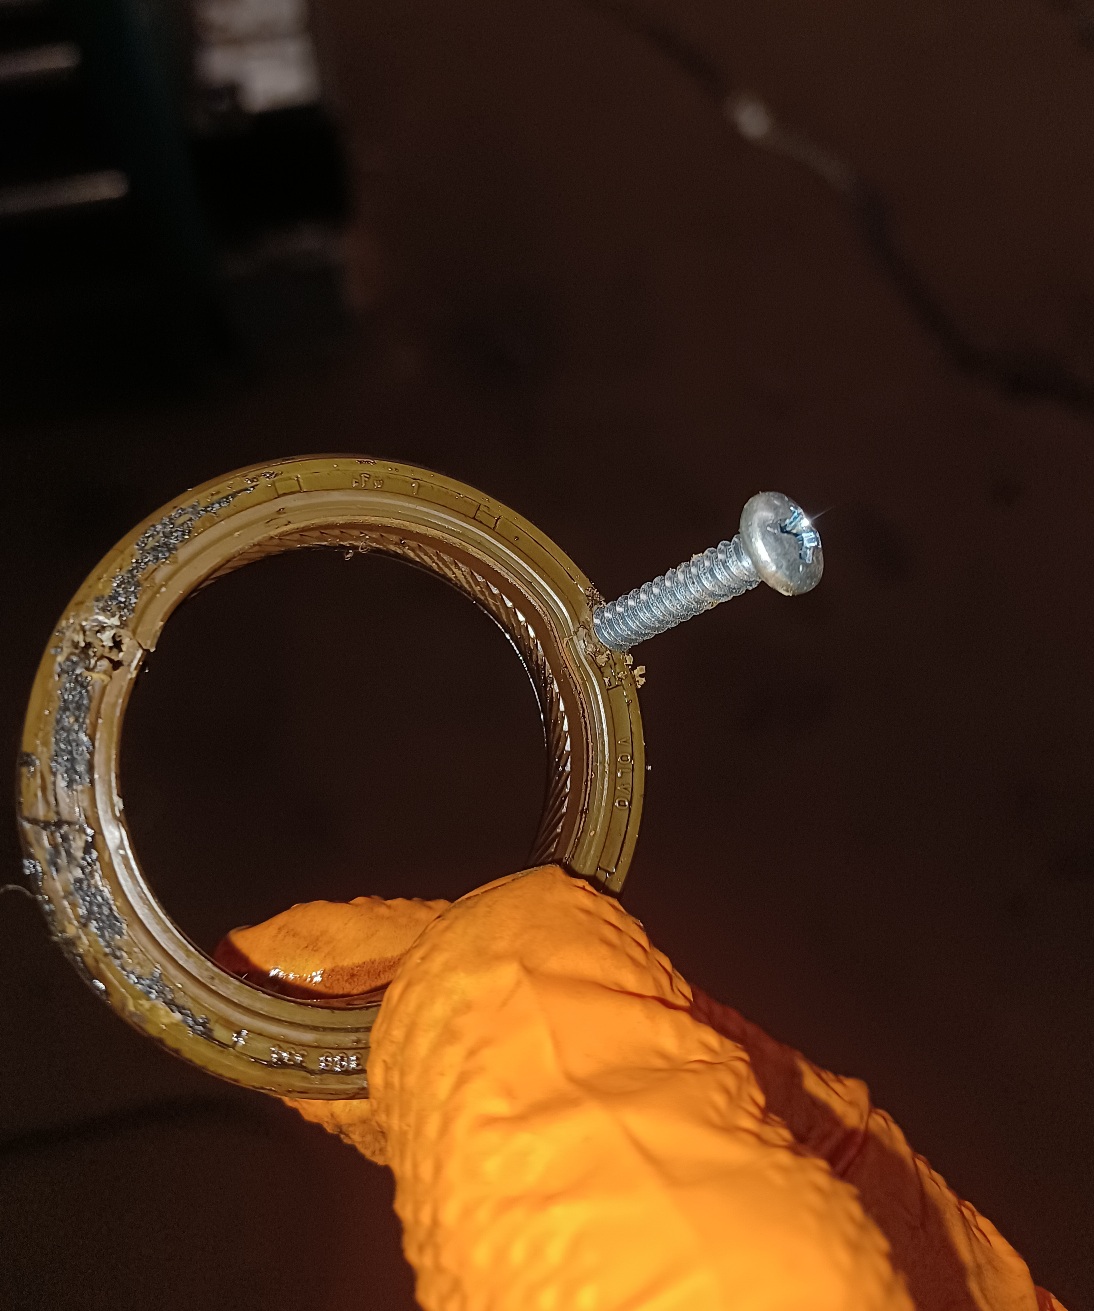
And there we go! Repeat procedure on the other seals. Hammer them in place carefully with a fitting socket as a tool. Always mount seals dry! Only put some rubber grease on the lip of seal!
Put everything back in reversed order, new belt and tensioner, degrease the engine and change oil.
These old Volvo’s are really simple to work on, the engine mounted correctly and everything
Now it runs great again, just need some WOOD!
18 Likes
Goran, if you were my neighbor, you could fill up (firewood) at my gas station, I have A LOT of fuel in stock (if you’re not picky about quality and size) ![]()
12 Likes
Something missing?
Well, i’ve been harassed by the police the last months, a lot of trainees around here, and they are not nice to deal with, especially the female ones. They have told me they can’t prove why my car is illegal, but they are sure it is
Well, this monday they got jackpot, my car had run out of inspection time (1st of may) a nice ticket of 150$.. and i was sure i could drive it til end of june, even noticed it somewhere.
But thats life, getting of the gasifier, and fixing some stuff for inspection, and im running again, and a good reason to make a new build, im not happy with the performance sometimes, and the big burn-zone gives me some hesitation problems with to moist wood.
There is rust-holes in some places too (on the gasifier) that needs repair.
So, a new build, more stainless, lighther weight, but not very much more “stealth”, it’s going to be a “no-shame” gasifier again, but, im going to put it in the trunk, then my blue friends can’t say anything about it.

Only thing thats irritates me is my wood-supply is growing, and soon dry enough.
15 Likes
Most likely they know you are incredibly good looking, and intelligent. Women get extremely jealous. They will hate you because you are out of their league.
At least that is what I think when it happens to me. ![]()
8 Likes
Goran, you probably already have a plan for a new gasifier,… I’m thinking a lot about the construction of a system for my Mazda pick-up,… hmm, this gasifier that I’m using now works really well, as Mr. Wayne would say “I don’t know what I would do differently”, …
I can only write a few things that it must contain:
- water-cooled condensation zone (maybe also a gas cooler with water)
- large fuel volume (150-200l)
- the same cross-section from top to bottom or to the narrowing
- heat exchanger for direct heating of the air with the exhaust gas (similar to what I did in the previous gasifier
- heating with exhaust gases
- spring-loaded gas mixer with non-return closure
I know, this is your topic, I can’t talk too much - write. ![]()
11 Likes