Ran this thing again today. Finally got a flare after wrapping enough duct tape over everything so that it look like the Mummy. All you guys that said I was overcomplicating. You were right. I wanted the duct fan off it for the greenhouse heater anyway so I tore everything from the Ammo box out, apart. The mulch in the filter duct was about half frozen. Didn’t even fall out. I’m surprised any gas could get through it. I’m going to go a different way on that. Need to get to a store for more supplies to do that. Besides that section of the stove pipe just above the bucket began to get red hot. I shut it down before it could get too bad. I’m thinking that the flute nozzle may have the holes too spaced out for that little 6 inch space. I’m going to pull that out and try the bryan White nozzle instead. The one plus is that the outside of the bucket is barely warm and the cob is now baked into a two inch thick clay flue pipe. Even if the stove pipe liner burned out it would still work. Living and learning.
10 yrs ago, and several heart surgeries earlier. Before my step daughter burned my house to the ground, and I had all kinds of mechanic tools, yea I would have done the repair myself. But I took the truck to a local repair shop. They changed the CV SHAFT in less than an hour. Cost $175.00 total.
I have a few more things to fix on this truck, and then I am selling it.
I’m hoping to find a Ford Ranger or an S10 with 4 wheel drive, and a much smaller engine.
That sounds pretty fair Jesse. Especially if you have to work outside this time of year. Parts had to be a lot of that.
Got a big mud hole in one part of my driveway. Bottomed out on the way through. Heard a loud bang and the truck lurched a bit. Thought I had hit a big rock that was buried in the mud. No such luck! The big bolt that holds the rear end of the main spring snapped. And the spring is now trying to come up through my truck bed. So now I have to get that fixed. Life goes on here in the Ozarks! If it’s not one thing, it will be something else.
Some video on the latest permutation of this no-weld unit. These videos were made for my homesteading friends who may or may not have any fabrication skills so I have tried to make this a build just about anyone can do. It makes gas. I need to get it plumbed into a generator to see how good and how much. Other details to follow.


Hi Tom , great to see you on cam .
You showed in video that you have cut a hole under the nozzle pipe how do you seal that hole air tight ? i could only see a lid from a paint tin covering the hole .
Cant wait to see you running the gas on a engine
all the best
Dave
I didn’t think that would be a problem when the reactor was filled with fuel. That can lid gets screwed to the bottom of the bucket but if it’s going to suck extra air into the reactor it can be easily sealed with a bead of silicone around it. I didn’t have that hole on the original model, but I wanted to be able to lay the thing flat and access the nozzle to see how it was faring or to experiment with other kinds, without having to empty the fuel and separate the hopper. It was kind of done as an after thought so that’s why I used such custom materials. Thanks for suggesting it may be a problem. Would have taken me a while to figure that out.
What i have found in the past is , if it can suck in air anywhere other than the nozzle the flame will also migrate to where there is fresh air coming in , so i would layer a bead of silicon over the lid now so that when you come to run it should be nice and set ready once its been run a while the ash will form a insulation to protect the silicone or just pour some ash on it before filling with charcoal
Tom,
In the same vein, I would suggest sealing the pipe cap nozzle to the pipe feeding air to it or your charcoal may start burning around the base of the cap.
Hoping to flare this today and get it hooked to my Generator. Right now I only have two 400cc engines working and I’m wondering if it makes enough gas to run that size engine. We will see. Thanks for both suggestions. I’ll seal both areas.

Weather has finally turned enough to work outside. I fired this up today. Mixed results. I used some char I had removed from my bigger unit and it’s been sitting inside the work area in an open tote. I sealed around the lighting port and bottom as Dave and SteveB recommended. Took a little while to flare and still a little longer to maintain it. It was invisible in the daylight so no way to tell what I was getting by color but what I did get was a lot of condensation. Actually had water condensing out of the gas as it left the flare can. A good quarter inch in the catch jar after only about 15 minutes of run time. Tried to run it after dark to see the color but it would only flare for less than a minute before it had to be relit but when it was running it had a whitish color at the center of the flare and a little orange at the outside. I’m going to vacuum the rest of the fuel out of the thing today and bake some in my dryer before I retry. Also going to order the hexaloy nozzle tips because it did run better with the lighting port open at the start. I knew I wanted to try different nozzles anyway. I’ll mess with it more today. Seemed like a decent amount of gas when it was running. Maybe enough to run the 400 cc generator. Rebuilt the carb on that a while ago but haven’t run it since. Must have missed the O ring on the float bowl. Gas just poured out of it. I hate that freaking generator.
Another video updating this thing. As explained in the video I was getting a lot of condensation from the stored over the winter fuel I was using so I stuck it in my dryer. Some screw up on my part made part of the video inverted. Did not maintain a decent flare even with new very dry fuel and would only flare with the ball valve on the 3/4 flare pipe half closed. I have completely sealed the bottom access hole and I ran compressed air in this thing and sprayed soapy water over every inch of it. No bubbles. Water drip not hooked up but I fed water into the intake pipe with the spray bottle of soap water and it did flare much stronger. I would think it was a leak problem but I sure can’t find it.

Did you screen all that dust out? That is way too much dust, I dont think my machines would flare off either with that much dust in there. You probably have clogged filters from that dust.
I wondered about that and if the solution is as simple as that I’m going to hang myself from a door knob. I’ll vacuum out what’s in there and refill it with cleaner fuel. Much appreciated.
Tom , i have a sheet of perforated steel that the charcoal flows down when coming out of the grinder to get some of it out and also i use a round 15 inch round plastic sieve with 1/4 in holes bought from the hardware shop to get the dust out .
Dave
No worries there is as reason I know this. haha
He would of had really good luck, by slowly dumping it into his drier. The wind was blowing it right out. ![]() He has a trommel that would also work. At least my trommel gets most of it out, but if you don’t have a cover over it, it could get really messy and dusty.
He has a trommel that would also work. At least my trommel gets most of it out, but if you don’t have a cover over it, it could get really messy and dusty.
This hit’s home. What doesn’t fit in the small trailer work shop get worked on outside. At least I don’t waste time sweeping the floor anymore.
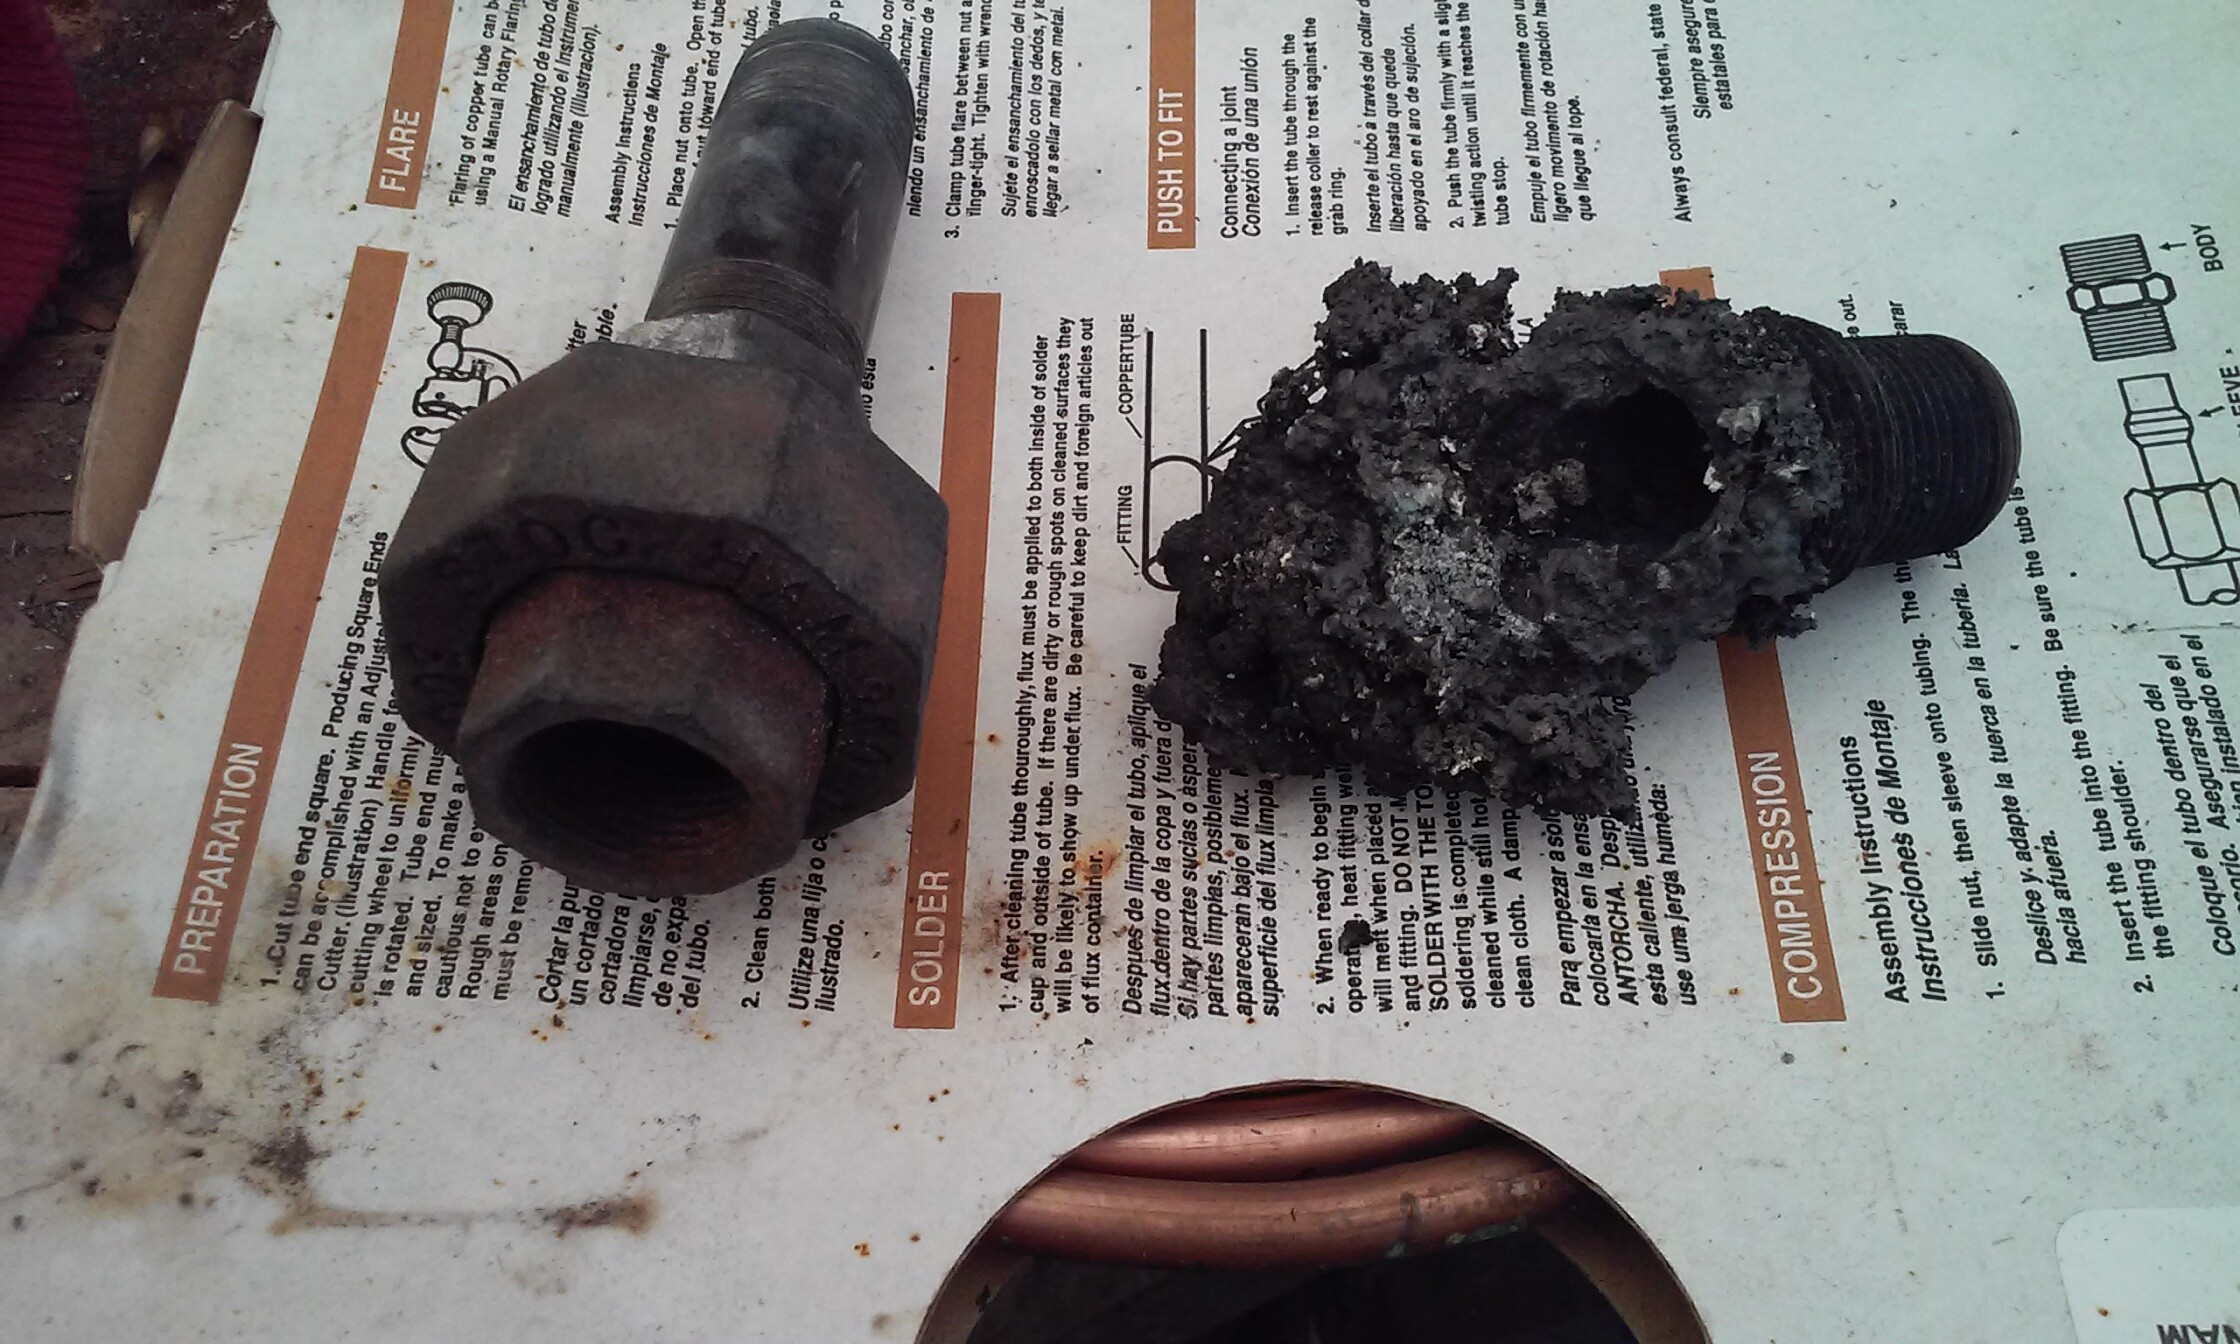
I’m going to have to order those hexaloy sleeves Dave recommended. So far testing this thing I’ve probably melted 15 bucks worth of pipe nipples. The one on the right of the picture was a 3/4 nipple with a 1 inch nipple over it. It lasted about an hour of run time. Now I have this installed. Real curious about how long it will last.
Tom,
Did the pipe cap with holes drilled in it not work either?