Having prob posting pics
Jesse, there are a few things you have to understand. First, the photo can not be too many pixels. I have to put my pictures into an E-mail to myself. They come back in a few minutes and I have to take them out of my E-mail and put them in my photo album. Then to post them on DOW, I make a post and slide the picture from my photo section and drop it into the posting.
When you E-mail a picture it automatically cuts down the number of pixels. I don’t know why I can’t just drop the picture from the E-mail to a DOW post, but I have found I have to load it into my photos from the E- and then to DOW postTomC
3 Likes
Thanks Tom, I apreciate the quick response. I’ll try it tomorrow. Here it is already Mon.and I haven’t slept yet
I don’t know about you folks out there but I usually wake up woth the birds
1 Like
If you need to make your pictures smaller there are free programs out there to do it for you .
I use a program called VSO image resizer , I have used this program for over 6 years now and it works good and is simple easy to use , reduces the size very small with hardly any loss of picture quality .
Dave
1 Like
I use microsoft Paint which comes free with Windows.
2 Likes
Picture resizing thread:
2 Likes
I eliminate all this resizing hassle by just setting my camera to the lowest resolution to start with.
Takes up less memory on the camera, Less memory on my computer, and less memory on the site. Also uploads a lot faster.
9 Likes
Hey Tom, Brian, Andy
Just getting started, for now I’m stuck with a crappy Iphone 4 with no adjustments
On the camera and I am too cheap to just buy a camera. I can always think of 900
Other things that we need to spend that money on. With help from members like you guys I’m sure there will ne no Real problems ,just a bit of confusion.
Thanks guys
Jesse
1 Like
My way is long but that was my solution. I will add that when you E-mail the pictures give it a couple of minutes and then go to the mail box and ask it to check for new mail. Other wise you may not get it automatically until the next day. Looking forward to pictures.TomC
1 Like
I just crop the picture on my phone before uploading
1 Like
I uploaded a picture yesterday. It started at 3Mb’s. I did a “Print Screen” (Windows 7), Brought up MS Paint (free), then “Paste”, Then cropped the picture using MS Paint, Then “Save As” JPEG photo file. Drag and drop into your post. The finished file still looked OK and was less than 200Kb. I am no expert, but that worked!
1 Like
Good morning fellow Gasers,
I have been running my micro gasifier. experimenting with different fuels. and what I have found is this:
As long as the fuel is sized very close to the size of commercial pellets then it works ok,
First off I had to find something that would work as a grate and not clog up but not let the material fall through. the center piece from a ss kitchen drain works pretty good so far.
when using pellets I get no left over char. no little chunks or bits of unburned fuel in the cyclone. granted a real cyclone would probly work better.
when using charcoal it has to be sized the same as pellets. With no fines. almost instant good gas. but it is hungry, can,t seem to keep enough in the tube.
Need to add a large hopper. also need to figure out a viberator.
last night I ran the gasifier for an hour on pellets. I had no problems except having to add pellets about every seven to ten min. at about fourty min. almost all the color left the flame and it stayed pretty much very blue for the duration.
this run was made with out any filtration or cyclone.
haven’t taken it apart for inspection of the left overs or the grate but I think I know what I will find. there should be about a large coffee cup of charred pellets and the same amount or a bit more of unburned pellets. Depending on how long it ran after I added fuel.
I am making some changes to my cyclone. I had some clogging issues that arose while trying charcoal. think it was mainly caused by fuel size which caused a bridging problem and too many fines in the coal. caused by me trying to clear the bridge.
when I opened the cyclone yesterday after everything had cooled of I had about a 1/4 cup of condensate. no sticky tars inside the cyclone. everything washed out with dawn dish soap and ss steel scrub pad.
I was able to purchase the last few fittings for my filter can so today I’m hoping to have that set up, and ready to go.
will start temp testing on exhaust gases have to get below 130 degrees F. so I can switch over to sump to sump hose, or pvc pipe.
In my little town people put there garbage out on Sunday night. my neighbor rides around looking for anything he can rescue and sell.
Mon. morning he wanted to show me his finds. I was able to buy a new already charged 700 amp booster pack for ten bucks. 
my blower only draws 3 amps I ran it for two hours and lost no power. hopefully I will be able to set up on the vac. side of the blower, and set up a manometer soon. on the lookout for an old lawn mower
that I can experiment with.
well that’s it for now got to go and be Dad the home school learning coach.
Jesse
5 Likes
Jesse,
Thanks for the update. It sure is fun reading about your progress. Brings back memories of those exciting early flares. I look forward to seeing more from you.
BTW, my boys were also home schooled, got their GED (Good Enough Degree) and did well in college.
3 Likes
Hey Bill,
I’ve been home schooling for thre yrs.
The boys don’t seem interested in college. Just want to do what ever work we can come up with.
So the blue in my flame was caused by char build up at the 2"x 3/4 coupling grate openings are to big.
Cut new grate out of sheet metal
Drilled a bunch of 1/4" holes in it, nice tight fit .
Set up on the ground instead of my coffee table. Can see right into the tube.
Ran the new grate a while. No real issues except the speed of the gas seemed to slow once the zones got established, and everyhing settled at a stable temp. Held my hand over the blower to check blow back and realised I had more than I thought. Dug out the duck tape rearranged a couple fittings added a piece of stove pipe and now the blower is on the vac. side. More duck tape!!! Blower is set up on top of the cyclone. A bit close? Well in the spur of the moment it worked. Ran about 1/2 hr.blower was get hot gas temps 3’ above the blower was 130 F. Should have put my blower there!
Very pleased with the way the fuel traveled down the tube,no zone migration issues.
I set an old 25 cup coffee pot on the tube, for a temperary hopper, no hang ups. Only put about 3 lbs. of pellets in just to see if it would work. If I make it permanent, I’ll have to figure out a lighting port.
I also have a much larger blower, but I will have to install a power control switch
on the power cord. Right now on low its 150 mph,or on hi 200 mph. 120v leaf blower. The vacuum impeller is seperate from the electric motor.
Will post more later.
Have to go make charcoal for my filter.
Its supposed to T Storm all day tomorrow
Jesse
2 Likes
Woops that was to Bruce Southerland
Sorry
Well I went back to the proverbial drawing board.
No more closed pipes. clogging issues are gone !!!
So I had a clogging issue: char collecting in the 90 degree elbow
I removed the 3/4 reducer
Installed 1’ reducer and nipple on the bottom of my 2" nipple pushed that down through the top of my pail. Lots of RTV silicon 1100 degree around the can top and floor flange that I use as a bulkhead fitting on the side of the can for out going gases. That is still 3/4". Already had those parts gotta use em
Light it up !!!
Loaded the tube wadded some paper lit it and added lots of air.
We got so much gas ! ! !
I installed a 12" long 3/4 nipple then set a 3"x 3’ stove pipe just leaning on the end of the nipple and laying up against
My little bbq grill
When I lit the gas from the bottom it
cannoned ka— whoom!!
Really cool!!!
Now I have vac. Issues.
Life goes on ! ! !
Man this is fun!!!
No longer calling this thing the little rig
From now pn it is the TCG1
( Trash Can Gasifier 1 )
I know, I know, its a FEMA STYLE Down draft
But until I can get with Mr Matt from
Vulcan Gasifier, and talk to him about where and how big the air nozzles he thinks would work, I’ m happy!
It makes gas
The gas burns
It runs on 12v
Set up on my front porch in a cabinet
With proper air flow can heat my home
For pennies on the dollar! Yea !!!
Now the real fun begins!
Conquer the air leaks! RYV! To the rescue!
Why did I not continue ln this coarse
of action to begin with?
Guess I wanted to combine Steve A’s no weld and Tactical Woodgas’s ideas together. Had I just went 1" all the way it would have been so much easier.
I have 6 pallets of boards to cut up and turn into charcoal tonight !
Will post a vid later tonight of the flare.
Jesse
3 Likes
yesterday I went back to my original design. Burn tube dumping into
The pail. moved the gas out port up close to the top. Patched the hole with a piece of sheet metal and some rtv. Set up and tryed to run on the push side, made good gas right away, also suffered a zone migration that I could not recover from.
Shut down
Today I worked on getting everything hooked up. My bilge blower got tarred up and didn’t want to pull enough air all I did was make alot of smoke and tar. Never got hot enough to dry out and run right
Shut down again. Finally cool enough to work on.
Grate was clogged from yesterday’s zone migration.( can’t push air with the new grate) cleaned everything. Scavanged the tube off a dead weed whacker gave me an extra 3’ of cooling before the cyclone. Cyclone to filter is sump hose, filter 2/3full of charcoal. Filter to big blower (150mph wind) it sure moves some air!
Light up was very easy could not make gas. Too many cfm through the tube. Not enough residence time in any zone. It sure burned the pellets up quick! Like I said in a previous post that blower needs a power control switch, so I can slow it down
Finished cleaning the little blower. (Oven cleaner, and hot soappy water got 90% of the tar ) let it dru for an hour or so. Hooked it up to power, works like new.
Needed a way to attach the little blower to sump hose. Was picking up my mess and found a couple 24 ounce beer cans from yesterday on my work table. As I was going to put them in the barrel it occured to me that these looked like a real close fit. They slid right in the end of the blower. I cut the center of the can bottom out and pushed a 3/4
nipple through the drink hole and hey a little rtv around the pipe to make it air tight. Some duck tape to seal the can to the blower
Duck tape to seal the pipe to the sump hose and tomorrow I’ll try it again. Probly after church. Don’ want to show up for worship smelling like a piece of smoked herring minus the fishy part.
I know I have been promising pics of my progress. Still can’ upload pics. Please don’t flood me with do this or that, it doesn’t work. So I’ll put video on my channel and post the links when I get a chance. Your going to see a lot of duck tape and clear rtv silicon
10 bucks for a caulk gun tube for 1100 degrees. Compared to 16
For 1700 degree red rtv same size tube. My beta machine is kinda spread out, but like I said its the beta! I have to prove this works. Makes good gas consistantly. then compact its size with propper plumbing, and propper arrangment of pieces and parts in a much smaller footprint. Well its oh bed thirty. I have to be up early and do my house work that I have been neglecting.
So I can be outside tomorrow afternoon.
Jesse
1 Like
What brand rtv are you getting to achieve those temps? I get mine from Menards and the clear is 500 degrees and the red is 650 degrees.
1 Like
Morning Don
I’ll have to dig the empty tube out of the garbage but it is originally for direct vent
aplications on furnaces. I thought the red stuff went to a higher temp I was useing the white high temp food grade but it only goes to 450F that was only 7-8 dollars a tube but my hardware man needs to order more. Ever mix high temp silcon with bondo? Makes a real nice seal with some strength to it. Keeps the bodo fr cracking when under vibration
Or heat failure. You have use a high speed wire wheel or grinder to remove it. Found my empty tube I did not have my glasses that day so when the hardware man said it went to 1100 I believed him
Imperial brand 450F after its cured
My Bad Sorry
Hate giving out miss information
Jesse
1 Like
Well I have spent every spare moment on the gasifier chaseing down air leaks
for the past couple days. Finally can’ find any more. So I put the short tube on the gasifier, turned on the blower and lit it up. It took probly a good five min. before any gas would try to lite. Little bit, little bit I mucked with it another 5min before I thought of an air leak.
I have to get another tube of silicon today. My filter lid had a small leak. Fixed that.
Nice big blue flame.
A friend owed me a couple bucks, so I talked her into getting me a bale of pine shavings From the local feed store. Put a hand full in the tube to try it. The mew grate did not let enough air through.
Pellets ran fine. Chips clogged it up.
So while clearing the clog I accidently poke a hole in the sheet metal grate.
Wow what a differance. Now it sounds like a big blow torch.
I added some more pellets and relit
the flare. I now have a much large flare than ever. Mostly blue with a little red and orange.
I flared like that for more than an hour. Ten the flare started to get smaller and more red.
Hmmmm…
Ah! The blower. Need to plug the booster pack in. So I got my cord around where I needed it, and plugged it in.
It was great lots of gas, big flare!
Then that air leak ,I thought I had fixed came back.
Ka whooosh, whoom it puffed back!
Lifted the spring loaded lid on my filter.
The seal that I had made, and thought was cured, had decided to let go.
After that I shut things down. It was time for coffee and bed.
So here it is morning again. I have to ride my racing bicycle to the hardware for some silicon. Latex caulk does not hold up to wood gas condensate. When I opened the filter can this mornig that whole seal I had made, was all peeled loose, and gummy. Probly should have given it a couple more days in the sunshine! On the bight side I was pleased with what I found in my filter can this morning. The gas does go up the outside some but not as much as I thought it would. I had found a nice piece of polyfoll pad in the garbage the other nite and had put that in my filter yesterday. Solid dark gray brown the old tee shirt under that just had a big dirty gray circle in the middle, where the gas came up through the charcoal. The micro fiber towl below that was the same. The charcoal seemed dry, to my hand but there was some condensation on the underside of the lid, kinda expected that.
Todays goals are new lid seal
Better more open grate
Thats all for now
Jesse
3 Likes
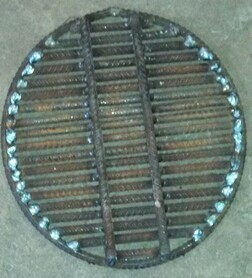
Hey Jesse,
I got this idea from Mike L for my grate. It’s made out of rebar.
2 Likes