Sean,
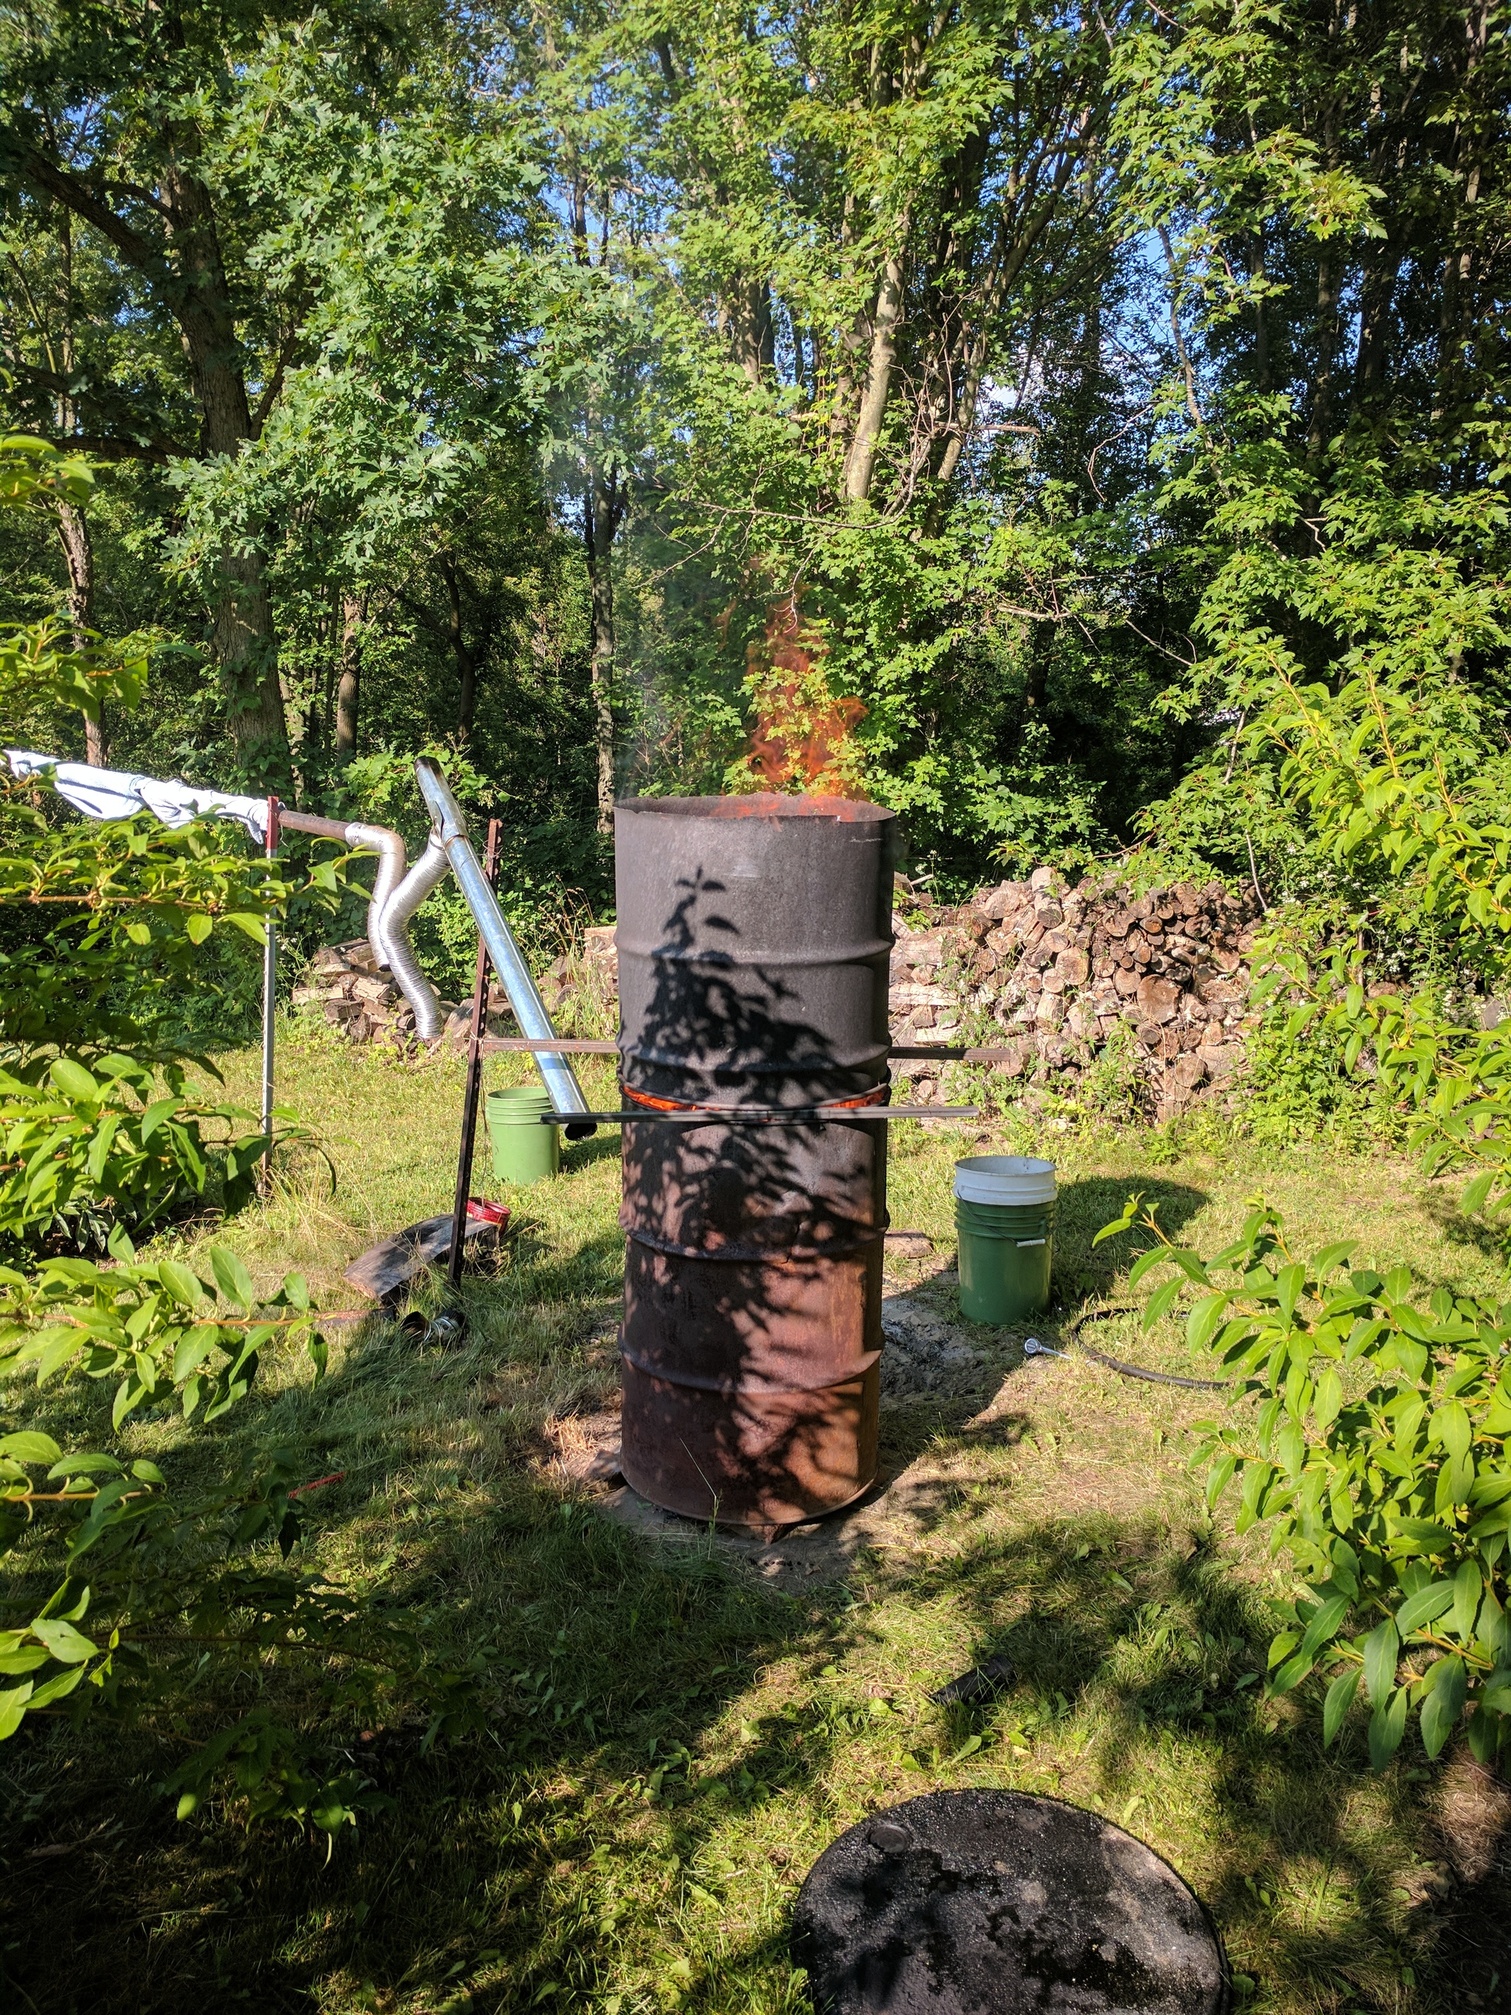
As Bruce mentioned, see my post from May 25th. Get some rusty old tin roofing and slice it with a metal saw or tin snips, or an old hatchet. Make it prettier than mine, so the tin reaches down on the inside to just above the holes, and on the outside to about a foot from the bottom (so there is room for the dirt and clay to cover the holes, and to insulate. Start the fire on top with paper balls, and add small brush to build up a good bit of glowing char on top. Try to sort your junk wood so you have a load of uniform size. I like to load the sticks vertically, and break them and fill the barrel as tight as you can. Throw the little stuff into the top of the chimney barrel on top. A barrel of what you show in the photo will burn down in less than an hour. A barrel of 6" to 8" logs is going to take 2 hours. At the end, pour 20 gallons of water into the barrel to extinguish the embers. Dump them out later onto more old roofing panels to dry. Try to split that big log you show in your photo. If it won’t split, throw it in the top after you have a really good flame, then at the end, pick it out and toss it into a tub or water. If no tub available, a hole in the ground will work. The chimney barrel on top doesn’t have to be pretty, and I usually use what is left from the old bottom burn barrels. (Next load will be my 256th barrel, so I have quite a few bottom barrels that have been replaced.) Try it. (There won’t be any smoke.)
I don’t want to make it prettier then you have. 
I was trying to avoid using water because it gets messy, and I want the ash for fertilizer.
I just cut the top of an old burn barrel, and was going to try to run it like your original… I need to find some metal if I try it line it. I was going to try running the barrel then just closing it off with the barrel top like I have been doing. I just wanted to get a feel for how much smoke comes off. Im sure a lot less, but I also wanted to test the wood vinegar.
It is a LOT hotter and a LOT less smoke then I had for sure. But Im a little tweaked because I have to watch it or I have to move it to an area that is more burn proof.
I run a 5 gallon TLUD and use a similar size flour tin to dump into, makes a beautiful clean clinking char, once cool it is as dry as could be. Next goal is barrel size.
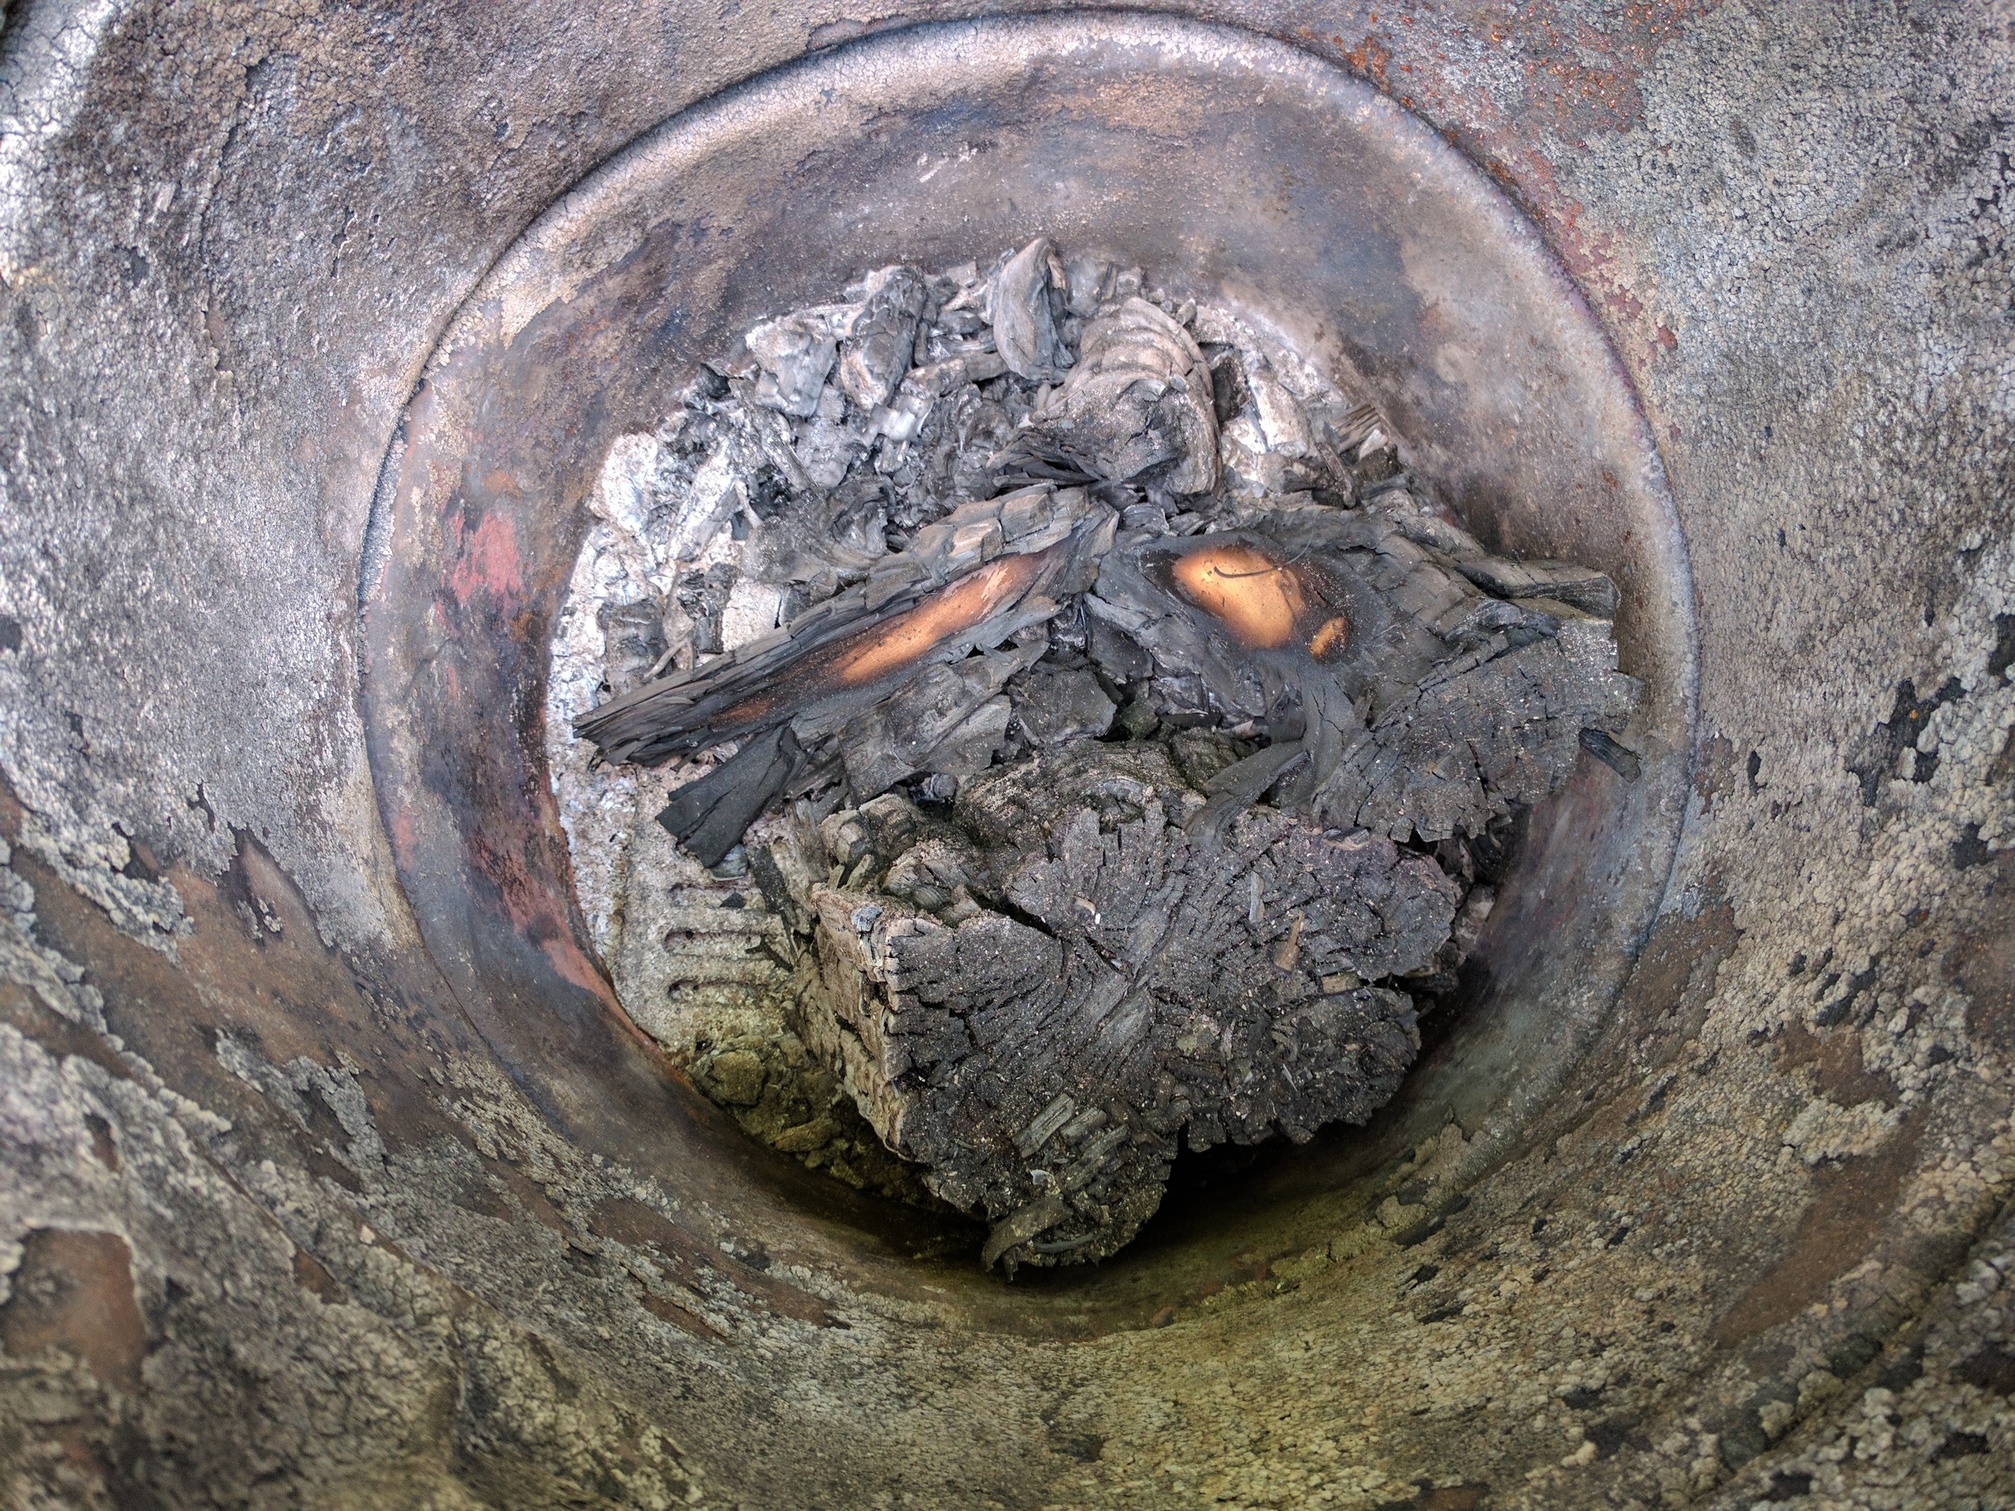
Here is the results of the Menke style. it was about a 5 gallon bucket full and about a 3/4 of a shovel full of fines/ash. I probably let it run too long. I might try an actual tlud with a 6" stovepipe. Having the exhaust in the center would help a lot to make the burn more even.
I did end up with a little over a half gallon of vinegar from the previous run, but I think I really need to extend the pipe, and I am not sure exactly how to suspend it because of the hill.
Yield here is usually about 20% to 30% of 55 gallons, depending on how many branches I feed in at the top of the chimney barrel. With holes at the bottom (under the barrel) it might be hard to tell when to start closing off the inlet air. I use a sledge and a pair of punches to put 1/2" holes all around the bottom sides of the barrel about 6" apart. After the flames are going good, usually a few of the holes on the upwind side with show glowing char, and I immediately shovel sand over them. I keep watching the other holes, and keep shovelling, until the side of the barrel is covered about a foot up from the ground. (I feel this creates a hot oven environment.) With the bottom covered, no air can enter and burn up your charcoal, unless it comes down from the top. If this air hits the flames, it will never make it to the charcoal. Check out Kelpie Wilson’s site/blog, and also Gary Gilmore’s video on his PA Pyramid Kiln.

Another thing the dirt around the bottom of the barrel does is keep the 20 gallons of water inside the barrel until it eventually oozes out through the holes at the bottom. One way to recover any ash that gets washed out is to simply move this used dirt to your compost pile, and bring in fresh dirt/clay or sand for the next burn. My TLUD stoves over the years have evolved to a rather large powerful stove using old six inch stovepipe spliced together to make a nine inch pipe that fits into a nine inch stainless steel stockpot. The grate is a worn-out 10" carbide saw blade with teeth knocked off. I made a slide show about 4 years ago showing how to build this stove. The details are in the description. The current version is slightly modified in that I have cast pearlite/plaster into an oil pan with the grapefruit juice can up the center. The 20# weight on this holds the top on tight, and allows me to use only two bricks to hold the pot.

This makes lots of really good charcoal while cooking. I no longer need to use the air valve on the bottom because I have learned to use charcoal brands to regulate the flame height. I do use forced air at the end, especially if I am down to partly consuming my “made” charcoal because I need just a few more minutes of simmering time (like to finish a big pot of rice).
I have been out collecting more dead fallen branches from a wet weather creek/ravine that passes through my land. This wood, like driftwood, is very dry, and is converted to charcoal without cutting it, and ruining those nice 10" carbide saw blades.
I like the cooker. It is fancy!! Does it get hot enough to melt scrap soft metals like aluminium or copper?
I was originally going to wrap in insulation but I take the barrel to the brush pile to fill it up. The insulation plus a covering was going to be too heavy to pick up. and I haven’t figured out how to make it removable and waterproof (so I can leave it outside on the barrel if it rains)
However, the hole in the center is something that I need to do, and I can run the vinegar distillation or run it more like a tlud, or a cooker like you have, which makes it a lot more useful. And your short stack answered the question on how tall the after burner stack actually needs to be. I just need to figure out a good diameter.
I doubt it. For cooking, frying, and boiling water the flame needs to be controlled. The tips should just barely lick the bottom of the pot. About 30 years ago, I built a charcoal powered Aluminium melting foundry and melted down lots of automotive pistons. I still have some of those ignots, as well as the foundry. It used refractory cement cast into a 5 gallon bucket with a welded up hunk of square tubing to hold the pistons to be melted.
If you use the tin sheets as I described earlier, you can leave them out in the weather. The sheets are removed before you dump out the charcoal, and they are not heavy. After I dump the barrel, and restack the dirt/clay/sand (it is nice to have it stored in 5 gallon buckets, so it can be dumped over the glowing holes easier), I re-assemble the sheets into the barrel, and fill it with the wood for the next load. Then I cover it with a very large plastic molasses feeder container, to keep everything dry. I like to make charcoal at or before dawn, when there is plenty of dew on the grass.
I have fiberglass insulation in the liner in the TLUD stove, and it attracts mice. They are not always successful in evacuation procedures. It also needs to be kept covered when not in use, else the insulation get waterlogged, and the stovepipe turns to iron oxide flakes.
Right now, I can’t use the sheets because I don’t have any. I would have to locate some… However I do have some insulation I could use. I was thinking possibly taking a couple of barrels, then making a skirt for it with a hinges with removeable pins so it folds out to put the barrel in. then make a separate top cover like a trashcan cover for it that slides over the top and fits over the edges of the skirt. then the whole skirt could collapse for storage in the winter. I don’t think it would require welding either if I broke it into 3 pieces and I could possibly support the one piece with some pipe to hold it in place. but I am way ahead of myself.
Is 6" going to be about right for the size of the stovepipe? the 2 1/2 outlet is too small and the barrel was too big. I don’t want a huge fire hazard.
I might have to build a charcoal kiln. For the 2 dollars a lb, it isn’t worth going to the scrapyard to sell the little bit I have, but it seems like a waste to throw it out and it is potentially useful or at least easier to store or take to the scrapyard in ingots.
This morning started out a cool 57 F degree temperature so I got rid of a lot of punky sticks and branches that I made into biochar in my smokeless cone retort.
Before putting the barrel cover on we put foil wrapped potatoes on top of the hot charcoal for lunch.
“Waste not - want not”

Hi bsoutherland and any others that want to chime in, I really like your style of smokeless furnace set-up, and I’m going to do my best to make something to make charcoal.
Now that you have a bit of experiment time, I’ve curious if you are condensing the white smoke given off thru both of your retorts while your waiting for them to begin their own pyrolisis, or is it just allowed to vent to the atmosphere? I’m trying to determine by asking, how much tar can be accumulated from a single batch? I noticed Keon Vanlooken’s drums in this thread were obviously condensating some major tar, at the pipe, that he seemed to direct into the fire. And there was a video of condensing the white smoke thru a pipe submerged in a water trough…but I have no idea how much tar accumulates from a typical batch. I haven’t noticed any kind of condenser in use on your charcoal maker & I was curious if you were going in that direction at all? Even if your not intending to condense the white vapors, have you an update of how your rig has been processing charcoal?
I am still interested in going smokeless, and as others here at DOW have properly pointed out to me, water vapor & venting of it is a consideration in making charcoal. So I think I’ve got the water removal figured out, I’m hoping to ‘kiln dry in my woodshed’ my firewood, to condition the firewood before loading into the retort. I’m expecting that if I can remove the bulk of the water vapor before loading the retort, while confining huge amounts of heat into a fairly small woodshed/work area, I will be quicker into making charcoal by loading [hopefully very dry] batches, as well as generating kiln dried firewood outright [not necessarily all of it needs used in charcoal making], created by waste heat from the charcoal making process. I too would eventually like to daisychain one batch to the next. So am I on the right track with the ‘kiln dried’ approach? bytheway, I googled ‘kiln dried firewood’…nothing popping up, but solar drying–somewhat different approach.
The thing is, I live in a heavily wooded forest [not a lot of solar available], and these TLUDS & others that have these huge flames, flying embers & intense radiant heat surrounding the work area…well fire breathing smoke stacks… just isn’t realistic for me. I want to make charcoal in the shade! hahahaha
oliver
Oliver, I use my horizontal retorts with pallet wood and <2" sticks. My vertical retort is great for wood chips. I don’t do anything with the steam and condensate. For smoke free operation, the curtain kiln is the best.
Hey all, I liked all the interesting ideas bouncing around in this thread, and I borrowed what I could as I launched into my own retort project. I have been making charcoal with a really inefficient retort, and I think I was burning almost as much wood as I was putting into the barrel. I did not really produce very much smoke with my setup, although it hardly matters where I am. Once I get up and running I am going to take some good measurements: Pounds of wood into the retort, pounds of wood burned to get the process going, and pounds of charcoal. Anyhow, on to the build:
I really like the look of the Hookway system, but I think Bruce is onto something with the horizontal arrangement for ease of unloading. It is nice to be able to just shovel the charcoal out when it is done. I envy that section of stainless pipe you found, btw. What I was able to find locally was a section of 6"x 5" steel box section with 3/16" walls. I welded one end closed, then cut out a hole for the chimney, and the gas inlet. Here is a picture of the firebox:

I saw in the video of the Hookway retort that he had used a short section of pipe leading down into his firebox, but when the wind shifted, it would allow the smoke to billow out the end. I decided to do this as well, but put a bit of an angle on it, so that the gas would be directed as a jet in towards the chimney, and over the hot coals.

I used a chimney cap that bolts down to tapped holes in the little tabs in the firebox - 3/16" material was hard to weld, but it was great for tapping holes to bolt things on. I also made a flange for the door, since I wanted to be able to feed the fire and load from the same side. I welded on some captive bolts, and put some stove gasket on it, so that the door can be cinched tight, hopefully making a good seal

Here it is assembled, with the door clamped and bolted on.

I added the threaded floor flange, which will have a 90" fitting, and a lid to allow steam to escape at startup. The chimney pipe in the back I sealed with more stove gasket after I took this picture, and I also made a simple little steel cap that fits snuggly over the opening to the firebox to seal the system during cool down.
The next step is to devise a way to insulate it - I have 2 ideas, one is to take the paper off some extra fiberglass insulation i have laying around and attach it with chicken wire, the other is to build a dry-laid box out of cinder blocks, prop it up inside, and fill all the space around it with perlite (which I also have a large quantity of just laying around).
I am really excited to get this thing fired up, and would like to hear any ideas or comments. I am not sure if the thick walls of my firebox are going to be a problem (it was the thinnest material available in that size). I worry that it might be inefficient as a heat-exchanger, and that too much heat might go up the chimney. Any thoughts?
Roxul should take the heat better then fiberglass I think. I really like this one it’s pretty.
Looks good. You will probably find that this system burns hot enough to break down regular fiberglass. The only thing missing is a grate in the firebox to get air in under your kindling. Use a blow drier or other fan to accelerate your kindling burn or you will have a long wait to reach a self-sustaining fire in the tube firebox. I often find brands in the bottom along side the firebox tube so I have laid bricks along each side to raise the feed stock up a bit. I use a long piece of threaded rod with a half round disc on the end to scrape out the charcoal. I picked up some more of that free SS pipe yesterday. Check with woodstove shops for leftover pieces from chimney lining jobs.
Because the heat may warp your lid, I would bolt a piece of angle iron reinforcement to the lid horizontally just above the cutout opening for the firebox. I also install lid insulation inside the lid with a sheet of metal to hold and protect the insulation.
Thanks for the input Bruce, reinforcement on the lid sounds like a good idea. I will think about some sort of grate, I am thinking maybe several short sections of angle iron side laid by side, with slots cut perpendicular to the length? End-on it would look kind of like this: /\ /\ /\ /\ /. I also have a couple of little blower fans that I will try using to get the fire going.
I was wondering about that: will regular fiberglass break down really quickly? Looks like Roxul is available down at home depot, I might have to go pick some up. I am thinking perlite is going to be too hard to contain without building a sheet metal shell around the whole thing.
I use Roxul for various stove and retort projects. It comes in batts and boards. Our local Home Depot has boards and Lowes has batts.
Hi guys, I´m always interested in this subject.
This system has worked fine for us; totaly smokeless. I posted it in “Biochar the Science Behind It”
Here it his:
Reactor working, notice the intensity of the gases, the steel barel is red hot.
")
Reactor working. We just lite it, and go to sleep, next day it´s cool and of (self extinguished), and biochar is DRY, once its pulverized it wil ABSORBE the “soup”.
")
This is the next day after the burn.
")
Yes, the barrel in a barrel is tried and true. That was my first kind of charcoal maker. My retorts evolved as I looked for a way to pyrolyze more challenging feed stocks like pellets and wood chips. I have come full circle now. My latest rig is a used super store hot water tank standing vertical inside of 55 gallon drums with a blower to assist the TLUD operation. Free wood chips are the feedstock. I’ll post pictures if it works.