Thats the air they are talking about i thought, less air needed too maintain a high enough hearth temp too make clean gas, No Tar, as Wayne Said yesterday , he has about 1/2 million miles on wood gas, no engine failures. No Tar. Rich gas meaning less oxegen used too make clean wood gas, and no oxegen in the gas as its makeing its way too the engine.Quit a balanceing act that has been acheeved in the gasifier designs.Each gasifier brand or design gets it done, some are more critical on the detail, then other designs, Wayne keith i think said his design was half imbert and half fema.?? For instance his design is less criticle on air speed than a imbert design.And has a better turn down ratio then any other designs out there. And i would say a WK design gasifier most allways has more reserve fuel available than the other designs.???
Kevin is right. However, not less volume of air when preheated, but less mass - fewer atoms of N and O2.
What’s practically possible in terms of dry wood and amount of preheat determines the outcome.
Any “free” heat and heat not needed to steam off moisture can be used in the woodgas making process.
Hi Tom, are you using a cold air muffler Preheater for the incoming air to your gasifier using the wasted engine exhaust with your gasifier setup? May be you could do a walk around with pictures of your gasifier setup, or a refreshing on how you changed the Imbert over to more of a WK. Preheating the air is the key to making good quality wood gas.
One thing that I have been doing now, is when I get done with running my gasifier, I run my truck on fuel for a short distance a few miles. Specifically if I am trying some new on the set up of my gasifier and it is not quite running right. I always want to make sure the truck is running correctly on gasoline. I Learned a hard lesson last year heading out to Argos with Mike Gibb. The truck was running great on wood gas but would not run right on gasoline going down the road at highway speeds.
Thanks for keeping us updated on what you are going on your truck and gasifier.
Bob
Sorry Bob that I have been lax about replying to your post. Here are a couple of pictures of the difference between types of gasifiers I have run.
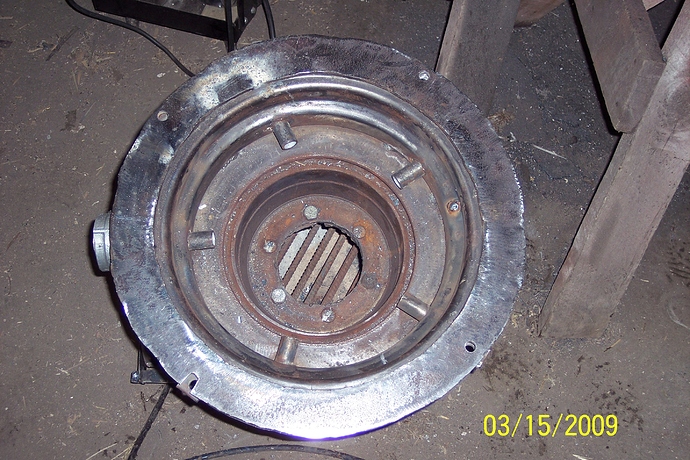
The first couple of pictures are my first and most successful gasifier. It is made out of a tire rim with the nozzles welded into it and the oxidation zone is a couple of brake drums off from the rear of pickup trucks that have both a drum and a disk. Grate was just rebar.
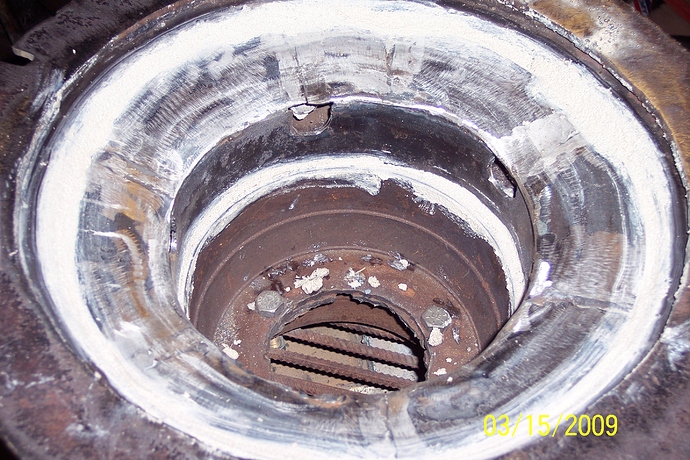
This is the same gasifier with a “tar fence/shield” to keep gasses from going behind of the nozzles. ( the white is fire brick cement to fill joints but was not necessary )
This next picture is where I made a special fire tube to “spec’s”, with 10 nozzles, a new reduction zone that had char for insulation, and a grate per Max.
This design created “clinkers” on the grate.
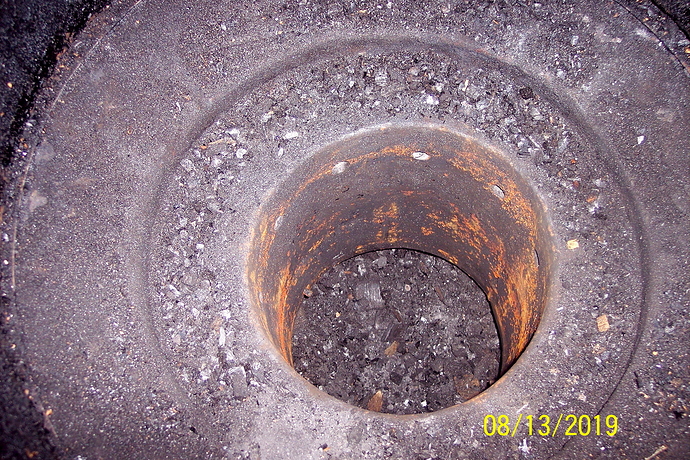
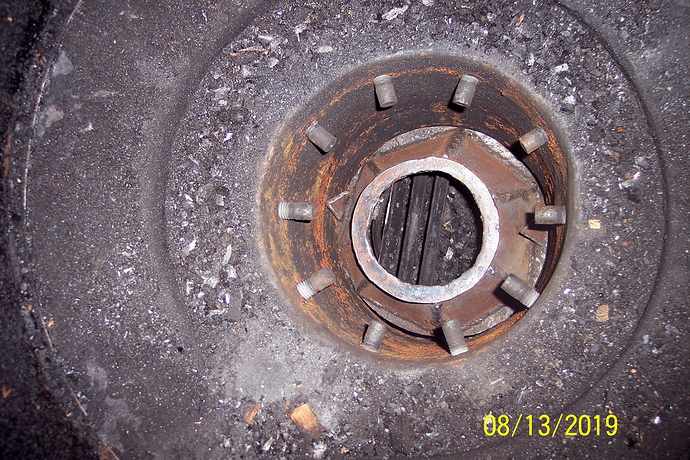
So then I had another plan which required pulling ALL of the innards out of the fire tube. When I did this is what I saw.
I thought, golly, that looks like what the WK guys are building-- 10 large nozzles flush with the fire tube wall. All I would have to do is add a restriction at the very end of the fire tube and hang a grate. At that same time JO was building WITHOUT a grate. I was so close to the bottom of my ash pit, I decided to copy JO-- only difference is, I do have a clean out for my ash pit. This is how my “sort of WK” turned out.
This setup ran in my Chev V6 like a jack rabbit chased by o’briar fox.
I had spent good money to have that fire tube made and I didn’t want to ruin it by the erosion some of the WK builds had developed around the nozzles. So at a couple of hundred miles I cleared the fire tube and checked it. I found little flakes coming off.
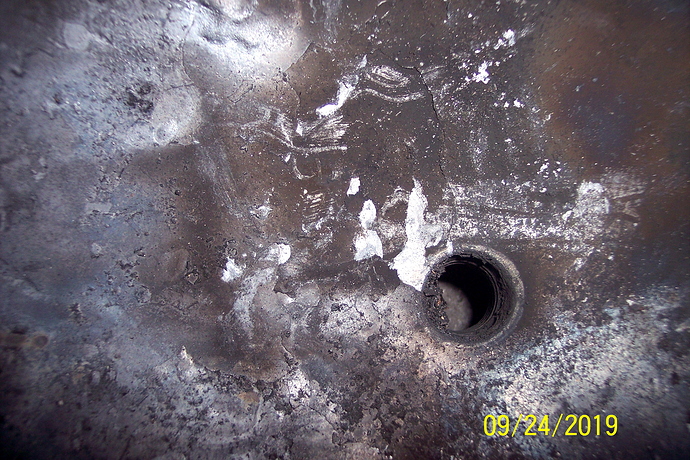
I thought about welding in some heat sinks, but I already had a “inverted cone” reduction bell sitting on the shelf waiting to be tried. So this is that reduction bell/restriction.
This is the one I was trying to get to run when I got tar on my TBI butter flies and stuck them. The truck has been sitting every since.
And Bob; finally;
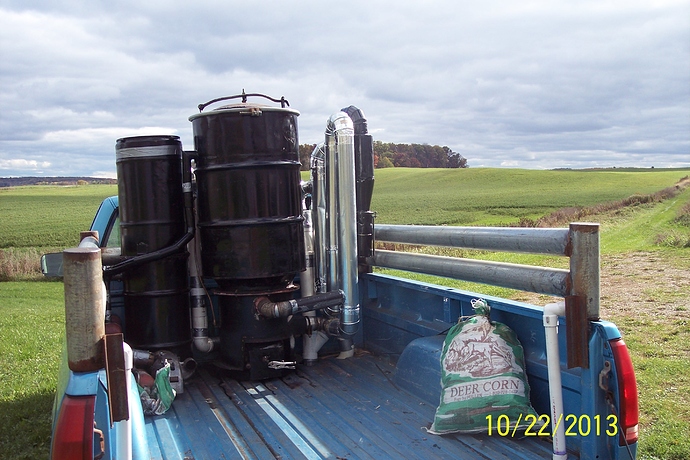
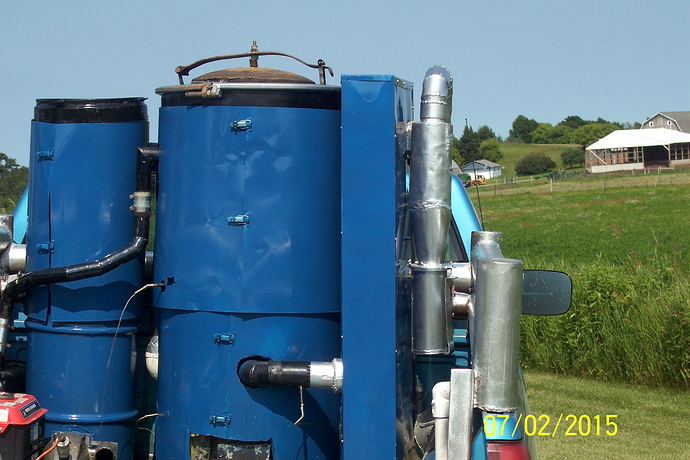
I don’t think that holds true for an Imbert. These final pictures are of a intake air preheater that I tried and found no advantage to it-- or at least not enough to carry around all that weight. This is a 3" pipe coming out of my gasifier and wandering around until it gets to the cyclone inlet. On the outside of the 3" pipe is a 4" pipe that picks up air at the cyclone and runs back to the gasifier and then down to the gasifier air inlet.
I even enclosed the reverse flow heat exchanger in an insulated box.
Well there is a short book on where I’ve been. Where I go from here, the good lord only knows. Kristijan one time told me he gets so much done because he has several projects going at one time. I have now tried that. I purchase several items to use on several projects but instead of moving smoothly from one project to another, I am like a man running as fast as he can go with one foot nailed to the floor-- in circles. TomC
WOOD PREPERATION!
OK the reason I came back to my thread and found Bob’s comments is I wanted to say something about wood preperation
Forget about all this pie in the sky stuff --chipping wood in the back of a truck or making pellets on the fly — You are smoking that funny stuff the kids use. Grow up.
Gasifiers run on “chunks”. Yes you were talking about one that runs on saw dust-- I have never heard of it or let alone seen one. And how can you talk about improving something that you know nothing about. The two most popular chunks are charcoal and wood. I going to talk about wood.
Mr. Wayne and JO have the best set ups for making logs into woodgas fuel-- although I don’t think Mr. JO knows it yet. My interpretation of the problem is to use a saw mill to cut the log into about 2x2" boards, then take those boards and run them through one of the chunker many of us have made or— through a rebak. (JO has plenty of small aspen, birch, to run through his rebak, but if he wants to use some logs for transportation instead of heating, he has the tools) So, many have or are building “chunkers” and I hear talk about other building rebaks. So what is really needed is a saw mill. Since JO introduced me to the “swing blade” saw mill I have been studying YT’s and even bought a few parts to build one. Maybe this is too big of a job for some and I am one. So what I was working on when my shop burned, was a small swing blade that would only cut up to 2x2 or maybe 3x3" boards. I’m not planning on building a house of of them. I want fuel for a gasifier. I picked up a “Sears radial arm saw” and found that it had good cutting power when hooked up to run on 220 volts. They have a 10 in. blade on them which is better than a “skill saw” at 7 1/2 which I did consider. The saw does swing but it does not have the proper center point to use as a swing blade. The arm that the saw runs in and out on could be used to change the width of cut and there is a screw on the vertical arm that can be turned to adjust the depth of cut. It is all mounted on a frame that may — or–maynot be put on wheels and used as a carriage. The log would have to be jacked up between the rails that the carriage rolls on, or the rails could be lowered over the log on the ground.
Run the log through the mini sawmill, take the 2x2 off and stuff it through a chunker or rebak. That is something possible to do and it ain’t pie in the sky. TomC
Helo Tom Collins, I left that sawdust thread idea in the sky. Now i am working my brain on how too build a way too refuel while driveing With Wood Chunks. Back when i was 21 years old weed went up too 100 bucks an ounce. So i had too give that crap up about 40 years ago. Glad i quit that then and finally quit tobaco about 13 years ago. Back too saw dust, some one brougjt that thread up and i gess doug brethower ran his truck some what on saw dust. too much baulk too get any decent voulem on board.I SUPPOSE FOR STARTERS. Thats ware the make saw dust on demand thought idea came from. Any thing too extend refuel TIMES would be much better. GOOD LUCK ON YOUR SWING SAW, MY arms are a little soar from slitting a big pile of slab wood with my new Diy Wood Splitter over in my wood chunker thread.
A circle saw on an electric motor would be an easy build. Swing motor and saw as one. There was a commercial small swing saw called the Skill Saw (I think that was the name) it only used a 3 HP electric motor. I think it could saw 4 inches.
Jeff, the Skill Saw was one of my inspiration mills.
@TomC, If I didn’t have access to limbwood or young growth from thinning, I think I would rather cut logs as long as my splitter would allow and utilised it. I have a feeling that would be both faster and less work. Also, less flat gluing chunk surfaces.
Good morning JO. Guess you just got up from night shift. I mentioned I thought about the Skill Saw, but the radial arm saw has a bigger motor ( using 220 volts) and it is only a 7 1/2 in dia. blade --apposed to a 10 on the radial arm.
The important word in your reply was “IF”. All my wood it 100 yr. old oak, poplar, and some maple. When you haul your “growth from thinning” they lay nice on your rig for haulling. The limbs from my trees are more like trying to haul “brush”. My most recent thought is to take the tractor/chunker up to the woods and use my UTV to pull the limbs around to the chunker— then load the chunks on a trailer.
But there really is a LOT of vehicle wood in an 8 ft. length of 10 in. log Haul one or two to a mini sawmill and drive for weeks.
I definitely agree about square blocks in the hopper-- not as good as rounds.TomC
What JO said .
I always come out better splitting wood for the chunker vs sawing for the chunker .
Also may depend on the log as Mr. Tom pointed out .
Tom, the “Skill Saw” was a small sawmill. I think Peterson sold it for a short time. Wonder what happened to it.
My back is getting too old to lift large chunks onto a splitter. Now a days, If I need to split a large chunk I use my chainsaw (562sx). Even to roll a hundred plus pound chunk is too much.
Hi jo you mean glueing, sticking together in the hopper creating a bridge ? 
Wow Tom, you have been very busy in the gasification prosses. The tar problem you had is something any one of us can do with any gasifier that we build at any time, if we just do not get the conditions right to make good gases, heat in the right areas is the key, not enough heat and we will make tar and if not filtered out of the gas and it makes it to the engine we have problems.
I know this because I have caused my butter fly valves to get a little sticky.
On the picture of the fire tube that showed the wall flaking, yes some heat shielding would help there. I will not ever build another fire tube with out the extra heavy duty heat shields for the extra protection. There is just to much work involved building the fire tube to not do it, in my book.
On preheating the intake air it does work on my WK Gasifier design, I have never tried it on a Imbert gasifier, but it is very noticeable on starting up my WK with the extra heat vs. Not having the extra heat, and while running the down the road, especially in winter months of colder weather. The performance is better, it helps the turn down ratio to last longer for longer idling of the engine in cold weather. In my opinion every little bit helps.
Thank you Tom for posting the pictures of what you have done through the pass years in your truck gasifier builds and modifications. I hope you get the truck running again soon. Would love to take a ride in your truck with you at Argos. Lord Willing.
Bob
Hi Tom.
Have you looked at your generator, the last picture with 10 nozzles, what diameter do you have on these nozzles internally, and how big is your engine in the car?
Hello,Tom"
12.12.2019
Conclusions of your photos:
Results of the rebuild with new nozzles, insulated reduction and angle-iron grate:
No mechanical destruction, just developing melting slag.
Slag removal throug rectangular grate, hanging on 4 sidetaps, two opposite front-end taps over the front edge of the
L- rails , and the grate swings down, spilling out the slag!
Not built!
The slag developement just shows, that the operating temperature has just passed the slag melting temperature, still harming no metal!
So, easy way of lowering the operating temperature is:
Increase the nozzle-tip hole diameter in multipel SMALL increments.
SMALL: 10 degrees of 1000 degrees is just 1% !!!
Adding: A 5 % AREA INCREASE means 2,236% DIAMETER increase in each nozzle tip.
Square law at work!
One step at a time, If you “overstep” you cannot go backward without new nozzles.
The operating temp will go under the melting point of the slag.
And you can enjoy a healty heart with a downswingable grate!
Max
(asking before demolishing costs nothing)
Nope. Last time I checked the world was still spinning counter clockwise  I’m only 8-9 hours ahead of you. I was just home from an evening shift at that point.
I’m sorry about your gnarly logs and curly limbs. That would probably make me use my bicycle or kick-sled more.
Dealing with my limbs isn’t bad enough to force me to THAT solution.TomC
Hello Max; Thank you for replying on my thread. I know you are disappointed that I destroyed all the design work you led me through. I could make excuses or give explanations, but the fact is it is gone. After all the changes I made, I have concluded the inside diameter of my nozzles was incorrect. I spent a lot of time trying to calculate the diameter, starting with a 4.3 l engine at 2000 rpm and trying to get a noz.dia that would give a velocity of 30 mps. I came up with a number and had new nozzles made. Because of the metric calculation, I did not have much confidence in the final number.
After driving my truck with that ‘‘sort of WK style’’ gasifier, I am abandoning the Imbert style gasifier… Even though my WK build was no where near properly done, the performance was so much better than I could have ever hoped to get on wood. When I get time to work on gasification again, it probably be to put heat sinks near the nozzles, and try the ‘‘sort of WK’’ again. If I duplicate the previous performance, then I purchased some ceramic wool insulation to try as a WK fire tube.
A final comment Max, up around post 635 or so, you posted a computer generated skizz. If you have the knowledge to use that program, I hope you will use it more often. I used the concept, but it would have taken a machinist and shop to do it properly.
Again thank you for all the time and help you gave me. TomC
Thanks Tom!
13.12.2019
Good Luck!
Max
One comment Tom, a number of times you have stated metric being a significant barrier to your understanding. You could just convert the Imbert tables to imperial measurements from the get go, and then proceed doing all the math in the units you prefer. In fact, if you convert the tables, it would be a handy resource for people who prefer imperial, to submit it for the DOW library. For example, we know a meter is just a bit longer than a yard, and Google will do the conversion. Figure it out to feet per second. There are 25.4mm per inch, Google will convert to thousandths of an inch, then proceed.
But I do understand the experience you have had. Imbert seems more demanding on materials and design parameters being followed, and then may not have as wide an operating envelope as the WK design anyways. The WK seems to be the best performing, most robust gasifier design invented to date, so it only makes sense to go with it.
