Also you may want to check Bruce Southerlan project that he posted by the name of:
“1976 MGB Charcoal Powered NO DINO new build” (236 posts)
Or Don Mannes: “Don’s Geo Tracker Project - 2- - Charcoal” (336 posts)
I will say that in ALL topic there is something to learn, but there are so many… I have pointed out some of the few vehicle ones that I have being working lately doing some drawing for a better undestanding of each system.
B.R.
Eddy Ramos (Argentina)
6 Likes
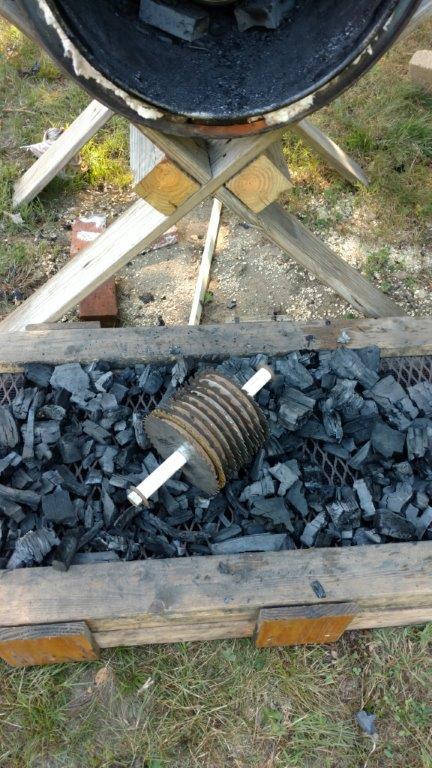
For grinding charcoal without a machine, I have used a shaft with several old circular saw blades and wood spacers between. Run this back and forth on top of a sheet of heavy duty flattened 3/4"expanded metal. Works like an ab roller exerciser. Blades crush char and force pieces thru the expanded metal. A smaller screen spaced below leaves fuel sized char in the space between screens. A garden claw hand tool cleans charcoal from between blades when pieces get stuck.
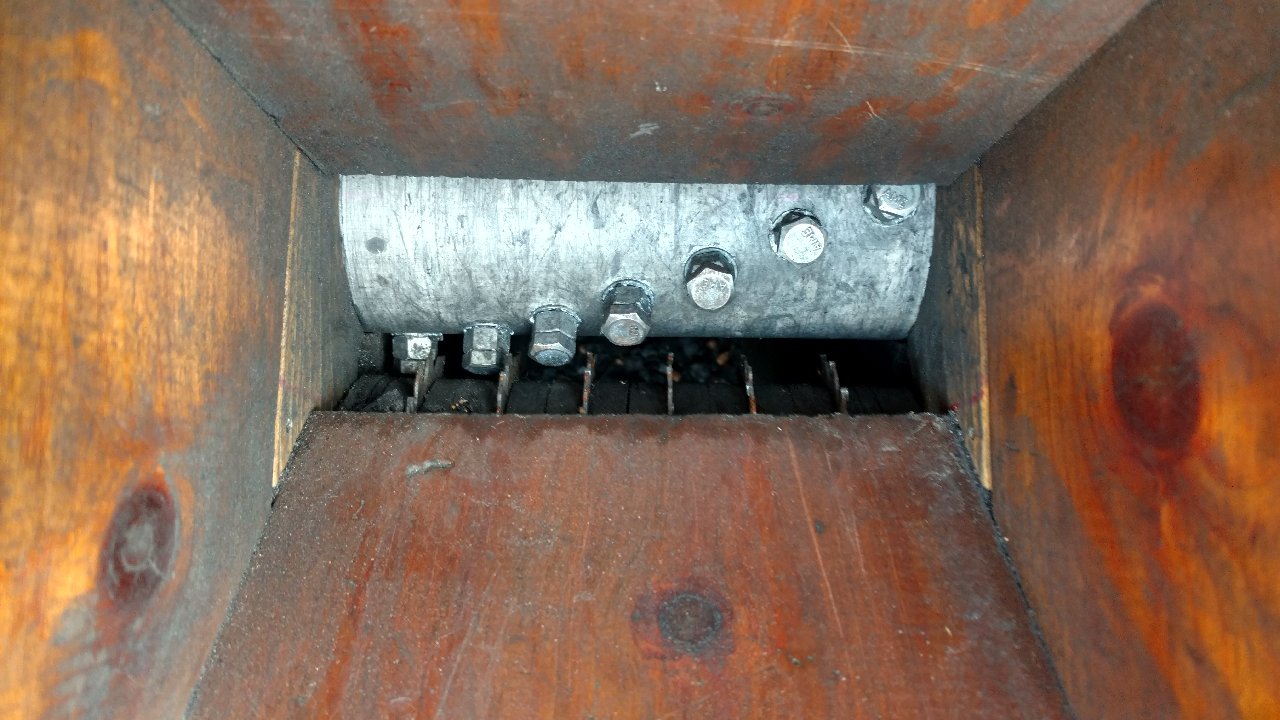
I now use a much quicker and easier hand cranked chunker that rotates studs on a 4" PVC pipe between free wheeling saw blades. Spacers with a diameter 1 1/2" less than the blades keep pieces larger than 3/4" from passing. Pieces fall into a shaker box with screen on the bottom to remove fines.
8 Likes
Bruce, do you have a video of the second method?
1 Like
Yes Bruce I too would like to see your processing equipment. I need to build something and would love all the ideas I can get before I proceed.
1 Like
Kristijan, thanks for the info on the nozzles. When I get further along, I hope to give your ideas a try.
Bruce, thanks for the charcoal grinder information. I removed the Corolla carburetor today and took it to my friend whose knows someone who will clean, repair and probably rebuild it. While waiting for that, I may try building a grinder similar to what you describe.
I found a picture of the first version here:
https://dow.nyc3.cdn.digitaloceanspaces.com/original/3X/e/d/edb9a405a367c32d019457805810a6c3d865bdf5.jpg
I know the video of the crank version is on DOW somewhere. I’ll post when I find it.
1 Like
These don’t show the mechanism very well, but will give you an idea of how fast it works:


I’ll try to find a picture of the guts so you can see how I built it.
2 Likes
If I were to do this again, I would make the space the blades closer together to produce smaller pieces.

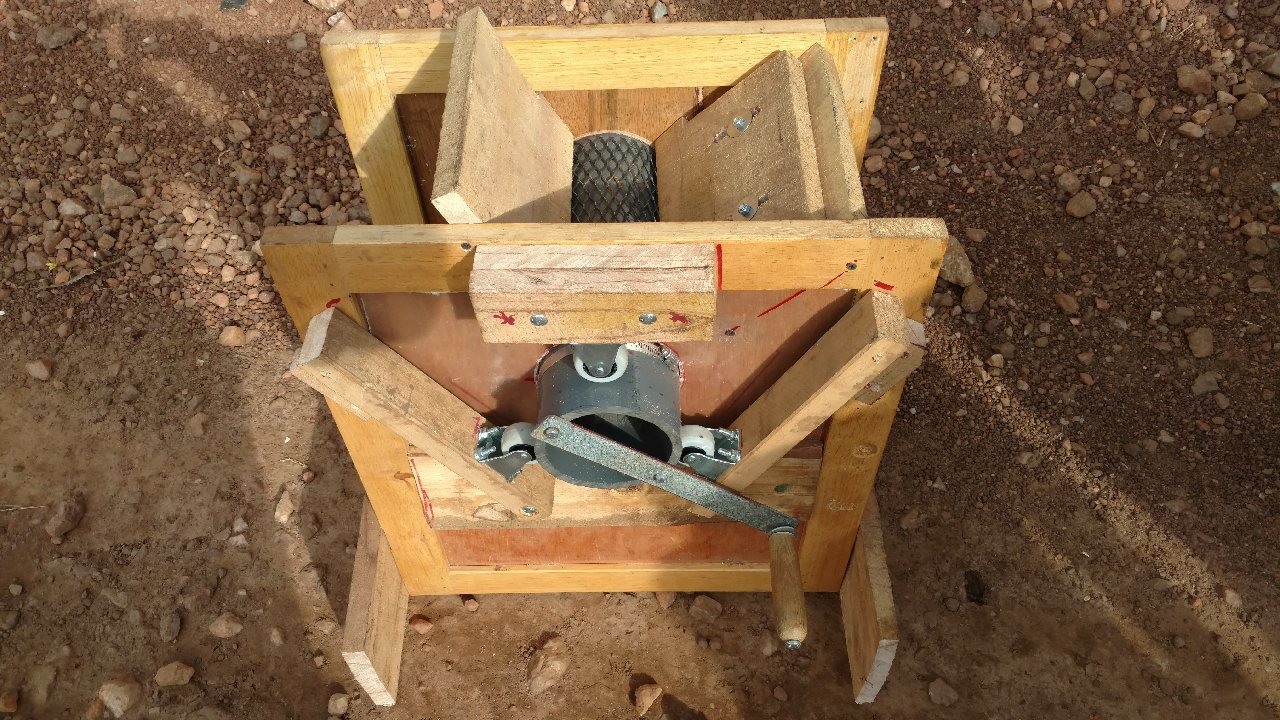
Here is a grinder we built in Africa to make biochar for our toilet system. It could be modified with slots and big teeth to make engine size pieces.
9 Likes
Thank you for the pictures Bruce. Very simple yet very effective. It looks like I have all the ingredients. I have been using the expanded metal like you have but walking on it to break it and push it through. Landscaping trailer tailgate propped on two unsplit firewood blocks and the trailer with a kiddi pool below to catch the char.
3 Likes
Post a picture if you build a grinder/chunker. The African version is made with 6" schedule 80 PVC with 1/4-20 holes tapped into the edge of the pipe to hold the handle.
Jim,
How well did your “treadmill” crusher work?
I guess it probably worked as well as any for crushing it up. May have created more fines than a proper grinder I don’t know. But it still needed sizing. I want to streamline the operation. I would like to turn the crank and get processed charcoal out of the container it goes in after cooled. I feel that motorizing it defeats the purpus but would get you away from the dust. If I am going to use charcoal on a more regular basis I also need a better view way to cook it as well.
2 Likes
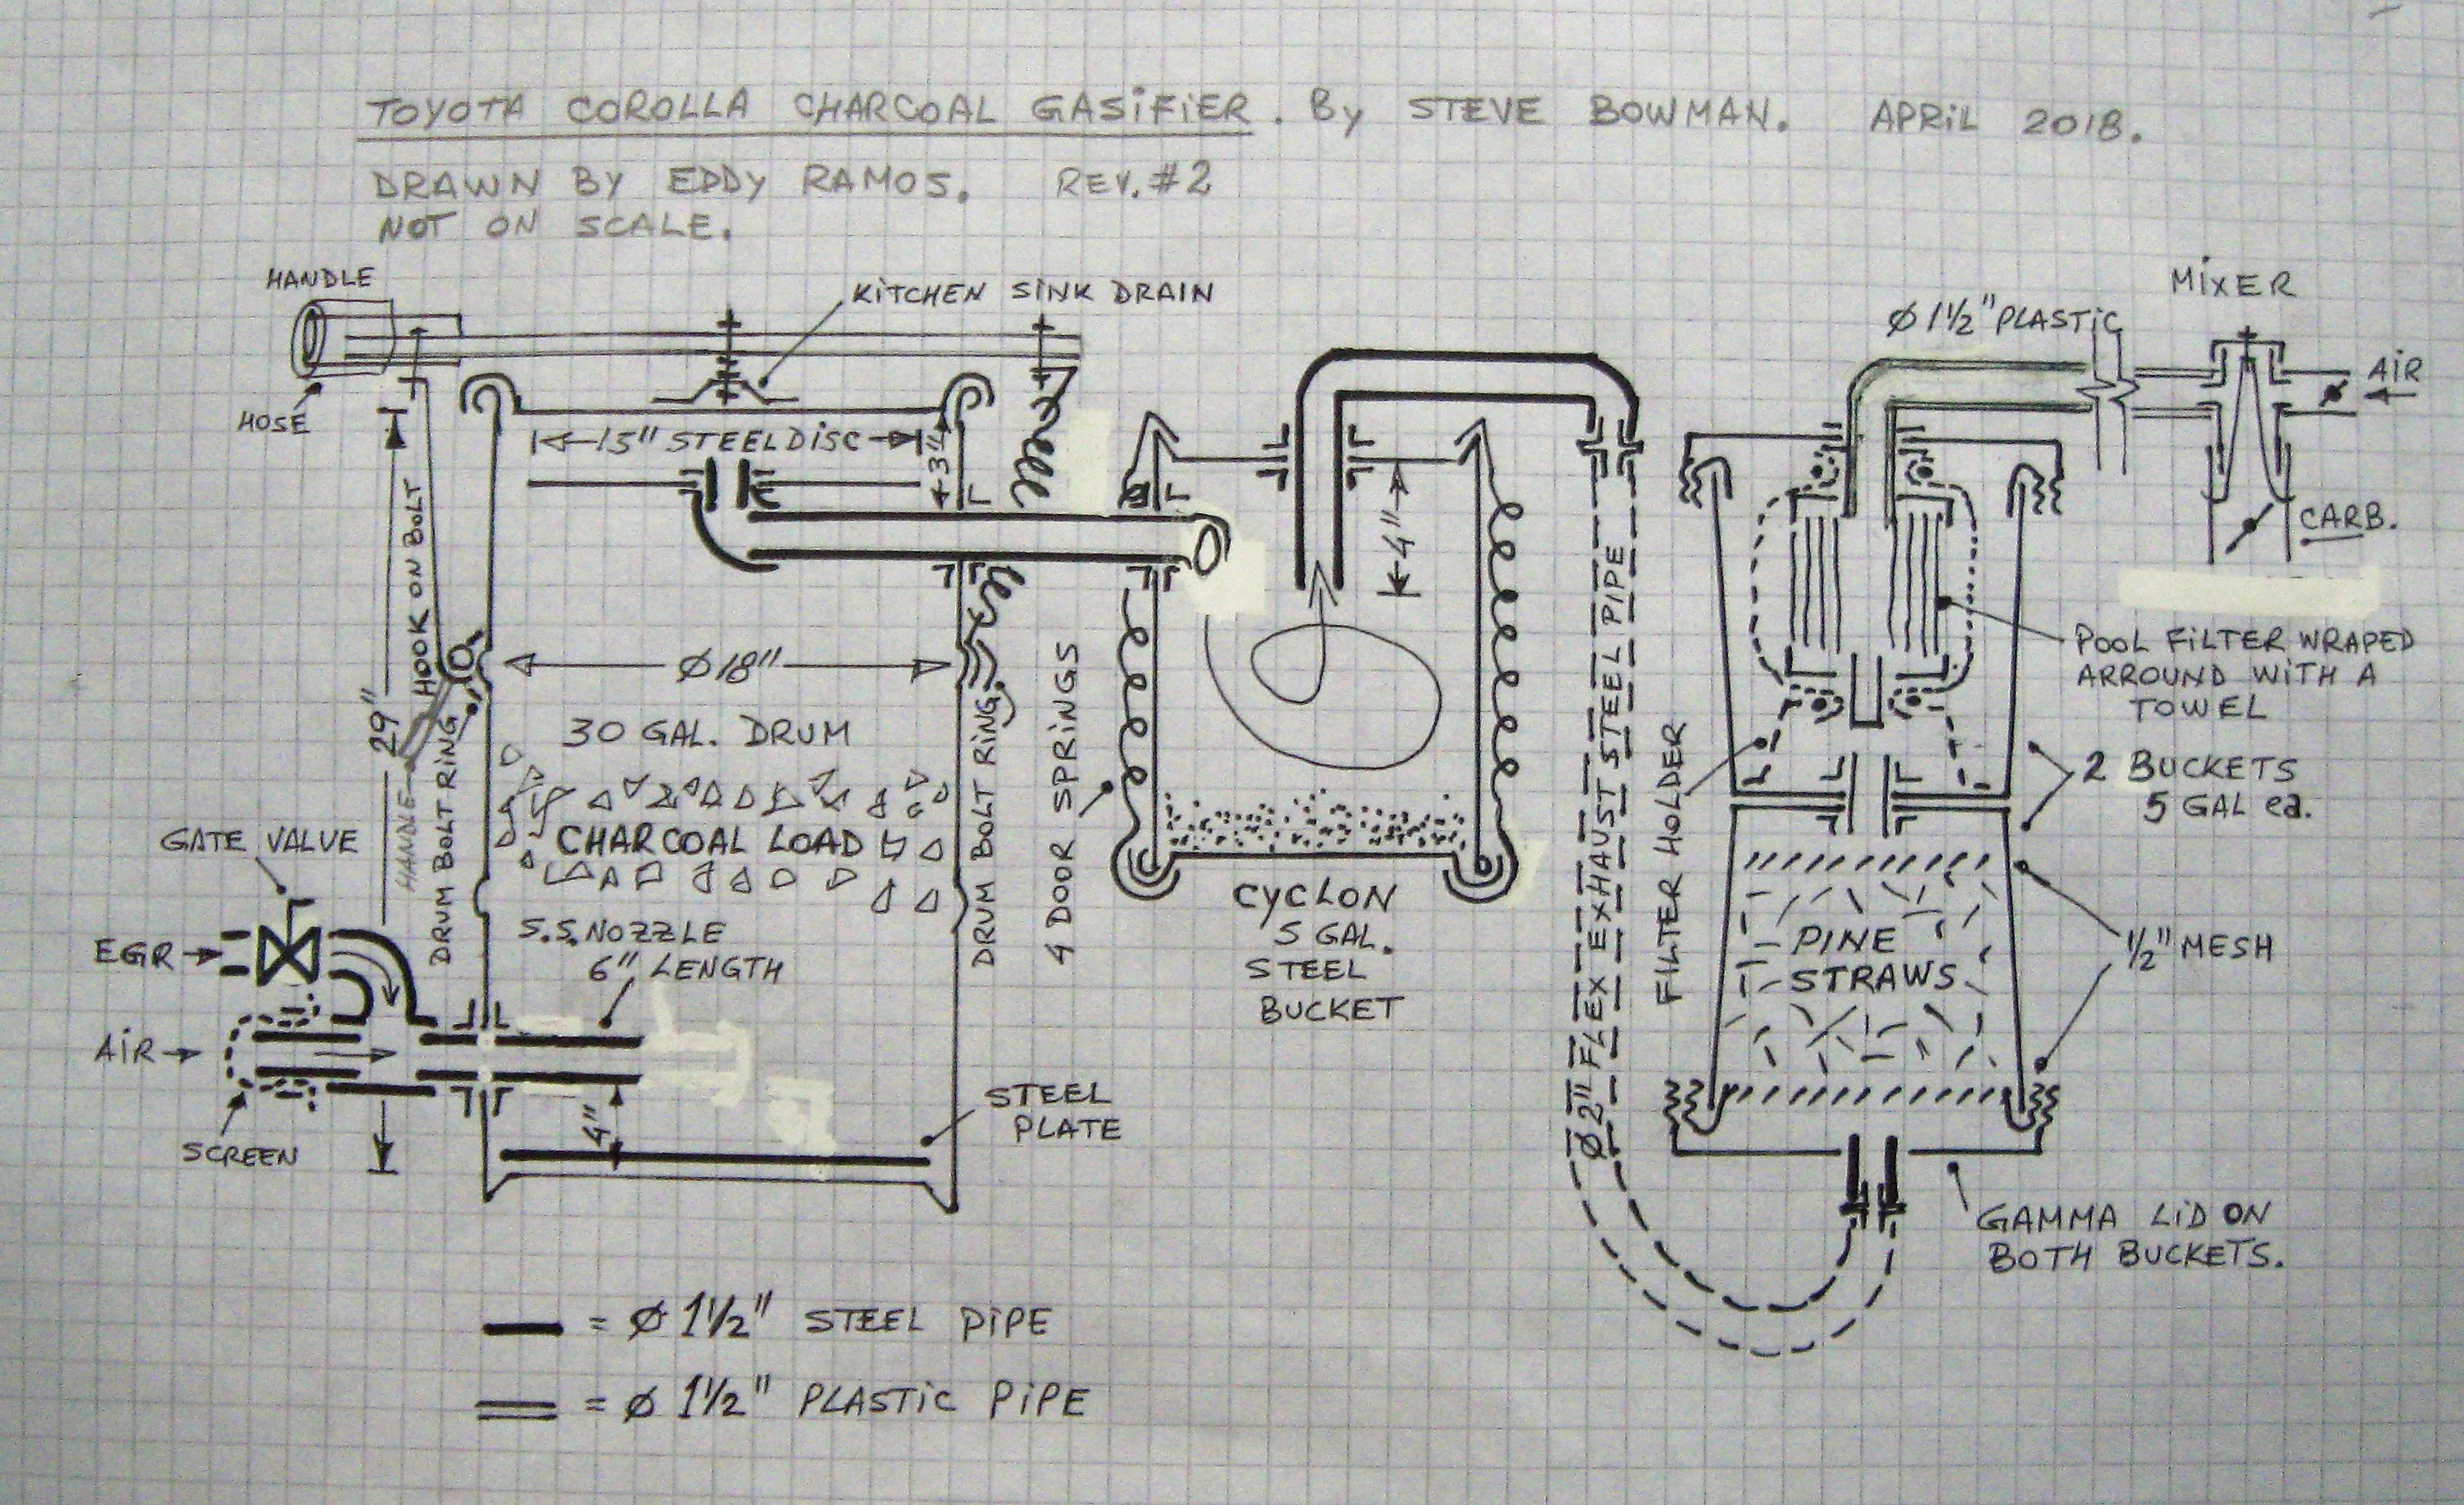
Hi Steve;
Here I am posting a basic drawing of your system.
Once you have tested more your car and in having more experience sure this drawing may need some changes. Also it will be great if you can give us a procedure description of how you start/drive and stop your chargas car.
Truly yours.
Eddy Ramos (Argentina).
5 Likes
Eddy,
Allow me to thank you “publicly” for your drawing of my gasifier. It is a very accurate representation. Now that all the “secrets” are out, many of you will notice in more detail that this design has Gary Gilmore written all over it, so once again I must recognize Gary for his Simple Fire charcoal gasifier design. Thank you, Gary, for your tremendous contribution.
Stay tuned for a project update later this week.
3 Likes
Greetings all: Here is the promised project update:
A friend of a friend worked on the Corolla carburetor several weeks ago in an effort to correct some problems, however the float bowl is still emptying its contents into the intake manifold over night. My work-around for that now is to shut off the gasoline valve and allow all the gas in the carburetor to burn out before turning the ignition off. Also, the spark plugs still show signs of the engine running with a rich gasoline mixture.
Two weeks ago I arranged auto insurance for the Corolla, had it inspected, registered, paid the highway use tax, property tax and fees. So, now it is legal. I was concerned about the inspection, so I put the original air intake parts back on and connected them properly. The inspector didn’t even look under the hood until I opened it up after he finished the inspection to ask if there would have been a problem with it set up for charcoal operation. He said that it would not have made any difference to him. He was interested in my project. I expect that helped. The inspector did mention something about big men in black coats and a thin man with a suitcase full of money and what might happen to me if I didn’t accept their offer to buy my threat to the petroleum industry. Ha! Ha!
Last week, I drove the car on gasoline to a one mile paved drive in an undeveloped industrial park. Then, I drove up and down the drive several times on charcoal. I thought it performed very well.
Today was another WOW! day for me—the first day on the highway (low traffic areas only, for now). I was very pleased with the performance of the basic SimpleFire fueling a car. First, I made three trips up and down the industrial park drive again. I tried to change over from chargas to gasoline and back while driving. That didn’t work very well. I may need to add a valve on the gas side of my T-adapter for switching over on the fly so no chargas will enter the carburetor when runing on gasoline. Then, it was on to the highway for the first time. The car stayed in second gear most of the time (it is a three speed). Forty to 45 mph is good on the flat. Don’t tell anyone, but I did break the speed limit once, going 50 in a 45 mph zone. I went about 15 miles distance total. There were three stops to change over to gasoline and back to charcoal to get past a high traffic area near an intersection with the interstate, and there were two long idling periods when I showed the car to some curiosity seekers explaining to them how it works and answering their questions. With all the starting and stopping and idling I expect the fuel consumption stats are low. It worked out to about 2 miles per gallon by volume. My charcoal weighs about one pound per gallon which I classify as low quality softwood charcoal. The gas coming out of the final filter remained at ambient temperature throughout the run. From initial lighting to shut down was about an hour and fifteen minutes. The flex exhaust was warm where it enters the bottom filter bucket. I failed to mention to Eddy that I have a thermometer in the top bucket which today never registered any increase in temperature. The filters did their job and were not unreasonably dirty.
I have been trying out a water drip. On the first run a week ago it did not seem to make any difference. Today I think it did increase the power some. I use the exhaust return all the time, but cut back on it some today when using the water drip. I did startup using the engine running with gasoline. The engine cut off a couple of times before it would idle. I like using blower better, since I can tell when the gas is good enough to run the engine by observing the flare.
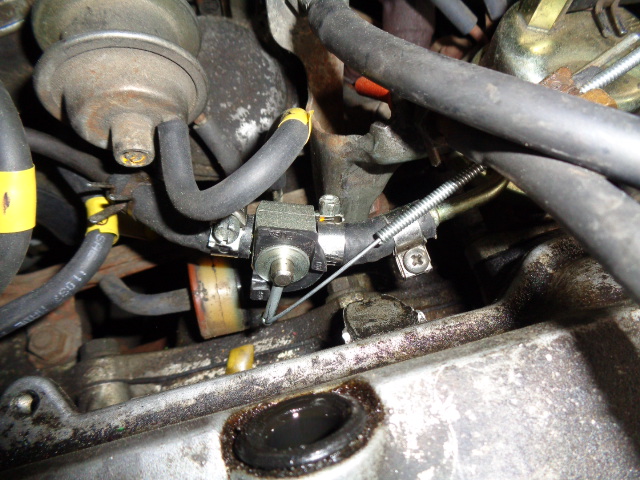
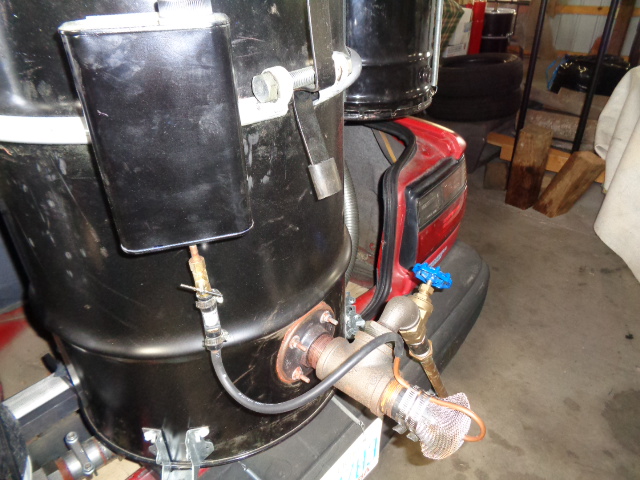
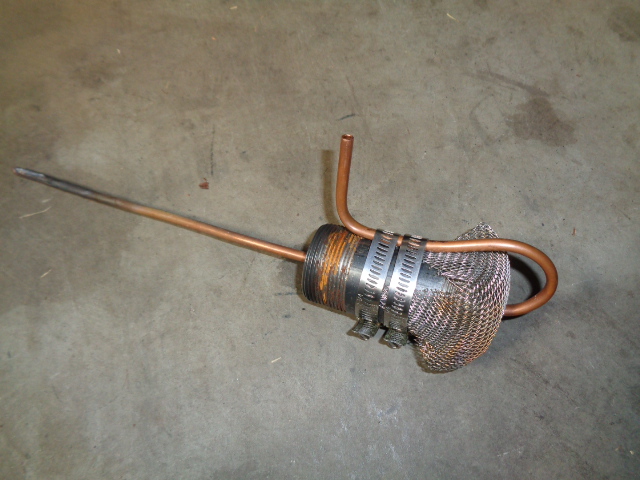
The only changes since the last photos are some protective “armor” for the sump pump hose, the screened air intake with water drip nozzle attachment, the water container, needle valve and sight “glass.”
Here are some photos for this update: (1) Cable controlled gasoline cut-off valve, (2) protective armor for the sump pump hose, (3) the water drip mechanism in operating position. and (4) the air intake water drip attachment.

10 Likes
Very nice setup, it is easy to see where the SWEM (smiling with every mile) gets started.
2 Likes
Oh oh, I can tell you are hooked! Nice work.
2 Likes
Nice build, get the lemons out…
1 Like
Nice! Do you just hold a propane torch flame in front of the screen for start-up?
Thanks Don, Koen, and Michael—yes, a big smile and with every mile. Ray, I have the air intake/lighting port closed off with a pipe plug when not in use. When lighting, I remove the plug, light with torch or piece of kerosene soaked rag on a wire wand, and then screw in the screen/water drip nozzle attachment.
I would like some input from you expert experimenters to answer a few questions: I have no use for my charcoal fines. Is there a way to add some to a load of charcoal in the gasifier so that they will be used to make gas and not clog up filters or create other problems?
Has anyone tried making charcoal out of pine cones?
The Lumina Van project has 1.5 inch sump pump hose gas line for a 3.1 liter engine. It was suggested that the chargas line for it be changed to a larger diameter. I have 18 feet of 1.5 inch sump pump hose carrying gas to my 1.6 liter engine. Do you think that my hose diameter is adequate? Also, the gasifier currently has four 90-degree elbows in it. I understand that “curves” instead of elbows or eliminating elbows would improve gas flow. Eliminating elbows would be difficult without changing my layout. Would such a change likely make a noticeable difference?
One final question: Will I have to add a valve in my chargas line if I am going to change over to gasoline and back to chargas while driving or can I perform the transition adequately with the air mixing valve? I want to keep this project simple and don’t care to make any changes unless they are likely to significantly improve performance. Your thoughts are appreciated. Thanks.
2 Likes