Hi Bruce,
Thank’s for your support. Thank’s for the flame arrestor info.
If your wish, and have the time, please check the part list that I have posted above. I am looking forward to hear your comments.
Truly yours.
Eddy
1 Like
Eddy,
I’m checking the dimensions for the items on your parts list and hope to send the (??) details soon .
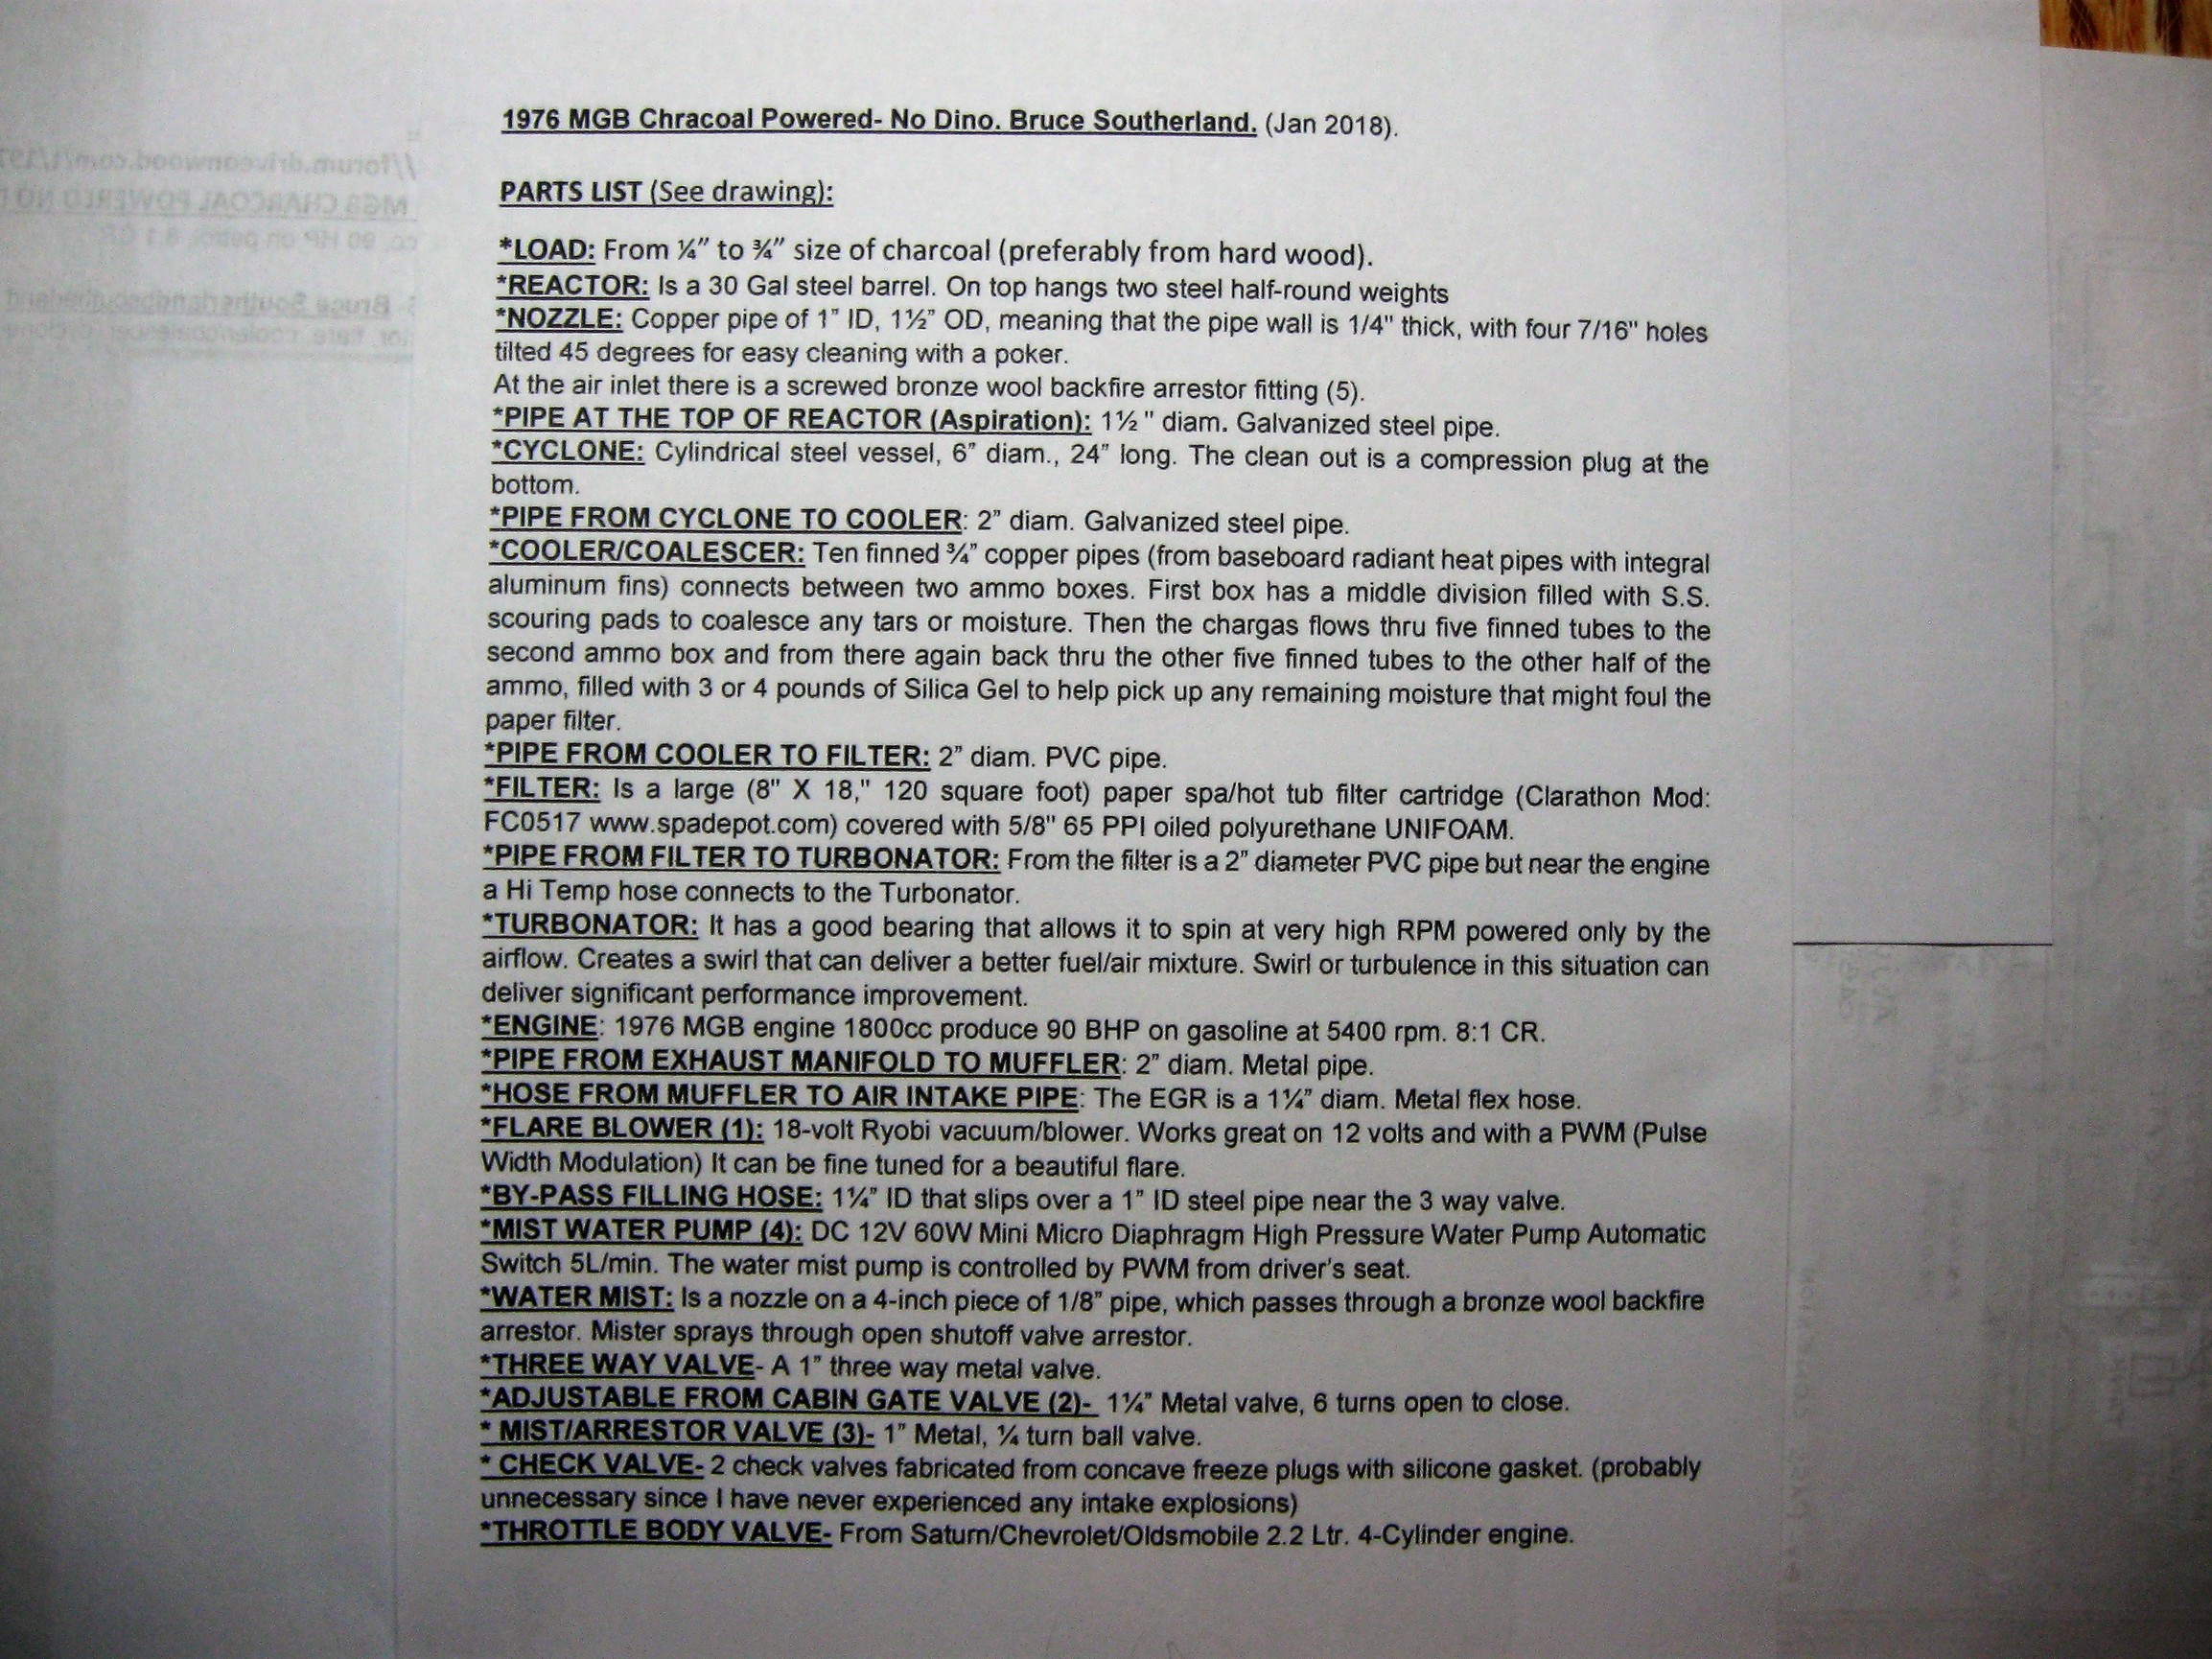
The filter is a Clarathon threaded filter FC0517 purchased from spadepot.com.
We should also use this spelling: TURBONATOR to find the swirling fan in an online search
2 Likes
Hi Bruce:
Thanks for your time to do that.
BTW: What size of charcoal you use?,
what is the diameter of the “filling by-pass” hose? and
When is your show? I am thinking to do something special for you, if I find the time to do it. Nothing fancy.
Truly yours.
Eddy
3 Likes
Eddy,
Charcoal size is 1/4" - 3/4". Bypass hose is 1 1/4" ID which slips over 1" ID steel pipe. Cyclone is 6" X 24". Pipe at top of reactor is 1 1/2". Pipe from cyclone to cooler and on to engine is 2". 2" PVC from filter to near engine compartment, then 2" high temp flexible hose past exhaust pipe to gas mixing chamber. Metal flex pipe for EGR is 1 1/4" ID. Finned cooler pipes are 3/4" copper “baseboard radiant heat” pipes with integral aluminum fins.
I don’t have dates yet for car shows, but none before May.
1 Like
Hi Eddy,
That is my link where I upload photos, honest. The “Air Carbon Fuel Cell” is my topic, honest.
I have free time this weekend and can answer questions and post photos, if you want.
Cheers,
Jeff
AKA Puffergas
Hi Bruce.
On my name and on the name of other anonymus people I thank you for this info.
I got almost every thing, but sometimes my brain is so numb that I could not figure out your frase “then 2” high temp flexible hose past exhaust pipe to gas mixing chamber". The mixing chamber is the turbonator, or is the “T” that connects the outside air with the EGR and the nozzle inlet?
BTW: I just found out that your engine gives 90 BHP @ 5400 rpm.
B.R.
Eddy
Hi Bruce.
Almost done, still missing the nozzle dimensions. Plese check the part list for (??).
B.R.
Eddy
You had it right. Nozzle is 1" ID 1 1/2" OD. Mixing chamber is Turbonator. Gas supply pipe from filter is 2" PVC that runs under the car then changes to 2" high temp flexible hose to go up into the engine compartment and connects to the Turbonator.
Hi Bruce:
Thank’s for your input.
I am going thru every detail on the final Drawing and Part list, so now I have some (hopefully) last questions:
- What size is the 3 way valve?
- What size is the “adjustable from cabin GATE VALVE”?
- What size is the Mist/arrestor valve?
- What size is the Check Valve near the intake manifold?
- Since you have removed the carburator, what are you using as throttle regulator?
B.R.
Eddy
- 3 way valve is 1"
- 1 1/4"
- 1"
- 2 check valves fabricated from concave freeze plugs with silicone gasket. (probably unnecessary since I have never experienced any intake explosions)
- throttle body from SATURN/CHEVROLET/OLDSMOBILE 2.2 LITER 4-CYLINDER ENGINE
Hi, Kristijan, and the rest of “mixers”!
20.1.2018
It did not take many days for DJ to adapt to tangential swirrel mixing with “sockturning”.
Adopted in his VOLVO with success, but in the chevy pickup unfortunately a big difference in the inlet area to the narrow coaxial swirrel chamber put the ratio almost over board.
He had to fight it with heavy-handed manual control.
1 Like
Hi Bruce
When you say :" Hi Temp Flex hose", this is a metal or a rubber (radiator type) hose?
Regarding the Part List, since I can’t download it as a Word file, bellow I will try to upload the List in Excel, so it will be nicer to print.
B.R.
Eddy
2-ply silicone rubber like Eloma E753017 SILICONE 2 HI TEMP FLEX HOSE
Thank you!
Hi Bruce.
How are you doing?
Regarding the Part List, this site doesn’t let me upload any Word or Excel papers…![]()
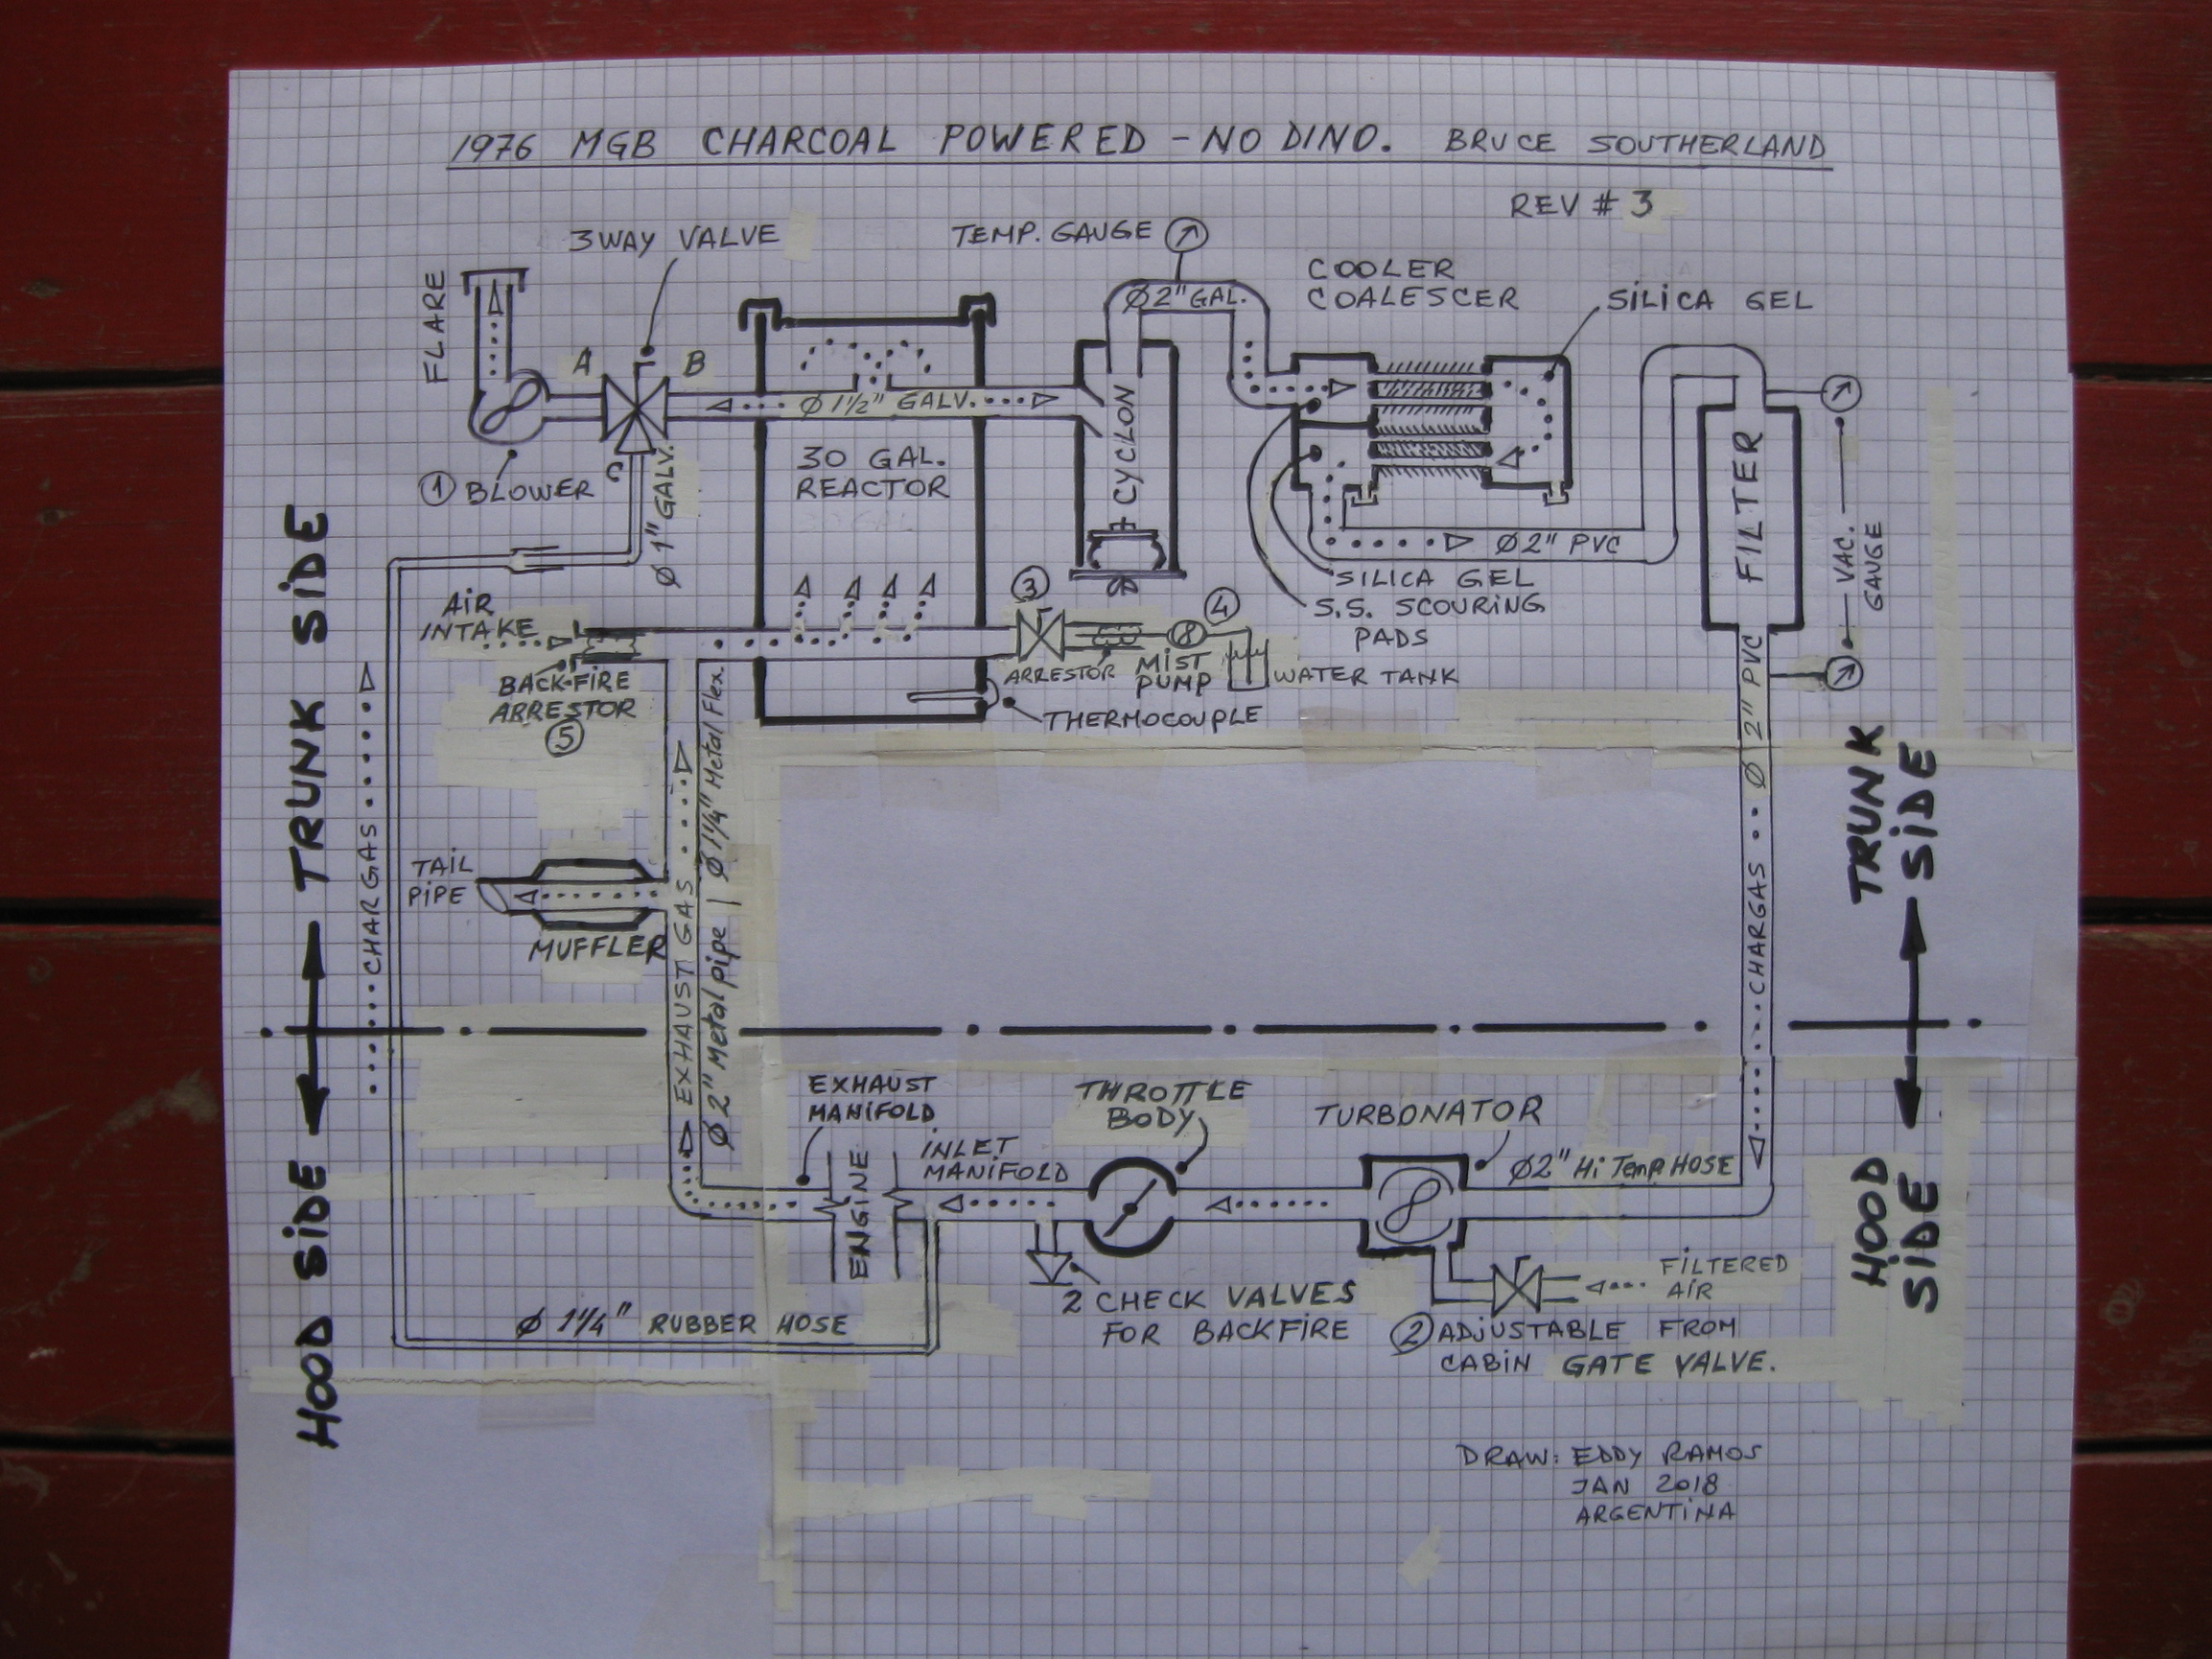
Please find attached the (hopefuly) final drawing (Rev#3) of your machine.
I assumed that there it might be some condensation in the cooler, so I added two drains at the bottom of the ammo boxes.
Now, the last stage, to make this perfect, it will be a procedure paper about how to star, drive and stop your machine (and propably some troubleshooting & maintenance advice). I have no experience at all, do you think you can write somethig basic?? I hope so.
Truly Yours..
Eddy Ramos
3 Likes
Thank you so much for your good work. I just noticed that the diagram is missing the 1" gate valve between the muffler and the air intake for the EGR. Also, we have not included the vernier cable to the distributor for adjusting ignition timing.
Safety Warning:
When refilling a hot reactor barrel/hopper use caution. Open the lid away from face and Ignite the gas in the hopper with a torch if it does not spontaneously puff.
Startup Procedure:
Close the air mixing valve, if open.
Adjust timing to 10* BTC with vernier cable to distributor.
Open valve on front nozzle opening (water misting side).
Remove nozzle cap and spark arrestor from rear nozzle opening.
Use poker to clean clinkers and clear nozzle.
Open EGR 1 1/2 turns from closed.
Set 3 way valve to conduct gas directly from reactor to flare.
Remove flare cap and turn on blower,
Ignite charcoal (squirt a flammable liquid into nozzle and follow with torch, or ignite with a kerosene soaked wick, etc.)
When charcoal ignites, reattach spark arrestor to rear nozzle opening.
Ignite flare and adjust blower speed to give sustained clean flare.
Turn 3 way valve to pull gas through system and reignite flare.
Set water mist to 2 drops per second.
Extinguish flare by capping and turning blower off.
Crank engine while opening air mixing valve approximately 2 turns.
When engine fires, fine tune mixing valve for smooth running at medium throttle (approximately 2 1/2 turns open).
Advance ignition timing for maximum RPM at steady medium throttle.
Running:
Increase water mist under load for maximum power/speed. Reduce when not under load.
Adjust ignition timing under load for maximum power/speed.
When stopping, close air mixing valve 1/2 turn in order to maintain low RPM idle.
Shut Down:
Turn off water mist.
Close air mixing valve.
Close valve on front nozzle opening (water misting side).
Place nozzle cap on rear nozzle opening (ignition/clean-out side).
Close EGR valve.
6 Likes
Like like like like like like like like like like like like like like like like like like like like like like like like like like like like like like like like like like like like like like like like like like like like like like like like like like like like like like like like like like like like like like like like like like like like like like
my keybord needs replacement…
4 Likes
Hi Bruce
I thought that with the injection of water it was not necessary to adjust the ignition advance?
On my oliver tractor I do not change the ignition advance
Hi Thierry,
generally spoken, you don’t need ignition advance to run an engine on chargas, especially a slow truning tractor engine.
But if you are after the highest power output, it helps.
Yes, hydrogen rich chargas with steam injection burns faster. But some ignition advance might be still useful. It can change even during the run because of load and gas quality changes. So manual adjustment to do some advance is a good thing.
3 Likes
Thank god we have ecu’s and obd2 these day’s 
Knock sensors are a gift from heaven…
3 Likes