Here in northern Minnesota, it goes from green to frozen under snow, usually overnight.
4 Likes
“Frozen In Time” ?
S.U.
3 Likes
Tom Holtton I did picture up my wife’s saved from a garage sale yard charcoal BBQ grill.
40+ years old now.
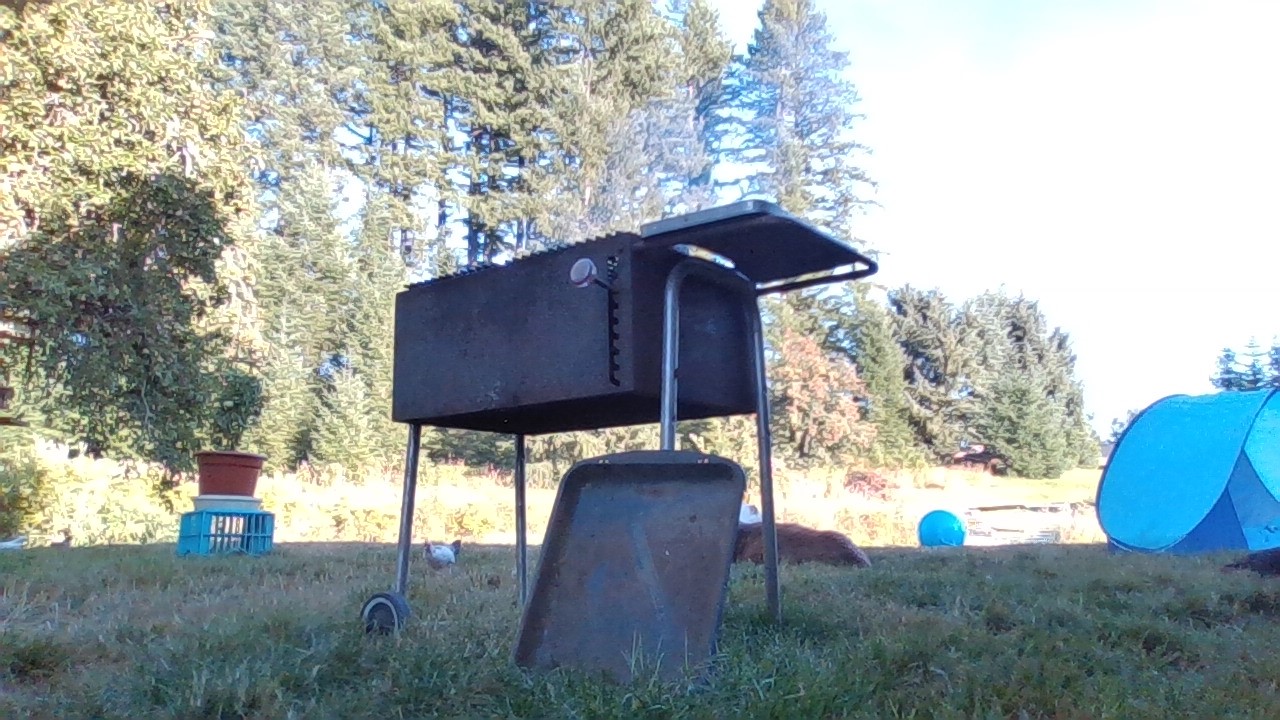
The factory charcoal holding 24 gauge steel pan had center burnt out a long, long time ago .
We’ve been using now for three decades with fused enamel stamped steel broiling pans dropped into the burnt out hole.
How long do they last?
About two years BBQing use. 12, eight pound bags of commercial BBQ briquettes. About 300 hours of charcoal exposed burning time.
She is unable to effectively cumulative ash protect the holding pans bottom due to height space limits.
Anyhow. A charcoal gasifier able to ash and inactive char insulate made from appliance fused enamel “white” metal panels and drums should be able to last at least 1000 to who know how many more hours.
Vehicle terms that’d be 20,000 to 35,000 miles.
O.K. for free cast off metals.
5 Likes
I’d like to do a little brain picking here. I’m starting to build a charcoal gasifier, modeled pretty much on this Troy Martz design with a few changes.

Not sure about all the terms. I’m using a 50 gallon water heater cut down to about 30 gallons. The reactor pipe, if that’s the right term or what they are containing the gasification core in the picture is a piece of 6 inch Sch 80 pipe, 12 inches long. The grate will be at the base of that pipe. I want the nozzle installed in the side of that pipe rather than up from the bottom. What would be the optimum distance up from the grate for the nozzle and with a side mounted nozzle would I still need a lighting port? If so would it be directly across from the nozzle?
I have watched the off-grid pro videos of their start up tests for the cross fire gasifier. That seem similar but an improved version of this concept drawing. The mentioned that they had trouble drawing steam into the nozzle but went to larger diameter tubing and eliminated the needle valve. Not much follow up to that other than to say it solved the problem but It seems to me that with the reservoir well above the coil and the outlet that the water would just pour through the tubing without flashing into steam. It seems like it would be better to have the reservoir below the the exit tube an have a metered amount of water pumped through the coils. Of course that adds a small pump into the mix. Am I confused about this?
2 Likes
Hi Tom, Just a few comments on your intended build of a charcoal gasifier. If you place the nozzle 90 degrees in the “reactor pipe” it will get that pipe red hot on the opposite side, causing the steel to oxidize away rather quickly. The charcoal burning at the tip of the nozzle will be around 3000F, just like in a blast furnace. I’ll bet the water filled pipes will not be enough to prevent the pipe from getting red hot. If you build according to the diagram, the carbon monoxide being pulled off will be very hot and need cooled down. Why not have the gas outlet at the top of the gasifier, forcing the hot carbon monoxide through the rest of the bed of charcoal where it will lose that heat? Monitoring the heat of the chargas is also a good way to determine when to refuel the gasifier.
To make an even easier unit to build, may I suggest scrapping the “reactor pipe” and go with a nozzle placed in the side of the water tank, about 4 inches off the bottom. Dave has had good success with a ceramic nozzle (I’d look up the post under “nozzles” and give you the link but I’d probably loose all my typing :frowning ) I’ve had good success with a water cooled nozzle that actually makes steam that can be directed back into the nozzle. I’ll see if I can dig up a photo.
Once again, just my 2 cents worth.
Gary in PA

10 Likes
Hi Tom,
I have a few links to the origine of that coil
And the why to use that:
pay attention to the air intake of the gasifier, the color of the glowing changes when the water steam enters, the engine revs up from the hydrogen formed in the reduction with the glowing carbon.

This is a clip to demonstrate how far the red glowing zone reaches in this simple build with an horizontal nozzle.
I keep my charcoal small sized, bamboo charcoal, then that hot zone stay’s in limits

5 Likes
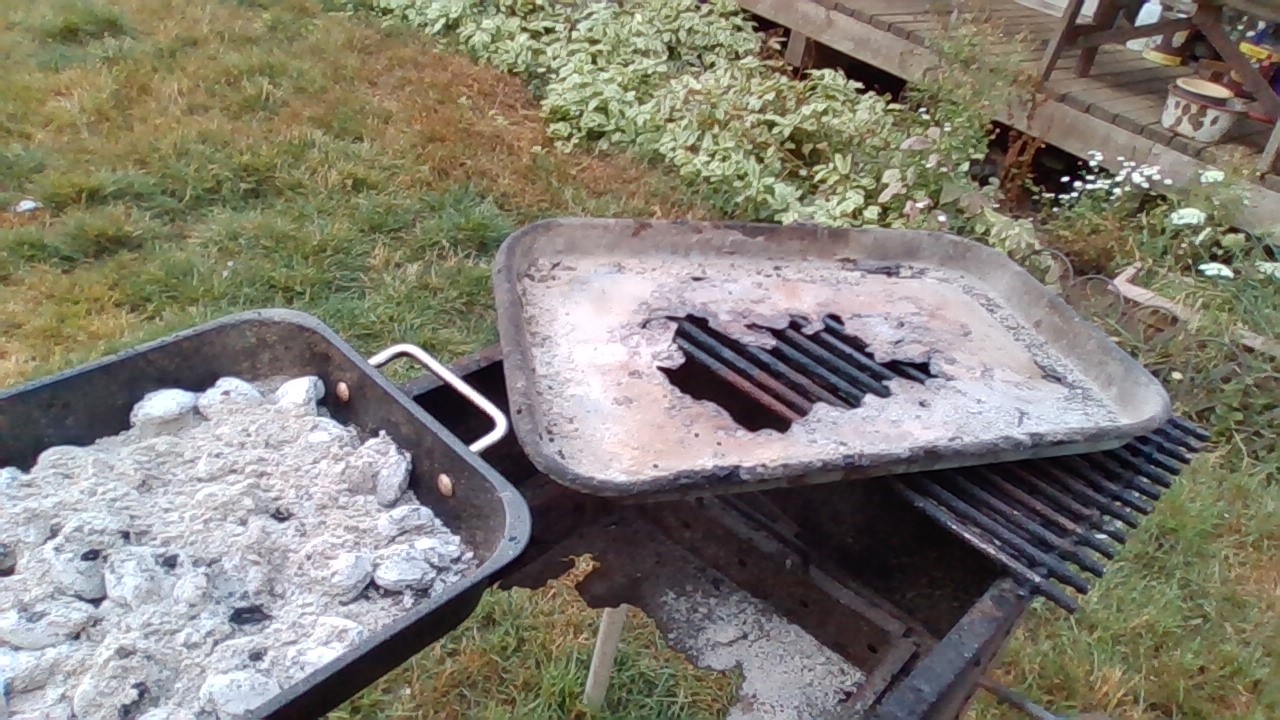
I am with Gary on this one , have the gas outlet as far up as possible allowing the heat to dissipate and will also leave a lot of the fine charcoal dust from being sucked up into your filter .
I think you will also get a longer run time from 1 filling , another thing i have noticed in the past when running a full 55 gallon drum of charcoal with a nozzle around 4 inches from the bottom is that it runs out of cool decent gas when my drum is still half full of fuel , but that could be because i do not use a water drip to help richen my fuel or cool my nozzle . plus the dia of the drum is on the large size .
Dave
4 Likes
Gary, do you not run some of the engine’s exhaust into the nozzle?
3 Likes
I will contribute my 2 cents: charcoal is very forgiving, so the level of complexity in that diagram is not really needed. You will learn a lot by building something simple and playing around with it. Adding water in did boost the output of my little generator prototype, though, so it is worth considering in my opinion. The biggest problem I had was dumping all the excess heat - as I ran a very small hopper and it quickly got hot enough to start melting my plastic tubing. 55 gallon drums will give much longer run-times than the little 5 gallon metal pails that I used. Also, if the reaction is not tempered with steam or exhaust, the heat will be enough to fuse the ashes into a glassy clinker. This clinker does not flow well, so it will probably not go through a grate. Adding steam makes a crumbly white ash that should be easier to deal with, but if you include a grate, maybe think about a way to give it a shake now and again. If you are not going to clean it out after every run, make sure you can poke a rod or something up the air inlet to bust up any ash and clinker - it will make relighting it a lot easier.
If you have not done so already, read the threads on charcoal Nozzles. The first one goes off into the weeds a bit, but it still contains some interesting things people tried. Besides Gary’s water-jacketed and Brians’s (tungsten?) carbide tube, I highly recommend the heavy steel pipe nozzles like the one Mr. Leitinger invented. I suspect it is using the same principle as the side-nozzle Koen developed in Thailand, where the incoming air is speeding through the hottest point, and managing to keep the thick steel from overheating. Anything made of mild steel that gets to a cherry red heat will be toast before long.
My guess would be that the diagram you posted is going to have ash problems. Since the gas is going in the opposite direction of the grate, the ash is not going to be able to work its way down. It will build up, probably fuse, and that will in turn push the reaction up out of the core. As the hot lobe rises, it will probably eat up the gas outlet pipe (I agree it should be at the top). It might work as a down-draft; putting the nozzle where the outlet is shown, and pulling gas out of the ash bin, but that mucks up the whole steam generator design. @KristijanL did a downdraft for one of his charcoal car projects, maybe he will chime in with his take.
3 Likes
I haven’t dried chunks but I dry brush in a 55 gal barrel with slits in the bottom propped up on old patio blocks. I put a pipe nipple into the bunghole of the lid of the barrel, then put a coffee can over the nipple to help induce a draft. (it also blocks most of the rain). There is plenty of heat from the sun. Then you can do a bunch of batches at the same time, and not have to worry about fire quite so much. It also makes handling it quite a bit easier.
You could put the rocket mass heater under a barrel and just do a closed retort if you are aiming for charcoal.
2 Likes
First off, I highly appreciate all the advise you guys provide. Years of experience and I’m sure a lot of trial and error to get to where you are now. I’m gomer Pyle.
Having the gas exit pipe so low was one of the questions I had. Didn’t make much sense even to me. I thought this would be a good design because of the cross fire videos but putting the nozzle in the hopper would be a lot easier. The water heater tank is 4.5 feet high. I was going to cut it down to keep it from being too high with the reactor tube and ash cleanout. I assume the full height would be an advantage. Would four inches up from the base be the best position for the nozzle? I think the tank is about 17 inches in diameter. How far in would be the best place for the nozzle. Is a grate an advantage or a needless complexity? I’ll have to rewatch your videos Gary. I must have missed the part about how your water injection works. I did see you were using exhaust gas for cooling. I haven’t seen your videos Koen. I see from other posts I’ve read that you are a well respected builder. I’ll go back and look your post up. I’m glad I’ve be redirected. I would have spent a lot of time and ptobably ruined a couple of hole saws trying to bore an inch and a half hole in the six inch heavy wall pipe. I’ll regroup. Still have lots of questions.
2 Likes
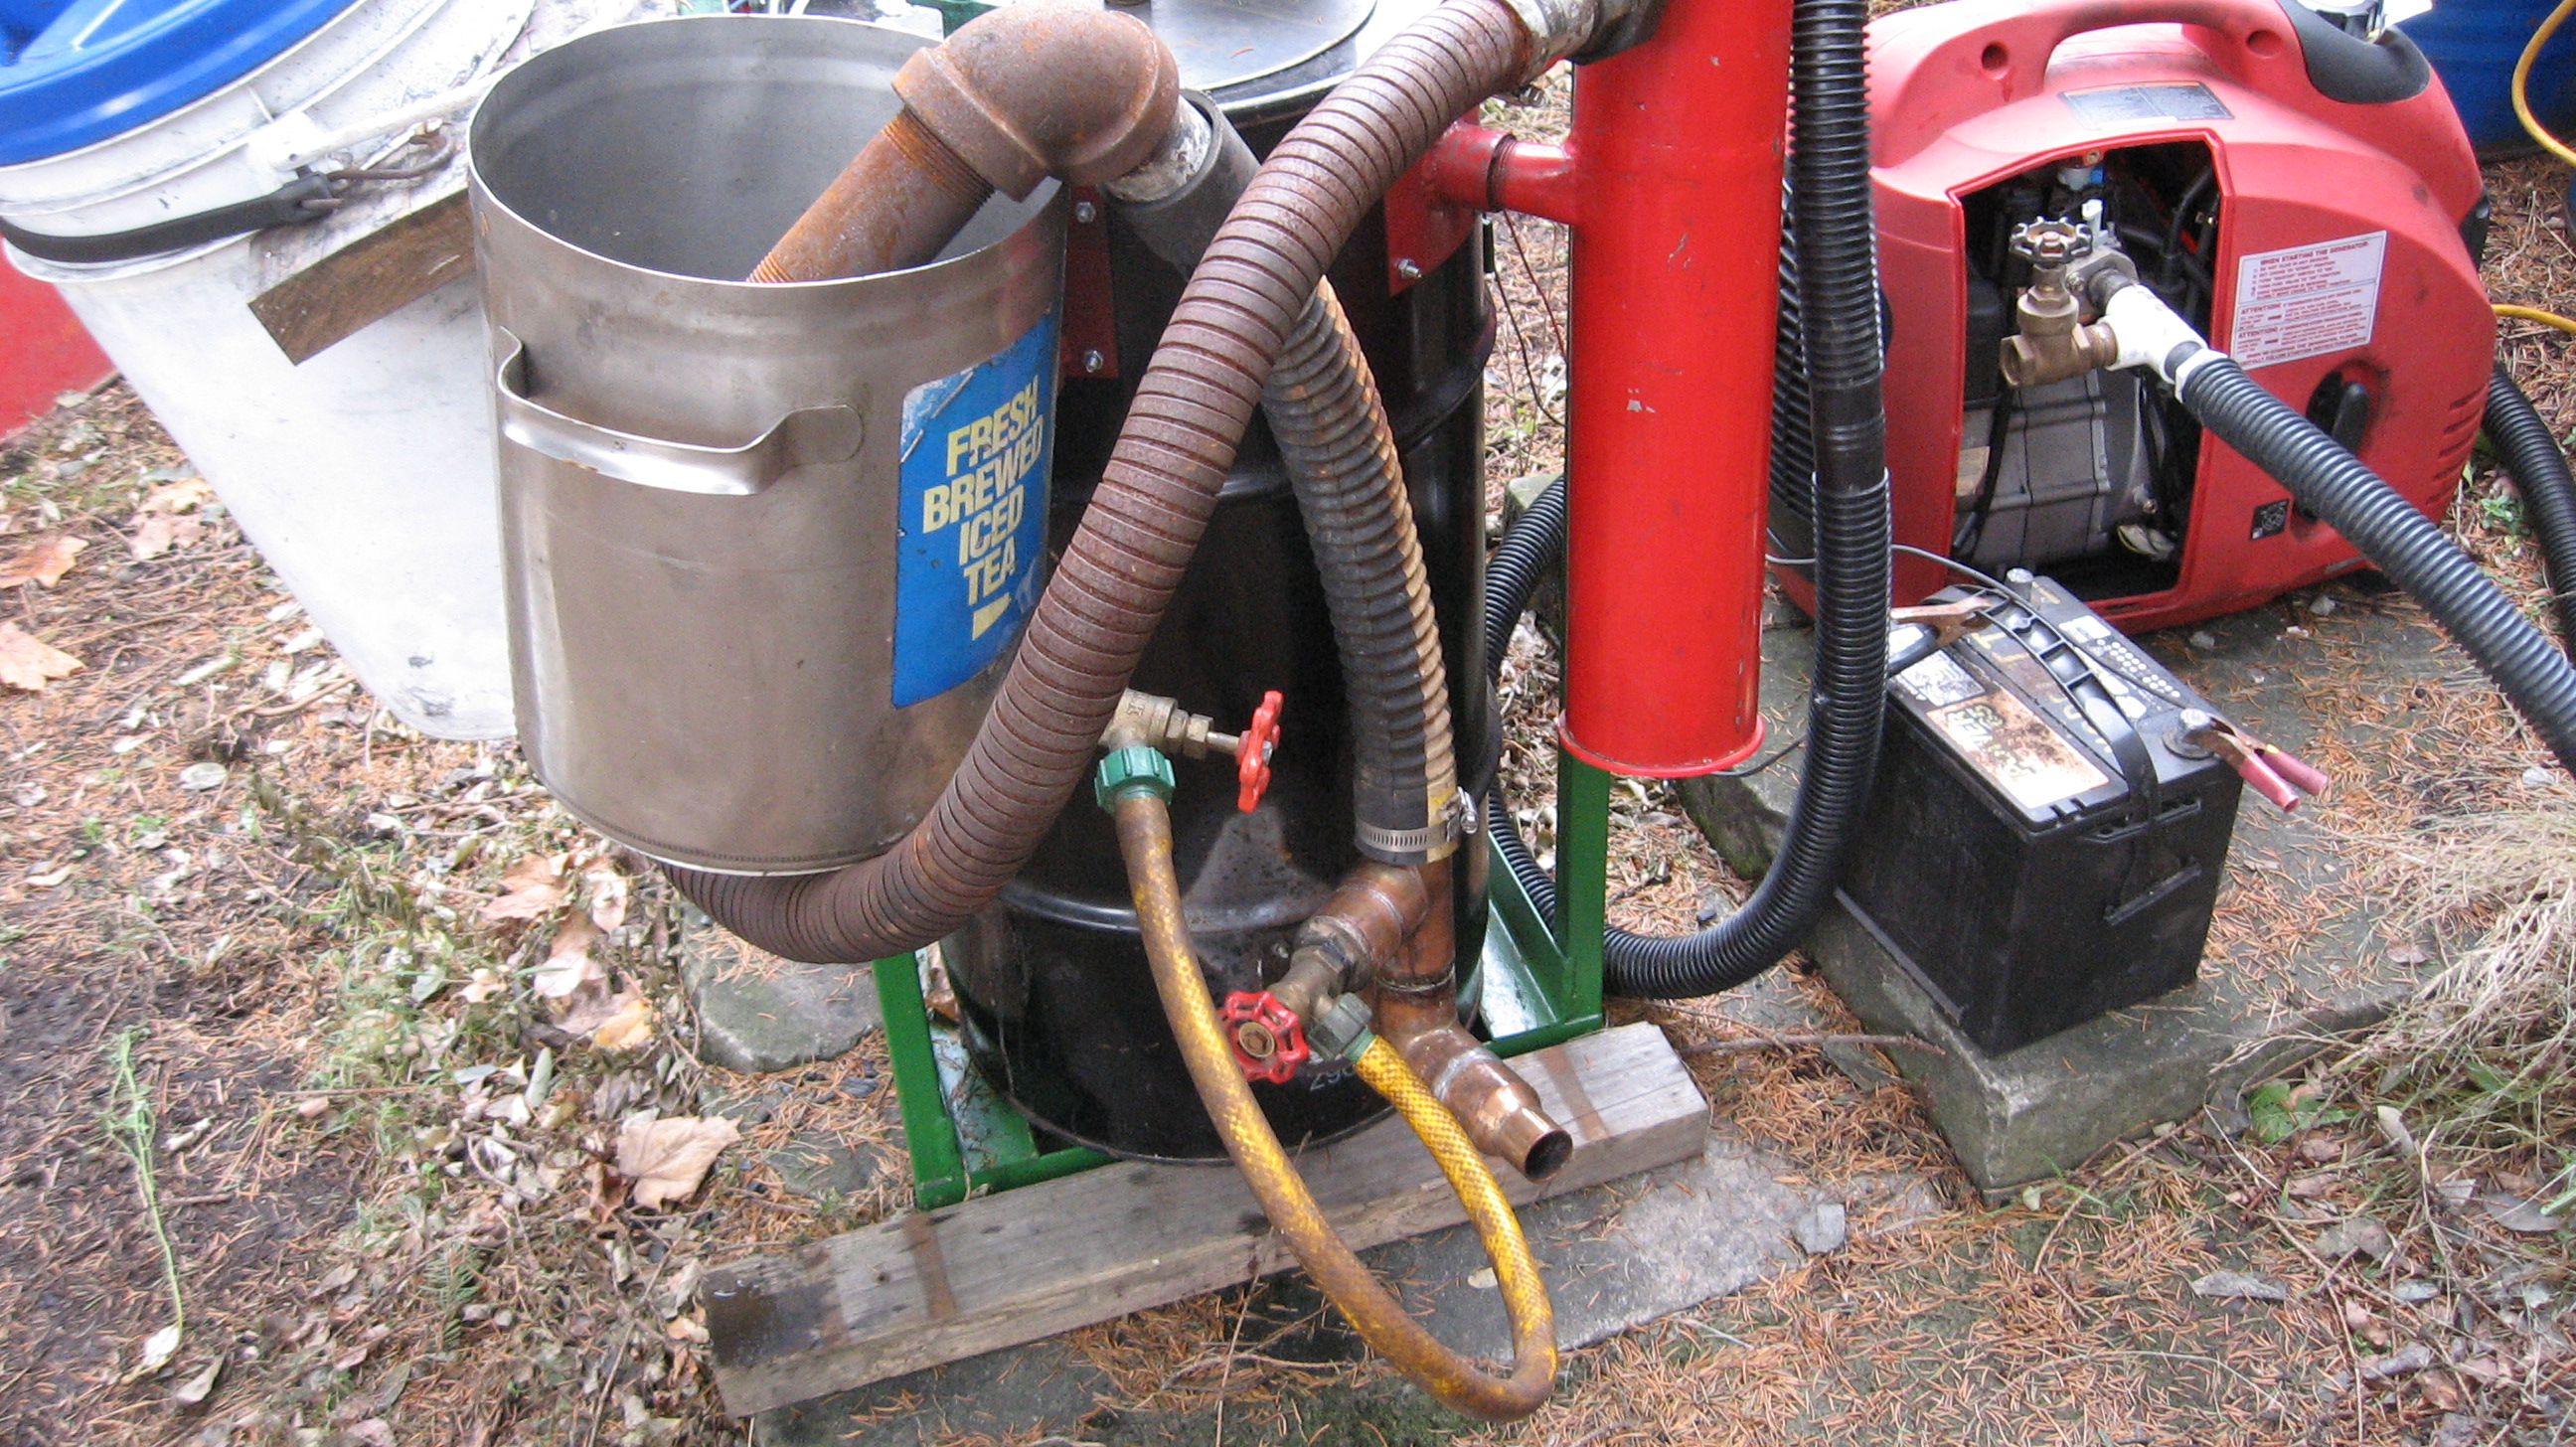
Here is how I built my charcoal gasifier out of a 30 gallon water heater.

13 Likes
Don,
Thats not fair…
That is not a gasifier, that is a piece of art…
9 Likes
Very impressed with your build Don. From 17 sec you show what appears to be some kind of hearth. Could you explain about that and how the water is fed and turned into steam?
At 1:20 it appears you have welded a cap over the water inlet tube. I surmise that that whole hearth is a sealed chamber somehow.
I didn’t see an actual grate over the hole. Does the shaker component just serve as the grate as well?
Any kind of ceramic on that nozzle?
Looks like an air hose fitting on the water inlet pipe. Is that just for a quick connect or is the water pressurized.
Why twin cyclones and have you found them to be useful based on some of the comments I’ve read other places on the site?
I’d like to build something like this. Not real clear on the hearth though. Seems like that is the most important component. I see more flanges in my future. I guess we still need them stinking flanges.
Thanks so much for the video. Most of my time now is spent canning and dehydrating the stuff from my garden but I always like to spend some time each day on a project. Now I have a direction to proceed with.
2 Likes
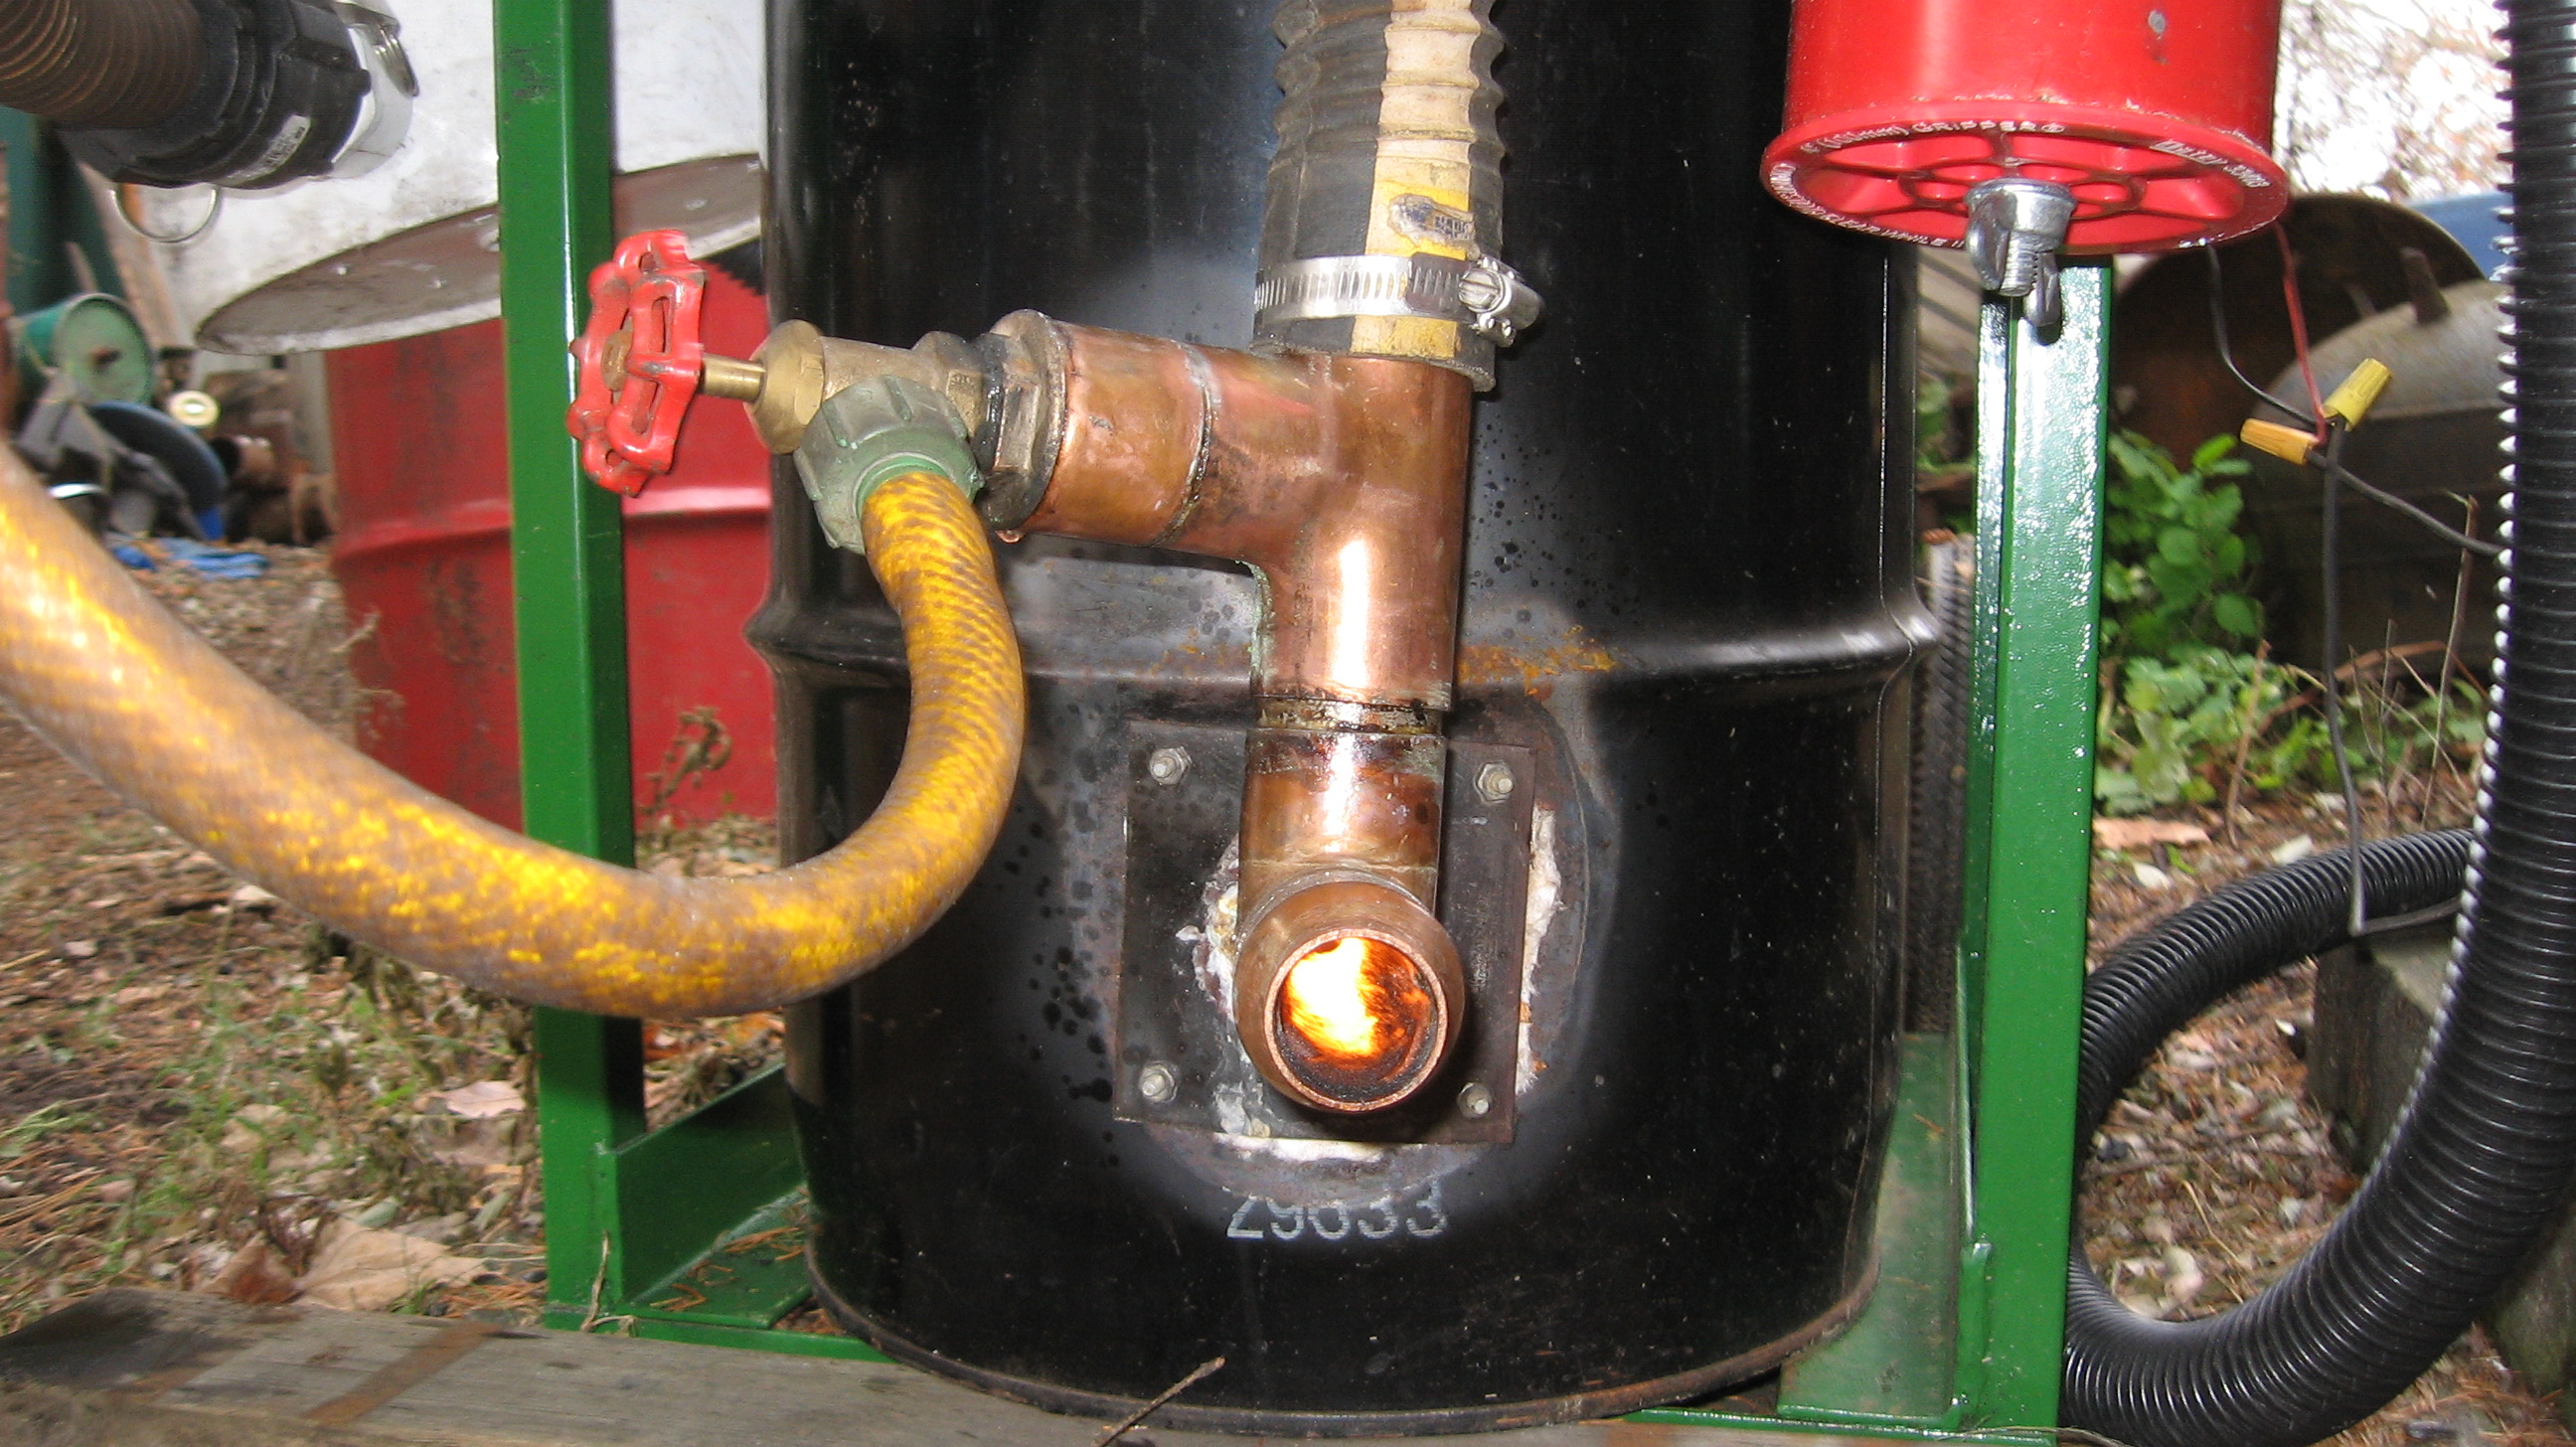
Tom, here is a screen shot of the main parts of the gasifier.
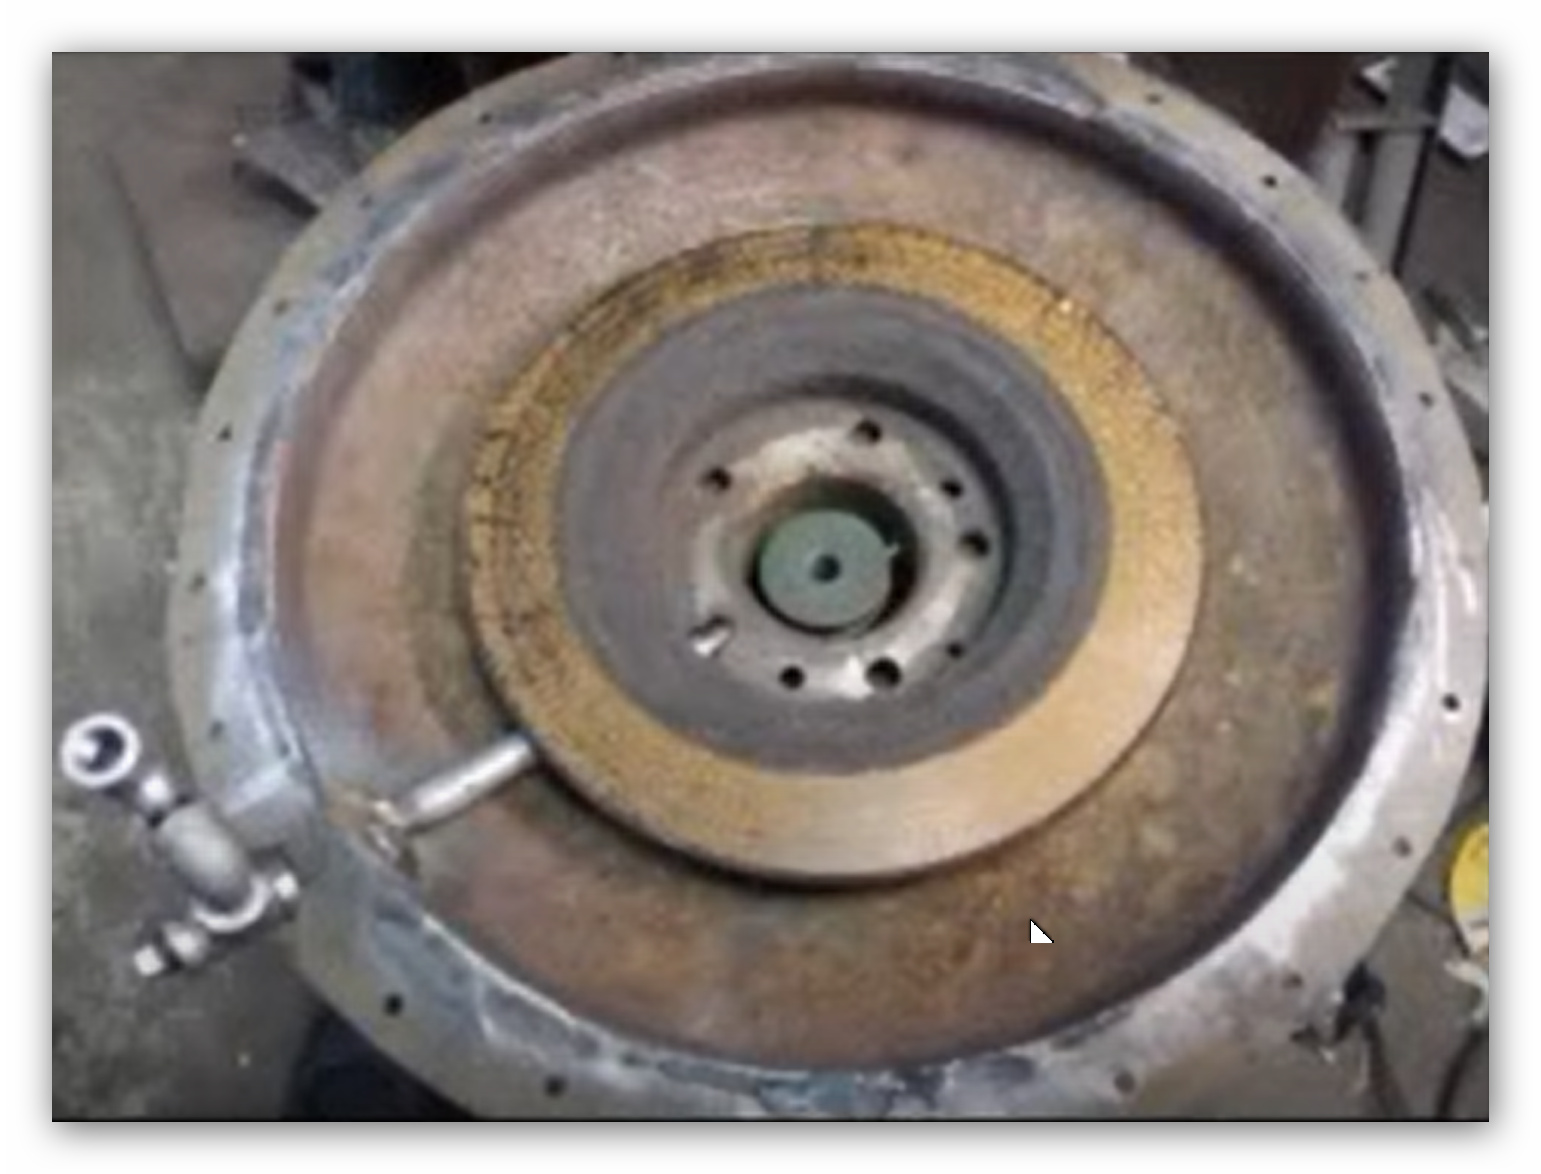
The three inch center hole is actually the center chimney of the water heater and the green plug in the center is actually a cast iron flat belt pulley about 1-1/4" thick which acts as a grate and more importantly as a heat sink. I made it swivel so the ash could fall thru but found out that was not necessary. The brake rotor fits nicely around the 3 inch center tube and protects the metal under it and the water tube from the intense heat. As the incoming air is drawn up around the pulley it helps cool the grate pulley and the mass of the pulley protects it from melting and the rush of air also sucks in the steam from the slots in the center tube to add hydrogen and aid in cooling. The plug in the end of the water inlet pipe is just to be able to poke it clean in case it plugs for some reason. The double cyclones are for saving space in my little Geo Tracker bed. I have a video showing the unit burning which I will show also here.

13 Likes
Yeah, I think you are on the right track. The extreme heat in the hearth of a charcoal gasifier is a big challenge. I am looking forward to seeing what you build. Make sure you start a thread and post some pictures as it comes together!
3 Likes
Will do Carl. Right now I’m planning to clone Don’s unit if he has no objection. No point in reinventing the wheel. This is already saving me a lot of wasted effort from the first plan I was going with. Still have some brain picking to do. As I said, and as you well know being a grower, this time of year gets a little hectic. It has been hotter than usual here this year and things like tomatoes have come on early. I have a couple hundred plants, three quarters are determinates so getting them all canned basically at once is a job. Sure glad I’m retired but I think I got more rest when I was working a job.
5 Likes
No objection Tom but I forgot to say that Gary Gilmore needs the credit for the nozzle design. That was his idea after he observed how the heavy nozzle of a forge lasts for years of use.
7 Likes
I have a few other questions about your build Don. I think I’ve got it mostly figured out now. Took me a while. I’m going to explain what I think is going on and ask you to set me straight. There is no nozzle in the hopper itself. The only pipe coming in is a water feed. The combustion air is fed from the ash hopper through the three inch pipe with the spinner in it and that is the actual combustion zone. It is protected by the brake rotor. This is where I’m a little unclear. The picture at 24 sec is the rotor inverted. The band and the tabs hold the rotor up slightly as it sits on top of the protruding 3 inch feel pipe and allows the water pipe to bleed into that space to create the hydrogen steam. The spinner in the nozzle is to move ash into the hopper but you say you didn’t really need it. I assume that’s because it’s in a vehicle and the vibration keeps the nozzle clear. It would be necessary in a stationary unit? Is there any need to control the amount of air going to the nozzle? On the open fire gasifier they estimated that they could attain a one to one hard fuel- water ratio. Is that a proven theorem now? Seems extreme.
1 Like
I have other more general questions. I have watched a lot of video now. Koen’s, that I could find and I rewatched Gary’s. When I put up the diagram of the Troy Martz design it was said that building that fire tube with a side nozzle would overheat the opposite side of the pipe but Koen’s tubes seem about that size and not as thick as sch 80 pipe and yet his tube in that area don’t seem red hot. He stuck a welding rod in there and only the center of the rod seem to reach melting temps. No longer interested in that Martz design but wonder about that.
Wondering about the cyclones. If there is not enough velocity to actually spin the heavy particles and dust around why wouldn’t a diverter plate set in the center of a tube drop the larger particles just as well. Much simpler to fab.
I haven’t seen any mention of using fiberglass insulation as a filter medium. Any reason why it wouldn’t work well?
When you are placing the thermocouple in the hopper what are you measuring. The heat in the combustion zone or just the heat of the gas as it rises through the charcoal. What is that temp telling you?
In the Ben Peterson book I think he said that for the gasifier to function at least 9 inches of WC were necessary but that more was better. In some of the posts it seems that you are getting better performance from your vehicles by lowering the pressure. Just wondering about that. My pea brain has a hard time sorting all this out.