I’m making a little wood stove to keep me something resembling warm while I work in my little shed/shop this winter. The shop is a 8’Dx10’Wx5.5’H sheet metal shed with no doors and some ventilation holes here and there so a bit of leakiness isn’t much of an issue.
The box is roughly 9"x9"x20" and I have some sacrificial fire bricks that roughly fit inside as well as a source of almost pure clay (what the locals call “soil”) to line it with.
My question is this: should I build it as a “tall, top-fed chimney” or a “low front-fed bread loaf” style?
I built a wood stove out of an 80 gallon vertical compressor tank…foot print is small and a small fire inside heats quite a while as lots of surface metal to heat up. . I use a small box fan about 3 feet away to blow the heat around my shop. Can keep a toasty 65-70 F and only used about a cord of wood last winter. Post more and better pictures later.
Dennis: mine is going to be much smaller and generally more packed with wood while in use.
I don’t have anything like that available/affordable and if I did, I could think of a lot of better uses for such a tank.
Also, that is a small footprint for a huge wood stove of that capability, but way more than I’d need and still quite large. I’ll be within about 5 feet of this anytime I’m working out there so it should keep me quite toastie.
I think I’m going to go with a more standard horizontal setup with a front door and a chimney off the back top. That should allow easy feeding but also I could heat up a kettle or skillet on the top between welding bouts.
The other, vertical, design would have a top “trap door” for feeding next to the hot chimney but that would also make the flame come out the feed chute when I opened it to add more wood. The reduced footprint would have been negated by having to have wider legs/stance to maintain stability. One benefit to a vertical design is that once it was hot, I could just dump in a handful of wood chips or pellets and have them smolder/burn which I couldn’t really do with a horizontal “LoafStove”.
I need to figure out a way to calculate my needed Primary Air, Secondary Air, and Exhaust piping dimensions. I think I currently have 3/4", (some) 1", and a fair amount of 2.5" pipe, though the 3/4" and 2.5" are both galvanized stuff that I’d have to treat with a strong vinegar to clean it off before heating/welding.
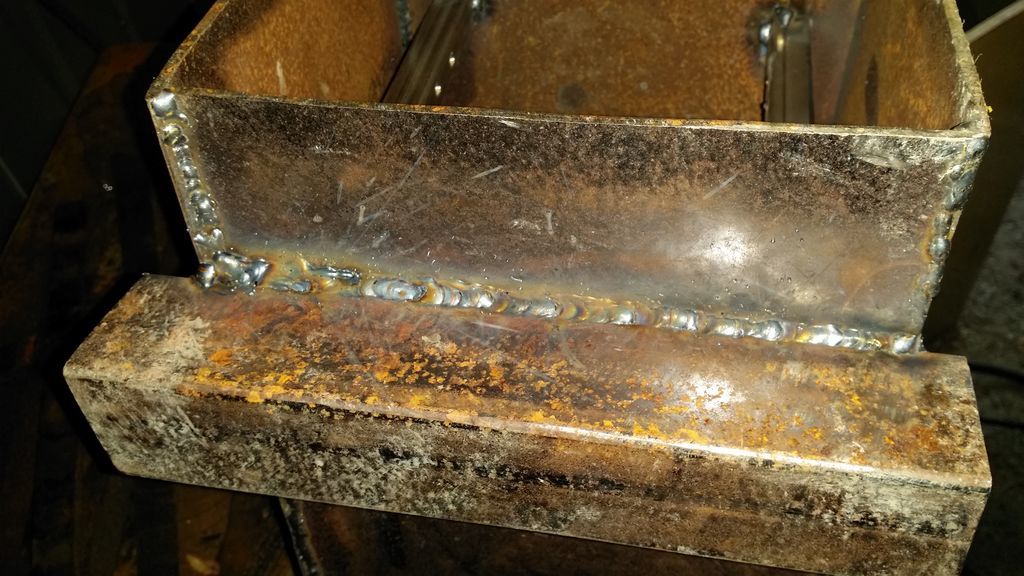
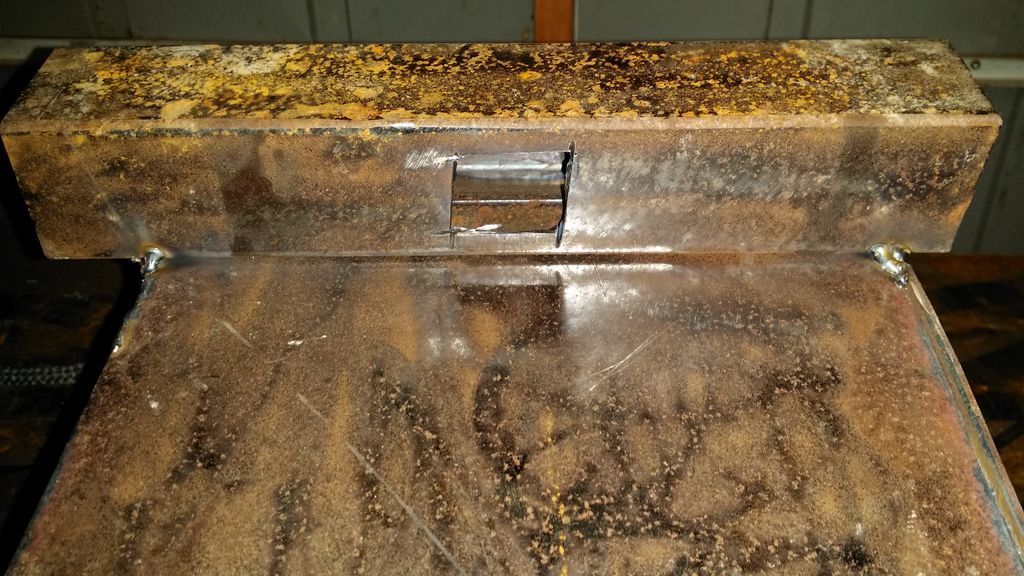
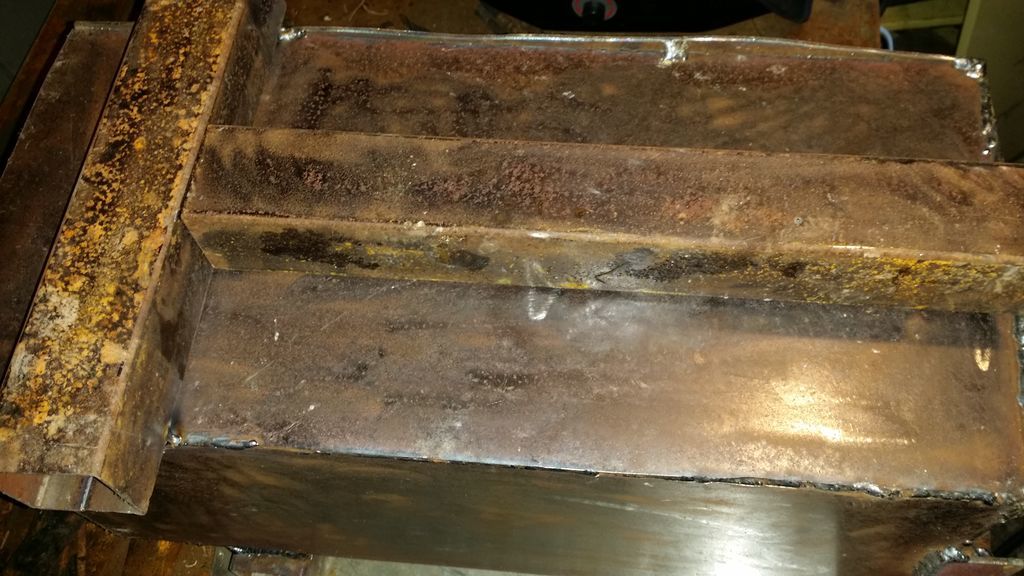
So far, I have the walls all welded together and welded onto the base/back plate. Some of the welds are on the inside, some are on the outside. I wouldn’t be able to see my arc/pool if I tried to do all the welds on the insides and I’m not good enough of a welder yet to trust that I’m doing a good job just by sound/feel.
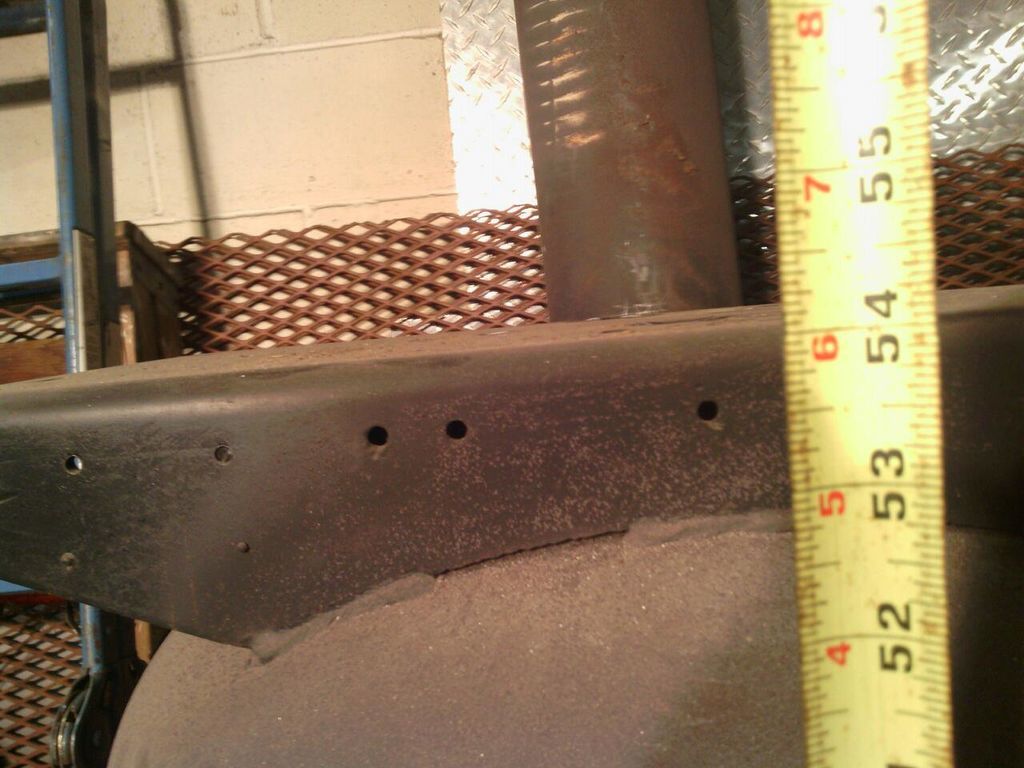
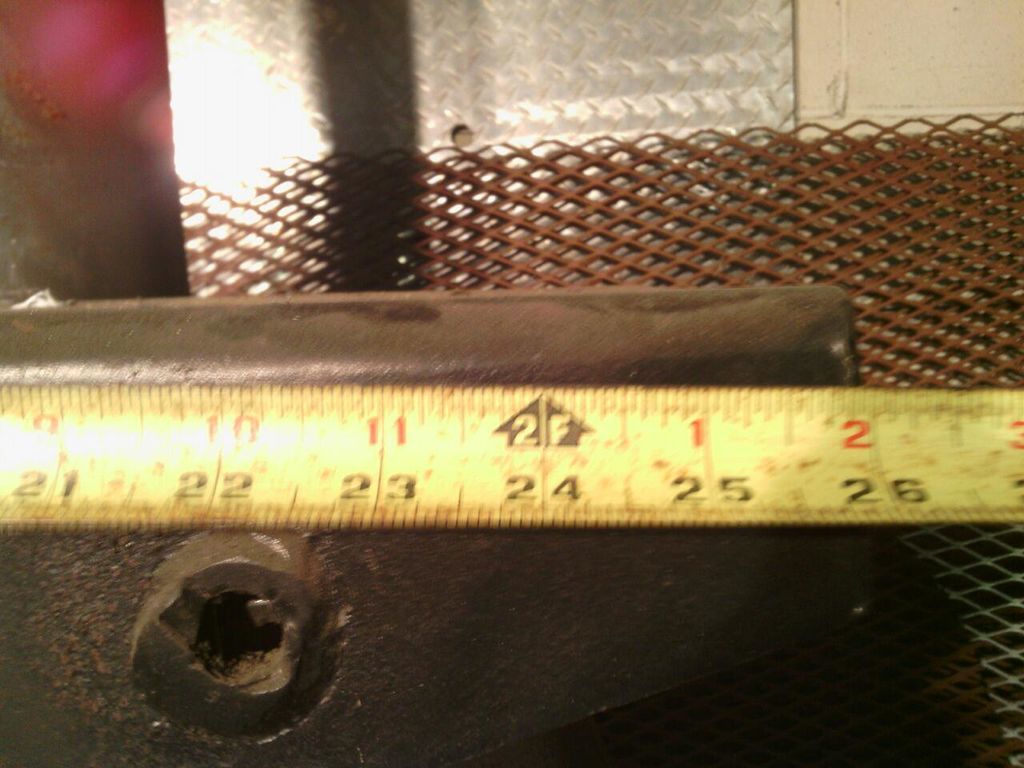
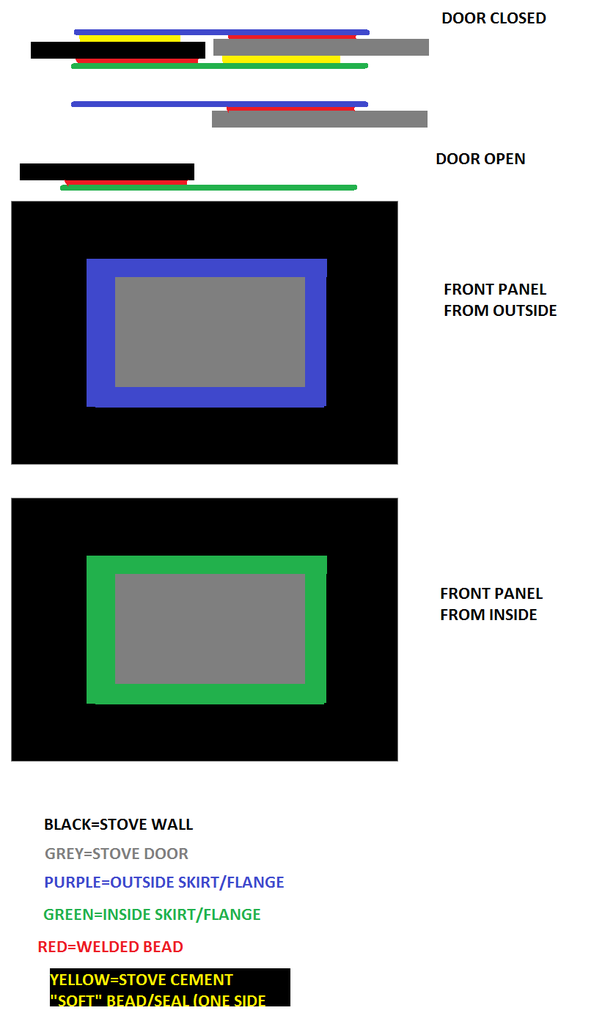
Next, I am going to cut out the front door and “frame” it in the back with banding and add a flange/skirt thing out of banding on door to help seal the opening when the door is closed. I’ll also goop them with some “stove cement” to add to the sealing… I’ll try to do an MSPaint diagram to show what I mean… :EDIT: Posted MSPaint diagram of door sealing system.
PS: I really don’t know why some of my pictures here are coming out sideways… On my phone, and other places that I’ve uploaded them, they come out fine.
I am building a little wood burning stove of my own right now to save on the natural gas bill this winter. I am considering my options for sealing the door. I was thinking the door could have a channel running all the way around it that you could wedge a strip of oven seal in.
Edit: I like the way Dennis’s door closes. Real simple just weld a piece of plate on the inside and cut it out a bit smaller than the door. I need something more airtight as Im planning to put this in our house.
Steve Uhruh should show up sometime soon and tell us how to get it most right.
if your fire is right…and your draft working…there is almost no smoke…I was going to seal mine better…but I have found out it is all in the way you build your fire…My wife works up front and hates the smell of wood smoke…and 99% of the time…she never realizes I have a fire going except…the furnace does not kick in…
Eric,
You are on the right track. When I built my outdoor wood boiler I had all four sides of the door bent and then welded angle on the inside to form a narrow channel. I used braided glass stove gasket and tucked it into the groove, no adhesive. The opening of the stove is flat bar on edge so when the door closes I get an air tight seal all the way around. I have been using this for almost 20 yrs. The only time I had to replace it was when some plastic melted on the edge of the flat bar and it stuck to the gasket and pulled it out of the groove.
Ha! Ha! There you go. I heard my name used again.
Ah; but this time I aintta’ gonna let myself get sucked into a “Best” woodstove quagmire.
It all centers around that word you used ErikC of whats most “Right”.
Right for WHERE, by Who, for Who and using what form/shape/type/species of fuel wood???
Now you’d think it would be about just the Science of Combustion for heat using wood as the fuel wouldn’t you? Not. Not. Not.
I think DennisP’s air tank stove 'n chimney pipe looks jim-dandy as a shop trashwoods heater. Nice long ~36 inch long combustion pathway with lots of heat trasfer surface area. Nice straight up chimney pipe with NO 90’s, Tees or visible horizontal runs. And with his nice big door I’m sure he can shovel or paper sack toss in re-fill loads of wood “feathers” splinters, small chunks w/bark, and such.
BrianH with your materials I’d gone vertical at least 36 to 40 inches high fout sided pyramidal like an old music tick-tick timer shaped like enclosing a Rumford fireplace hearth. Easy secondary air introduction where actual using then shows the need for it. You could have still had a flat hot spot top. Lower main wood loading door. With a halfway up lower hinged out wood feathers dump-in door. This door chain opened held for wood dribble slide filling with dump in clearing on closure.
Now to set up a long combustion path with heated secondary air in a horizontal box “loaf” stove is much harder to do. Can be done. I used an EPA converted Jotul 902 for 5 years untill I tired of the shorter Euro-spec wood cutting and fine splitting down. And having to replace out it’s cast iron guts every three years severe overheat operating it to stay within our WA States legal regs for “ONLY visible smoke allowed for 20 minites in every 2 hours for refueling purposed only”. In our State all outdoor wood bouler “smoke dragons” and long continual smoky burns are illeagal.
BrianH look at the internals on these EPA/WA State certified woodstoves friends have or in commercual legal woodstove stores and you willl see that the combustion path from a sideways view has been modified to a squashed down, streched out elongated “S” pathway. Door, wood and primary air IN at the lower left hand S leg. Burns Back along the S. Then Up and then forward under an internal 3/4 depth combustion “smoke” shelf. Then up around this shelf forward edge and Back again along under the stove top to the chimney pipe exit at the right hand upper S end. Internal enclosed pathway heating Secondary air is routed to the underside of this combustion shelf DRAWN-in (why these MUST have very GOOD drawing chimneys to function) through SS hole drilled didtribution tubes or a undershelf SS stepped formed and then step edged drilled covering plate. I HAVE 110 gallon soaking tub pot heated water in my little Jotul cooking top “hot spot”. For actual HOT frypan cooking an actual old syle short path “smokey” box stove with the inside top radiant exposured to a built up HOT glowing char coal bed are much better.
Stick with your thermal bricks bottom and side and back to prevent overheat metals warpage and weld popping. This will help a lot to get your combustion temps UP, and Held UP to be able to clean burn with minimum smoke.
Even as a Shop trashWOOD heater stove avoid any plastics, waste oils, or baby diaper burning. Realize here in the Clean-Green Urban voter dominated counties you and I live in we are always just one neighbors complaint phone call to the local staffed, State chartered air pollution control board. They Must Have documented compliants with thier documented responses to justfy/preserve thier Top-Down funding. Mine is the SW Washington Air Pollution Control Board; your’s the Puget Basin. Look in your phone book and you will see.
Washington State BrianH and I live in the very far West Coast U.S. Everybody so far resopnding here are far, far to the East of us (including you PatrickJ!) and generally down airshed from me and Brian.
So for a woodtrash burning in a SHOP stove you all can make most anything work as long as it does burn trashwoods and put out some heat. Top loader the best by far for this and Your RIGHT for this. Nice clean American/Canadian spec 18 inch long cordwood for in house exposure to your Sweetie and the kids you’ll have different stove RIGHT. A front loader either from one end “cigar” burning, or wider faced front loader with full across the 18 inch wood pieces “full log” buring can both be RIGHT for you easteners in other less “Progrssive” states. The cigar buring better for smaller controlled BTU’s/calories releases. The full across log burning better for the COLD, COLD of you needing mondo releases of BTU’s/calories per hour. The Alaska and Northern Tier heat needing actually be better RIGHT served with bulkwood stoves able to take full CORD wood lengths of a true 4 feet or 1 meter. Much less wood cutting and handling
Then the RIGHT for the Must Be extremely fuelwood conservative like most modern Europeans ends up with stoves sized for 12 inch/30 cm short cut chunks able to burn with the least visible smoke, least measuable emmisions, AND the highest Lab efficiency ratings. NO long, long burning over-wood-stuffed, long smoky, air-choked-back “Sit Back and Forget” buring is possible Right for them.
Then the RIGHT for the extreme effiency fanatics will be different also. They will sacrifice all else to be able to post up cerifiable Right good numbers. The rocket stove promoters. Surprize. Surprize. How many of these I’ve found acrually heating with propane and natural gas in there own homes. Guess these are for “other” “disadvantaged” peoples in “other” places.
Anyhow here’s what I have found all of theses Right combustion stoves do have in common. The BEST of them actually have all evoled to have a mimicked small wood bon-fire’s ~36 inch/one meter long flaming combustion plume now somehow wrapped up inside them. To make this actually open flaming completely combusted/oxidiezed plume now all wrapped up as BrianH has said you have to get in some secondary heated air introducing somewhere along this now wrapped in long pathway.
Easiest to see these features by just going to a stove place with EPA spec certified stoves and looking inside very carefully. The actual manufactures DID have to lab and safety cerifiy thier stoves.
2nd thing that I’ve learned is a woodstove can be no better than the chimney system drawing it hot. I can make any AIRTIGHT stove configuration work with any fuel wood by operator fuelwood prepping and in-stove piece management as long as I do have a good drawing chimney to drive the stove HOT. I see less than a 13 foot/11 meter tall chimney - forget it. I see more the ONE 90 degree elbow or Tee pipe - forget it. I see any horizontal chimney pipe runs - forget it. Yep means those SHOP stoves with chimney pipes horizontal stuck out the wall - you just foot shot yourself and never be able to drive ANY stove well.
Ha! So see lot more to this than just about the stove.
O.K. I cleaned up my too long above post as well as I could.
I strongly echo DennisP’s that woodsoving is mainly an ACTIVE operator. Just like wood gasification for engines.
And I stongly echo WesK’s statement to HAVE control you must make it AIRTIGHT. You will know this when you can put out a burnt down to glowing charcoals fire and be able to save the charcoal for another day.
For your how to secondary air heat and route questions Brian and Eric I’ll put up some stove internal pictures and brief explains.
My Jotul 902 had the whole back wall doubled with the secondary air heating and rising to the top to be under the combustion shelf underside distirbuted out through a SS stepped hole drilled plate. As a one end front to back “cigar burner” this worked poorly with the rear wall the least glowing char heated area in the stove. The SS plate edges were always air leaky from the severe differential heat expamsion and contration between the SS and the cast iron.
My three window panel bay fronted stove also secondary air heats poorly with the boxed in front corner air heating channels again now WITHOUT enough glowing char exposure and with the glasses front radiating out intentional heat energy “loss” across the room. Does have very good secondary air distribution with square carbon steel tubes forming the actual combustion shelf edges. Then woth five end floating SS air distribution tubes slide in inserted into round holes between these air manifolds. Spaced ~ 4 inches apart. Actual shelf is just a panel of layed on alumina-ceramic ridgid sheeting. This stove has NO primary air heating. NO ash separating grate. Cool dense primary air blown at the char directly on the insulative stove brick in this one aways slag/glassifies melts it’s wood char.
The single pane Gold frame stove has excellant all four corners welded boxed in air heating corners. The front corners connected top and bottom in an “O” pathway for primary air heating and distribution. Fire primary pre-heated air is lower center jetted into the actual charcoal bed. Top of this front primary air-O the air drawn in to “air wash” down and burn off any window soot. One picture with the opened door will show these drilled air distribution holes. Secondary air is back of stove box welded corners boxed in channeling up heated to now horizontal upper carbon steel boxed in distrubution manifolds again forming the combustion shelf outer edges. Again the actual secondary air distribution tubes are round, drilled SS sideways slip-ins. The actual shelf is made up of two purpose cast very HEAVY composite refreacory plates layed on directly on top. This one operates the combuston shelf VERY hot with red glowing SS tubes and even shelf plates. These need every 3rd year changing out for heat and erosions deterioration. This stove; with the worst chimney set up as an outside 14" x 14" unlined cinder block chimney fed by a 90 degree pipe out of the stove; has the absolute best burning characteristics able once up to heat. Then able to cleanly to use ONE piece of wood at a time. Stupid chimney if allowed to go cold will downdraft terribly taking LOTS of newspaper burns to reheat into back into an updraft flow. Owner will not let me upgrade! Bloody dangerous. Glad this set up is no longer on my need to take care of list.
My porcelain cream stove is 90% all cast irom plates bolted and cemented togather. The front stove corners are cast boxed in with heated primarty air distributed as described above. The secondary air heating is in cast iron channels midstove located adjacet to the hottest fire char glow. Smart. Distributed up through hollow piviot rods for the swing up combustion shelf aasembly. Shelf with edge square hollow castings with again end unconstained SS air tubes inserted in beteeen. Rigid alumia-ceramic plate sandwiched between these heat floating SS airtubes and an upper fly-ash catching and holding cast iron top plate. Complex. Expensive. I am carefull not to glow overheat this assembly. This stove NOT the best numeric Lab efficient has the absolute widest fuel woodS flexibily that I spent four previous woodstoves in and out of my house looking for. With an actual char and ash separating grate and an under grate SS ash pan behind it own stove roped airtight door I can under grate air force blast/burn actual winter wet picked up wood. I can blast this one with now FOUR controllable air flows and my 26 foot high triple walled chinney up to gasisfing heat in 20 minutes with normal for me 25% moisture fuel woods. With an established HOT wood char bed I can top dump in a-n-y-t-h-i-n-g burnable.
So there is how the manufactures do this.
Actual horizontal barrel stoves I’ve upped to 90% of these capabilities with layed in thermal stove bricks and three pipe union assembled internal black gas pipe pipe made up secondary air assemblies. Ha! Do keep those actual air distribution tubes as SS end floating inserted into side pipe drilled round holes. Ridged T piped joined there WILL heat crack in hours.
Have fun. DO much. If you are not burning out and having to upgrade/repair you ain’t tring hard enough to find those performance woodfuel performance edges.
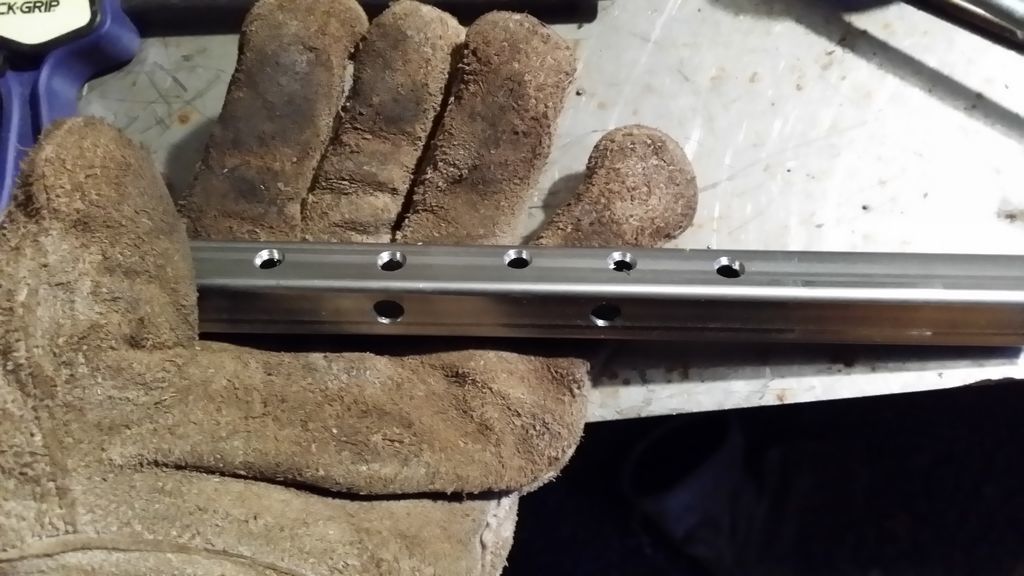
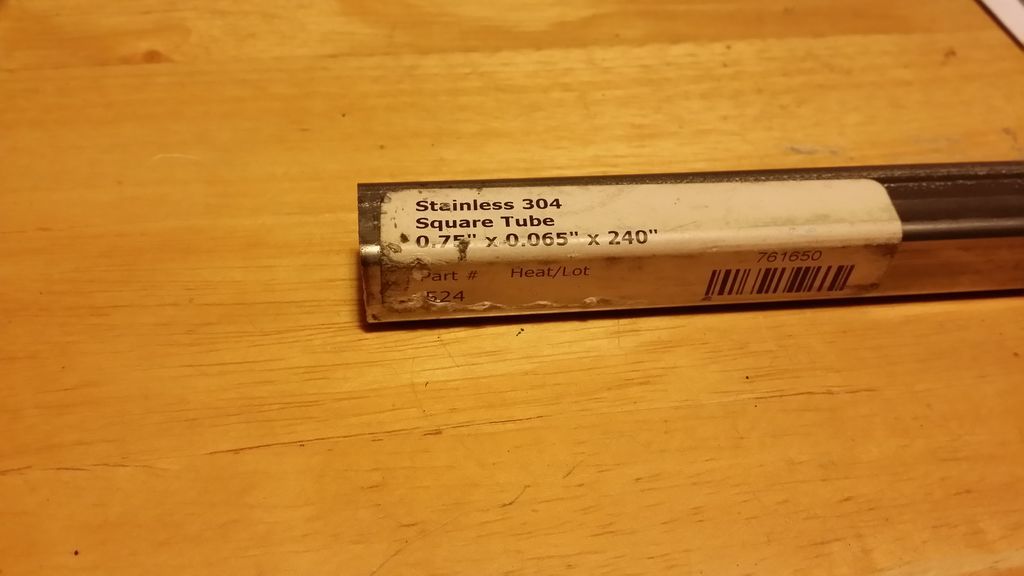
Cutting small square holes sucks… I thought I’d posted about finding some cheap (2$ for 3 feet) stainless square tube but I guess not.
Anyways, cutting small square holes for the Secondary Air into the outside of the stove body sucks. If they were larger holes, I could have just used my angle grinder but they were too small for that. I ended up using my Unibit to make round holes slightly too small. I then used about 30 of those crappy fragile 1" Dremel cutoff discs with the little screw post in the middle to make square holes roughly the right size. I finished them up with a Dremel stone grinder bit.
I only managed to finish 3/4 of them in about 3 hours of work.
I also drilled 5* 1/4" holes in one side of the tube and 2*1/4" holes in another side of the tube. Question: should I have the 5 holes blowing in and the 2 holes blowing down or 2 in/5 down?
Picture 1: Good to the last grain. Getting the most out of my bits. Before and after.
After looking more closely at Steve U’s stoves and a few online, it looks like my prefered nozzle orientation is going to be mostly in with some down. I hope that’s right because I don’t think this is going to be an “easy fix” to change later.
Luckily, we’ve had some pretty warm days/evenings lately when I have been working so my current “igloo of bricks” fire pit by the door (to allow smoke out) has been enough to keep me working. Several chunks of glowing red hot metal in close proximity also help keep me warm.
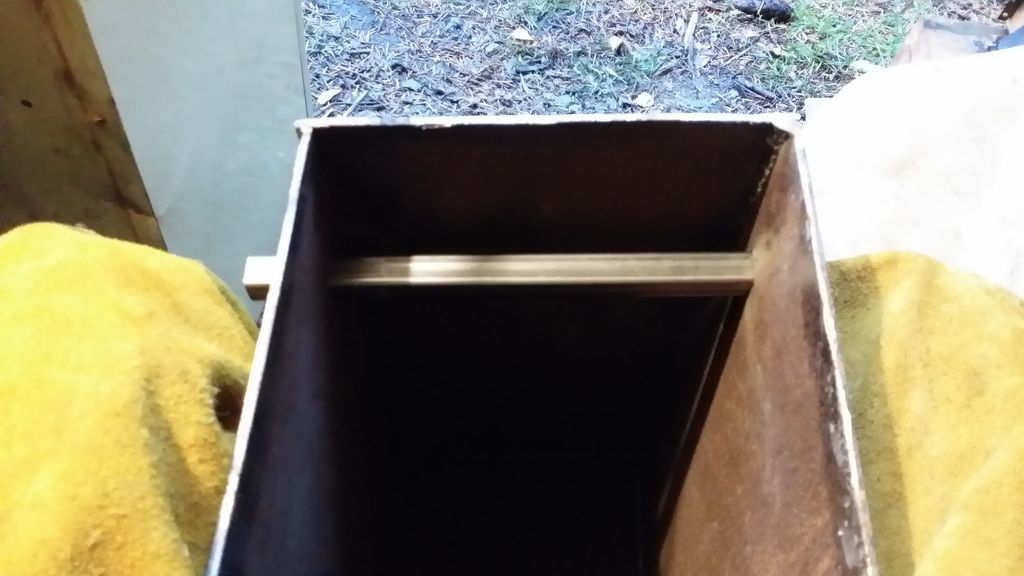
Made some progress on this stove tonight. I got the 4th hole squared out, thanks to a 20$ set of cold-chisels, to accept my secondary air nozzle and the nozzle tubes inserted, tacked into place (yes, I know thermal expansion won’t keep them bonded at temp), and covered with the external secondary air ducts/preheating.
I’ll have another piece of square tube running vertically up each side to do lots of preheating and have a 5th square tube running across the bottom of the stove with my secondary air control/shut off valve coming off of the side, right next to the primary air control/shut off valve.
Also, I got a line on some cheap (50 dry lbs for about 9$) fire clay mix to use to make refractory for sacrificial stove and charcoal forge lining.
It’s been a while since your last update. How’s the stove coming along? Curious to see how the secondary combustion works out.
I also have some off topic questions regarding the Anacortes/Guemes/Whidbey Island areas. I tried to use the DOW contact form with no success. If you have time, please drop me an email to [email protected] and I can reply with my questions.
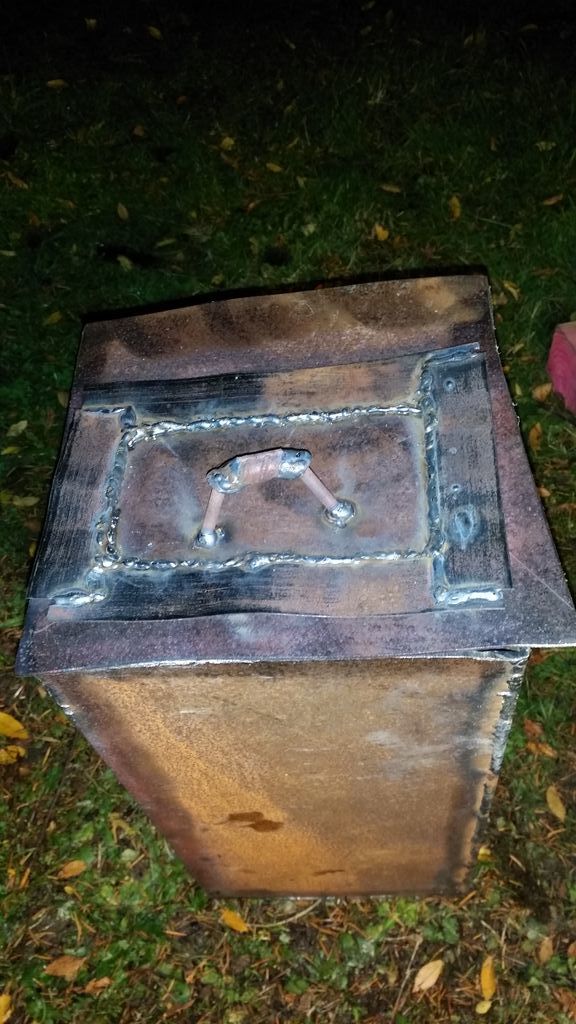
Hey Billy. The stove isn’t doing great. I did manage to finish welding up the Secondary Air ducts and controls for both Primary and Secondary Air. I also welded the top-plate (with loading door), and a small flanged ash-cleanout port into the bottom front of the unit. Still need to cut out the chimney hole, weld on a chimney “holder”/adaptor (short piece of steel pipe to slip the chimney pipe over), and weld on some legs.
Between my few home-made smithing forge builds, I only had enough clay mix to line 1 wall of the unit. My “supplier” for the fireclay mix (A local pottery artist) stopped replying long ago and never ordered my large bag. The bags are only about 15-20$ for 50Lbs but shipping starts at about 50$ from the Seattle supplier. If I could find another potter who orders in bulk, adding another bag wouldn’t add much to their shipping costs.
I currently don’t have any place I can do welding, so I’m stuck on the body too. I moved into an apartment and we had to rent a shipping container for storage/shop space. The owner is hoping to run power out to “The Box(es)”, but currently I’m on hald-powered tools only. It hasn’t been good for my already “iffy” headspace.
And thanks again! Hoping things work out for you to get back to your stove build. I have toyed with secondary combustion air in a barrel stove with varying degrees of success. Primary/secondary balance is tricky.