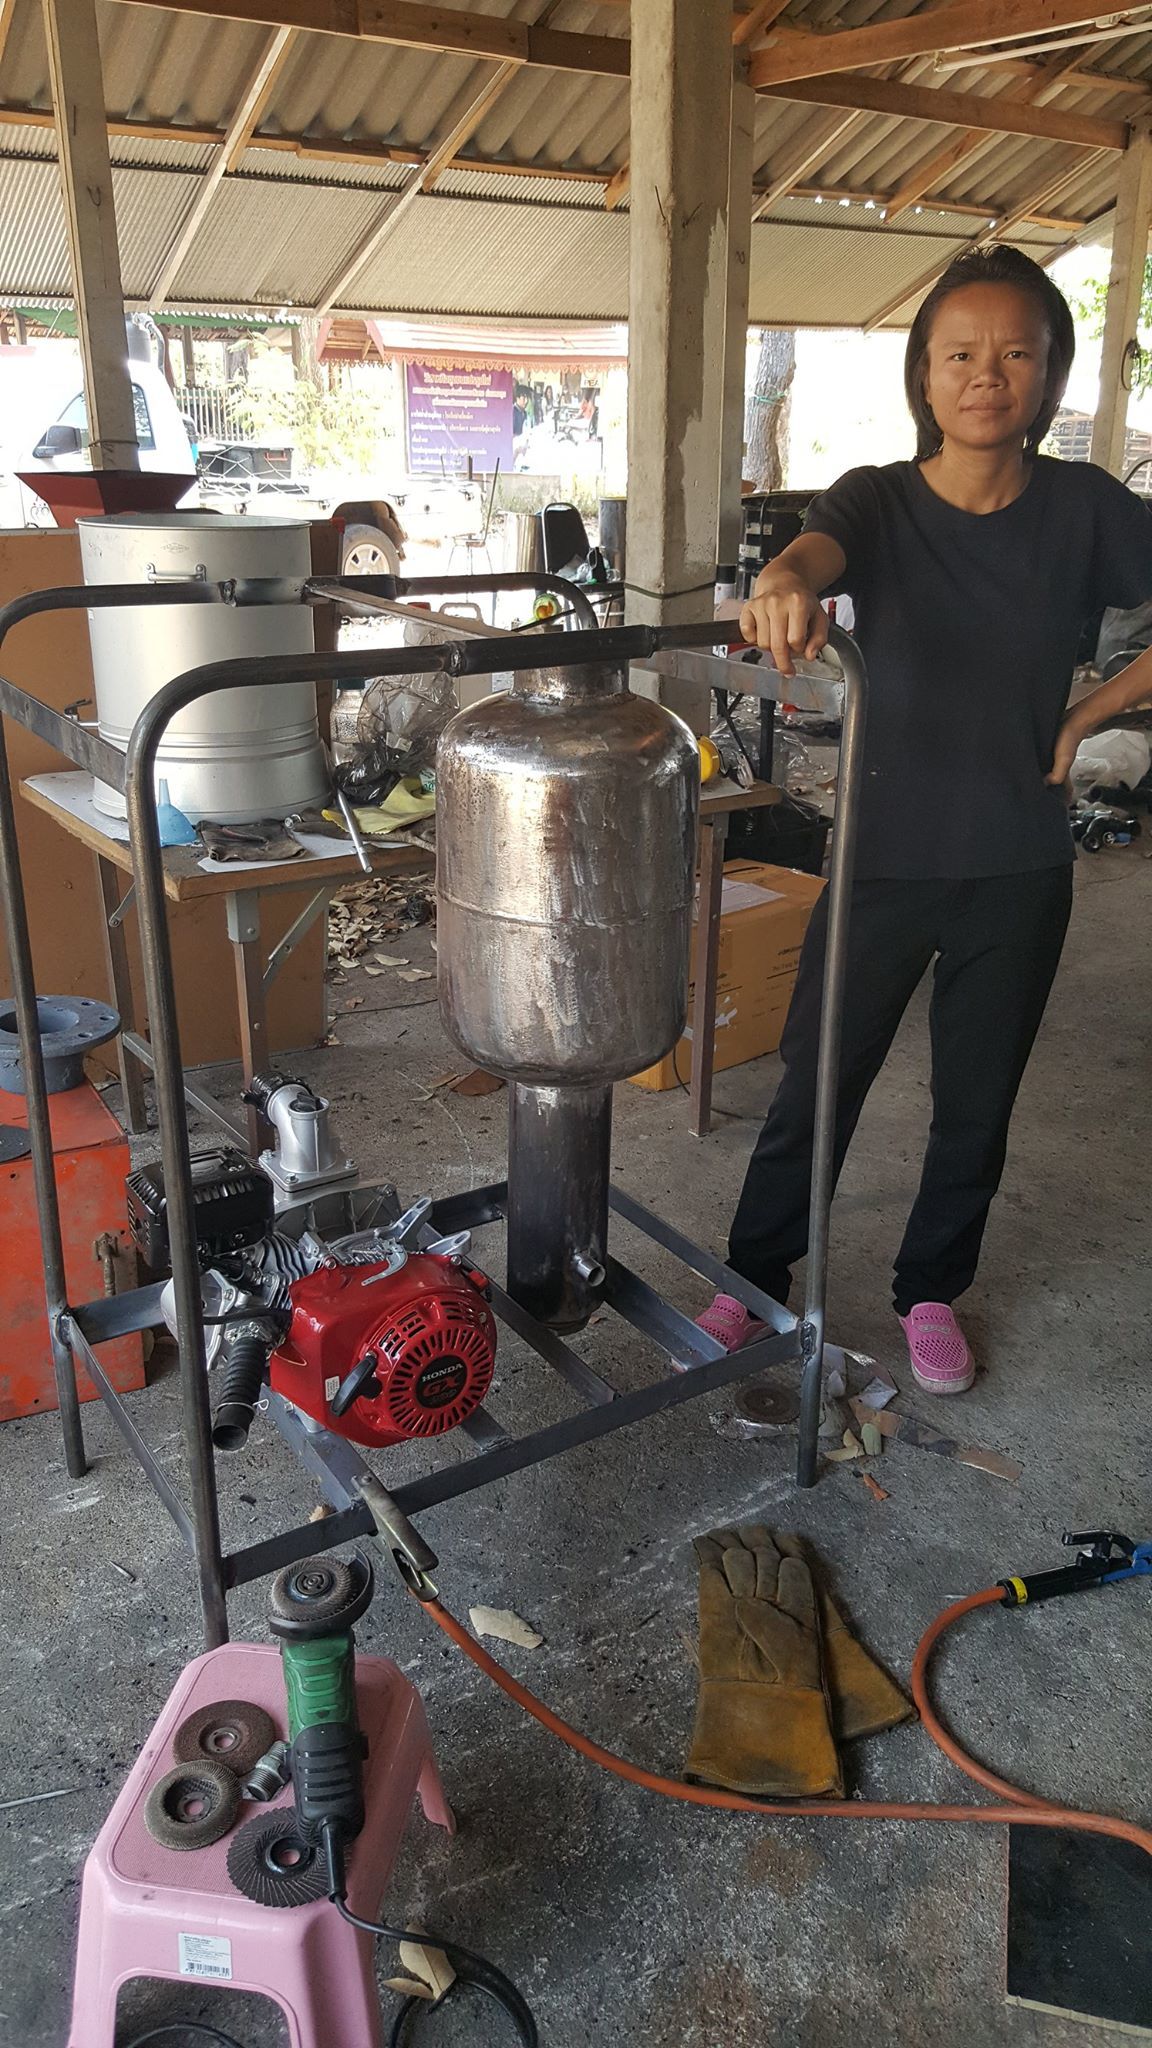
If I understand you correctly, you are saying that the charcoal fuel level has to stay about 20" above the nozzle to keep the outlet gas properly cooled? Is that the reasoning behind the long tube on the bottom of your reactor below? The propane tank on top is acting as a fuel hopper that keeps the tube filled up? What sort of run-time did you get with that quantity of charcoal?
Gary puts a pipe coupling through a piece of metal plate that is curved to match the reactor wall. The coupling is welded to the plate so that threaded nozzles can be replaced on the inside and the outside threads receive plumbing for water drip and shutoff. This curved plate is bolted to the reactor wall and sealed with stove gasket. Jeff puts a couple of inches of refractory cement in the bottom of the reactor with a vertical hole for a nozzle. I like to use 2 pipe nipples opposite one another big enough to receive my pass through copper nozzle. I bore a hole through pipe caps, slide over the nozzle ends and fill the space around the nozzle with high temp putty. As the pipe caps tighten, the putty is compressed and squeezes out a bit around the nozzle to seal. The pipe nipples can be held in place with electrical connector lock nuts and high temp sealant or welded into place. My brother’s rig has a piece of pipe welded through the side of his reactor. A fire brick with a hole bored through it slides over the pipe and serves as a long lasting nozzle. Lots of ways to skin this cat.
Hello Carl , simple fire, and simple build , you said you dont mind the run time as long as you can get 1 hour , so my suggestion would be to grab a hold of a small drum , i started with a 25 litre drum with a lid then i went to hardware store and bought some 25mm galvanased pipe fittings with nuts , i then drilled a hole in side of drum and inserted 1 of the threaded couplings and with a large 25mm nut tightened it down onto the fitting against the drum , applied some high temp silicone around the outside , i did the same to the lid as that was my gas outlet , and just used some 1 inch hose pushed down over the thread of the fitting with a clamp to get good seal and then onto a filter bucket and onto the engine , back down on the nozzle end i cast a nozzle in a tin can with a piece of pipe in the middle that was a push fit into the galv fitting screwed onto my barrel and thats it , that is all there was to making gas and running an engine for roughly 1 and a half hours hours , no welding at all and as long as you dont let it get too hot the pipe stayed ok , the lid seal i just used high temp silicone that had gone hard around the lid and pulled tight with long springs from top of drum to bottom .
But if i were to build one now i would always make it so the nozzle is pointing upwards ,even if you go in on the side try and get a 90 deg bend so that it points upwards and it will increase the lengh of time your nozzle lasts .
have lots of fun and show us all the photo’s
Dave
You can start without a hopper and keep the pipe straight for your first tests, runtime about an hour or so, but same principle.
here a clip running the straight with a 2,5 kwh generator (7hp)
Hello everybody, thanks for the useful info. I am starting to get a picture in my head of what I would like to build. I will make some sketches when I get some free time - the grape harvest is not far off, so I am going to get pretty busy here for a while. I did pick up a steel ammo can (50 cal square box with gasket) that I am thinking of using as a filter. A quick search of the forum made it clear that I was not the first one to think of it. I will poke around and see if i can figure out what has been tried. I was thinking of maybe brazing/welding a cyclone filter to the bottom of it, though, and then plumbing the cyclone straight to the top of the reactor with a thin walled steel tube. I am going to have to go down to the steel yard and look for a section of 5" pipe for the hearth section of my reactor.
Koen: I was thinking about this design you posted:
Instead of wrapping the hearth section in pipe, what about wrapping it in a slightly larger sleeve? You would leave enough of a gap so that the cross section (seen from above) between the hearth pipe and the sleeve was about the same area as your nozzle. The sleeve would be sealed at the bottom, so your draft air would have to be sucked down along the hot sides - preheating your reaction air and also cooling your reactor vessel. You could plumb in a port for EGR in the bottom, but I do see that adding water might be hard to implement. What do you think of that idea? For maximum efficiency is adding steam a must?
Thanks guys, I will be in touch again as soon I can!
Any idea will work, but only will work if you have your char glowing… ( starting point)
I love not to preheat my air, since i want as much heat going in the glowing for charcoal as i can get, colder air gets more oxygen in a smaller airflow, and not blow away my charcoal with hot air and no burning…
It seems I maybe didnt understand the function of the stainless pipe that is wrapped around the base of the RET gasifier - is that only creating steam, while cool reaction air is drawn in from directly below the nozzle?
Indeed, your last observation is correct.
For your generator however , you can do without the steam.
I used the steam to drive a trike engine. My pumps and generators run without extra steam
Okay, I made it through another grape harvest - so now I should have a little more free time. I have been working on the dump loads for my photovoltaic system, with modest success. I have made enough hot water on sunny days to take a hot shower without burning any propane, but I have had to babysit it. I want to have my electronics do all the switching so that I can simply feed power into my batteries, and not worry about overcharging them. I have some parts on order to set up a switching relay to direct power to an air heater once the hot water heater thermostat opens. We will see how that all works out…
Anyhow, I did get a little bit of work done in the shop during a rainy day, and tried building a hand-cranked blower fan out of an old gearbox that I had (off an old label gluing machine). It has about a 10.5x gear ratio
I mounted a shaft on some bearings where the motor originally sat, and fabricated up a radial bladed fan. It is about 4 1/2 inches in diameter, and the blades are maybe 1" tall. I only put on 4 out of laziness, 8 might have been better.
I made a shroud, and brazed that to the plate with the inlet, then bolted the whole thing together. It should probably be sealed with some sort of caulking, but the performance does not seem to be good enough to merit putting more work into it - it just doesnt blow very much air.
I might play around with it some more, but I also found a couple of fans at Goodwill for inflating air mattresses or whatnot, which seems like a much easier approach. I got a 12 volt model and also a more powerful 130Watt AC unit. I remember reading that it is important to be able to adjust the airflow of the blower to match the engine, can that be accomplished by reducing/throttling the opening or exit of the blower, or is it easier to adjust the speed of the fan? On DC I would think fan speed would be proportional to voltage, but can you slow down an AC fan?
I am looking forward to a couple of rainy days to read some more posts.
I have used a router speed control (SCR circuit, I bet) (light dimmer basically) with some luck with AC universal motors and a little less luck with small blower motors.
I like the anvil! Usually the horn is all beat up and by the taper it must be an older forged anvil as opposed to a modern cast steel one. Does it have a good ring? Have you built a gasifier yet? Just curious why you are working on the blower first. The air mattress blower you got at Goodwill is fine. Forget about the 130 watt fan as it is too big. It does not take much air to start up a charcoal gasifier. If you haven’t started your chargasifier yet I can give you a few simple step by step instructions that will have you making chargas quickly with little expenditure.
Gary in PA
Hey Gary, I built the blower mostly just because i had that gearbox laying around and i wanted to do something fun with it. I have not gotten any actual building done as of yet, and the powers that be have delayed the open burning season here and so i have not wanted to try and make any charcoal yet this year. I have been making char with a retort to use in the bbq, but I need to work on a good way to grind and sort it. I will post some pictures once I get something done.
Well I have finally managed to get a little bit of progress on my project, in a somewhat round-a-bout way. I got a free lawnmower engine from my brother who has a fleet of lawnmowers that he fixes up and sells. It needed a new recoil start assembly, had no carb, and had a bolt cracked off in one of the mounting holes - but the price was right. I cleaned it up, and built a plate to bolt on a tube where the carb would go - and brazed on some threaded 3/4 iron pipe to that. It now has a T, with a gate valve on one side that leads to an air filter, and a ball valve on the other to go to my gasifier. I forgot to bring a camera, but I will snap a picture tomorrow and upload of the current setup. I sprayed ether in the ball valve, closed it- left the air valve open and got it to fire right up, so the engine seems like it should be good to go.
I am curious however on 3 points: First this engine has a breather tube, which would normally connect to the back side of the air filter housing. I did a little reading about what they do, and I still dont quite get it. It sucks air into the engine during the exhaust stroke or something? Should I connect it with a short section of hose to my filtered air inlet?
Secondly, there is an engine governor. I am guessing from what I have seen so far that I can just disregard this, right? The control of the engine when running on woodgas will be limited to what I can accomplish by adjusting the air and wood-gas valves?
Lastly, the lawnmower has a flywheel brake, that also shorts the spark plug to shut down the engine. I am curious what the shut-down procedure is for a woodgas engine, and if I can dispense with this piece entirely. It would seem to me that starving the engine of fuel is going to shut it down pretty fast. Is there any reason not to just shut off the fuel valve when i want to kill the engine?
It sounds like you have a good start. The breather tube is just to suck blowby gasses from the crankcase, instead of venting them to the air. You can just ignore it. For experimental purposes, you can get along without the governor. Later, you may want to make a butterfly valve to replace the ball valve and connect the governor to it it you want to do real work with the engine. It shouldn’t hurt anything to just starve the engine when you want to shut it off.
Thanks for the input Andy, I have given some thought to trying to make a butterfly valve, but was not sure how challenging it would be to fabricate. Is it fairly straight-forward? The plan is to make the engine run an alternator to charge my batteries, so i assume it will be a pretty constant load on the engine - but do you think a governor would still be good to have? I think I might get a little section of 3/8 hose and a barb fitting to drill into the PVC just downstream from the air filter so that the breather tube is not sucking any dust or dirt or bugs into the crankcase.
Here is a picture of the engine. Its a B&S 190cc. I bought a pre-cut mounting plate that has universal grooves for both the engine and a 10SI type alternator. I need to fabricate a tubular frame to keep it from resting on the shaft.
My plan is to make a compact little generator, and an approximately equally sized gasifier to sit next to it. With only a single 1" hose to connect the two, it should make it really easy to keep it in storage and set it up quickly when i need it. I am revisiting the simple fire thread, then I will probably be back with some more questions.
Looks good! If you plan to use exhaust to control the reaction temperature, you will have another hose (metal flex) heading back to the gasifier and another gate valve. Interesting mounting plate. Does it come with suggestions for engine pulley size to create optimum engine power at required alternator RPM?
I found it at here: Vertical Shaft Belt Drive Generator Mounting Bracket Its sort of an eclectic website, but they have some cool stuff. It comes with no info about target RPMs. I suppose it depends a little bit on the specs of the alternator. I am going to start with a 1:1 ratio, and I am planning on maybe putting a tach on my engine, and an amp meter on my alternator. Once I see what I get, i can maybe try and change up the the gearing to squeeze a little more performance out of it.
Speaking of exhaust, have people found it to be an integral part of running on charcoal? Will the temps simply get too hot without it? I would be curious to hear what people who are running small engines have done successfully.
Making a butterfly that small might be a bit of a challenge, but can be done. Now if it was me, I would install that ball valve directly to the engine and the end where it presently is would be wide open to the wood gas hose. As you have it, you will need to adjust both valves together to change engine speed. It seems most youtube small engine players do it that way, but it’s not ideal. The way I have described, once you adjust the ratio of gas to air with the gate valve, it will stay the same. The ball valve will then serve as your throttle and only it will move to adjust speed.
Edit: the rest of your question. The breather hose would have a slight pressure if anything, so dust wouldn’t be an issue. Bugs on the other hand could plug it up. Running a generator you will definitely want the governor.
Interesting to see you are advancing with this OrCarl.
Keep an eye out for a free/yard sale cheap overhead vlave version of this B&S engine. You will pick up a bit’o power with less fuel-in useage. These have a stamped steel rocker arm cove on the end of the cylinder head. IF you were raw-wood gasifing these overhead valve types are easier to oopsi!, de-tar, de-stick clean up
Same plate mounting pattern.
Lawn mower engines use the attached blade mass as a flywheel to carry through the four strokes smoothly. Same engine on say a rotor-tiller/snow-blower will have a heavy-mass flywheel to do the same. Yours will be engine smoothed out with the alternator/pulley masses. Expect hand hurting cranking over jarring until you add this smoothing carry trough rotating mass.
Normal horizontally mounted auto alternators can be ran vertically.
The double ended ball bearing units will live longer turned sideways.
All mid-80’s Chrysler/Dodge/Plymouth/Jeep’s use a NipponDenso dual internal fan, double ball bearing alternator. External regulator units; so you can then add your own battery bank optimal three-stage marine/off-grid Better regulator. This is were to spend the money to maximize life on those batteries.
You will probably find running the engine at 2600-3000 rpm to be the best for power, and controllable.
Actual want to spin an auto alternator at ~4000rpm, or more (up to 8000 rpm) for best cooling and loads change power. Look at old riding lawn mower decks for larger diameter pulley for the engine shaft.
Carry-on to generating man
tree-farmer Steve unruh