Thought I’d post a video of a one of my early test runs.

Thought I’d post a video of a one of my early test runs.
Thanks much .
Your looking good!!
My trusty 8 hp Tecumseh HMSK80 quit on me during my last burn. It was my only running engine. The valve clearance is zero on both valves which I thought was odd, since it had run great for years. I would have expected too much clearance. I’m thinking I’m going to have to grind the valve stem .003" to .004" so I can hone the seats. Then regrind the stems to specs. Anyone have any other ideas on the reason for tight valves? My family has owned this brand new since day one and it has never been torn down.
I just received my 8" 3 jaw flywheel puller and pulled a flywheel with a sheared key. I set up and torqued on the bolt quite a bit until it popped off with a loud snap. It was so loud I thought I snapped the flywheel. It was fine. I did however find a keyway configuration I’ve never seen before. The shaft keyway is 1/8" and the flywheel keyway is 1/4". The key is one piece.
I’ve got a new fan blower to play with and adapt. It’s used to blow up play houses, etc, outdoor use, continuous use. I’m hoping I can control the fan speed.
Hopefully I can get up and running in a couple of weeks.
Pepe
Pepe, it looks like you could advance or retard timing depending on which way you insert the key.
Hi Don,
Thanks for the comment, it made sense, but I just found this gem this AM, after much searching
Pepe
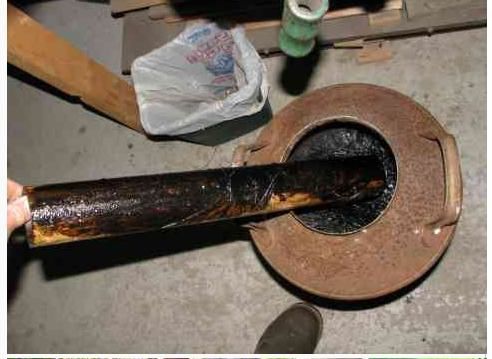
I finally got a few hours to set up my unit inside. I outlined all the bases on the floor with a magic marker for reference. Before I stood it up, I checked the burner to cyclone shroud gasket. It appears to have been leaking and gradually the heat ate up the wood stove fiberglass door gasket material I used. Thus the explosive flare starts I witnessed in the video I posted in my 08/01/2014 post @ 09:55 hrs. I’ll have to find something more heat resistant and/or reconfigure the connection. Maybe a sleeve type connection?
Here’s a short vid of emptying the ash collector on the cyclone with an appropriate notation to move on.

My next step is to layout the cooling tube number and locations on my monorator hopper. Later I’ll remove the preheat shroud and hoist the monorator hopper with burner unit off the base unit, check gaskets, clean out the char, etc. At this point I can also remove the hearth and check it or replace it with a different hour glass configuration. So far I like it just like it is. Gasket performance is my main concern. I’m also going to put a hinge and quick latch on the base cleanout door.
Pepe
Hello Richard
Valve clearance will get less as the valve face & valve seat wear.If there is no adjustment just grind a bit of valve stem.If you have no specs.,I wood say .008 thousands for intake valve and .010 for the exhaust.And it will be just fine.
Calvin
Hi Calvin,
Thanks for the info. I’ll take a look at the valve seats and valves. I’m curious about how much wear there is.
Pepe
Pepe, THAT is a great looking machine!
I have been getting puffbacks on mine from air leaks too. I don;t hardly flinch anymore. Most are from not emptying gas first or trapping oxy in start-up.Operator error. I have been experimenting with my adapter sleeve and getting anywhere from ‘less than good’ to GREAT! results. I’m learning the machine much better. I wish I had made mine more disassembly friendly like you have. Next one I will. good luck to you. Gordon
Hay Pepe; Where I have steel to steel flanges and I want to seal them I get a product from Manards
Be sure to read what it says. There are several that look just alike. The one I uses says good up to 1375 degrees. I don’t think it is flexible. It drys hard. I have to take a wire brush on a drill to clean the surface after use But, when you have bolted together flanges, it seals them very well.TomC
Pepe,
That’s interesting how some of it is still intact. Could it be possible that a small air leak developed where the two ends met together and just got worse with time? I remember at one time Steve U telling me that if one is going to use a gasket, to spend the money and get a continuous gasket. Of course he told me over a year ago, so I may be remembering it wrong. But I’m wondering if this is the reason? I also remember him telling you to put two rows in to balance it out.
While I agree with your other advice I would tack weld a nice fitting sleeve inside of the outgoing side of the gasifire before the joint until after the joint as a heat shield. I did this on my flanged crossovers but inside that I made a double walled insulated pipe as well. it is about 5/8" thick filled with mineral wool. It is ready to bring outside and crack off but I am waiting for temps to get up in the 20s so a guy can spend the day out there. Was looking for a pic but I need to get a new cord to upload them. Dam puppy but in his defence it is the only thing he has destroyed.
Hi Jim,
Thanks for commenting. I did mention a sleeve connection in my post above. I thought it would do just what you mention as a heat shield. Man, if it’s not one thing, it’s another chewing up the hours, lol. This is the first time that gasket has been destroyed. I think the shield fitting into the outgoing side is correct also. I will try it using the same gasket material also. The cyclone shroud is relatively easy to R & R.
Pepe
Hi Tom,
Thanks for the link. I found the 1375 degree F stuff. If my sleeve doesn’t work, I will give this stuff a try. I just remembered there is also a firestop material that we used on the NYC and LRR cars we built in Plattsburgh, NY. I’ll have to get some specs on it from my former QA team members. It was a red moldable material. Can’t remember if it eventually set up, though.
Pepe
Hi Bill,
Thanks for commenting. That’s what I love about this site, there are many folks jumping in to help. I think that’s exactly what happened and I agree that a single piece gasket would be ideal. I’m hoping the firestop I mentioned above will fit the bill along with the sleeve. I had added the double gasket and Steve noted the added advantage of equal pressure to keep the joint tight.
Pepe
Thanks for the update. I haven’t taken a long look at the site yet, but I will.
Pepe, I used stove rope and the 2000° adhesive that came with it from Menard’s. I worked the adhesive into the rope first let it dry a little then slight even pressure when I assembled to let it dry. After it had time to dry is when I snugged it up. Seemed to work.
Hey Gordon,
Thanks for the compliment. It’s been almost 2 years getting to this point! I went back and reread your blog looking for clues to performance. Your post on 12-30-2014 @ 0945 hrs reminded me of my post on 12-28-2014 @ 1347 hrs. Your firetube diameter is also your “nozzle ring” diameter. As a beginner “slicing and dicing” 100 lb propane tanks I had yet to start considering fuel flow. Pic 1, I just joined some “stuff” together and the 2 ridges inside the tanks provided a hangup spot for fuel, first bad. Pic 2 further down the the curve of the tank provided a “shelf” for further hang up possibilities just before the firetube entry. We seem to have similar “hang ups”. Pic 3 shows my nozzle protrusion necessary to get my nozzle diameter to the “imbert” specs on the chart. My firetube is 9 3/4" diam. I followed the chart because I didn’t know where I was going really. Smaller fuel and Dan Cox’s hopper vibrator seems to have resolved the bridging problem for me. Hope Murphy didn’t hear me say that!
And of course, my biggest hangup, ungasketed drop in hearths, etc. This is the only performance issue I could see, internal leak lets gas bypass the reduction zone diluting your gas.quality. Some will poopah this, I say why chance it… Your hearth diam and height above the restriction are almost 1 to 1 which I believe is close to a standard ratio, so that’s good, imho. Smaller fuel is a definite must considering the ledges,etc. I’m presuming you’re making a separate drop in with flange for your different numbers trials. Let me suggest that you layout a hole pattern on the flange for bolting the flange down using a suitable gasket material. I would look for a flat wood stove type gasket wide enough to put your bolts through. Double it up spacing the joint 180 degrees. I’ll try to find a source for the flat gasket material.
Drill the flange holes, drop in the unit and using the drill, mark the locations. Don’t drill the same size hole, these holes will be tapped and require a different size bit. This should eliminate that joint as a source of “internal” leaks. Nick a reference mark on the flange and the mounting base for quick and easy line up of parts. Make a full size pattern of the bolt pattern and use it on all new flanges. Insert your drop in and mark the hole locations where the drop in will go. Drill and tap these holes. Now your new trial flanges will have the same locations to bolt to. Don’t forget to reference these flanges to the original index marks.
First pic is the beginning of my slice and dice trip on propane tanks. These are still parts of my present gasifier! I thought you would appreciate the design changes I’ve been through.
Steady as she goes, Mate.
Pepe
Thanks everyone for your comments, every little bit helps.
I’m going to install the top end of my cooler tubes on an angle to match the hopper lid. I figure the gas is being deflected in that direction why have it change directions again and create turbulence. Again, every little bit helps. They will be 3" wide, 2" deep and 16" from tip to tip. I’m working on the area, will post later.
Pepe
OK, it’s later. The area of a trapezoid is (base 1 + base 2)/2 x height
The area per tube is approx. 1.25 sq ft. Adding 4 tubes will add 6 sq ft. or approx 37% increase in surface area. 6 tubes approx 47 % increase. More than likely I’ll use 4 tubes.
EDIT I erred, 4 tubes is only 5 sq ft or approx 31.25 % increase.
The initial area of my monorator is 16 sq ft.
Hi Pepe, You are very observant…I was having air leaks and diluted gas from a non-gasketed adapter “drop-in” hearth. I like your idea about securing it with bolts. I wasn’t getting accurate results so I just pulled the adapter out and put dropped my original choke 2-3/8" in. I ran some hardwood trim pieces ‘smaller’ and was amazed at the quality of the gas! I didn’t have to shake the machine to cure bridging and overall flow was great.I killed my flare and put a paper towel over gas for 30 secs and had no soot to speak of. I had full conversion going as far as I could tell…very little filtering. Very hot exothermic burn inside and gas exiting was very cool going into the dropbox.
I have been doing other things around the house and haven’t been working on the machine for a week…argh! I will update soon Gordon
Ps. Amazing how similar our builds are.
Hey Gordon,
Every time I re-watch a video I seem to find another nugget. I’m talking moisture. Are you still running the gas to the filter first? Somebody may have already noted this, but if not. I think it would be advantageous to run the gas to the cooler first, wring as much moisture out of it as possible before sending it to the filter. The tar in your filter is on its way to the valves. You’re correct on the not cracking tars, heat relationship. Definitely been there on that one.
I have an idea where you have to only drill one set of holes in the mounting base and bolt on a “clip” to hold down the new flange. Just keep the flange the same OD on your experiments. I also show how I added my airtight ignition port, yours may be a different size. Next time I will make mine bigger, minimum 1" clear opening for easier lighting. Have fun.
Pepe
EDIT I would make the hold down clip 1" wide, not 1/2".