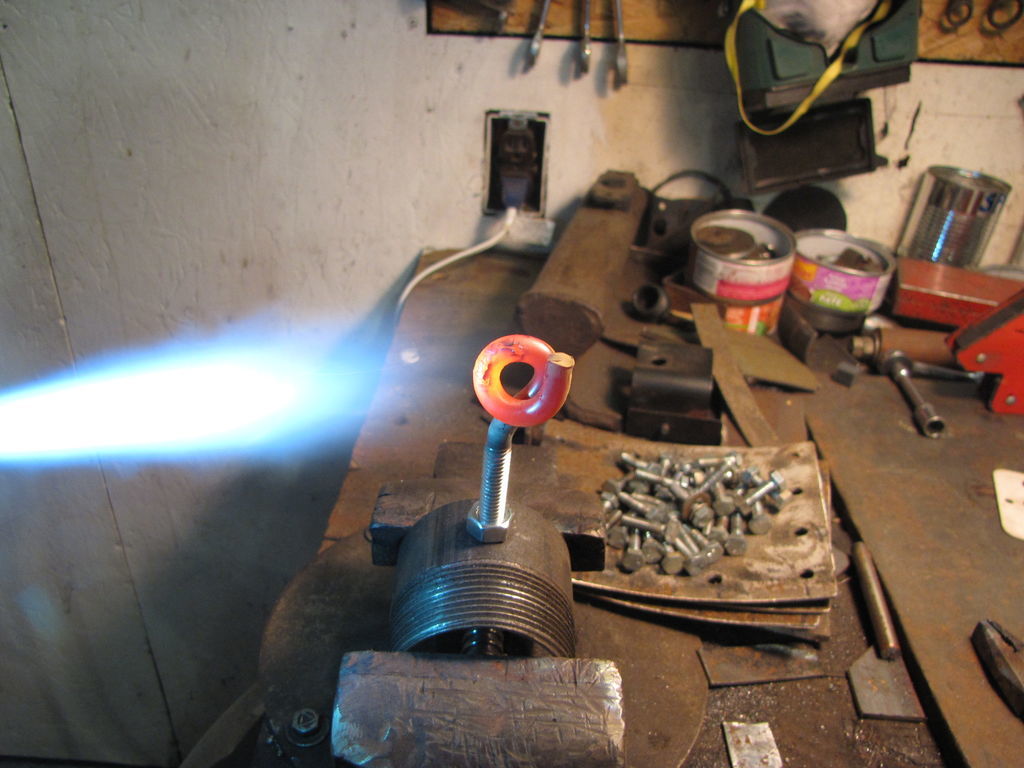
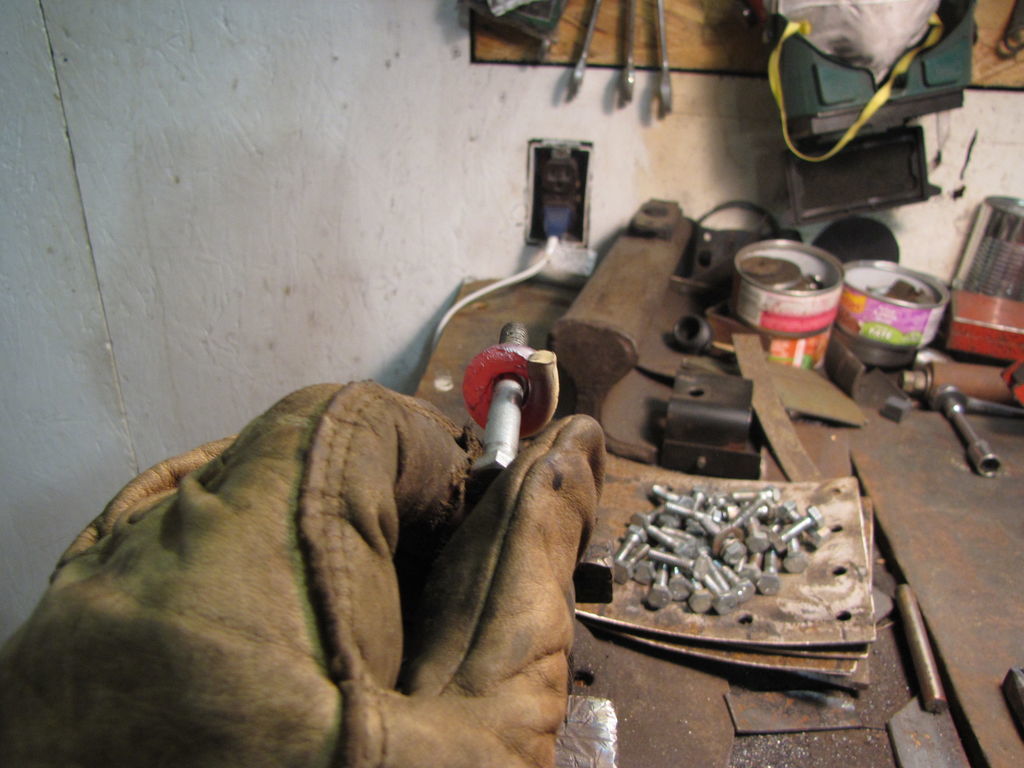
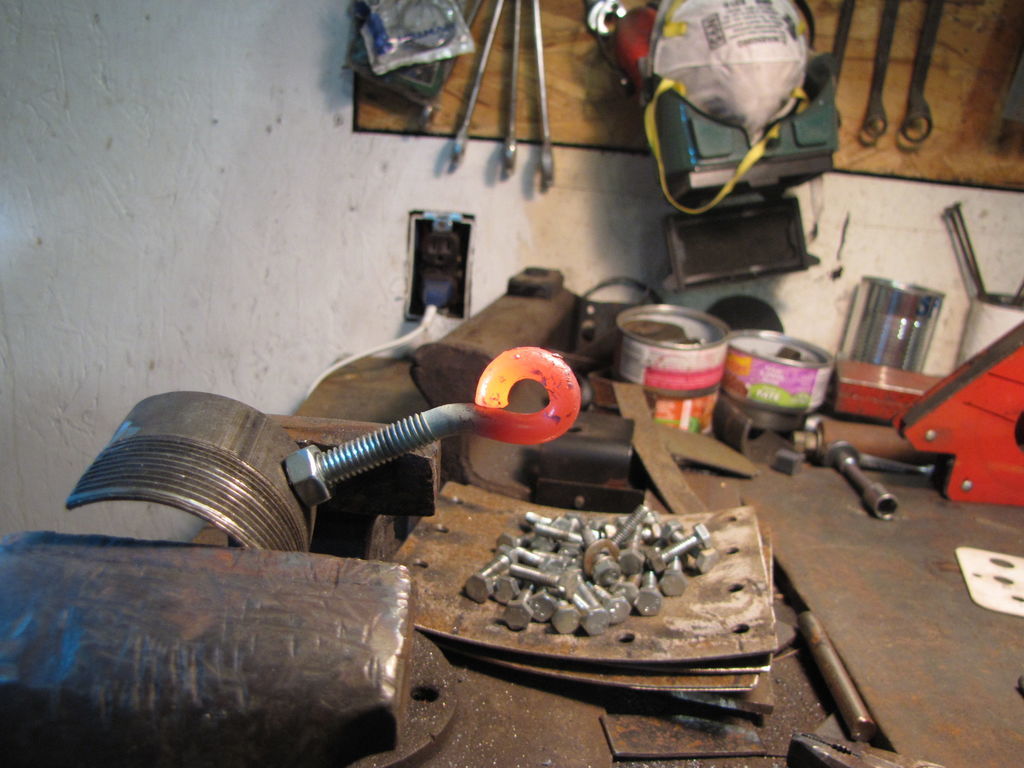
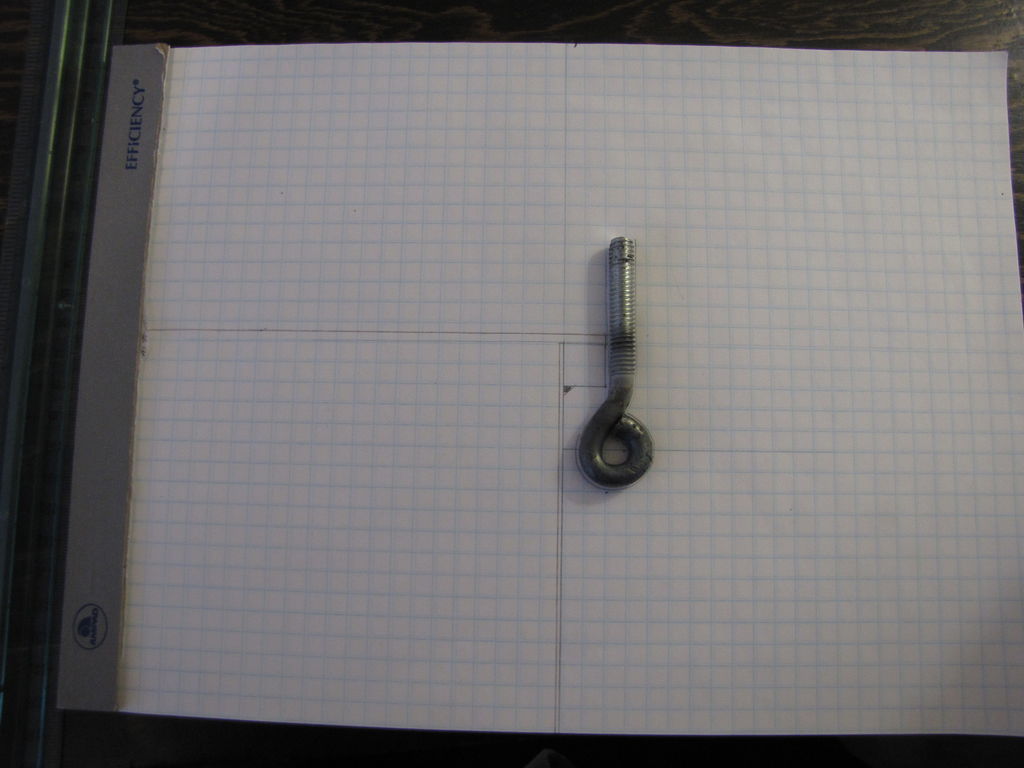
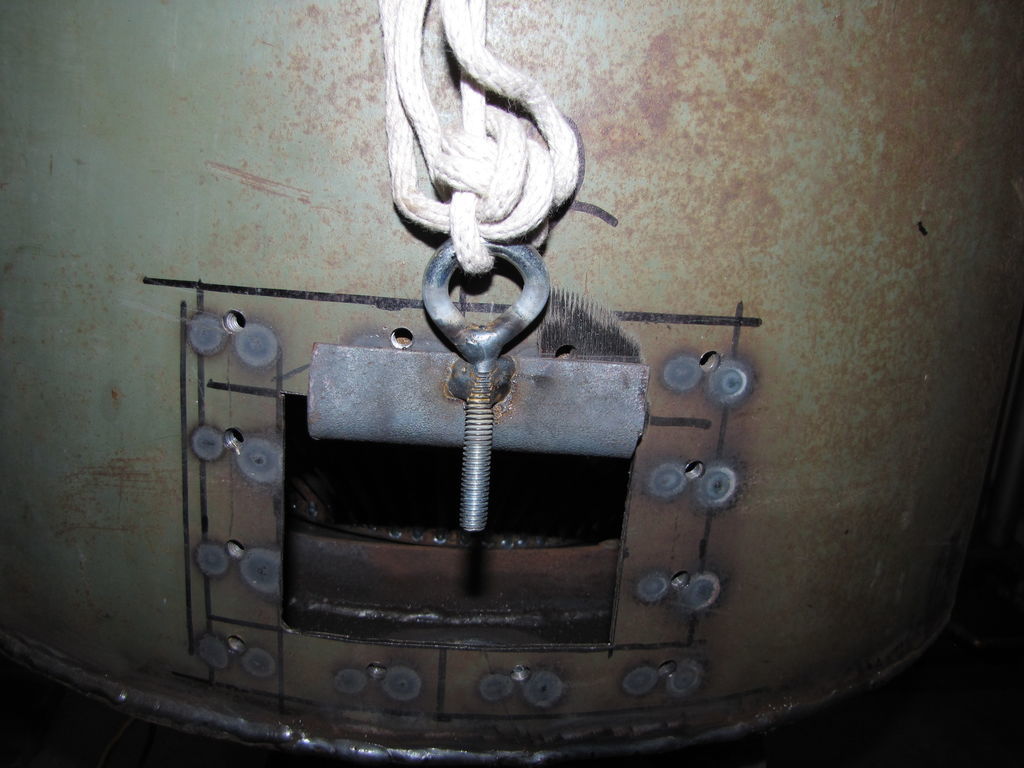
Worked on my eye bolts today and also got the 16 hinge brackets cut out and ready to drill. Pic 1 and 2 Used this left over tapped pipe for a setup jig for bending. Pic 3, 4, 5 Heated the bolt and bent it to fit the bolt pin. Then I cut it flush and realigned it. I measured the cut off piece and cut all the bolts to length and finished the bending. Pic 6, 7 I laid the finished bolt on my full size drawing and designed the hinge brackets. Tomorrow I’ll weld on the brackets, cut out the lid with slots and see how it fits.
Pepe

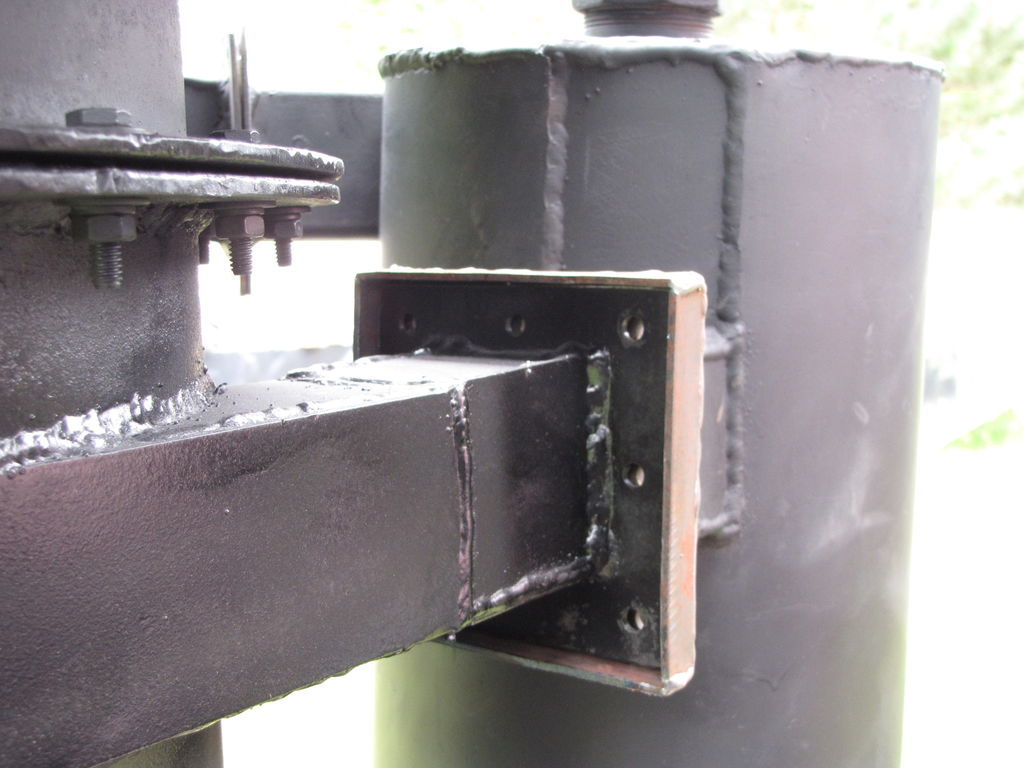
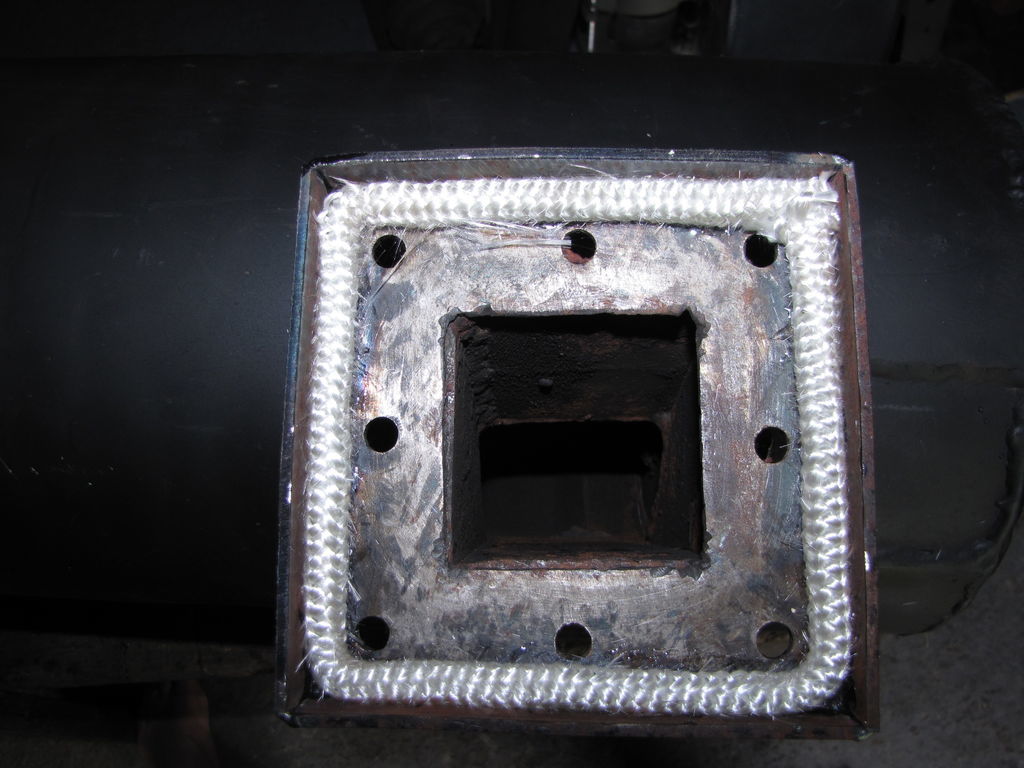
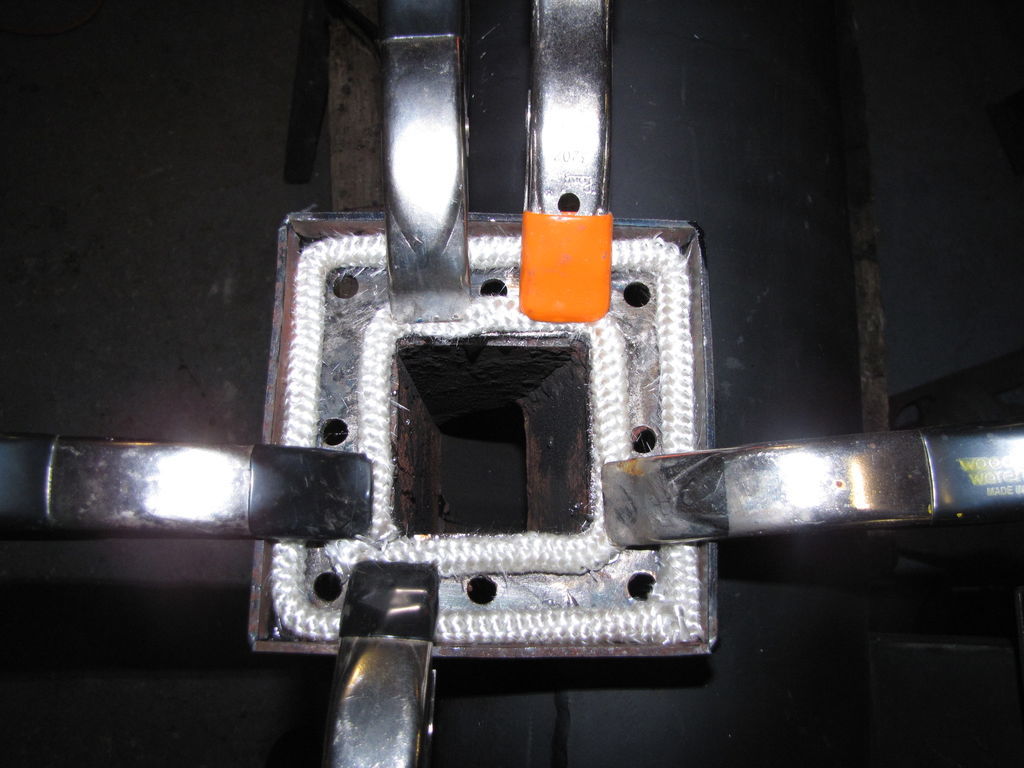
All I had time for today was drilling holes, ratcha fratch. I made up one unit for a fit. The angle cut fits over the weld under the lip. It seems to swing into place OK. Tomorrow will be a weld up day and cutout the cover. I will adjust the fit using the esna type lock nut.

1 Like
Looks good Pepe.
I’m a bad builder, I never make drawings.
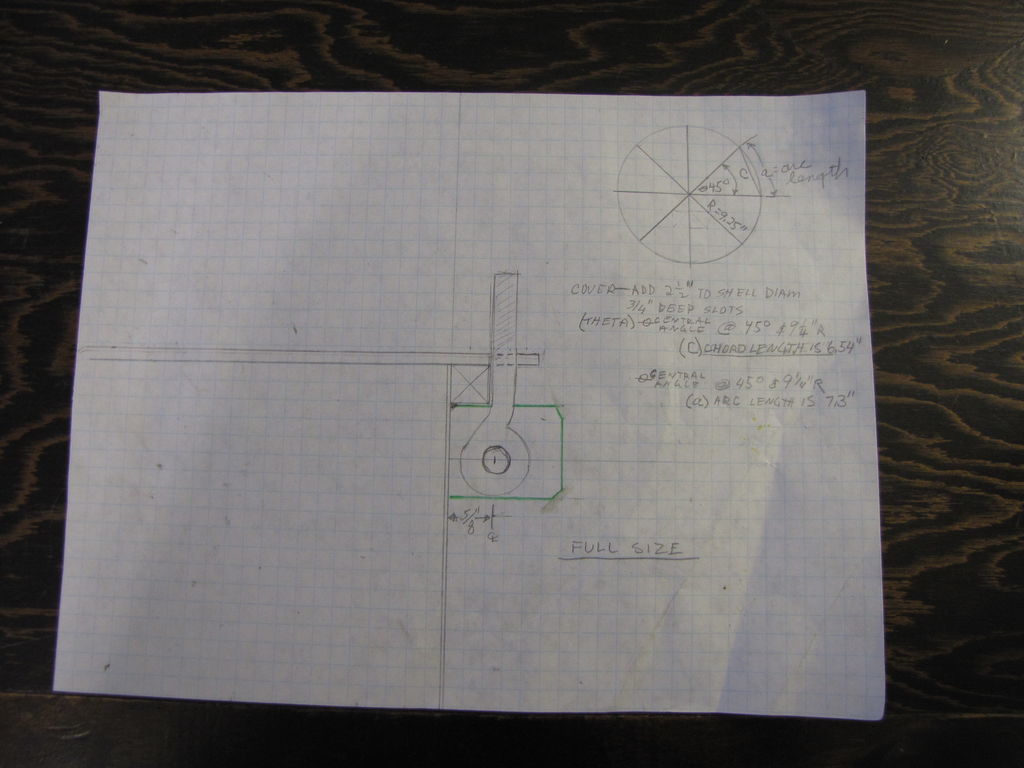
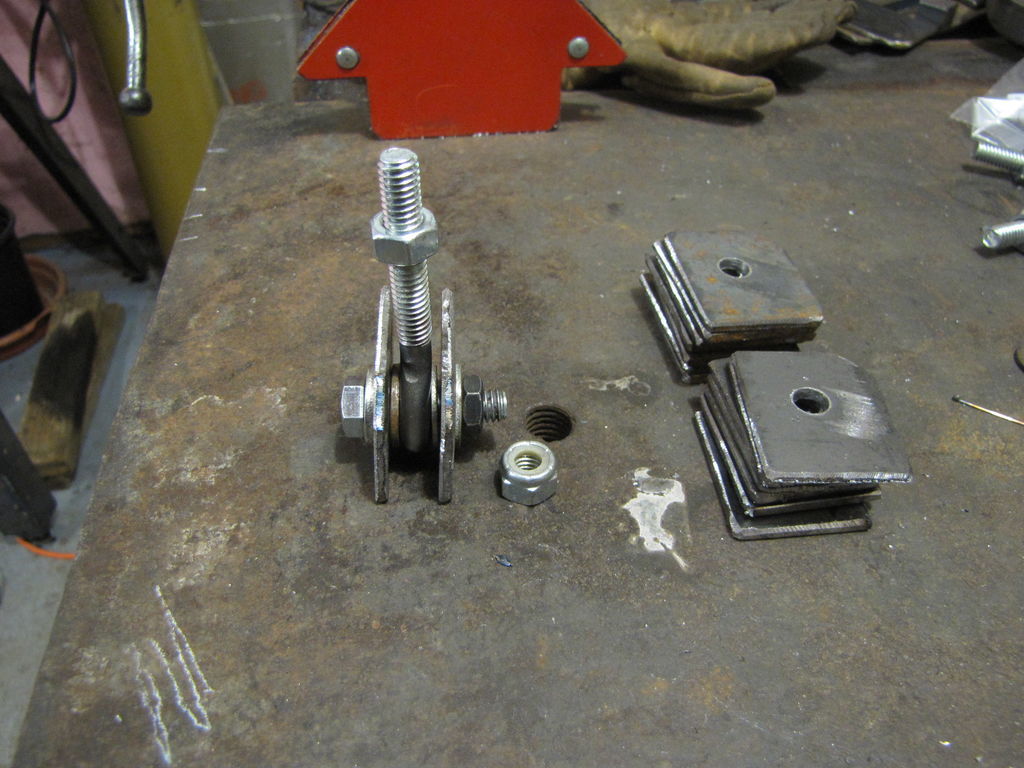
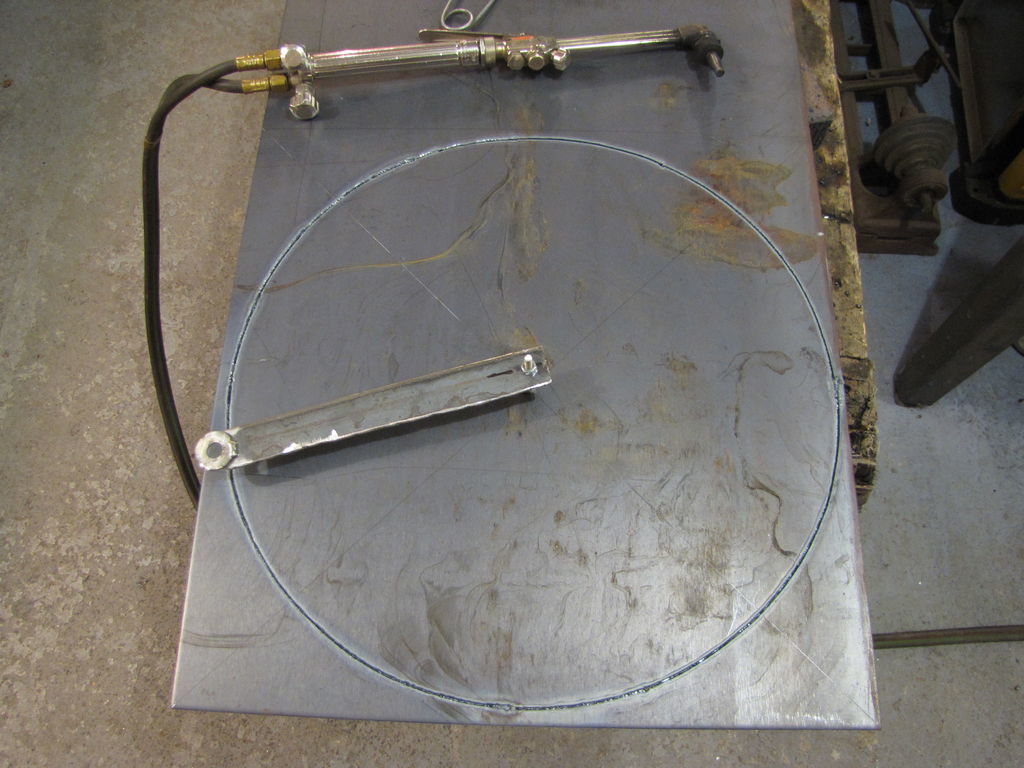
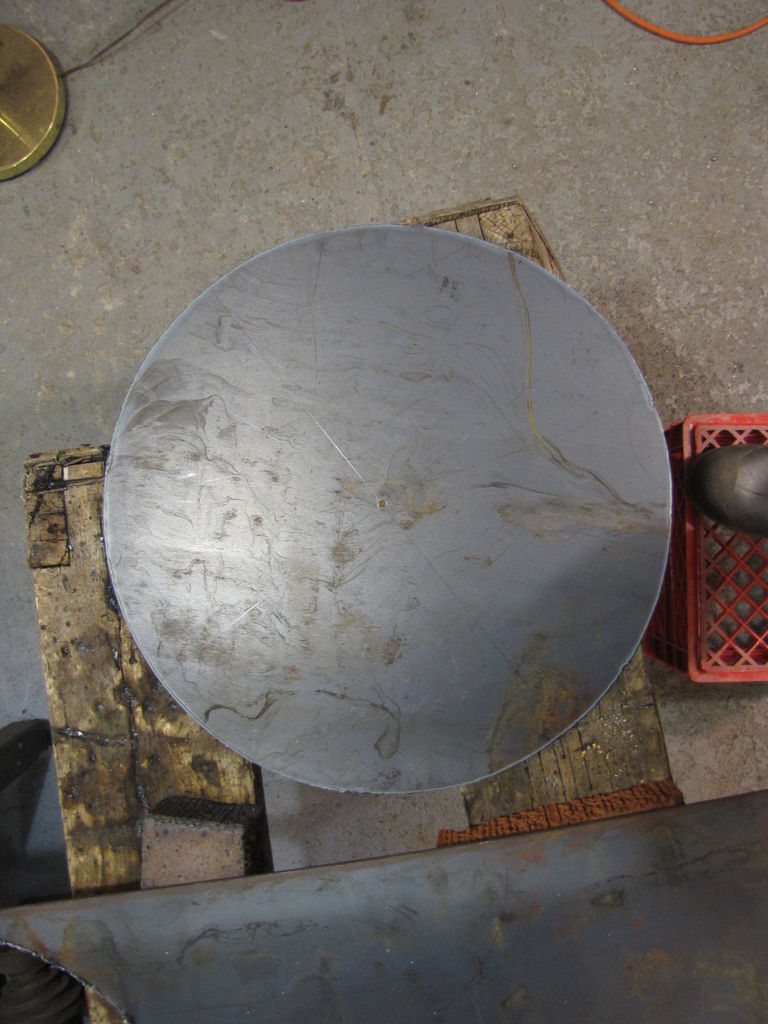
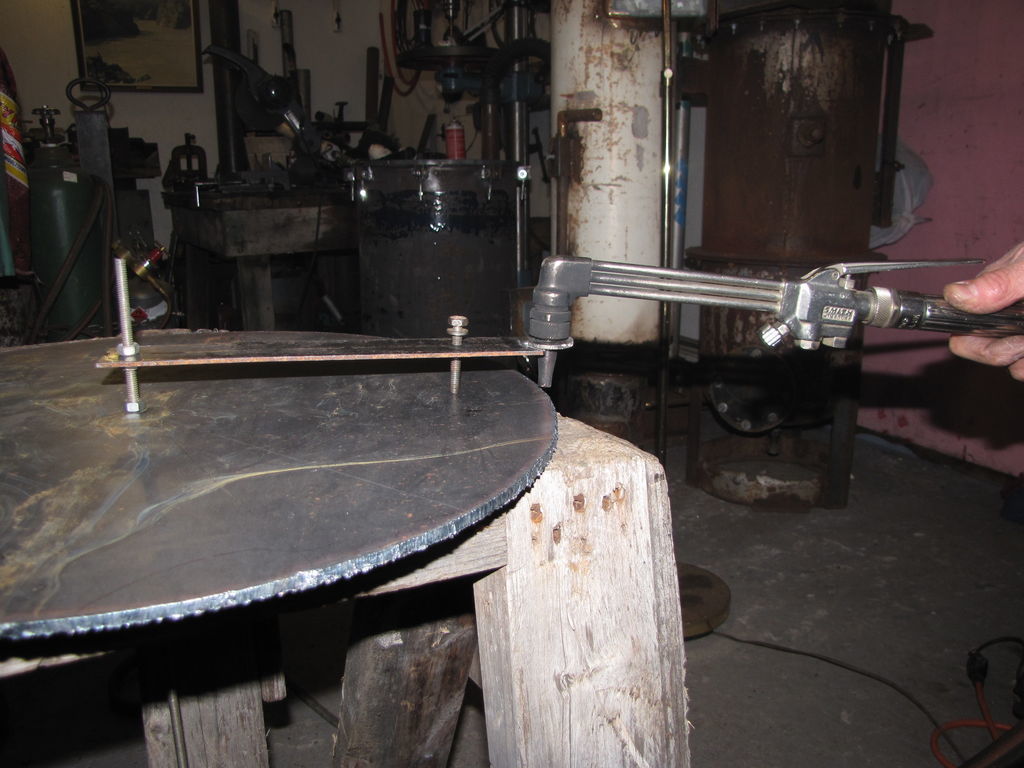
Thanks Bill. I use 1/4" grid/graph paper, it makes drawing full size pretty easy. Erasing is a lot easier than grinding off and restarting. Once you start drawing you will learn to trust the drawing concept. I didn’t start off drawing and wasted a lot of time and materials. Take my hinges for example. You can put the compass point in the center of the hinge pin and the pencil on any part of the hinge and swing an arc to see exactly if that part will hit any other part in its travel. It will help make you a better builder. Time at the drafting table/drawing board is never wasted, it just feels like it, lol. Then you can modify the drawing without a grinder. I finally got my lid hold downs installed. I made a cutting jig for my torch (OK, I didn’t draw it). Adjust the leg (the hole is threaded) and lock it in with the nut ( the nut is under the arm) so your tip is about a 1/16" to 1/8" above the plate. Use the correct cutting tip, pressures and speed for the material thickness. Keep the tip straight up and down. This is the best circle I have cut so far. I cut it before I thought of the leg and I had trouble holding the tip distance. Ok, don’t rub it in, lol, I’ll get better. I hope to get the slots cut today after Easter dinner. Hmm, good luck on that one, Pepe!

Hi Guys.
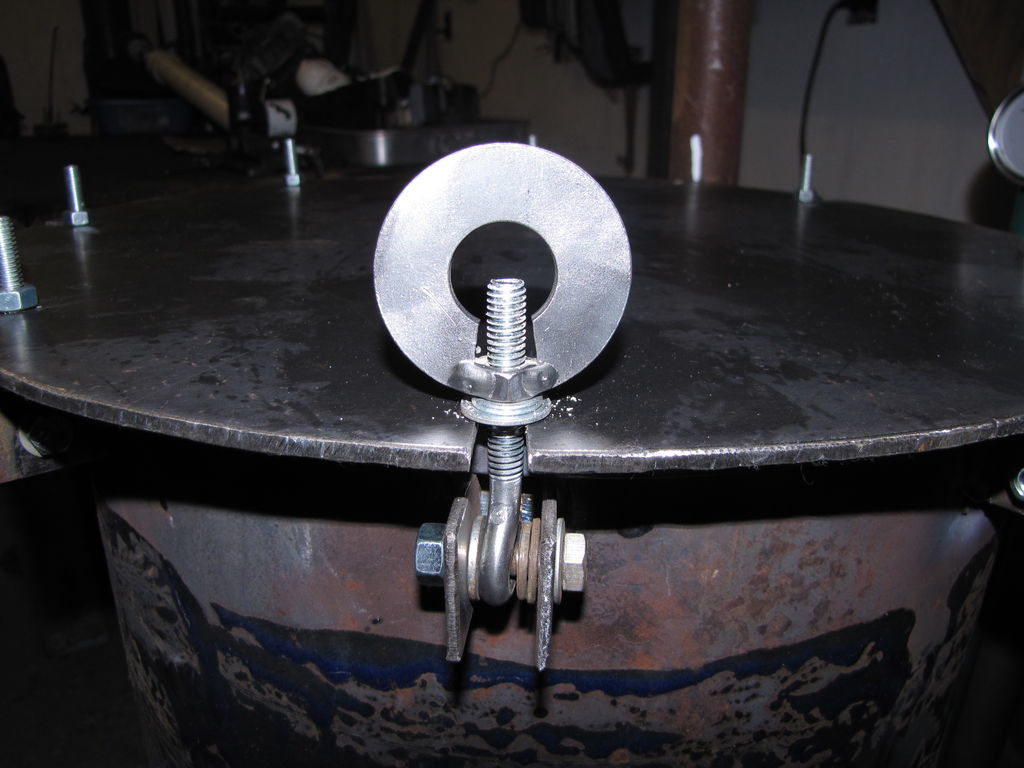
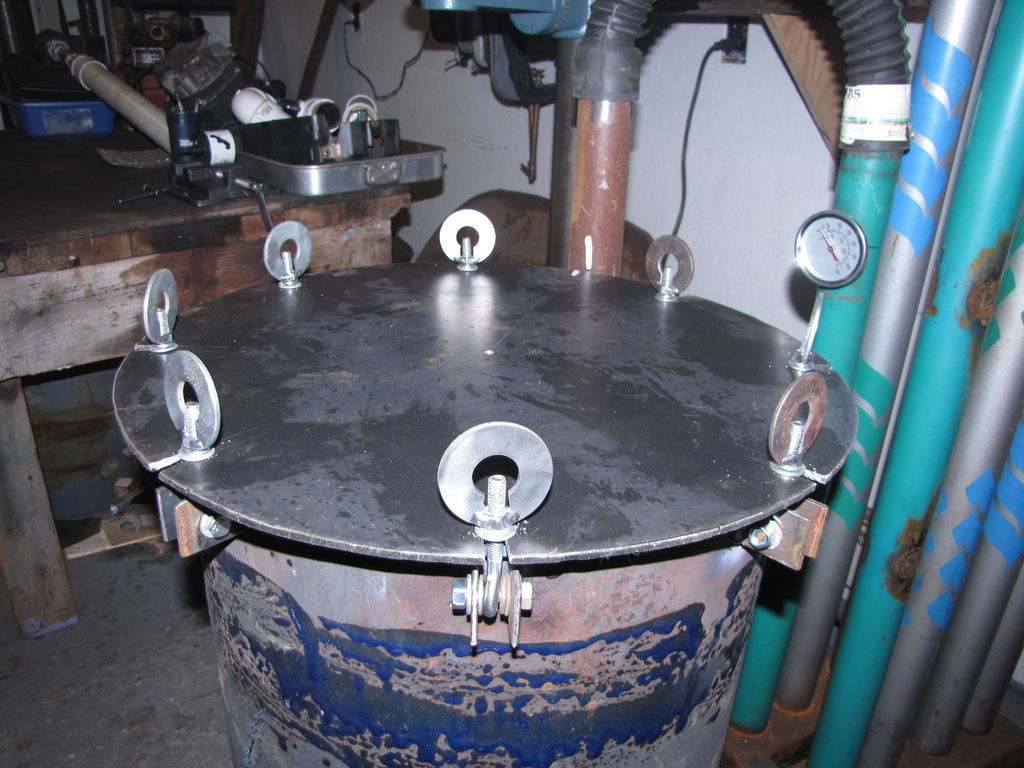
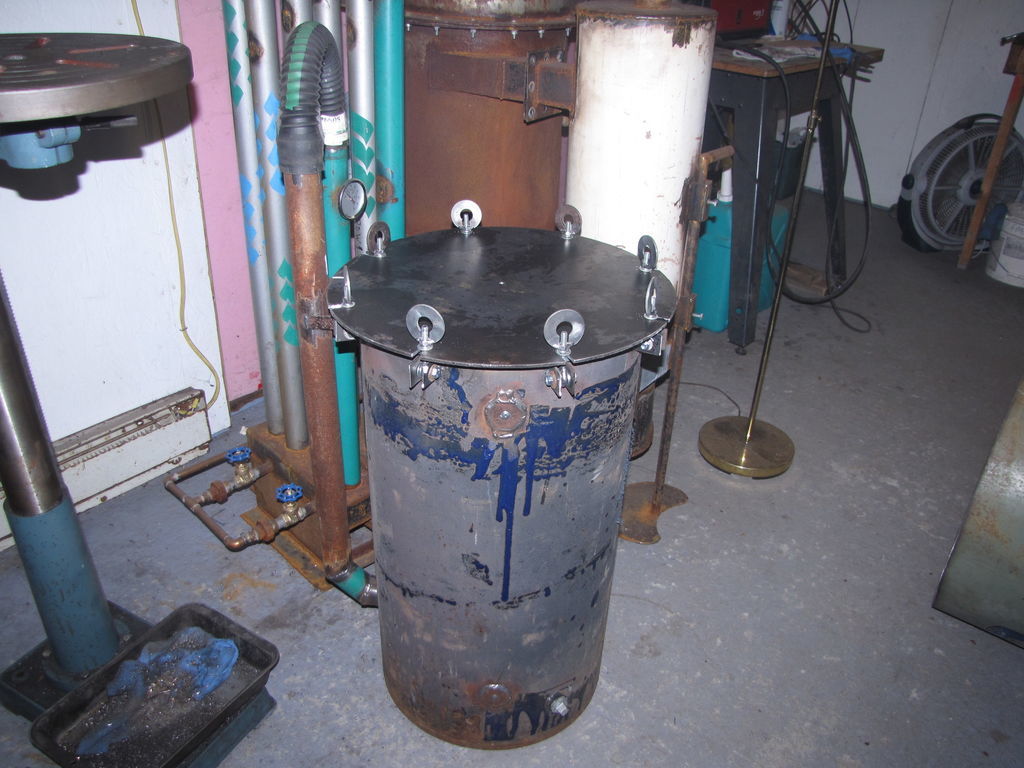
I tackled the lid slots and fasteners today. I think they turned out well. I’m getting closer to moving the setup outside. I ran out of flat gasket and the store hasn’t gotten their shipment yet either. Oh well, at least I can get my outdoor wood processing area set up. Oh yeah, I’ve had these huge washers sitting around for 20 years and had no idea where I would ever use them. Yes, I never throw anything away. Well, almost nothing.
Pepe

Hey Pepe;
Great use of large wahers. Looks very functional, easy opening, tight fitting and large access hole. Nice job. Dan
1 Like
Hello Fellow DIYers,
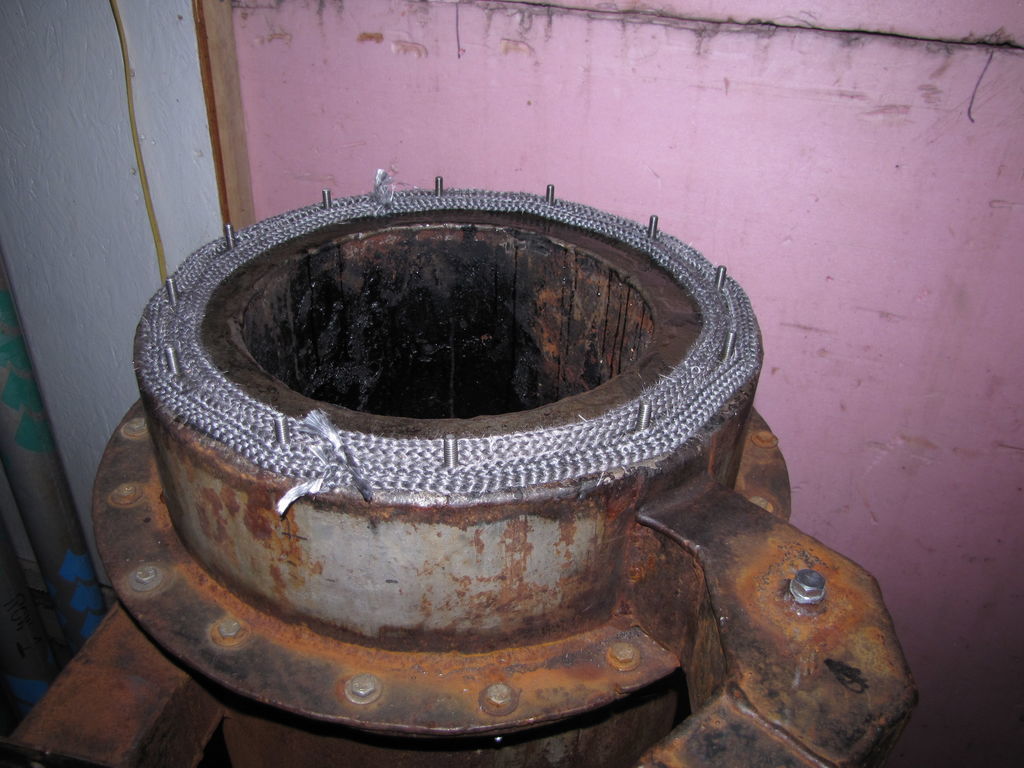
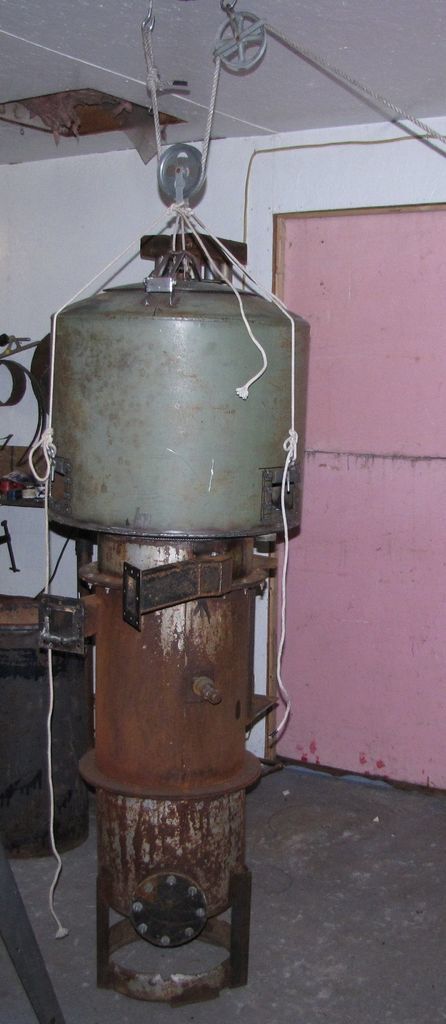
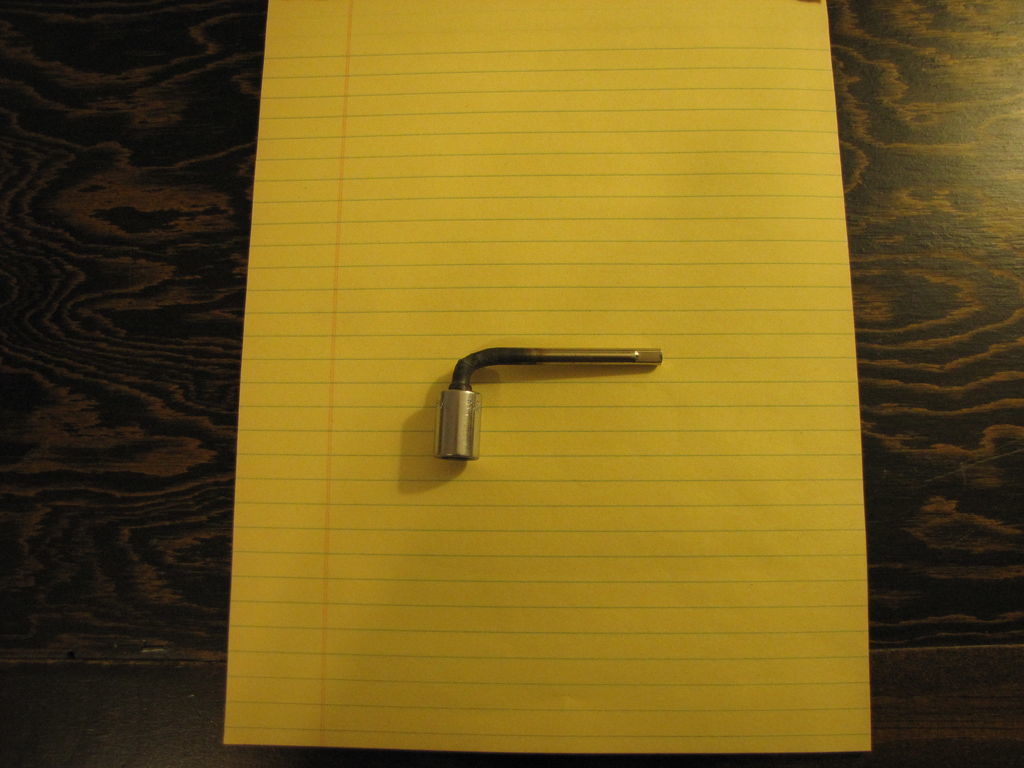
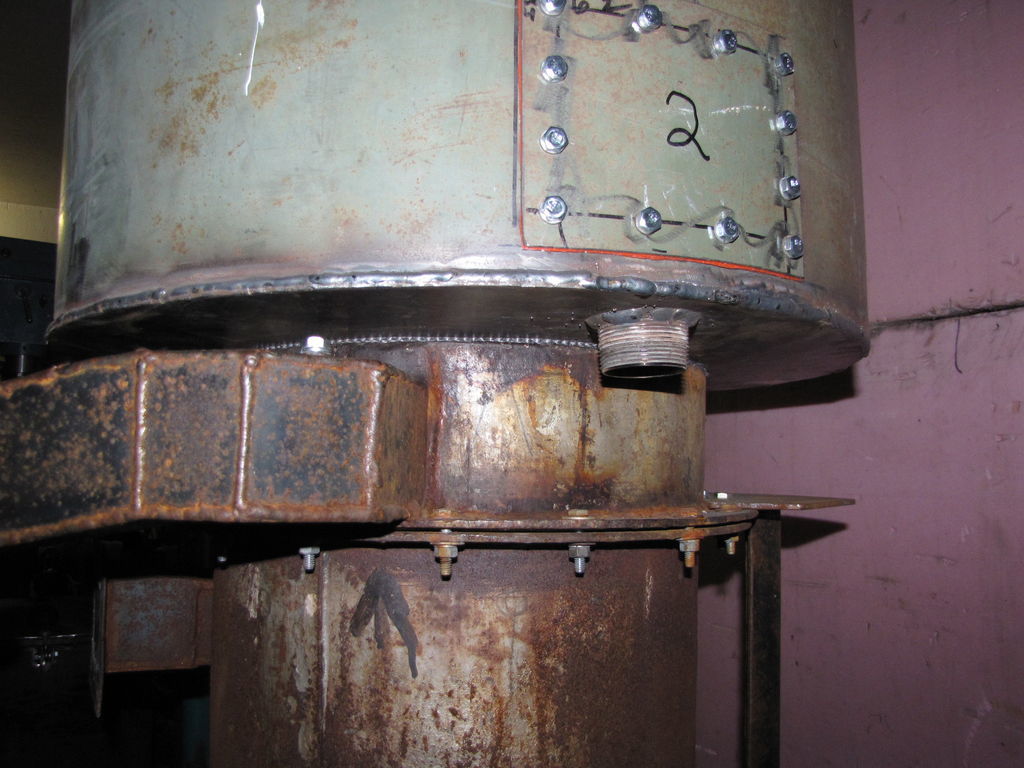
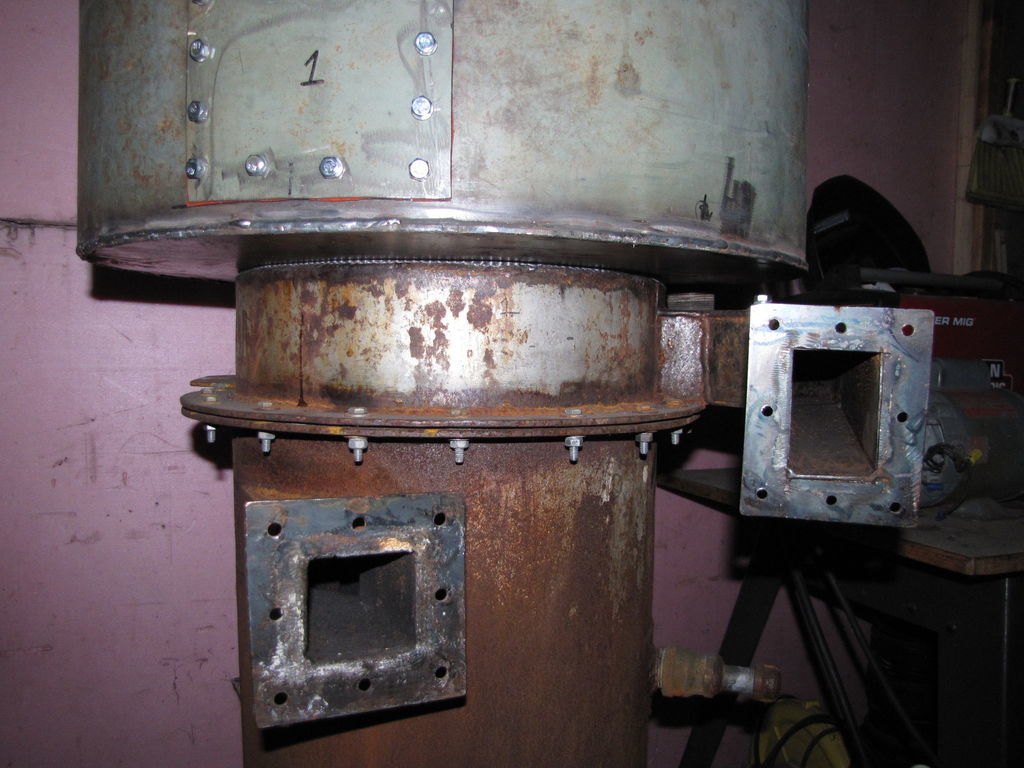
I made up some lifting brackets for hoisting my hopper. After hoisting I positioned the burner under it and lowered the hopper to 1/2" above studs. I jiggled the burner into position and gently lowered the hopper onto the studs. It dropped on the first try! Then the 25 min chore of tightening the 12 bolts with this small tool. Make sure “your” ports fit “your” wrist and arm! Actually, my new version will have a wider receiving flange and the bolts sticking down so the nuts can be attached from outside. The next pictures show the evenly seated rope gasket. The last shot shows the 12 studs, the condensate dam and drain hole. Will work the final filter stuff tomorrow and fix a small leak in one of my cooler manifolds.
Getting real close to fire now!
Pepe

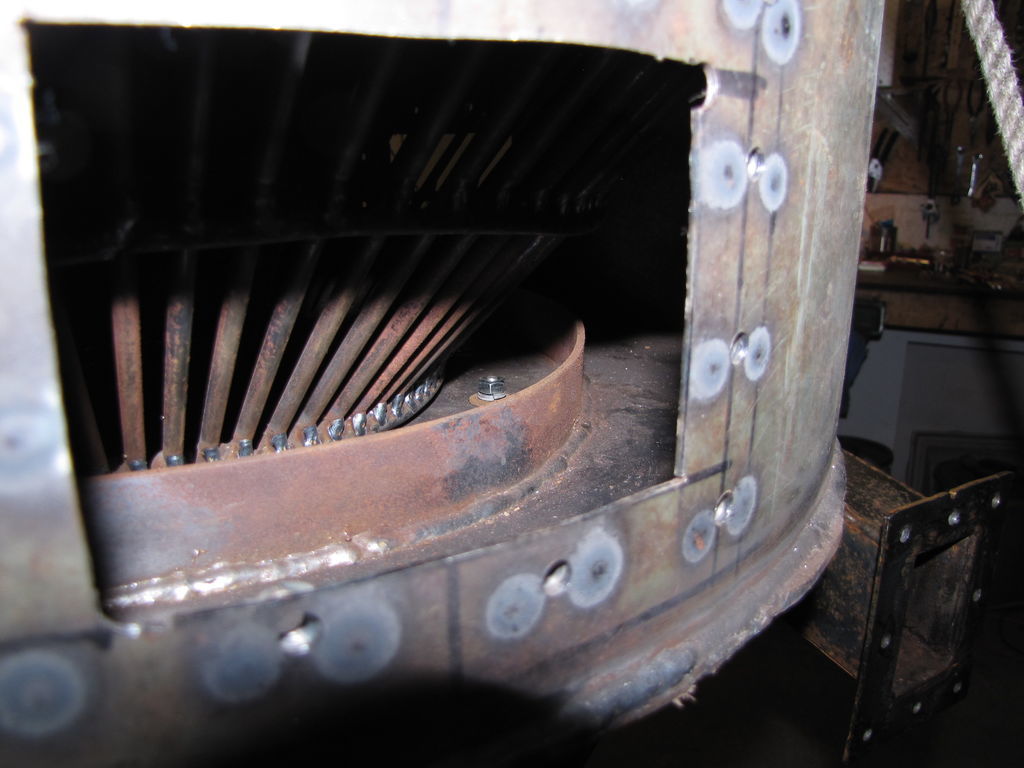
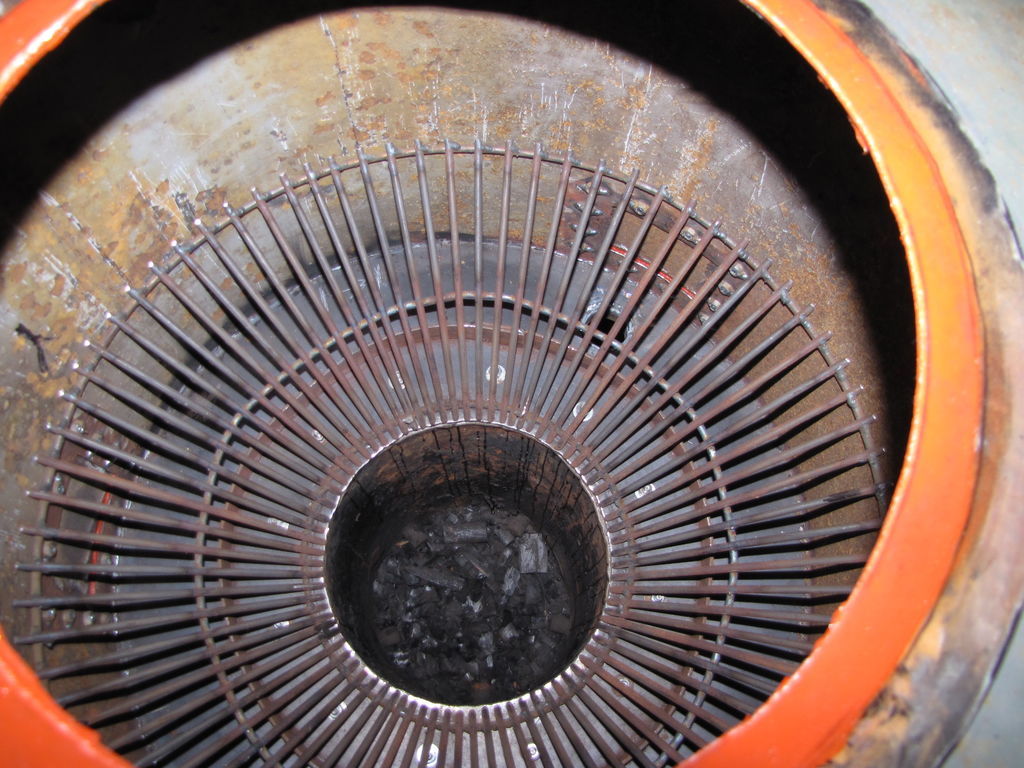
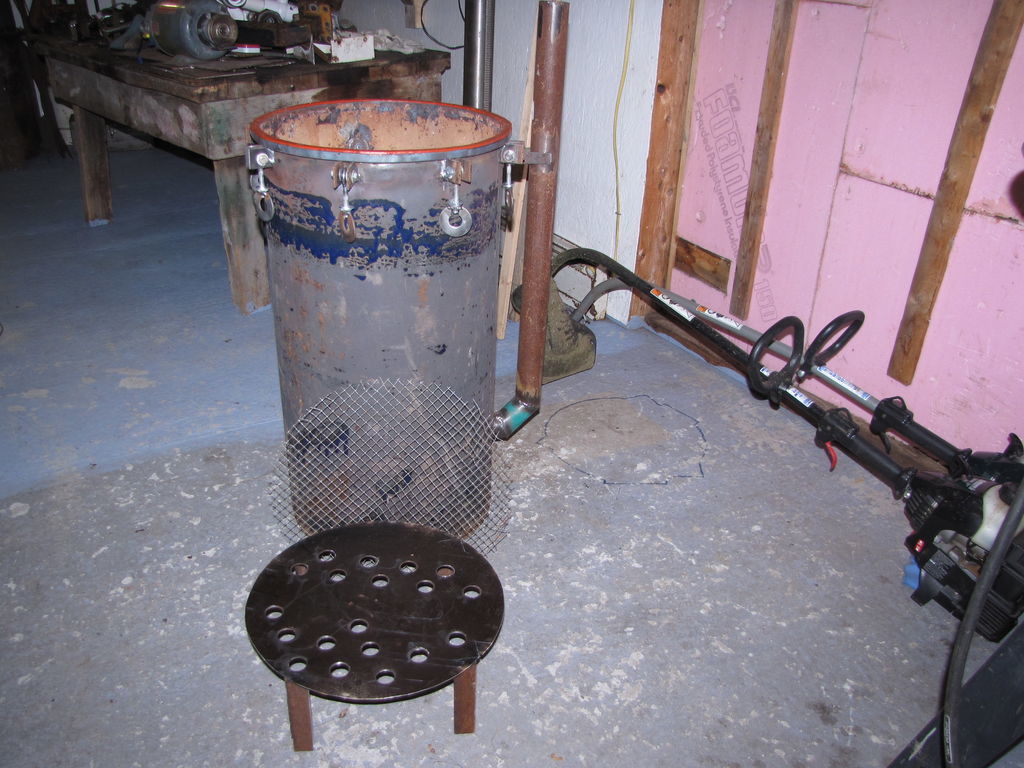
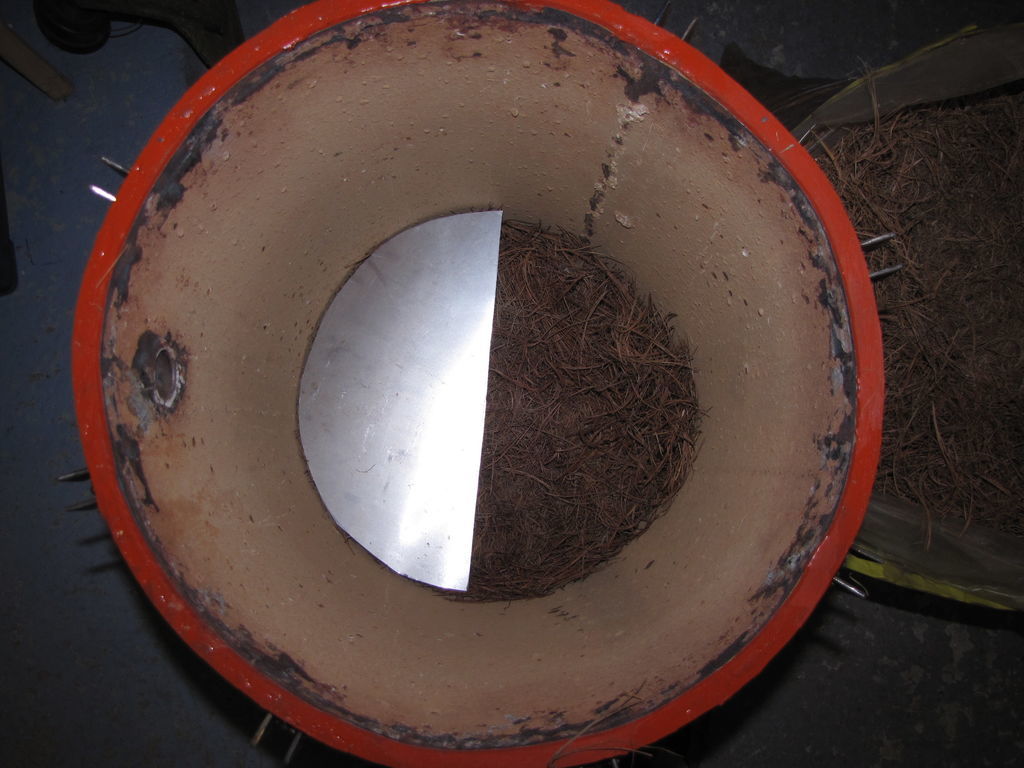
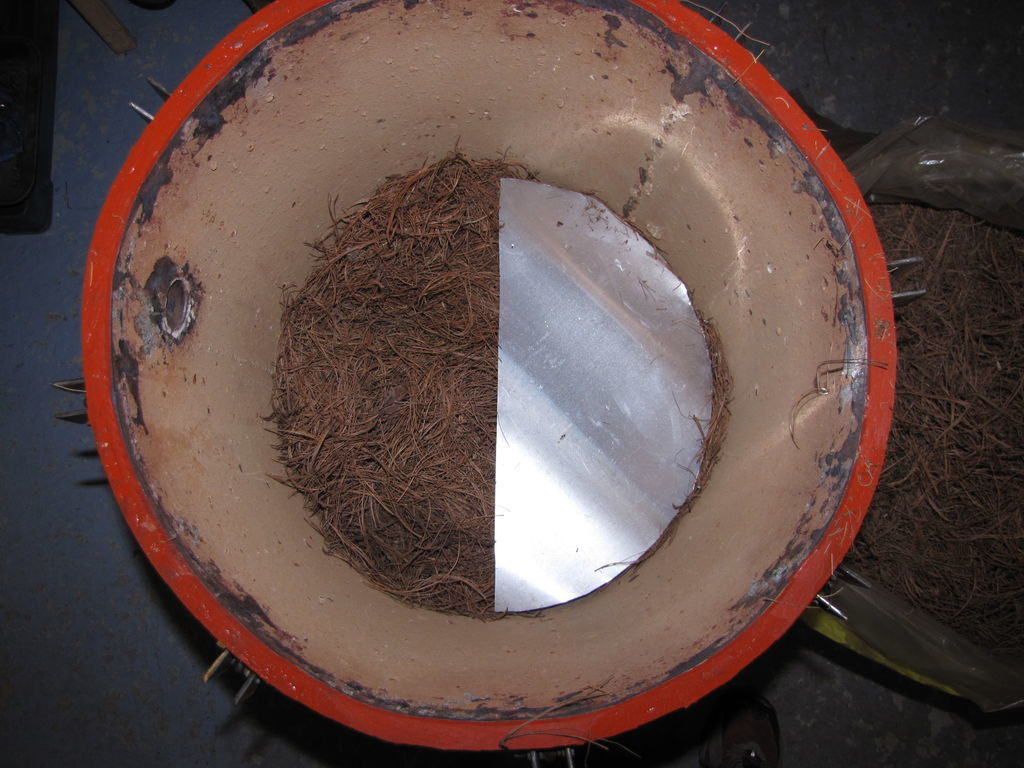
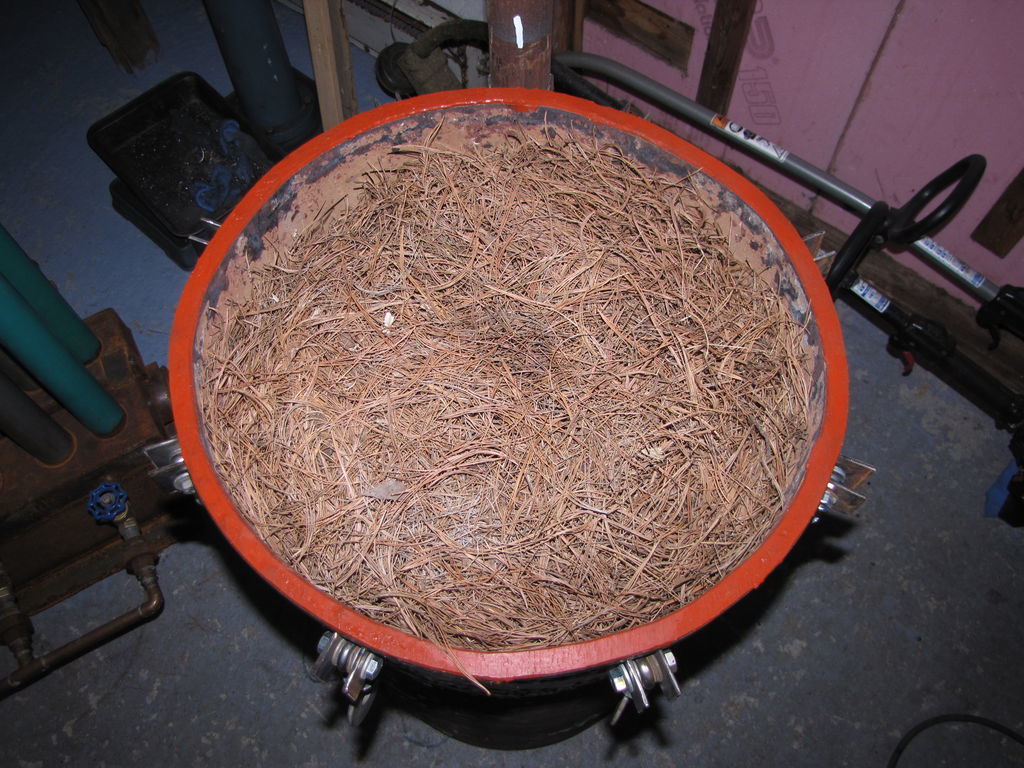
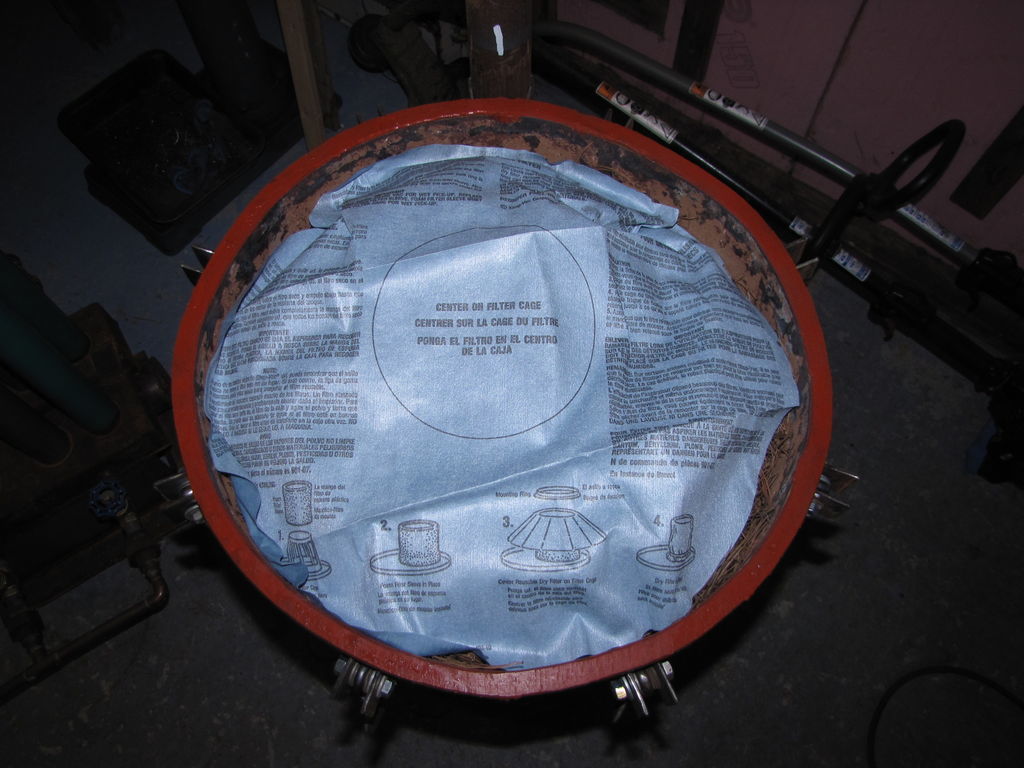
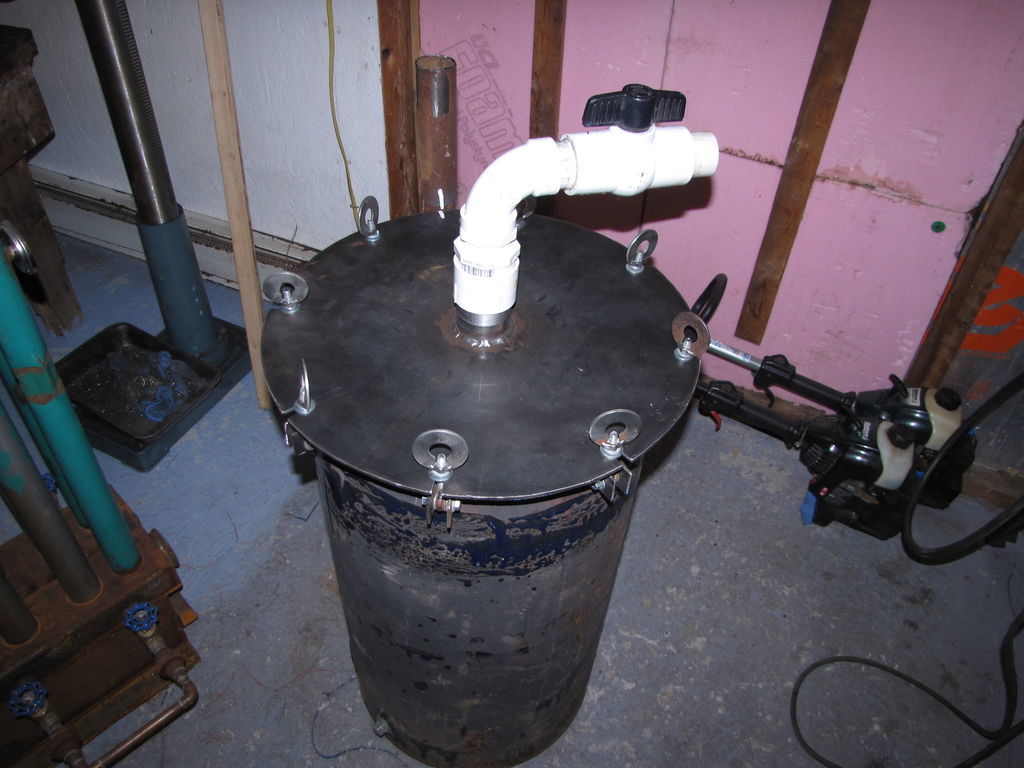
I finally put most of the finishing touches on my filter. The first pic is the gas inlet. The second pic is the support grate for my filter medium, pine needles. The third pic shows it installed with 1/2" galv hardware cloth over the holes. The next 4 pics show the loading and baffle placement. Hopefully these baffles deflect and direct the gas through most of the medium versus a no baffle straight route basically up the center. The last pic is the filter exhaust and line shutoff. Pepe


1 Like
Looks good Pepe.
I like the redirecting gas flow. I wonder if the you may notice gas pathways in the hay if it was carefully dissected after some use therefore not fully utilizing all the hay? You know how the gym lockers had slotted vents in the doors? What if those deflecting shields had slots cut in them and each shield is positioned 90 degrees from the one below? You may even be able to use full shields then? Just my 2 cents.
1 Like
Thanks for the suggestions, Bill. I will be doing the careful dissecting as you suggest to see just what the flow looks like. I like the slotted shield idea, some gas through, some gas around may work well. I might try 90 degree placement as well. Guess I’d better get burning! Pepe
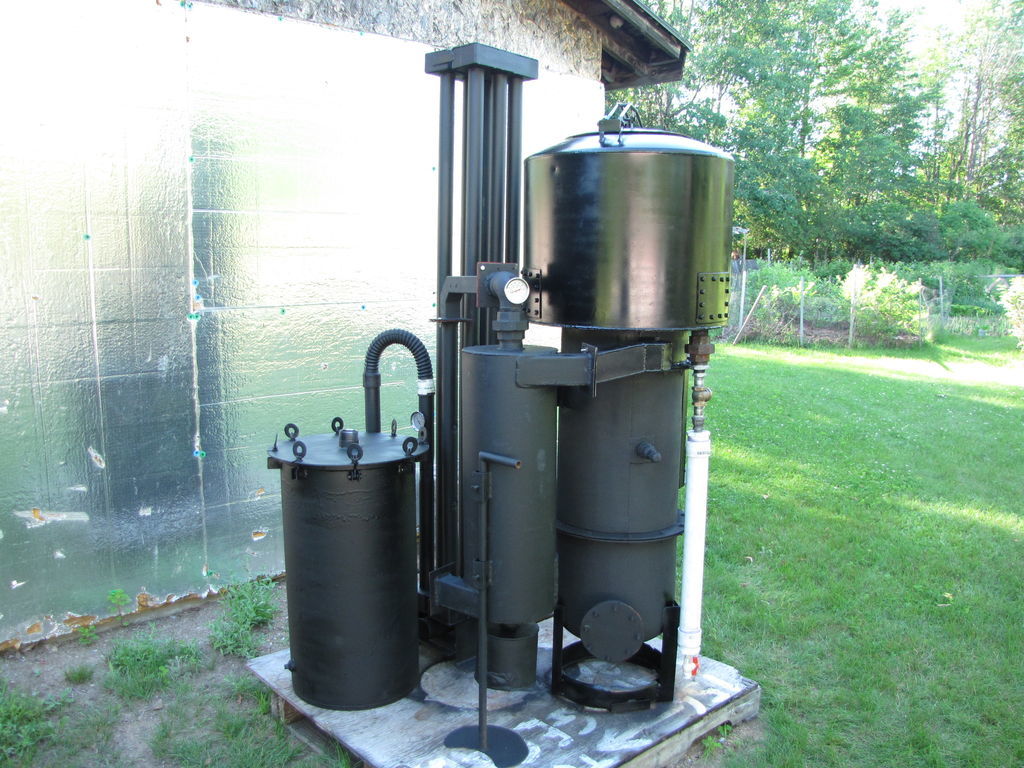
I took the components out today to step up the footprint on a 4’x4’ platform and to do some finish painting. Your right, Dan, what a difference a coat of paint makes. Still have to cut out a few gaskets that I decided not to reuse. Too much work to do this after it’s all bolted together. We’ve got 4 or 5 nice days predicted so hopefully I’ll be up and burning by then. Can’t wait to see how the monorator hopper works.
Pepe

1 Like
Looks great Pepe!
As you can see, I used your idea but used eye bolts instead.
I hope all works well
Thanks, Bill, great to hear you got it running. I’m plugging away but the weeds are plugging harder, lol. I added a refinement to the flange on the gas outlet from the burner. This will help keep the gasket in place during assembly, set the lineup positively and sort of hold that side of the unit in place while I bolt it up. The other 2 gaskets involved here are both Dan Cox types, silicone impregnated fiberglass mat due to lower temps involved.
Pepe

Hello Pepe
Looking good alright.
On your shown flange coupling sealing you need to also put a strip of stove rope INSIDE of the bolt patten not to have bolt shaft gas/air leakage.
Is maybe this inside sealer strip already on the opposing side?
Now to work heat put some shading variegation patterning onto that new paint, eh?
I am busy chickening/new flock raising.
NEED to be firewooding! Fast drying weather for the next 3 days. Then rain. Then HOT weather after. Busy, busy summertime!
Regards
Steve Unruh
Hi Pepe;
Looking mighty fine indeed. The paint really pulls it together as a unit. Like the flange idea as them gaskets can be a real pain.Can’t wait to see it run, if it runs as good as it looks you’re home free. Always alot of rain here in summer, and between that and the heat and life I havn’t fired mine up recently. Take care…Dan
Hi Steve, Thanks for the comments, nice to hear from you, man. I agree I should include a piece of rope gasket on the inside of the bolt pattern. Darn, just when I thought I had it all covered. lol. Yes, I can’t wait to put on some heat pattern variegation on this baby. My daughter and son-in-law will be delivering my first bee hive soon. I’m a gardening nut and the gasifier part of me is always fighting for more time! Last summer came and went without a firing. Finally got some burn time in Oct. Take care.
Hey Dan, I thoroughly enjoy rewatching your vids and keeping my eye out for that next tweak of improvement. Several of my neighbors have expressed a desire to watch the action. You really run an ICE off smoke? It’s been cool here but the temps are going to the 80’s starting today. I’m not a heat wave person, at 71 it knocks me back a little.
Pepe
I added a gasket to isolate the bolt holes and prevent bolt hole leaks as Steve suggested. Don’t know why this slipped my mind??. Don’t be too anxious to get going! First pic, I used the clear adhesive ( may be hard to see) supplied in the kit, apply it, let it get tacky and second pic, pin the gasket overnight
EDIT: Do not pin overnight! If you put too much adhesive on the flange and pin it too tightly the adhesive will wick into the gasket and set creating hard spots that may not seal well. Pin it just long enough to get the gasket to stay put, then remove the clamps.
EDIT 1-10-2015 this gasket did not hold up well. See 2014 teardown ahead a little bit.

Looking good Pepe
Your two strips now will keep the bolt pull down from flage edge bending and bottoming out.
Why no-see?. I figure you still driving old, old stuff with only one door rubber seal. The 99 mini-van I drive has two rows of doors rubber seals. Wife’s 2007 Hyundai has three rows of doors rubber seals. Ha! Just one of a thousand reasons new vehicle prices keep driving up.
Regards
Steve Unruh
good to see your still making progress, weeds and gardening alwise take up lots of my time too. i’ve alwise wanted to try bee keeping. keep us posted
Hey Fellow gasifier enthusiasts,
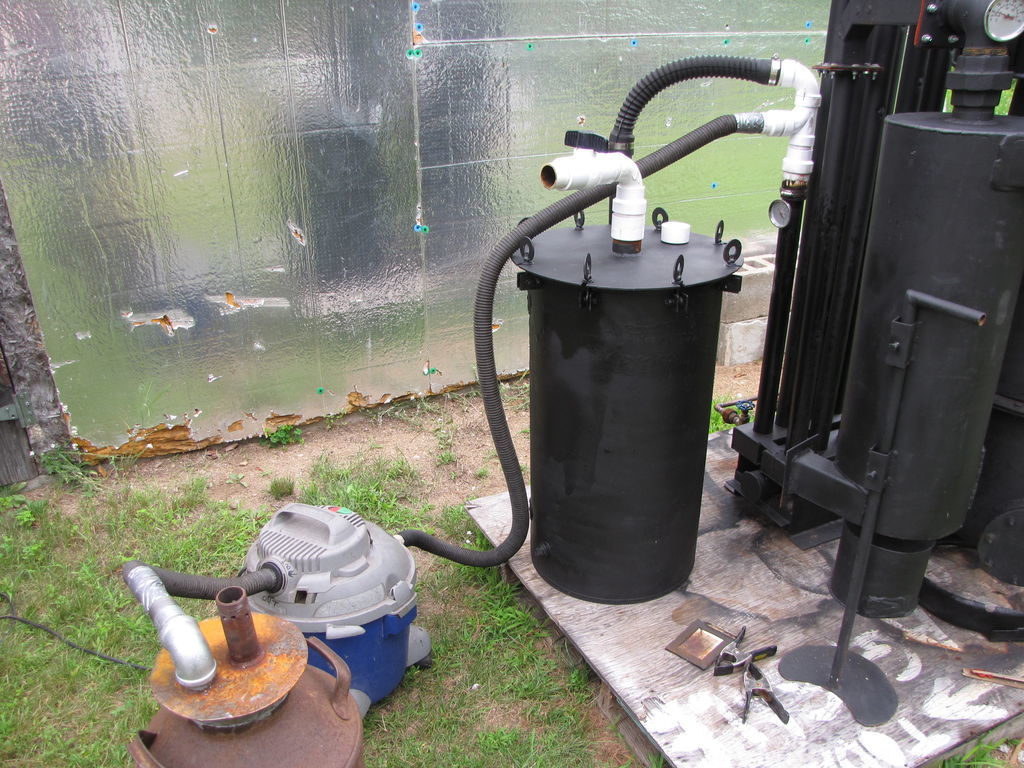
I finally did the first burn with my new monorator hopper and I’m impressed with the preliminary results of that short burn (45 min after 15 min start up). Pic 1. I loaded the monorator hopper with about 15 lbs of wood chunks. Pic 2, I used the vacuum in the start up configuration (by passing the filter) by opening the tee cap, inserting the vac hose and closing the filter valve. When good gas was being produced at the flare tube, I switched to Pic 3, the run configuration, by replacing the tee cap, moving the vac line to the filter valve outlet and then opening the filter valve. The gas is now routed through the filter to the flare tube again for an initial run to shut down due to fuel exhaustion.
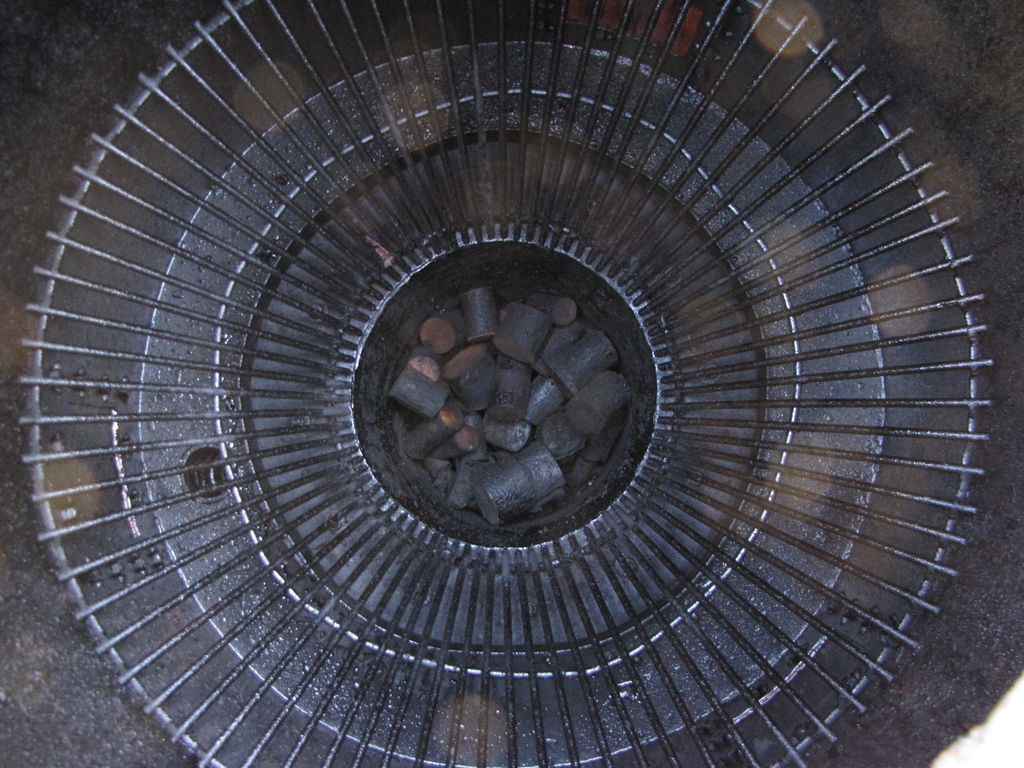
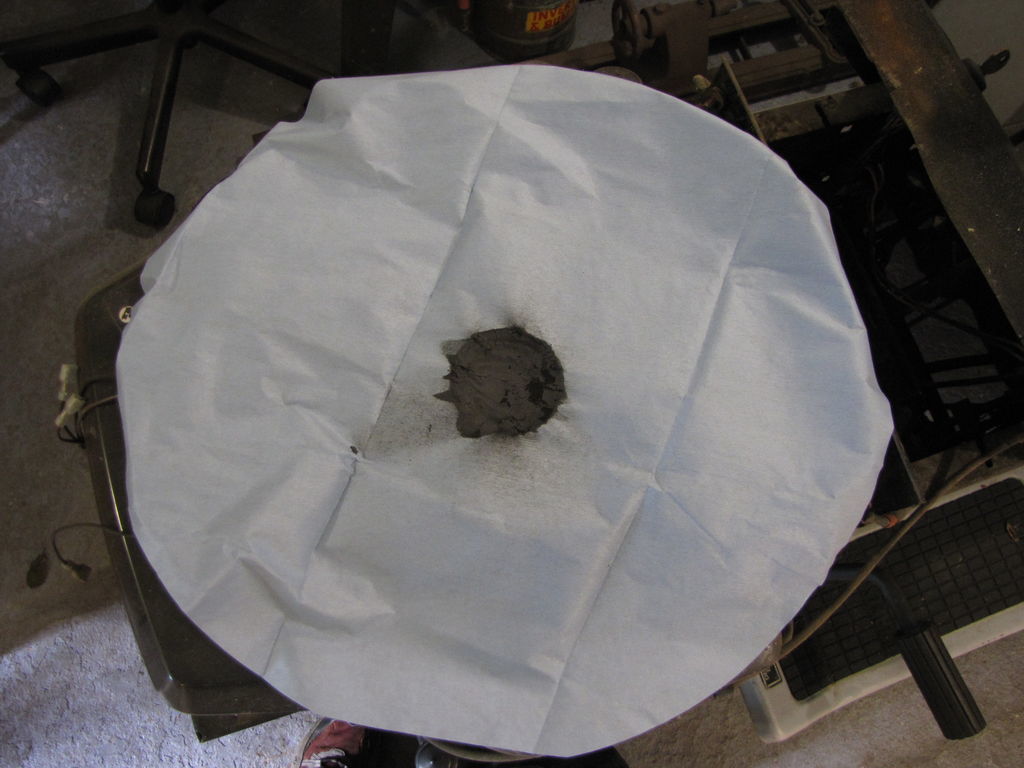
Good gas was being produced in about 15 minutes. I switched to run configuration. Even though I was getting a burnable gas, the temps were on the low side. Eventually the process started to slow down prematurely, so I decided to shut down. Pic 4 is what’s left. It’s still a way to the nozzles. I took the filter apart and voila! The filter paper Pics 5 & 6, got sucked up to the bottom of the outlet pipe, filled with soot and killed the draw through the nozzles.
The pine needles were completely dry and there was no moisture in the bottom. I repacked the pine needles in 1" layers spritzed with veg oil to help trap the obvious soot getting through the filter. We’ll see if it smells like sunflowers.
Now for the biggy, how did the monorator hopper handle the moisture on this short run of 15 min startup and 45 min run time? I drained about a pint of water from the hopper moat. I opened the cooler condensate drain and there was no water there at all. There was no water in the filter either. Also on every run using my vac with my old hopper there was always some water in the vac canister. This time the vac canister was bone dry. All of this even though my vac was really under pulling for my design parameters.
I can’t wait to fire it up again to see if this was just a fluke, but I am really encouraged by these results.
I’m working on a short video of the flare and drain. I should be able to post it sometime tonite, maybe.
Pepe
EDIT: http://youtu.be/ZBVpSLIBJmY