Very nice Richard.
Now is it one more step to making some electricity from you gasifier and engine.
Then comes the 75 % learning to operate, observe, smell and listen to the system.
All great fun 
Have fun
Patrick
Very nice Richard.
Now is it one more step to making some electricity from you gasifier and engine.
Then comes the 75 % learning to operate, observe, smell and listen to the system.
All great fun
Have fun
Patrick
Ha! Ha! See, Pepe I am not the only one crazy operating by senses and feel!
PatrickJ I use taste too. Just be super careful with the hopper juice. Tiny, tiny bit on the tip of the tongue as it will leave a cell killed dead spot until cell regrowth replacement ~3 days for me. Why it is such a good bug killer.
S.U.
Hi Patrick,
Thanks for commenting. I’ve fiddled around for several years now from Fema, fluidyne and present imbert style with hour glass hearth. I finally have a design, albeit bulky, that is producing a nice clean gas. The temp drop incident was part of my 75% operator experience. I remember also hearing the engine backfire a couple of times minutes before the engine died. Now with this unit I can do more operating and less fabricating changes although I still have a few ideas to implement. More wasted heat use/ conservation of heat and after watching your videos an inner cone for my drain channel and a double shell for the hopper(good ideas) in my next design. Did I say less fabricating?? lol.
I lent out my great running old 5 hp BS generator and it got left out uncovered so when it came back I had to pull the head, free up valves, drain water out of sump, carb, fuel tank and lines, etc. Can’t wait to get it back on line. Been think about feeding exhaust into my SPAI (single port air inlet) preheat shroud, insulating certain areas and putting a fuel drying rack over/next to my cooler (it’s 7’ high now).
Yes, it is all fun and I’m determined to implement it all, Lord willing.
Pepe
Hi Steve,
It took me a while to put the senses thing together, but I’m paying more attention to sights (smoke, flare color) and sounds for sure. I think it was you who first alerted me to the other 75% rule. I’ll be operating this unit a lot more in the coming months and sitting at the drawing board for a size wise more efficient/effective unit.
Pepe
Hi Richard
Hi Patrick, I must say I like the double skin and conical lid for moisture collection. A simple water lock keeps it air tight. I will keep these in mind for my next build.
Pepe from DOW.
Thanks for the comment on my youtube video. Yes a water lock would be a great Idea just a few problems, when you have a puff back it may blow all the water out, and under load my hopper vacuumed is some times 2-3in , so it would have to be pretty deep.
Thanks for the idea
Patrick
Hi Patrick, The water trap I referred to was your drain tube going into the bucket of water. Not exactly a water trap but it keeps outside air at bay.
I saw an old design posted on this site somewhere that did have an actual trap in the bottom reservoir of the cooler assembly. Same blow out possible with that also. That idea needs some thought for sure. I’ll post it when I run across it again. It an interesting design and easier to fabricate than mine. Of course I found this way after I started my cooler. lol.
Pepe
Hi Pepe
Sorry I thought you meant the seal on the lid of the hopper.
I saw a water lock on a large log gasifier in one of the youtube links posted in a thread here on DOW that was used for heating.
It’s a very good idea but as I said a lot of thought would have to go in to it.
That’s the beauty of this site, there are so many minds working on basically the same thing with different ideas evolving all the time !
Thanks
Patrick
Hi All,
Thought I’d post a design that Koen Van Looken posted in another forum. It is a linear flow design easier to build than mine and I will try it sometime down the road. For you guys just starting to think about coolers, give this design some serious consideration. Not convinced??? Check out how much more difficult my design is to build by perusing these pages, lol.
Here’s the other narrative as an explanation.
Hi Koen,
I blew up your photo, the cooler part, so people could see the simplicity of the linear flow design compared to the one I built. Hot gas meets cooler water and more water condenses out. The s-trap keeps the water level constant as any water in the base higher than the top of the “S” will automatically drain out. The metal chamber separations force the hot gas to take the path of least resistance which is through the pipes forcing the linear flow insuring maximum contact with the radiating surfaces. My linear flow cools very well, but my design is much more complex to build and a bit more involved to drain. The setup for the S-trap requires some thought as far as accommodating the height is concerned, but not difficult. Also need to be able to bring water level up if necessary.
The linear flow is more efficient by far than the 2, 3, 4 or more pipes all down then 2, 3, 4 pipes all up as the flow in these cases is not consistent in each pipe therefore cooling capacity efficiency is lowered.
Hope this helps.
Pepe
while i’m not disagreeing with you, linear may well be better… I have found with our little unit the only time the top of our cooler gets hot (all thing being relative, can always hold it with out burning yourself) is when I’m pulling on it with our shop vac to get it started. With the engine running it’s just warm to the touch. and going by Max gasmans calculations of surface area i’m on the small side. I suspect the cyclone and piping to the final filter as well as the filter itself all add to the coolers numbers.
Hi Arvid,
Thanks for the feedback on your cooler temps, I’ve wondered how well they worked and from your unit’s performance, I’d say well.
I went from a small S cooler to the present 7’er. I also want to be able to move up the HP scale and not have to build another bigger cooler later and was also sick of looking at the old dismantled swing set hogging a corner of my shop,lol. I saw a fluid flow demo on youtube and was surprised (not totally) to see the flow differences in the individual “legs” so I went for linear. I figured as long as I’m going to build one, I going to build it big enough(use up all those swing parts) and still fit on my footprint. I had no real idea how well it would work until I saw the temp gauges and felt the drop in each leg. It works great and the other cooler additions certainly help.
After feeling the individual legs I certainly could have gotten by with fewer. I also want a shorter unit but I’ll use this “for now”.
Hi All,
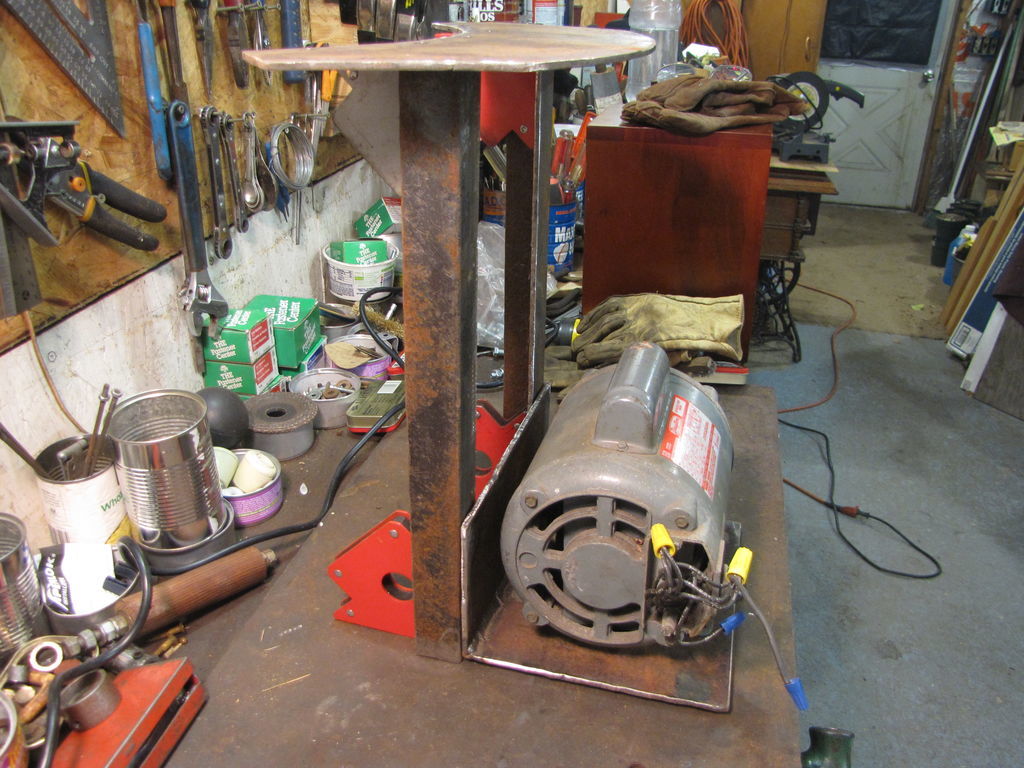
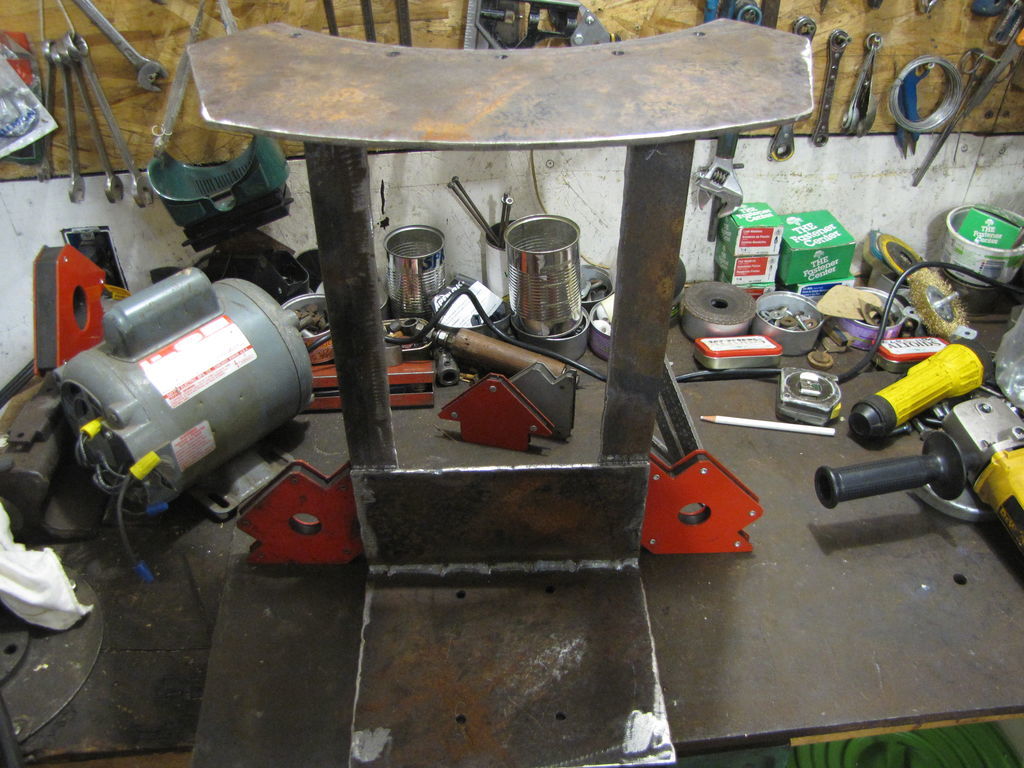
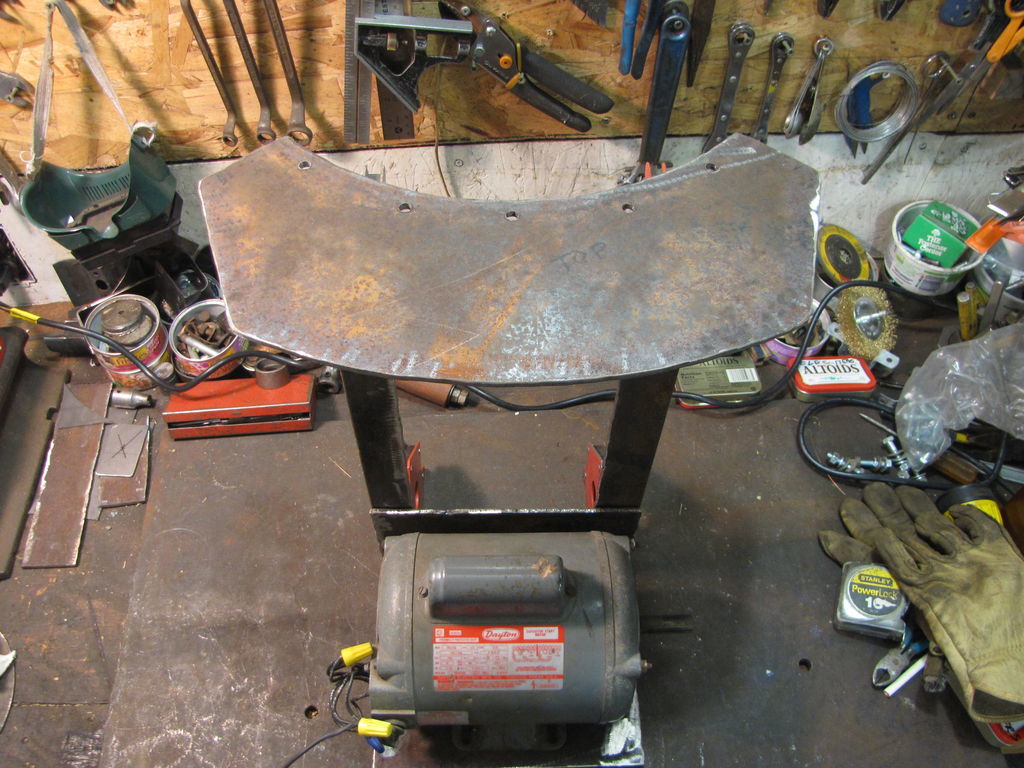
I finally got around to building my vibrator/shaker which is a copy of Dan Cox’s unit and I hope it works as well.
I had a little problem with the pics, but basically they’re a step by step, build a piece, dry fit it, build another piece. I love those construction magnets for sticking parts together.
I must add that my second run on 10-19 -13 above ended with a huge bridge (found after I shut down). Temps went up, I thought good, but 3 or 4 minutes later, engine sputtered a few times and died…huh?? Ah, more of the 75% learning curve kicking in. Banging the hopper with a big hammer to no avail. My gas wouldn’t flare. What the “fill in the blank”! I did have some larger pieces in this run so another % of learning… size is important for good fuel flow. I found the bridging after I shut down and started to empty the hopper. All of a sudden the bridge collapsed. It was about a 10" - 12" hole! The temp increase was caused by increased combustion without pyrolizing any new wood. Of course the combustion added more water vapor and CO2 to the mix and the engine shut down.
That really spurred me on to get the vibrator going. I’ll sort my chunks and chop up the larger diam ones.
2 1/2" length and diam seems to be the right size for my hearth. I have several "ledges inside my hopper from putting pieces of tank together so avoid this if you can. If you ain’t burning, you ain’t learning. For some great in depth explanations of all this, check out Jim Mason’s All Power Lab on youtube
http://youtu.be/qlq3_CCVniU. It’s long but the explanations are eye opening. Don’t skip ahead, this is where I heard the nugget about bridging and what really is happening energy wise and chemically at that point!
Can’t wait to try the vibrator.
Pepe
Great input and pictures Mr Pepe.
Have to say I’ve never seen this stout of hopper shaker bracketing. You’er not likely to crack and break with this.
Jim Mason does some wonderful expaining alright. All roads that lead to engine running with woodgas are Right.
On the fuel bridging problems.
Once past the fuel chunkiness mechanical locking up. Once past internal ledges hanging. I’ve still had problems going clear back to the very first gasifer I ever operated a very straight down into GEK II using just it’s tube-like straight in internal developer space without even using the external hopper tank.
Had bridging problems with even some of BepP’s earlier stuff.
Lots of shaker, even sideways bridging breaking up systems tried.
What I have personally seen was these bridges all had a componet of tars glueing to them. If the hearth was hard pulled to create a LOT of internal rising heat - bridging problem with the same fuels went away. As the gasifers advanced to hold in or recycle more heat back into themselves the bridging problems again with the same woodfuels went away. Got to where I could follow bridging problems based on the fuelwood moisture levels. Or the amount of fuelwood at the same moisture put into the same system.
That is where I came to evole the strong belief now that we need to balance out the gross amount of fuelwood moister AT ANY ONE TIME ALLOWED into the system to the available gasifier internal HEAT that be produced for the duration of that fuel load.
Have to keep those wood tars, hot, liquid, cooking and flowing downward.
Anymore as an operater of mostly other peoples gasifiers I operator “adjust” this fuel moisture loading to the actual gasifier hearth/engine loading.
I stopped believing the mantra of “make the fuel bin sized to convience”, “make the fuel hopped to match your wanted run times”. Yeah. Right. ONLY with perfect out of system kiln dried wood fuel or middle of the desert 1000 hour sun dried fuel m-a-yb-e. NOT what woodlands Rural living DOers actually have the majority of the year.
Try this on yours. Same wood fuel. Same wood fuel moisture. Pull your system up hotter making more heat by engine loading. Put in much less fuel wood. Batch by batch add more fuel wood to each batch until glue bridging begins. Now sun, woodstove, oven dry down this same amount of wood fuel and batch run again. BEST, yet; make the now loaded running engine heat do it’s own fuel wood drying for “free”.
I’m convinced. Only you can convince you. If you do become convinced you find this will drive forward you design principals.
My own personal system instead of now eleberate first lower hopper heating then upper condensate hooper converting the simple solution is to just use engine “wastes” heats to wonter wet better fuel wood moisture conditioning and not put these moistures into the hopper/gasifier in the first place and settle for shorted batch fuel cycles. Make the mositure load “foot” fit my gasifier “foot”.
Back to always needing an actual engine running for positive forward developement “benefits”.
In a not perfect world. With not perfect ingredents. With a not perfect oven. A Good Mom will still bake her kids cookies.
Best Regards
Steve Unruh
Hi Pepe; I think you will like your shaker. I noticed mine bridged after shutdown due to that one sq. ft. appx. area just sitting there cooking. Next day after cooling, I opened my hopper lid and started the shaker and after 10-20 seconds the whole center fell in filling the void. Remember not to shake during a run for more than 10-15 seconds every 10-15 minutes or so cuz the wood can pack together and block some air flow. But you.will get a feel for your own units operation. Very happy to see you getting to where you want to be. Dan
Hey Guys,
Thanks for comments and feed back.
Steve, Your info fits in well. I want to have several shorter runs anyway as it’s really time consuming to sit there and watch a full hopper burn away. I have seen the unburned fuel on the top peppered with creosote on the few times I shut down early in a burn, so I can imagine them gluing together especially at the next startup.
My first burn was 28 lbs and it went very well, no hop, skip or hesitating the entire burn.My second burn had about 50 lbs thinking a 2 hr run. It shut down real early in the burn. I’ll drop back to 40 lbs and try your suggestion.
As for engine exhaust I will use steel flex hose to direct the heat into my old copper cooler laid flat with some kind of cage over/around it to dry fuel. I’ll get there, man.
Dan, I used 1/4" plate for the top bolt on bracket plate, 3/16" angle (17" long) for the “legs” and 3/16" plate for the motor mount. I hope it isn’t too heavy. I’ve got a small pulley I’ll add some off center weight to. Any suggestions here? Thanks for the run time advice on the shaker. Compaction did cross my mind, but as I’ve said before, “crossing my mind is a short trip sometimes” lol.
You know, it just hit me that I totally forgot to manually shake my grate during either run, duh!
That trip’s getting shorter, Dan
Pepe
Yep! Seems we forget more than we remember as we age(ole to be young again with the knowledge and tools we have now). Bracket materials sound like a carbon copy of mine. I think I welded a piece of 1/4" flat eliptical piece to a steel pully maybe sticking out an inch or so from the shaft. Also a guard is a necessity as this offset spinning weight is very dangerous. Once operating properly with a timer you will not have to keep a constant eye on it. I actually went in the house and watched a 2 hr. movie and let the gasifier run on it’s own(it did fine). Looks like you have a 1725 rpm motor, thats good as 3600 rpm is too fast and the vibration cancels itself out. Dan
Thanks Dan, I was going to start with a small offset weight and see-feel how it worked. Glad I didn’t use my faster grinder motor- never thought about the smoothing out at higher rpm’s. I did notice your guard in your video. I’m also wondering what you used for a timer? Is it something from Radio Shack,etc? The off the shelf ones I looked at don’t have adjustable run time settings down to the seconds. You’re correct, running too long presents the problem of compaction and I’ve shot myself in the foot enuff already. Don’t want to be toeless!
Pepe.
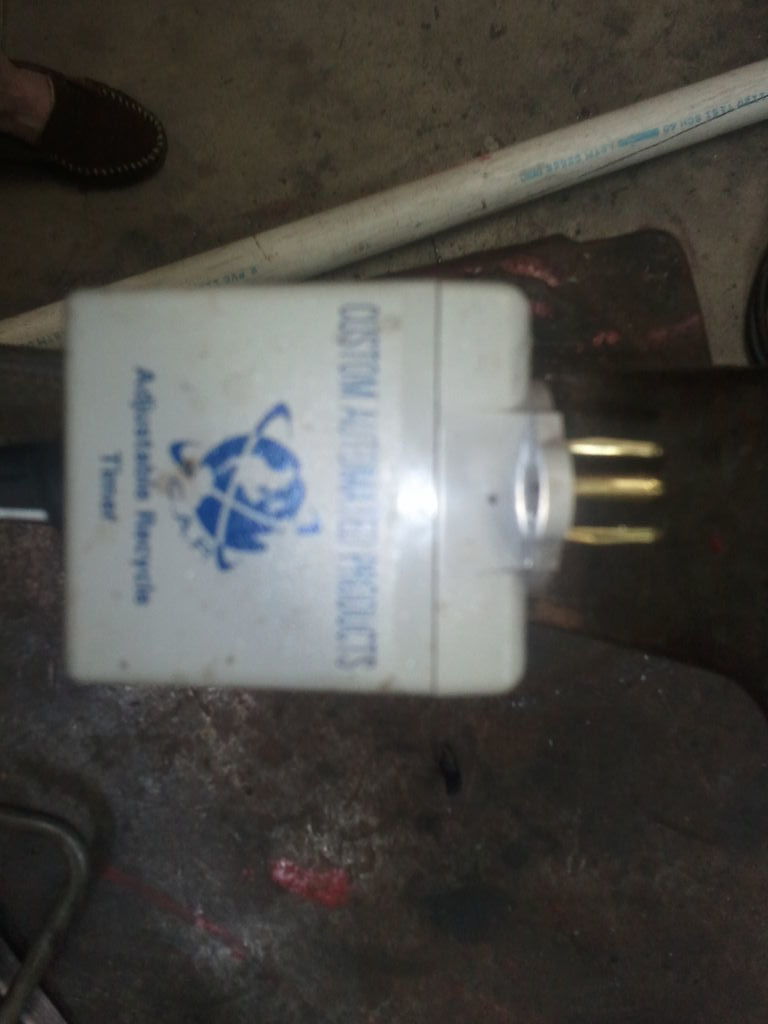
Pepe, I am posting 3 pics. of my timer. If you type in the name and repeat cycle timer it should come up. I think it was about $60.00 on line. Can’t remember who I got it from. It’s a little touchy and the numbers sometimes don’t line up with the time wanted exactly but it works good and you just plug it in and plug your vibrator into it. Let me know if you can’t find it(if possible as I have not received any notifications from DOW in sometime ???) Hope the pics. help. Dan
Steve,
I am with you 100% on this.
The whole idea should be also not to waste ( whats in a word…)
Seen the good example from doing things the right way in the movie from Patrick Johnson…
Imagine you put a extra drum ( filled with fresh feed stock) beside your gasifier, rotating or not, blowing all the exhaust trough as an extra flu gas filter… extracting the air for your gasifier out of this drum as well (mixture of course)
If the drum would be rotating, that movement could be used to actuate the grate shaker…
As Steve pointed out so many times… use what you got any way… and i will ad : you need it any how…
My two cents…
@Dan and Pepe,
I know there are 2 directions the grate can shake, horizontal or vertical.
I am working on a solution for mine, but not quit sure which i should choose from…
(Thinking on using the starting relay from an electric Car starter to generate a vertical movement in my feedstock…)
HI Pepe,
I have a timer just like the one Dan has shown and they work great. If you are interested in running a DC set up here are the timers I use.
Timing will be determined by many factors, how hard your shaker hits and size weight and density of your fuel. My advice is be modest at first as a bridge is easier to fix than a clog.