This thread is to document progress and ask for suggestions on this build.
Yesterday I worked on the door
I think I’m going to be redoing it.
The flashing I used is to weak and the oil filter wrench I mangled into a latch is wanting.
Still enjoying the process, lots of drilling, tapping and grinding.
These long quarter 20 bolts will be replaced with shorter ones.
The door will be built out with metal stud, and stuffed with roxul.
I installed and ran the mattress inflator, and was disappointed with the draft I felt.
Later I realized there were two threaded bungs left open.
I’ll plug these and hopefully it will.make a big difference.
I just fired this thing for the first time.
Here’s my report:
1.It needs insulation.
The door and sides get too hot to touch, water sprayed on them hisses and steams off.
It leaks!
Not water, smoke.
Mostly that was when I turned on the air pump.
It came out where the upper and lower halves came together.
I think I’ll put some mud/clay slip in a squirt bottle and use it to fill in some gaps.
It doesn’t need forced draft.
The mattress pump wasn’t needed, it actually seemed to create smoke.
I might try it again with a lamp dimmer for a speed control.
The reservoir/heat exchanger is huuuge.
As in wide.
As in, there is a lot of volume not in contact with the center chimney.
It was shaky with 3 gallons in it, filled up entirely, it would be dangerously top heavy.
Next time I will choose a narrower water heater tank, if I can find one, but it may not be enough and I’m neck deep in this build.
So,what to do?
Narrow the diameter of the water tank?
Concrete would be strait forward, but it would also make the boiler top heavy.
Insulation would be great, but can it be waterproof and resist boiling temperatures?
I could cast styrocrete inside the tank, around a sheet metal cylinder, and fill any gaps with silicon.
Seems fussy, but doable.
A water tight metal tube would be better, allowing me to set the bottom in water stop cement and fill the space between the tank wall and tube with almost any insulation.
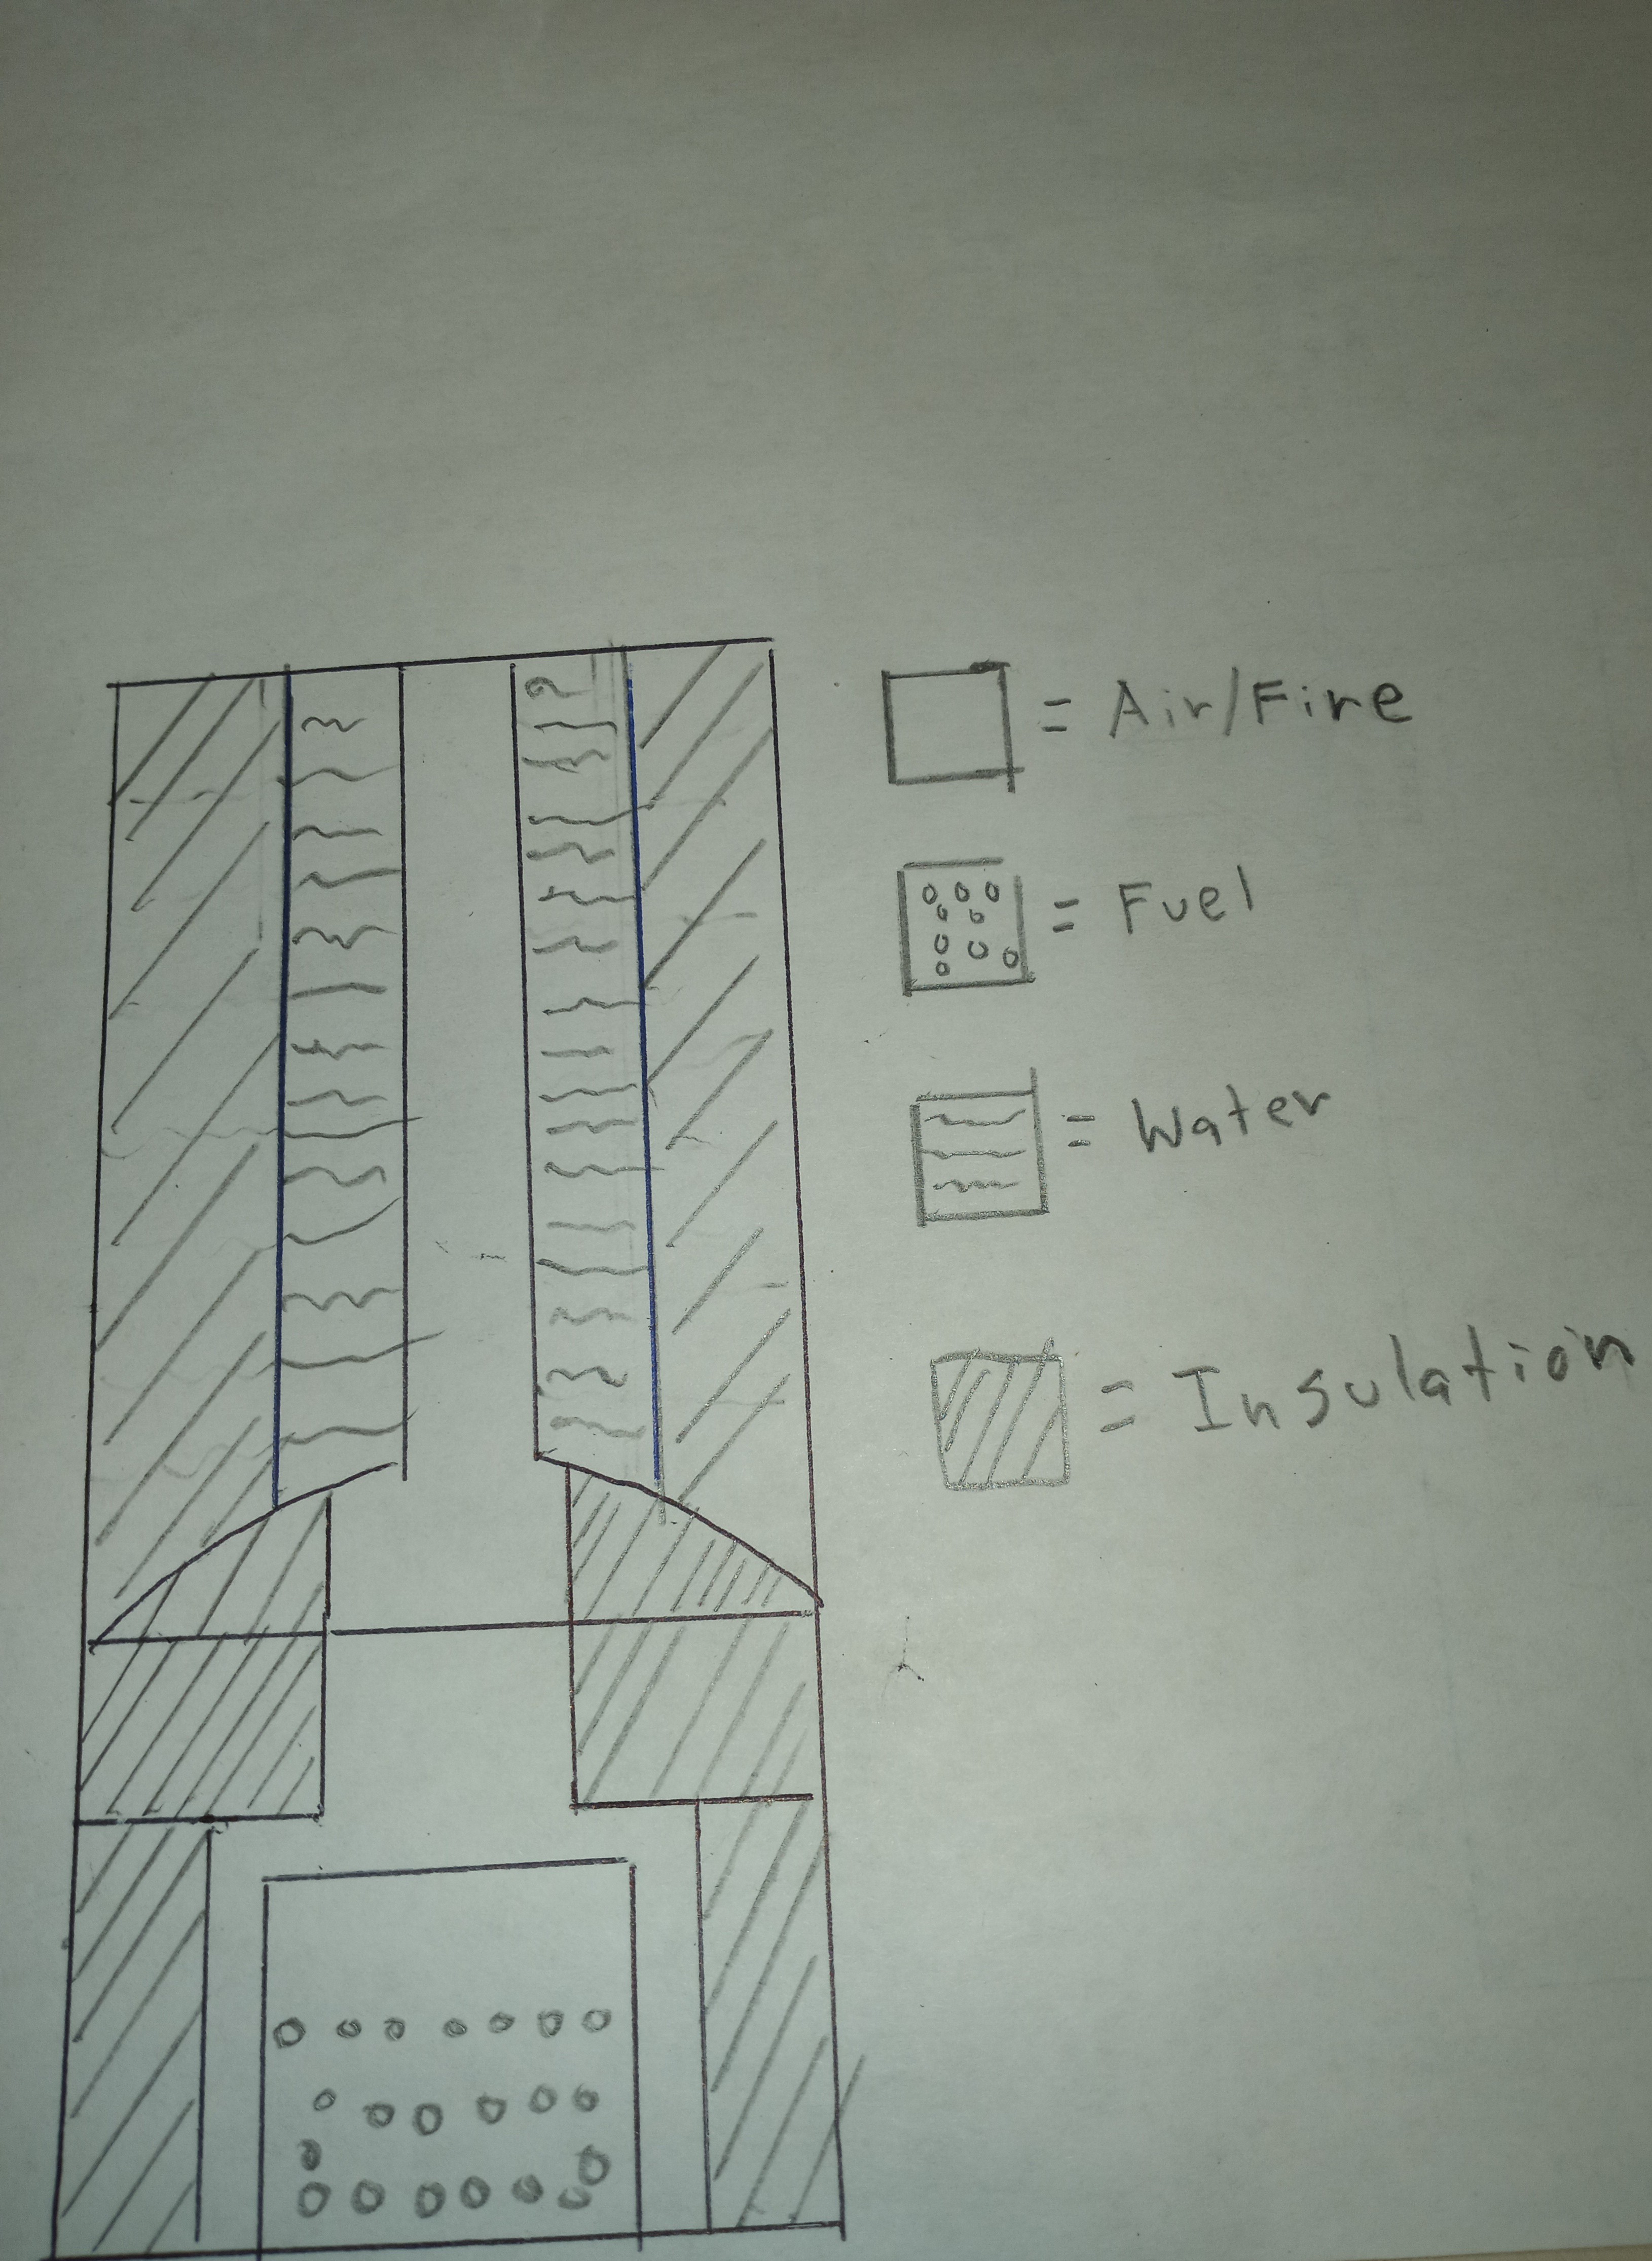
This versions shows the surface area to volume ration altered by adding insulation to the water tank. It also adds the legend/key for insulation, which I left off before…
I have tried to use mud for seals on things before William. It bakes and then cracks and does not seal. I’d use high temp RTV. Probably too much rework at this stage but I like Kamil’s idea about the multiple tubes. Same as a fire tube boiler that they used on steam engines.
Good note on the mud seal, that will save me a lot of time.
Multiple tube would be great, but I don’t weld)having no equipment and no knowledge), so this boiler was designed to take advantage of the heat exchanger /chimney that runs through the heart of every gas fired water heater tank.
Dealing with the top heavy issue might be the better choice.
I can shorten the legs and strap the entire beast to something substantial, like the back wall of the greenhouse,since that’s liable to be its home.
Without tools and skills, you should stick to KISS - keep it simple stupid. In such a case try light insulation outside, not heavy inside. Try your firepot smaller, otherwise you spoil too much heat. Do small replaceble steps, not total rework.
Yeah, I have the drills, grinders, saws etc, and I know them quite well.
Welding is like SketchUp or other tools/techniques, in that I in know I would get a lot out of it, but I don’t want to divert the resources to learning and acquiring the tools.
I’m preoccupied making and maintaining things using the skills I have.
I’m also drawn to the idea of doing more with less.
Anything can be accomplished with enough resources, but the more resources a solution requires, the less it applies for most people.
One of the reasons I’m pursuing Tlud technology instead of a rocket stove powered design is the materials.
High performance rocket stoves use ever more rarified refractory materials in pursuit of clean burns.
Even simple fireclay and perlite are hard to come by/expensive where I live.
At Tlud temperatures, a simple stainless steel stock pot will last indefinitely, and yet the burn is very clean.
Plus, you get charcoal.
Speaking of materials, I think I will make a smaller Tlud as you suggested.
I have a collection of #10 cans , so it should be easy to do and a fun exercise.
They may prove to be a better size for heating the greenhouse.
I don’t recall where you are from William. I have a Rocket Mass Heater in my greenhouse. Just uses one inch thick ceramic blanket inside a section of eight inch duct for a heat riser. Simple. I get the ceramic blanket on-line from Home Depot. It was even cheaper than anything I could find on E bay.
I have another heater that I built for my greenhouse that is mostly a water heater. I haven’t used it yet because it’s made to heat a 550 gallon water tank that I need to seal before I can fill it and try out the heater. Definitely a lot of welding involved so not what you are doing but I think it’s a good design. I post about it when I get it operational in a few weeks. Other heaters you may be interested in. Check Gary Gilmore’s Keystone stove. Video on-line on his site.
I recognize that build.
It used a perlite and clay riser,which failed and was replaced with an insulated brick riser.
The destruction of the clay riser ca7sed or resulted in heavy damage to the the steel form it was cast in, an example of ferocious heats involved.
It didn’t heated the space fast enough and smoked back too much for their purposes .
They replaced it with a j-tube rocket mass heater.
I think it could have served them well if it had had a metal top, which would have heated the space quickly and allowed easy access for maintenance.
I love rocket stoves,heck, up until last week I was building a 8" batch box in the greenhouse.
It took up almost 1/4th of the space and work was paused as I struggled to accept the material costs.
I tore it out in anticipation of moving the boiler in.
The boiler will take up less space and is better suited for feeding tempered water to the sub irrigated raised beds.
I still want to match a rocket stove to a boiler, but right now the tlud is a better match.
Is your rocket a j , or a batch box?
What is the rest of the core made of?
Firebrick, cast refractory, something else?
Are you using a masonry bell, a metal drum or both?
I’ve been messing with CementAll plus Roxule fibers for areas that need to be refractory but not necessarily insulated.
I have had mixed results and poor record keeping makes it hard to draw conclusions.
There are cheap ceramic fiber blankets on Home Depot website, but they are the ones that give off cancer causing fibers.
I’m gonna use them myself, but I’ll coat the inside of the riser with something refractory.
I think they are even cheaper at Graingers .
I found some cheap bulk perlite on that site as well.
I have one in town so they are a viable no shipping cost option for me.
It’s a J. I didn’t know about batch boxes when I built it. It’s just a six inch system with a 17 foot long heat bed that 30 inches wide and two foot tall filled with cob. It too almost a year of running to get the cob dried out enough that it wasn’t weeping water out at the base. The burn tunnel is fire brick set in refractory cement. I had the fire brick from other projects but I admittedly is a little pricey now. That’s one reason I didn’t build the heat riser out of it. Barrel bell. If I were to build it over I’d go 8 inch. I thought that would be overkill but it wouldn’t have been. The duct run in the heat bed is almost 30 feet with a 180 turn. A little too much for the 6 inch system to easily draw through. I use a duct booster fan to get it up to temp on start up. I’t will run without it but not real well when you are getting the fire established.
That system sounds pretty sweet!
How often/long do you burn it to keep your greenhouse above freezing?
I live in Southern Ohio, we get hot humid summers and about 90 days of below freezing weather each year.
I want my greenhouse to support starts and some cold hardy greens.
This is NW Michigan a few miles off the east shore of Lake Michigan so not the same cold climate you get farther inland. Our average winter temps are about mid 20’s. My greenhouse is more of a lab than anything. I just test what’s possible. It’s not a problem keeping it above freezing. Running the RMH a few hours a day will heat up the bed enough to do that. I could easily grow kale, chard, lettuce and things like that all winter. I try and grow other less cold hardy things. I have grown beets and carrots, and potatoes through the winter on top of the heat bed but we get very little sun in the winter so grow lights are necessary. I think any root crops would be doable. I have tried tomatoes and peppers with no success. I can keep the plants growing but no fruit and one day missed with the heater and that would be all toast.
jRight now the greenhouse is cleared out and stacked with new grow lights and 27 gallon totes. This winter I’m going to grow totally soil-less, testing dutch buckets filled with bio-char instead of perlite for root crops and Kratky method for another run at tomatoes and cukes. Similar to what Bobby does at MHP gardener.
I originally built this place to do aquaponics. Being unable to assure myself that I could produce the 24/7 power supply to run that system put that way on a back burner. The 550 gallon storage tank was going to be for fish. Now I’m going to heat the water in it to hold temp the GH better. As I said, it’s all an experiment to see what can be done and then to expand the successes later. I don’t have pictures on this computer but I will revisit this later with some photos.
Wow, you are way ahead on the curve of where I want to be!
Once I dope things out in the backyard, I have a second property that will get the benefit of experience.
My own beds are old refrigerators.
They are in place but not converted.
I tested the idea by turning one fridge into a sub irrigated raised bed, then using it as a outdoor worm farm.
It works perfectly, so I’m moving forward with the idea.
I hear yah on the aquaponics, keeping fish alive is an extra headache.
I like animals, but the only fish I’d keep would be koi, and they will still have to take care of themselves for the most part.
I’m leaning towards root crops for root to tip edibility, and low inputs of light and heat.
I’ve been thinking hard about artificial light in greenhouses, and I really want to use a renewable combustible to power a mantle style lamp to provide light and heat.
I raise worms as well. Red wigglers. If their beds drop below about 50F they quit eating much. I keep them in the root cellar with a heat mat on top of their beds which a 27 gallon totes. Old fridges would make good worm beds because they are insulated. The main reason I build the gasifiers to run generators is to power the greenhouse grow lights. I was using florescent fixtures that I had. I have bought enough of these to cover the 10 by 20 spaced of my GH. They are still in the boxes.
Hey, I’m about ready to insulate my beast and I was considering some options.
Sawdust, perlite or Styrofoam mixed with cement,mud or cat litter.
I’ll add some scrap Fiberglass or Rockwool fibers to alleviate cracking.
Another way to go would be loose perlite or rockwool fiber,sand or just dirt.
I’m leaning towards perlite and cat litter as a good compromise between cheap, easy and gas tight.
Sodium bentonite (cat litter)melts at 1200 degrees Celsius which is probably good enough as long as I keep it away from direct contact with flames.
It should prove useful for other purposes, like lining the bell of a rocket mass heater.
For your heater I’d lean toward the perlite but I’d mix it into aircrete. Just aircrete alone would stand the temps of the jacket surrounding your fire core. Would probably add some durability to your sheet metal liners.
A low cost source for this might be ‘western bentonite’. It is used as a binder for sand molds in foundry. You might check with a foundry supply house.
Rindert