I still have not had any tar come out of the hopper tank in 3500 miles, I did move a bunch of it from the top gutter last week when I did my repairs, maybe 2 cups. The bottom gutter seems to always be full of tar and keeps clogging the drain pipe. I heat it up with a small torch and some drains out then it gets clogged again. I don’t think my hopper gets hot enough for the tar to easily flow through the gutter, when I run out of wood the hottest the hopper gets is about 125f before I pull over and refuel. I was actually thinking of doing an excitement to see what temperature the tar needs to be for it to move fluidly, I almost wonder if I need to insulate the lower half of my hopper to get the tar moving correctly. Still not sure what to do about this on my next build since I am contemplating a square hopper for more wood capacity. The v10 I want setup for long distance while hauling weight, and will need to be able to be filled from the side in certain situations and the gassifier CANNOT extend past the cab. So less air flow around the hopper, potentially more problems with tar moving freely
Yes Marcus if the temperature at the exit pipe going to the water/tar condensation tank is not warm enough then the tar will not flow very well, especially if the piping is not at a 45° angle.
This is what I found out and changed on my hopper, it was completely plugged up when I got the truck home from Kentucky. I figured it was because Chris had stopped driving it when I bought it. It sat there not being driven hard for weeks. The tar slowly work its way down and plugged up the piping and into the tank. With the 45° angle pipe point down to the vertical 2" pipe in to the tank there is no more plugging up in that spot. Also my gutters are all slope inside the hopper barrel to allow the upper and lower gutters drain pipe to drain when the truck is parked on a level surface.
NOTE: This is not possible with the new Wilbur Smith hopper design you have. But you could make sure you just park the truck so it would drain that direction or just tip the whole gasifier to that direction a couple of degrees would do the trick.
When I am running my gasifier I can hold my hand on the lower part of the hopper but it is definitely warm.
Yes maybe a little insulation will do the trick and get the tar to flow a bit easier. Some thing else on my hopper is the cooling tube on the side of the hopper is also at the top and bottom gutters drain piping. It has hot air circulation going through the pipe when running the gasifier.
If you are burning up some of the tar and making good gases that is real good. More miles per pound of wood.
Bob
Okay what kind of wood are you using the most. Kiln-dried firs lumber woods probably a lot less moisture and sap to cook out.
It has been Kiln-dried once and now it just has gotten wet. Maybe you are burning the tars up in the firetube. If you can burn it up you are getting more energy out of your wood.
If you can slow down the slipping of the Charcoal at the grate a little but get the ash to go through it would be a plus for you. It is a real balancing wood gas act that we are performing in gasification. I am still learning how to do it consistently. Tricky at times with all the variables we face. We just do not want to let tar get by our Charcoal bed and pass through our system into the engine. Keep it hot in the Charcoal bed area and at the grate. Do not get in a hurry when starting the gasifier up is my rule of thumb.
Bob
That’s the next thing I think I will do is tighten up the distance from grate to choke plate, it’s currently 1 1/2" I think I would like to go tighter, some char is pretty big that slips past
What is the diameter of your opening at the bottom of the Gasifier vs. your grate that is 1 1/2" below that? This is where you can control Charcoal slippage. I do not mind slipping Charcoal by cause I have a Charcoal gasifier to put it into. I just empty it more often and clean the Charcoal and ash out. This is why I made the pads out of ceramic insulation and welding blanket to protect my ash clean out doors from high heat. My seals still look like new. And the spacer keeps the door hatch seals from leaking on hard pulls of more than - 30 with the gasifier. My gage only goes to -30 and I have pegged the gage at times.
Really hard on my plastic hayfilter barrel. I have round wooden spacers with holes in them to keep it from collapsing under high vacuum and hard pulls. Yup I have done that too. My hay filter barrel is my weak spot for a hard vacuum pull. Next unit will be all steel like the WK original barrel. LOL
Bob
The restriction is 6" and the choke plate is I think 8". I ended up using the bottom of the old ammo can I cut off as a heat shield inside the ammo box and a block of wood 6x4 cut to snug fit in the box to keep it from collapsing in and hold up the heat shield. Working good so far
How much bigger is the grate across. If you have a bottom of your firetube opening at 8" that is how much mine is 8" across the bottom open of the firetube.
I think my grate is be low the 8" open is 16" across diameter before the Charcoal will fall off the grate hanging by the 4 heavy-duty link chains. With a 1" to 3/4" spacing between grate and firetube.
Bob
I think the grate was 13" across?
That gives you 2 1/2" all the way around. So you might slip more Charcoal if you move it up any closer. The velocity of the gases has to go through the grate holes which are slightly plugged with Charcoal or out the sides, when you are pulling the engine vacuum and that causes Charcoal slipping over the edge of the grate. I would try first opening up your restriction that is at 6" to 7" you do have a larger cu. in. engine then me and I am at
7 1/2" opening but I am only 9 1/2" straight down from the bottom holes of the nozzles or 9 3/4" to the restriction opening. Remember this is very important “every gasifier build is different in its own design”. Not one design is alike.
Bob
Marcus, just a few thoughts about hopper temp vs juice and tar.
I’m not 100% up to date on your lower gutter area, but as I understand it you use bent fingers to prevent debrie from falling down into the gutter. At the same time hopper circulation is dependent on gaps between the fingers. Smoke falling down the hopper tubes is dehumified/condenced and re-enter the wood pile through the gaps somewhat more dry - heated up again by radiation from the nozzle area and ready for another turn up through the woodpile to carry more moisture away.
I’ve noticed the hopper temp is very dependent on how freely this circulation flows. Also, the more circulation - the more juice and tar is collected. Yes, more heat is wasted, but on the other hand the firetube will have less steam to deal with.
I found a pic from Wayn’s 95 Dakota where he modified the gutter protection. Look at the cut out gaps below the protecting ring.
I’ve thought about this a lot. I’m wondering how useful would it be to just make a bottom gutter but line the hopper with either slit cut sheet metal or expanded sheet metal to keep debris out and still promote smoke flow. You could terminate the perforated guard right at the lid. Don’t you already do that JO?
That’s right Cody. I use inner liners. Added tubes would of course increase cooling surface area a lot, but with my equipment I can’t weld my super thin ss hopper material.
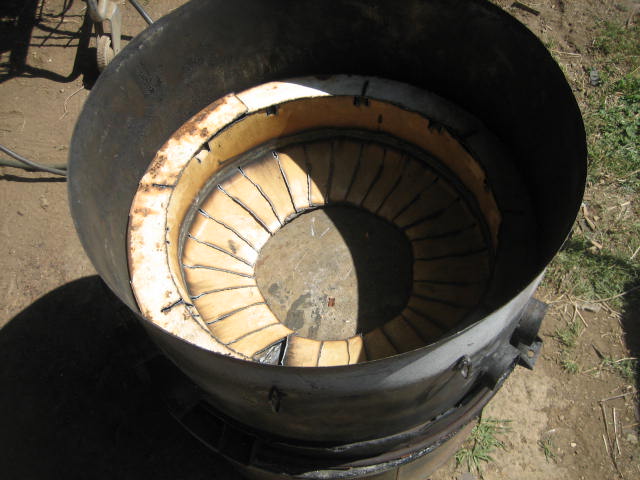
This picture is how I did my lower gutters, minus I do not have the small knockouts for extra air circulation just a straight wall and flat cap/guard

This is how Wayne did the Wilbur Smith lower gutter and ring with cut outs on the top edge of the gutter wall. In my hopper my slot holes are pluging up all the time and for good circulation of air I have to make sure they are unplugged. In this design Wayne has address this problem.
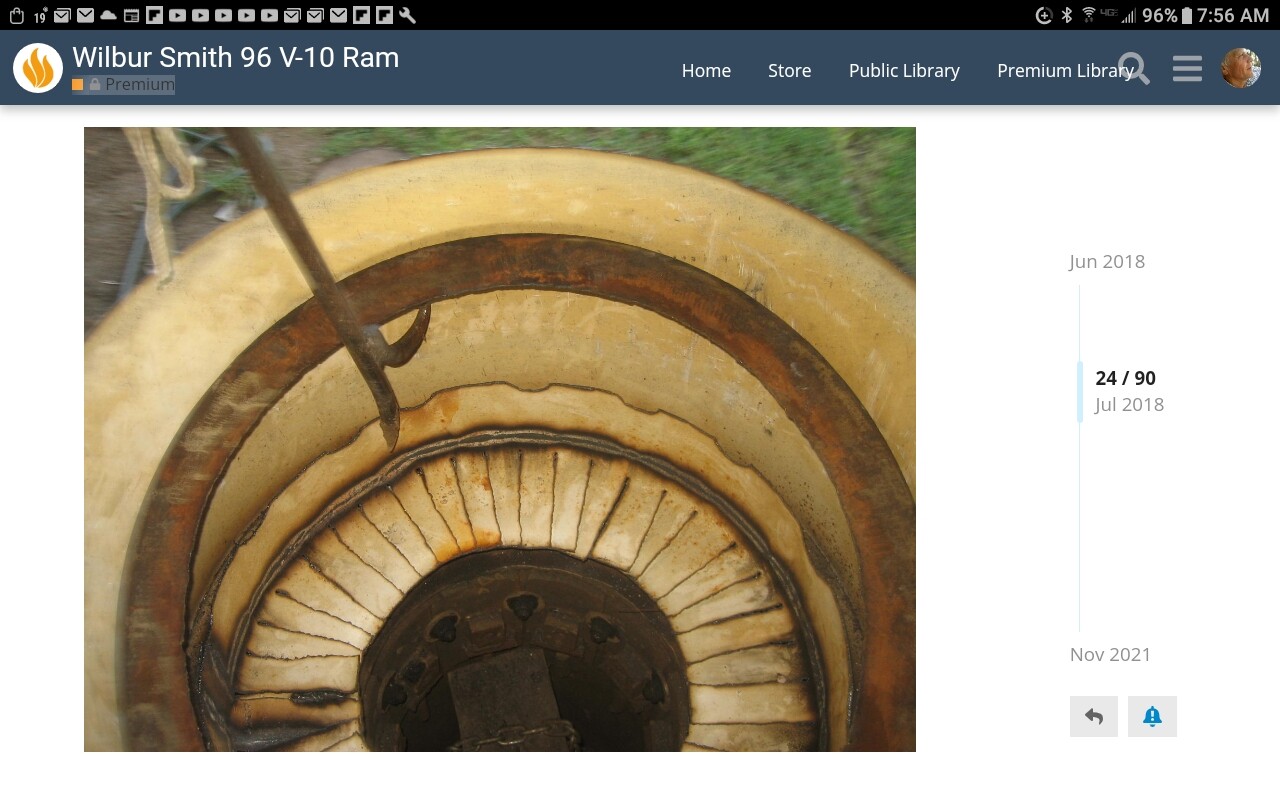
The ring protect the cut out edges from plugging up with fine wood and tar wood debris that could fall in to the gutter. But the hot tar/water can still run down the hopper wall and into the gutter while the pyrolysis of wood continues to work its way down in the hopper to the top of the firetube.

The long metal pieces are welded together to form a cone to help guide everthing into the top of the firetube. It is very hard to see all this when it has been used and tarred up with wood debris.
Bob
Thoughts
I think there are 3 essential parts to woodgas once past the construction phase. We often call this the other 75%, but I think we can break this down into a few sections
First, learning how to drive on woodgas. Ok, we all know how to drive but woodgas changes throttle response, depending on the mixture and or the temperature of the gassifier which in turn changes the gas quality’s will dictate how the vehicle will respond. I think this was what I picked up the fastest, being a mechanic I am so used to being in tune with what the motor is doing and how the vehicle responds it seemed natural to me. Changing mixture to get more power and finding that perfect lean mix that gives best throttle response and power. Made a little harder by fighting high vacuum which seems to have a big influence on idle quality and off the line performance
Second
How to operate the gassifier. Each one is different and responds different. And by operate I mean what you directly do that changes the performance of the gassifier itself. This can be things like size of chunks, quantity of charcoal added, distance from nozzles to restriction, grate design and distance from restriction, how much air comes in, preheating air or not. All change performance rather quickly
Third
How the gassifier itself operates. This is learning the quirks of your system. Mine likes to plug up the lower barrel with char and I have to be on my toes to catch it before it gets out of hand. Mine also like to clog the lowest cooling rails in about 2 weeks driving. My drop box fills up with char very fast after vacuum starts getting high, and my system can pass a lot of soot for some reason. This is just how it works, but I can step back to part 2 and change things to correct these where as now I am just learning what it does and how I can correct it to get optimal performance. I have also notice there seems to be a direct correlation between vacuum ratio and center post temperature. The high the vacuum ratio, the lower the temp for example at 20:1 I was seeing 250° cruising in the center post. Now at a nice and free 2:1 I am seeing 450°. Also seeing a much higher temp in the center post when running out of fuel while at 2:1 ration (700° yesterday  ) there also seems to be a correlation from vacuum ration to fuel consumption. The higher the vacuum ratio the less fuel used but a trade off of lower power harder to drive and some gasoline siphoning. The lower the ratio as 2:1 I have to make a extra stop on the way to and from work and refuel.
Learning and burning, Marcus in the chevotafire
Wow, last summer at the Washington State Wood Gas Meet Up at Mike Gibb’s place, you were still building your gasifier. Now you are driving and talking what your personal experience has shown you. Good job on getting your other 75% learning of gasification degree.
Bob
Before the engine carburetors with auto choke devices you had a manual choke cable. Most of the younger generation would be lost in a vehicle with that and try to start and drive off down the road.
Bob
Most of the younger generation doesn’t realize you could once actually roll up a window with a crank or that you just sat in a seat and didn’t have a button to give you an ass hug.
Your speaking about the kind of vehicle I like Tom newest vehicle I ever bought was my 2000 Silverado I got used and nothing electrical worked I hated it. I prefer my vehicles to be 1996 and older (pre OBD2) I love my manual windows manual seats manual transmission only creature amenity I have grown to enjoy is air condition and that’s only been as of recent since I can now service them myself, bought all the tools from the hazard drought and have fixed my old V10 my Silverado that I sold and the wife’s car. Did several big rigs at work now to. The rest I can live without just fine 
Preaching to the choir Marcus. I have a 2000 Ram that quit working. I changed out the injectors and fuel relay and it didn’t fix it. Without it running I don’t know how to pull a code so I parked it a couple years ago. It has power nothing but does have a 12000 lb winch in the bed that I miss. It’s a 360, kind of the Mopar SBC. I’m going to get a manifold for it and pull the carb off my also not running mud truck and get that thing running again.