OpenFire Gasifier V.2.0

Hi All,

After a year of contemplating the failure of my for-profit business (Off Grid Pro), I’ve gone through some rough patches, did some soul searching, and have done some deep thinking. I have decided to revive the OpenFire Gasifier. Although this time it will be much different than the first version, and I will be aiming at an entirely different set of priorities.

I have been toggling back and forth between focusing on affordability and/or performance. Because my own personal happiness is a major factor, I have decided to focus on performance. I’ll be using advanced materials and creative design to accomplish the goals.

This will not be a “super practical” or an “off-the-shelf” parts kind of unit. I will be pushing the envelope. I will be using the best materials available to accomplish this goal, such as alumina, ceramic, stainless, aluminum, and other materials that are best suited for the objectives and priorities.

I will be taking an “analog first” approach to the design, so that no electronics will be needed to start or run the system. This will go over well with the “EMP proof” folks in the prepper circles, as well as it being just good common sense. That being said, I am also designing this to be fully automated for those that want a “push button walk away” type of set-up. My own desires are to have an Arduino and Raspberry Pi system attached with sensors and automation.

Coming from the software development world, I see this in a very similar light… Versions with add-ons.

All plans will be made Open Source from the beginning, and I hope the bare bones package won’t be too steep in price. I will make this a Creative Commons CC BY SA:
https://creativecommons.org/licenses/by-sa/4.0/legalcode

This means that anyone can make contributions, anyone can sell or modify the design (as long as they share too), without legal entanglements.

I will be open to any ideas, contributions, and/or criticism. I hope some of you can join the fun…


Current Priorities:

  1. Modularity—High focus on attachments, upgrades, and enhancements. This will largely be done with the liberal use of flanges and the standardization of connectors and connections. If I want to add an auger feeder system, an airlock, a hot water heater, I should be able to bolt one on. This means I am considering all the obvious add-ons before I even design the bare bones system.

  2. Portability—This version will be tightly packed (i.e. laptop vs desktop) and designed for mobility. A single human should be able to roll the gasifier around on wheels, and perhaps even pick it up and carry it. I am particularly interested in some kind of cart or dolly system. I’d like to be able to add batteries, automation and other add-ons that might bolt onto the cart, just like some add-ons might bolt onto the gasifier.

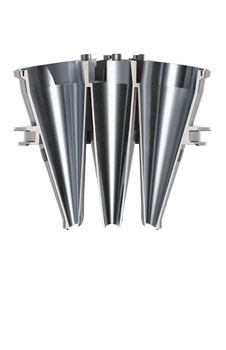
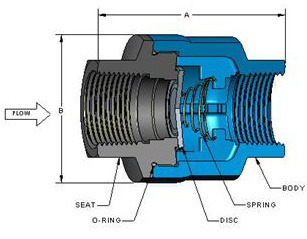
  3. Scalability—The real innovation here is to factor in the ability for a gasifier to use multiple nozzles and multiple tiny cyclones (think Dyson vacuum cleaners) to approximate a linear gradient with regards to gas flow demand. I will be using a series of low cracking pressure check valves to accomplish this goal for both the nozzles and the cyclones. In short, the system will be designed to run efficiently and optimally at 100cc up to 600cc of engine displacement. I’ll probably adopt the Honda platform for the engines, so the Honda eu2000i would function great with one 3/4" nozzle, and the Honda GX 630 would require all three 3/4" nozzles to be activated. This automatic “range” aspect of the design has me the most excited.

  4. Durability—I know I am going to catch some flak for this one, but I am going all stainless. I don’t want to worry about rust, paint peeling off at high temps, water drip headaches, and/or other factors. Yes, I know carbon steel can be incorporated in clever ways to save money, but stainless is where I am going. Of course, there will be some aluminum too, and even iron filings (for H2S), but 95% stainless is not too expensive when the system is compact.

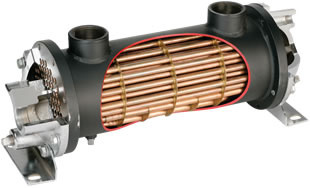
  5. Heat Management—Even though charcoal gasifiers have the reputation of low gas temperatures, they eventually do heat up as the fuel is consumed and the steel heats up. I will be incorporating a very compact heat exchange system with a massive surface area. This will cost money and require more welding time, but—as you will see—affordability is not high on the list. It can’t be if we want truly low gas temps for extended periods of time.

  6. Affordability—Unfortunately, many of the design decisions will push affordability further down on the list. I understand the repercussions, and accept them. For those DIY guys, we are only talking about the cost of parts. Also, if others wish to build with carbon steel to reduce costs, they can.


Thanks for reading!

Regards,

Troy Martz

5 Likes

Hey Troy ,
I will be following your progress with interest , keep the idea’s flowing !
Dave

2 Likes

Thanks Dave. I’ll do my best.

Hey troy glad to see you got your gasification mojo back. Good luck on the concept.
David Baillie

2 Likes

Troy,
Thanks for this stimulating post. Your Off Grid Pro unit was a beauty. I’m most interested in seeing how you approach heat management. Are you thinking about managing heat on the reactor body or something like a turbo intercooler on the gas line? I’m struggling to get on track with the multi-nozzle idea, so I look forward to seeing how it works out. Do you have some experience using check valves on nozzles? What is your current thinking about fuel processing? I love thinking about this stuff so am thrilled that you are applying your talent and sharing your ideas.
Whether our preference is for wood chunks or charcoal, whether we are inspired by simplicity or complexity, there is something for everyone on Drive on Wood.

3 Likes

Hi Bruce,

Some thoughts…

Heat exchange

The heat exchanger with not be part of the main body. It will be next to it, like a twin cylinder in height and width. All the filtration will also be on this side unit.

I did a lot of research on heat transfer, transfer rates, and materials… and have decided to spend the extra buck and go with 36 1/2" thin walled stainless pipes, each 36" long in either an open configuration, or (optionally) as a closed water heater for those who have water pressure, and want to use as a coolant.

The name of the game here is SURFACE AREA!!

For those who wish to air cool the pipes, I am positioning them so that 2-3 fans could take the waste heat from the outside core jacket as the poser source. I’m looking at both Stirling engine fans and thermoelectric. both would work, both would provide ample air flow, and both would utilize waster heat for power.

However, as nifty as that may (or may not) be, a water cooled approach is far superior.

It would kind of look like this (below), but upright, and the cooling tubes would only exist on the outside edge.

I am debating on whether or not to keep the shell on at all times, or to leave as optional… Open to the air would be more effective for air cooling, but “componentizing” the shell, as a “slip on” kind of thing would be difficult.

Multi-nozzle / multi-cyclone

More coming soon on the multi-nozzle idea… However, the main reason is so the air velocity at the nozzle tip can be configured to operate in a tight, predictable range. There is a direct correlation between combustion temperatures and air velocity. If I were to just have one big nozzle, I lose control… Better to “step” up the number of nozzles as the suction increases. (IMO)

Same with the cyclones. A cyclone is only effective within a certain gas velocity range… Too slow and your efficiency can drop to less than 50%. Too fast, and you’re dealing with pressure drop, frictional heat, etc. Better to “step” up the number of cyclones as the gas demand dictates, so you are always in the 90%+ efficiency range. (IMO)

Fuel processing

As for fuel processing, I really like Gary’s charcoal processor. I also like the Thymark shredder:

However, these are expensive, and I think something similar to Gary’s crusher would be cheaper to make, and just as effective.

The charcoal would drop down, and then at an angle, drop into a rotating trommel filter with a 1/8" mesh. Whatever falls through the mesh can be used as biochar (or whatever), and the sized char pieces would continue through and drop into a container. All this would be completely enclosed to control dust.

Because i plan on building a hand crank blower (with optional motor), I am trying to use that cranking mechanism for all three uses, just with different gear ratios. I.e. when you’re cranking the char crusher, the trommel is also spinning.

Troy

1 Like

Thanks Troy! Fun stuff.

2 Likes

Hi Troy

How about a heat syphon, User plugs in a container of water with a high an low cold out, hot in fitting, or better still, build your heat exchanger in a closed loop filled with glycol, they can then stick a container around it or not, either way it will cycle. ??

2 Likes

I need to look more into that…

Conceptual Thoughts:


Phase 1 (Q4 2016)

Camping scale

OpenFire G150 — single nozzle, fixed flow 50-150cc (~3hp max.) engines

  • Run a Honda eu2000i
  • charge small battery banks
  • use small power tools

Phase 2 (Q2 2017)

Homestead scale

OpenFire G700 — multiple nozzles, variable flow from 100-700cc (~15hp max.) engines

  • Use a Honda GX 630
  • Charge large battery banks
  • Run a welder or load-intensive tools

Phase 3 (Q2 2018)

Farm scale

OpenFire G5000 — multiple nozzles, variable flow from 500-5000cc (~100hp max.) engines

  • Industrial engines and generators
  • Power the farm
  • Run multiple load-intensive tools

ideas?

Check valve update:

Although I will be focusing on the “micro” gasifier first—because it’s what I can afford right now and has a single nozzle with no check valve—I had already started my search for low cracking pressure check valves.

Note: My nozzles and my cyclones will be standardized on the 3/4" pipe size, on all gasifiers.

After calling 8 other companies, I found the winner, I believe. The engineer (Steve) called me back, and said his distributors could deliver on the specs I require:

Part # SCV 8368
List price at $122 per
316 stainless w/ Viton® o-ring
3/4" female to 3/4" female
cracking pressure at .24 PSI (6.64 inches of water)

Special request needs to be worded this way when ordering:
“Metal-seated valve, with Viton® body seal o-ring”

He also mentioned that because of the special order, the actual part number would differ slightly, and that he didn’t know what it would be… FYI.

If you want a lower cracking pressure (which requires a special spring), the part number becomes:
SCV 8368 C001
List price at $143 per
cracking pressure at .1 PSI (2.77 inches of water)

Viton® is recommended for hydrogen and carbon monoxide application, and is rated up to 400° F :slight_smile:

Troy have you thought of a plumbing check valve first? The ones I’m thinking of are all brass, spring loaded and there is a screw holding in the spring. For a 12 volt small pump I have adjusted the spring to allow it to open easier that would give you the tunability you want. At $20 a pop might be a good experiment.
Random thoughts.
David Baillie

2 Likes

So let’s try a link something like this:

http://m.homedepot.com/p/EZ-FLO-1-in-Brass-In-Line-Check-Valve-20405LF/205858371

1 Like

Cyclone efficiency:

Fantastic documentation on cyclone efficiency:
http://engineering.dartmouth.edu/~d30345d/courses/engs37/Cyclones.pdf

Thought I’d share…

1 Like

On the heat exchanger skip the jacket, it dont work unless you are using aluminum. I’ve tried air blasting through shrouding on steel tubes with only very minimal results. Either go with an open air design or go to liquid cooling. Unless you are planning to move this heat elsewhere. But you need to factor in losses and this air will cool very fast if moved any amount of distance. Also the safety factor if in time corrosion or something allows it to leak.

Liquid cooling is not that hard or expensive to do. Use an RV pump and a heavy duty big truck trans cooler.

If you go aluminum that is the way to go but is now consumable. This is hard for the consumer to get over so its a hard sell. But for like you I want performance so we will be using a heavy gauge aluminum tube chiller soon. We will look at having it dipped is a corrosion resistant coating to combat this. However I think on our more advanced systems aluminum is not as much as an issue. In either case air or liquid cooled aluminum is far more effective. We are currently working on a machine for next years development in the Evolution S2 package. This machines will feature some of the very advanced systems, including a regen micron filter and the continued autonomous operating systems.

Matt, what type of anodizing, or corrosion-resistant coating do you know about?

For the micro unit, my CAD drawing is using 18 3/8" schedule 10 stainless tubing as for now (24" tall)… I can easily change this to aluminum, but those tubes are already ultra thin, I would be worried about hydrogen embrittlement and pitting… However, if you know of some kind of coating or treatment, I would switch to aluminum in a heartbeat…

Thanks!

David, what would be the approximate cracking pressure on those brass check valves? Any idea?

For testing, those would be good… For production, I’d go with something similar to what I listed above… I might be able to find some even cheaper with a little more digging.

There is a chrome powder coat available that will withstand both heat and corrosion. Otherwise use any anti corrosion paint. But with aluminum you need to dip it in an etching primer to get it to bond.

1 Like

Not sure. You can get it to open by just lightly sucking in even stock. Loosen the bolt on the spring and it was barely noticeable so lots of room for adjustment there. Set up some way of calibrating, adjust , jb weld so it does not move after that. In a way it is no different then an adjustable resistor in a homemade circuit…

2 Likes

Check valve update #2:

I just spent 2hours talking to an engineer at Check All (a different manufacturer), and we discussed gasification, the physics of check valves, the different types, etc. I learned quite a lot, and because of this conversation, I’ll be moving in another direction.

In short, after I explained the entire gasification process with my particular design slant, he recommended that I use check valves in an upward position with no spring. Apparently, the spring is the weakest link with check valves, and also introduces some extra physics for which I was not aware.

With a spring—even if the cracking pressure is .12 PSI, for instance—you would need .3 PSI of negative pressure (suction) to open the valve all the way, which is nearly 3 times more than the cracking pressure.

By removing the spring, and letting gravity serve as the check, we essentially remove the weakest link (the spring), and we don’t have to overcome the rated cracking pressure (at least by very much) to get a wide open valve. The piston will rise with the rated cracking pressure, and will close with gravity.

This is the next best thing to having actuated valves—something I am trying to steer clear of with these smaller, mobile units. This is a design consideration that I think is important. And at the very least, it is in line with the stated goals of the OpenFire.

Any thoughts?

Here is the check valve:

List price: $92.95 per

The engineer’s information:

Noah Miller
M.B.A.
B.S.M.E.
Application Sales Engineer
Check-All Valve
1800 Fuller Road
West Des Moines, IA 50265
Phone: 515-224-2301
Fax: 515-224-2326
Email: [email protected]
Website: www.checkall.com