Hey BrianH
The furnace cement will work great for temperature. Will/does crack and create an air leak with flexing and/or vibration. Next time if you slit the outer woven wrapper sheath of a common piece of stove fiberglass rope then double side work the cenemt into this flat strip to make your seal it will be much less prone to cracking. And when it does finally crack ussully it will not go all of the way through creating an air leak.
also, wayne said he wanted a picture of us so he would know what we looked like. that’s about the only pic of me i could find and i look like that most of the time.
Hi Brian, You are on your way to building a Simple-Fire! A few notes. A 1" pipe flange may be large enough to cover the bung hole and provide a threaded pipe hole for the 1" pipe gas outlet. You can cover your nozzle with furnace cement, but it will flake off in a burn or two. The metal pipe will expand faster than the cement and away it goes. Cannot find stainless steel sheet metal for a protective wrap around? Don’t worry, just go ahead and use the steel pipe. Keep a few extra on hand and replace the current one when it has oxidize back to a nub.
The steel pails will run your 18 HP engine at a good clip for about 15 minutes. You really need a taller gas generator to run an engine of this size for any legnth of time. Start scrounging around for a 15 gallon grease drum.
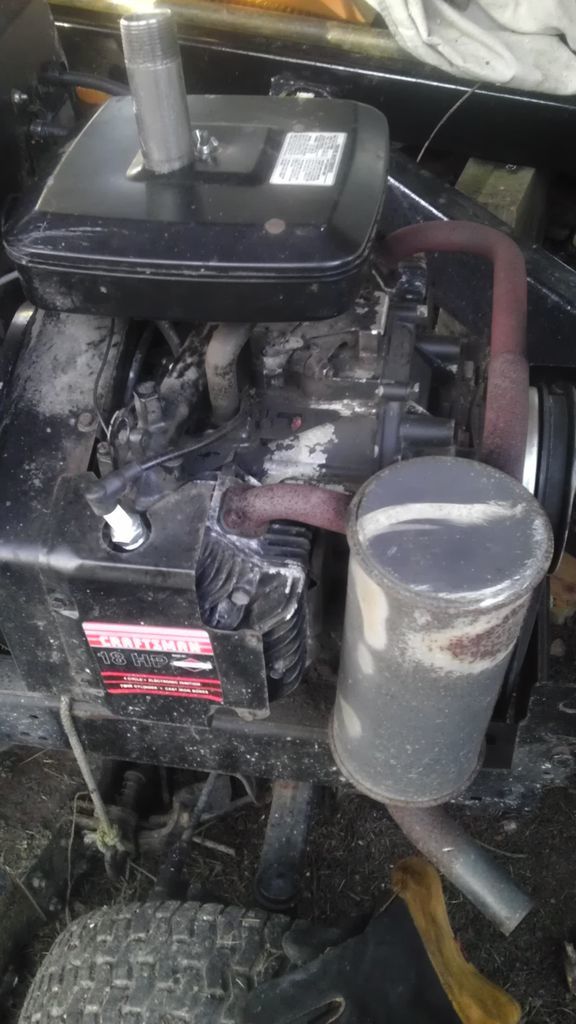
You will also need to put a “T” on the engine exhaust so you can route some of it back to the Simple-Fire air inlet. I’ll bet your B&S engine has a 1" pipe thread for the exhaust so it will be easy to put the “T” on. Here is a picture of how my Gravely exhaust and gas intake is set up. The beauty of this set up is I can run on Dino fuel or charcoal gas without makeing any adjustments.
Gary in PA
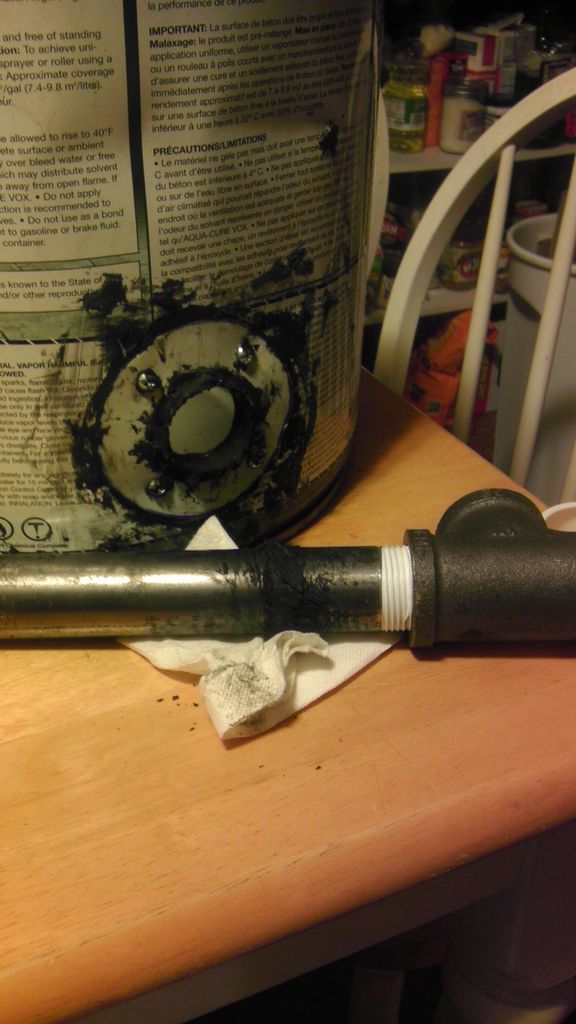
Picture 1: The lid seal didn’t work out at all. It got squished out of the parts that it needs to be in so the lid was stuck without actually forming a good seal. Also, the silicone stuck to the bucket side of the seal and just got torn up when I ripped the lid off. I know “soapy water” is supposed to be a good release agent for silicone sealants (standard and high-temp) but I guess my “hippy” dish soap that is just modified cocoanut oil and almond oil (“Earth Friendly Products: Almond Dishmate”) doesn’t work for that purpose. I hope the “Seventh Generation: Free and Clear” stuff works. It is a lot closer to standard dish soap but won’t trigger an athsma attack for me (I’m allergic to many fragrances and cleaning products. It is not fun).
The inlet pipe seal looked pretty good at first (picture 2) but just crumbled away with the first sign of stress from threading on the T-fitting (picture 3). I guess I don’t need to check if it will hold water, which is why I was putting on the T-fitting (and pipe plugs).
Clean the gasket material from the lid and can. Get some silicone caulking and lay a nice heavy bead of it in the lid, make sure it is even and let it sit about 1/2 hour to skin over. Place a piece of sranwrap over the top of your drum and gently place the lid on the drum. Add some weight (a pound or two) to lightly press the lid down and move the silicone to make a nice even seal. Let it set up for a day and you should have a very nice lid to drum seal.
The air inlet needs beefed up Let me recommend you get a 1" pipe coupling and weld it to the flange you are currently using. This way your nozzle screws into this coupling and therefore can unscrew from it. This makes it very easy to replace the burned out nozzle with a new one. Since the flange with the coupling is bolted to the drum, it is very easy to remove it and place it on a bigger drum if you wish.
Gary in PA
I should probably point out that my “flange” there is just 2 layers (1 inside, and 1 out) of sheetmetal roofing that I had snipped out and then cut a central hole big enough to jam the pipe through. I may have to spend the extra few dollars to get some actual pipe flange to bolt on. Since the pipe flange is likely going to be made to have a pipe threaded in to it, would I need to bore out the flange to fit the actual non-threaded pipe? Or should I cut my current pipe in half so that I have 2 threaded pieces to thread in to the coupling/flange? I guess I’d need to get at least 1 end re-threaded to accept my T-fitting on the outside of the can.
As for making my reactor taller and thus have more capacity, I was thinking that I could try to weld a lid, with the center cut out, to the bottom of another bucket, which has had its bottom cut out to make a double-tall bucket. That is assuming I can find a suitable place to set up my welder… This house was built in 1893 if I recall correctly and a lot of the electrical seems to have been done to the bare minimum requirements on an “as needed” basis. A lot of it probably wasn’t done by a particularly skilled electrician either.
Hi Brian, I think it is time to set up your welder. It will not take too much to weld up an air intake set up. The picture below shows a pipe coupler welded to a square plate that is slightly bent to fit the contour of the steel drum. The red portion of this air inlet contains a “T” where the exhaust gas enters the air inlet. On the other side of the coupling is the screw in nozzle with a stainless steel sleeve wrapped around it. You will notice it has been burned by the hot charcoal. As this slowly disinegrates, it gets replace. Trying to keep this device simple. Please note this unit is 3/4" pipe. It is my first prototype and now I am going with 1" pipe. 1" pipe easily fits inside sump pump hose and 1.25" flexible steel exhaust hose.
Regarding your idea of stacking buckets… The arrangement you suggest will probably not work. Hummmm, let me rethink that. May concern is the heat from the burning charcoal may destroy the silicone seal on the lid. But then again, the paint on my simple-fires do not burn off so maybe it will work. Another idea is to put one can upside down on top of another can and weld it. Then cut the bottom out of the one can and weld another bottomless can to it. The sealable lid will then go on top of the third can. This will give you a good long run time too. The unit will be about 4 feet high though.
Until later,
Gary in PA
Gary: My welder issue is multi-faceted. 1. We don’t have any concrete surfaces available. All we have are either flamable wood/carpet/sawdust floors or wet muddy grass. 2. I don’t think our ancient and partially jury-rigged electrical system can handle the draw of my welder without blowing half of a dozen ceramic plug fuses that are hard to acquire around here or shorting out the whole house.
Wouldn’t having the lid seal a second bucket higher away from the hot intake zone than a single bucket be better? I guess that regardless there would be seal for the lid of the lowest and hotest bucket, either as the main lid or as the joiner between the 2 buckets.
I don’t think the upside-down bucket idea would work out because I’d need to make a custom resealable lid for the “bottom” of the top bucket to add fuel.
Hi BrianH
I fought the same no power/safe place for a welder problem for years.
Our 1904 all wooden house was code complety rewired in a 1996 redo but I made no provisions for an outside 240 volt power source. Even if I had, the old and new wooden porches next to the natural cedar shake siding is a recipe for welding spark disaster.
And the old wooden farm outbuildings with 1940’s wiring, dirt/wooden floors and hay duff also be a burn down your own building disaster.
My only concrete here like you is in some of the foundation walls.
I fussed, frittered and fought with this situation for a few years expensive farming out welding needs trying to come up with a solution NOT costing thousands of dollars to put in place.
Solution.
Make up a 8x10 foot gravel pad with 2x6 ground contact treated stacked perimeter walls. Craigs list/local source one of the old all metal 6x8, 8x8 garden shed buildings. Wire brush knock off the rust and to give a tooth for paint and Rustoleum to your choice.
Craigs list/local adds/local rental place source and old still workings ebgine driven WELDER-Generator. Lincoln, Miller and Holbart are the brands with parts and sevice info available.
Then you will have a welder on demand. AC Generator capabilty on demand. AND an IC engine load mule for your gasification projects. Keep it gasoline capable for your build a system capabilty. House close enough for a power back up source. Internal sound insulate then with foil faced insulation.
Gary G.: I feel like I am hi-jacking your thread with my side issues. If you’d like, I could ask Chris S. to split my stuff to an off-topic thread.
Steve U.: Some things I should probably note: On the plus side, my welder uses a standard 110v outlet (Hobart Auto Arc 130. Does anyone know how would I calculate the power draw of my unit to see if it is safe to run it on “X” power source?
This guy just posted a 8’x10’ metal shed a few miles down the road from me for much cheaper than anywhere else or cost to build.
Our outbuilding electrical is the worst looking. The building itself is made out of 80-year-seasoned cedar with cedar shakes. We do have 1 outside outlet that seems to be fairly modern/well done and it is actually on the side of the house where my wood/truck/trailer/mower lives.
I only found 1 gas welder/generator remotely close to my price range (250$ end cost)but it looks like it was in WWII and the generator side doesn’t work. They didn’t even say if the welder side works, so maybe just the engine turns over.
I should also note that money is very tight for me. I have about 1,000$ of dwindling buffer zone but live on about 200-300$/mo cash (from side jobs) and 200$/mo food stamp assistance.
you should get at least 10 burns from a nozzle before it oxidizes away…
…now, does it oxidize and erode away a little at a time, or melt and disappear in big lumps? What I’m thinking is: use thick wall tube, treat it as consumable, and feed it in as it burns away. I was lucky enough to get a scrap piece of stainless, but it’s not outrageously expensive new. Anybody tried pressing TIG welder shields into service?
IF you use exhaust gas to cool the temperature of the oxidation zone from 3,000F to somewhere around 2,000F, your nozzle will erode away a little at a time. Fe + O2 yields Fe3O4 which is a black form of iron oxide found when forging iron. If you do not cool down the oxidation zone, your nozzle can melt away in a lump.
Thicker steel or stainless steel will definately last longer.
Gary.
I have claimed that metal shed and have cleared out a space next to the house near the good outside outlet!
Picture 1: The rim of my bucket was free of rust before I tried to make the lid seal. I think the RTV High-Temp silicone might have a corrosive effect, at least while drying. The stuff I have does smell like vinegar.
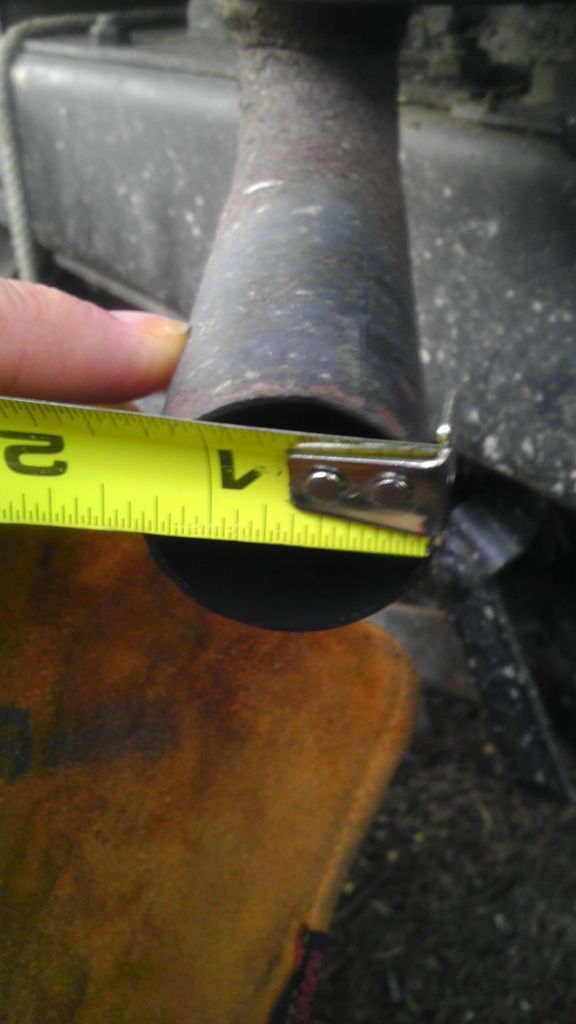
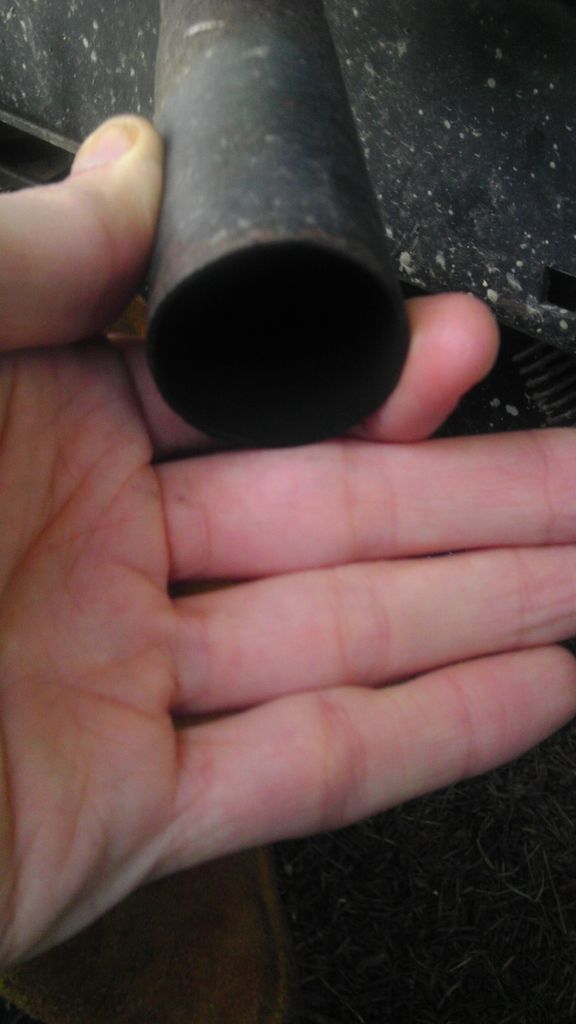
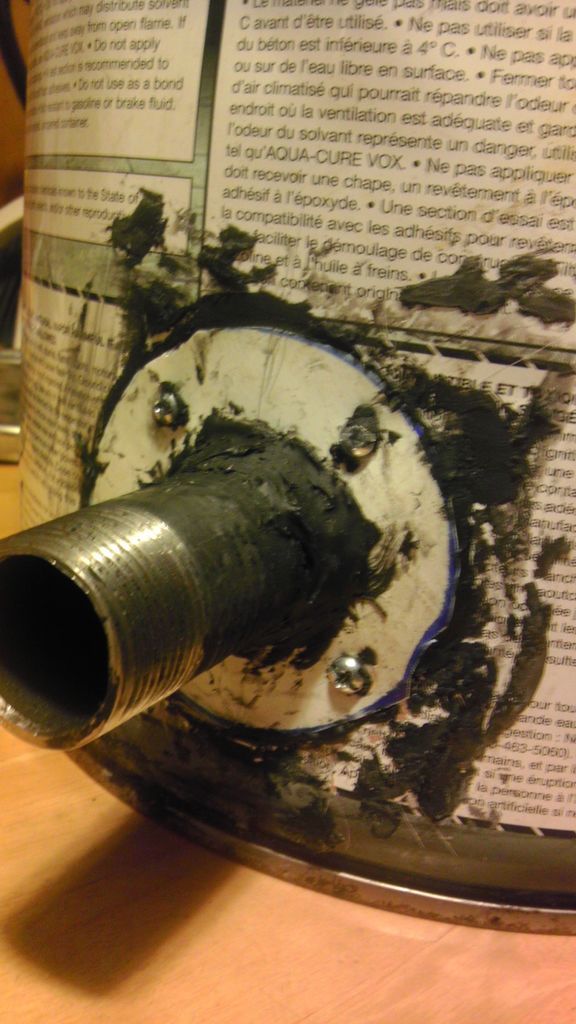
Pictures 2-3: My exhaust pipe is 1-1/4" unthreaded.
If your Hobart is like my lincoln they recommend a 20 amp plug. I use mine on a 15 amp all the time it is just when I increase the wire speed past a certain level that I blow the breaker. When doing work on older houses I will often install a power bar with an overload breaker on it. They are usually 12-15 amps and will usually blow before a hard to change out fuse. Keeps the client happier and warns me when I’m pushing too close to overload…
David
I got a power bar with a 15A overload breaker. Hopefully, that works.
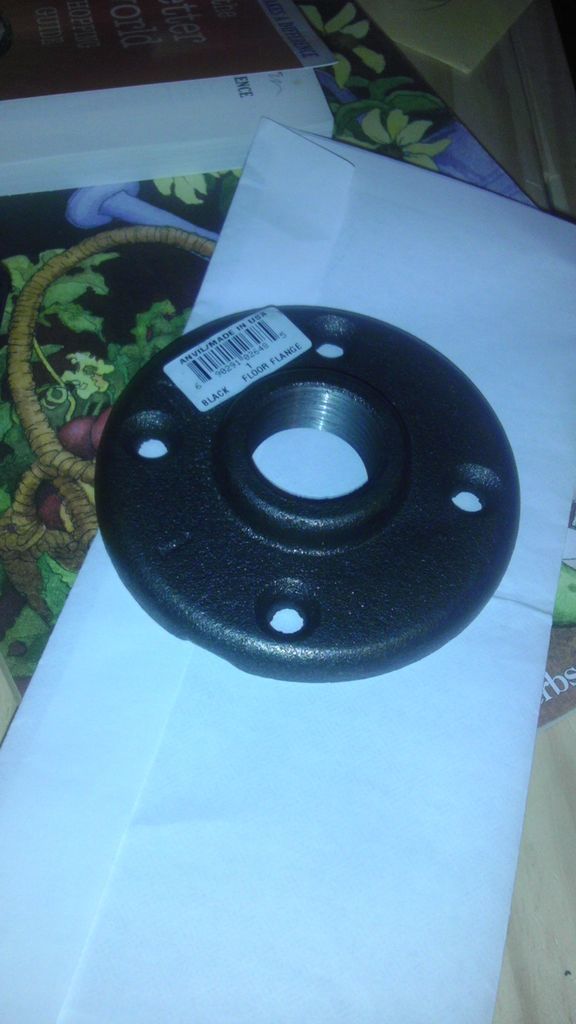
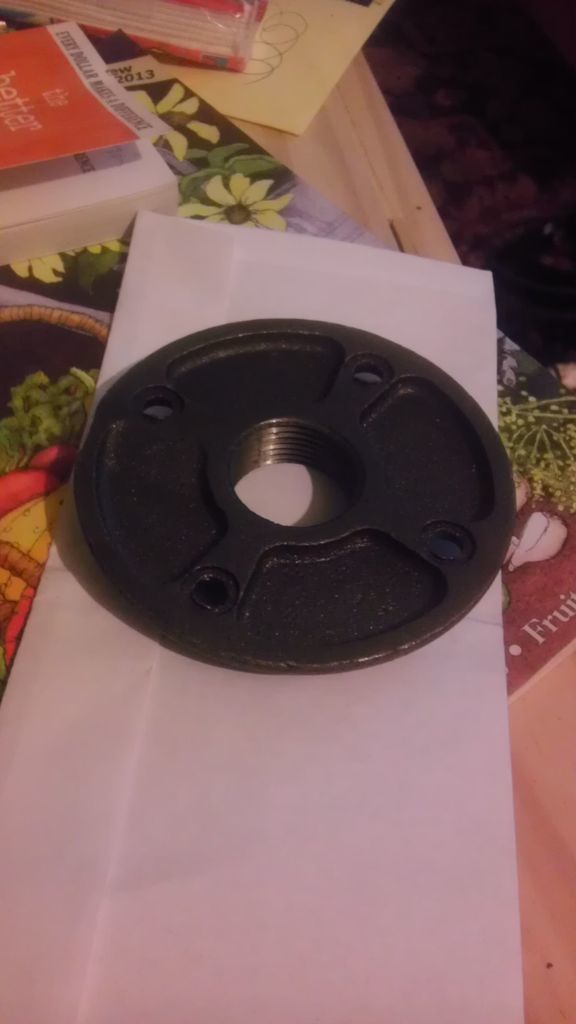
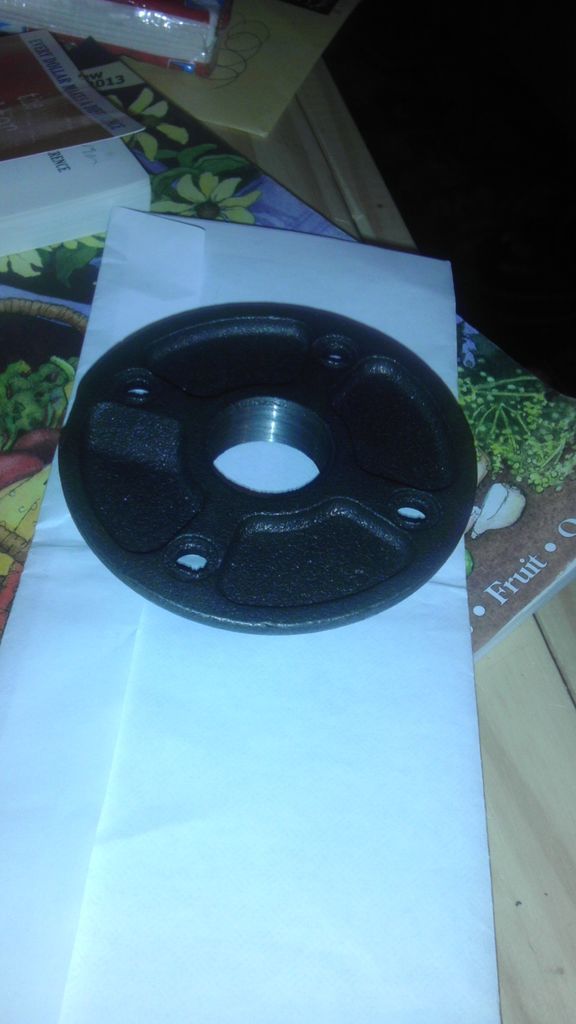
I also got a few 1" pipe “floor flanges”, pictured below. Pictures 1+2: top, without and with flash, respectively. Pictures 3+4: bottom, without and with flash, respectively.
The bottoms have 4 large indentations that I feel are likey to cause problems.
I also got some flattened fiberglass fireplace “rope”/tape and some bolts/nuts capable of holding the flanges.
Brian, you are on your way to building a gasifer. These flanges work just fine with the indentations. Use high temp RTV silicone to lay a bead around the bottom of the flange where the hole for the pipe is. Use a 3/16" drill to make holes in your can and hold the flange in place with #10 screws. Here is a picture of a filter I made using the floor flanges. You will also need to get some flexible exhaust hose to direct some engine exhaust to your air inlet. 1 1/2 is fairly easy to find but I really like the 1 1/4" hose because it is a snug slip onto a 1" iron pipe.
Gary in PA


 Let me recommend you get a 1" pipe coupling and weld it to the flange you are currently using. This way your nozzle screws into this coupling and therefore can unscrew from it. This makes it very easy to replace the burned out nozzle with a new one. Since the flange with the coupling is bolted to the drum, it is very easy to remove it and place it on a bigger drum if you wish.