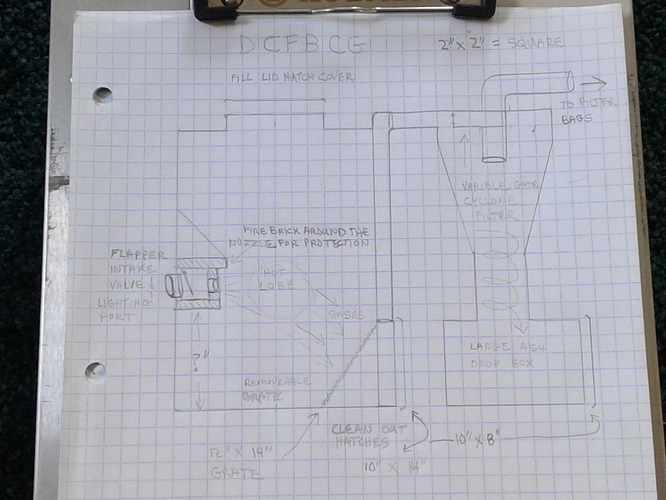
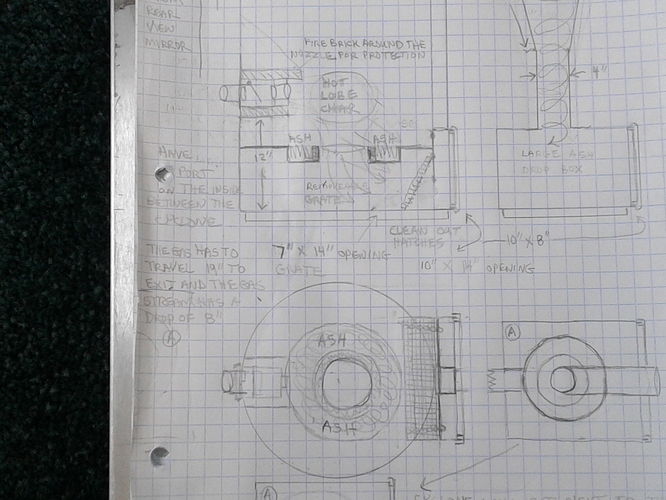
Here is how I am starting this new build for DCFBCG. I will first dig it out of my mind what I have already started and put it on paper. Lets get started. I also welcome all members for input on this subject.
Bob
My first draft. Clean out hatches will be facing back and nozzle intake will face foreward. Not sure of how high the nozzle should be from the bottom of the barrel and still have the maximum charcoal capacity in the hopper longer run times when driving, 50 mile range would be great.
Trying to keep it silly simple, KISS.
Bob
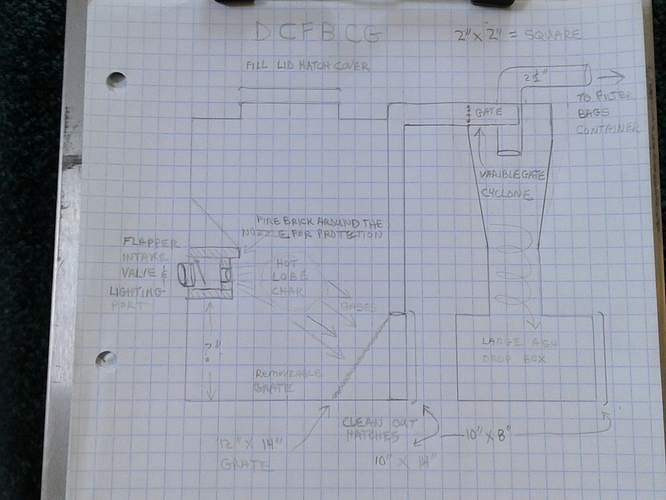
My cyclone didn’t look right in my drawing. Yup it 10"at the top not 14". Also my filter bag container has been already built like my cyclone. I need to go find a barrel up at the salvaged yard and a smaller paint bucket with a seal ring for the top filling. I think other than that I have all the other parts for a build. Just approaching 40 *f with a slight breeze. Come on heat wave, where are you.
Bob
Okay I have been digging into book marks of pass posts from members. The lighting port on the gasifer is below the back window of the vehicle. I would like to be able to see into the port hole from the drivers seat through my rear view mirror. I remember Don, Gary both using mirrors when looking into the hot glowing charcoal for safety reasons, very good idea.
I would like to build a two mirror periscope so I can look through the back window and into the periscope and into the intake air port hole of the gasifer. I was wondering if anyone else has done this before?
One other thing I thought about is when you are pulling hard on the gasifer and suddenly you stop flames will come out of the intake port, this is why I am incorporating the flapper valve. But how far does the valve actually open when pulling on the gasifer. I thought there were some members that are using Imbert gasifer that use the flapper valve for the intake air? Can you look in and see the glowing charcoal inside the port hole?
Have you had the flapper valve stick open and flames come shooting out.
I think I need to address this question before building the gasifer. On my gasifer it shoots out a lot but I was using a manual controlled butterfly valve off of a 3" throttle body.
Is there another way to monitor this to get the right hot glow in the pit of hell lobe while driving down the road? Need some input on this. @KristijanL , @don_mannes , @glgilmore , @k_vanlooken, and anyone else that has had experience driving on a charcoal gasifer system.
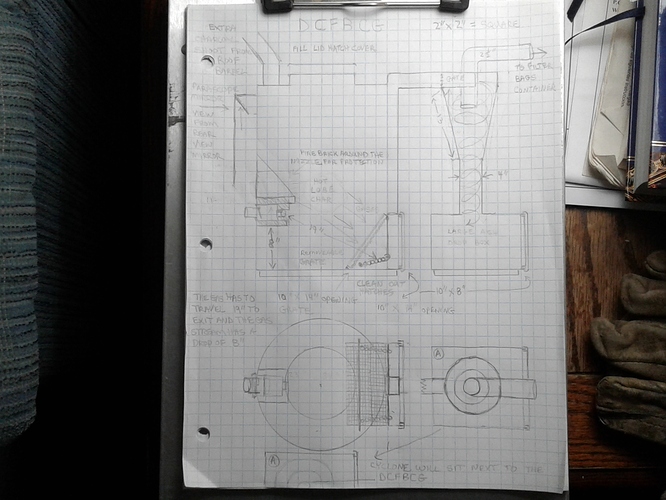
Believe it or not this is the same piece of grafting paper that I started with. Lots of changes on the paper but saved on the thread I started. I have erased things but I have a recorded history of it still. The cyclone is now at the corrected measurements or very close to the actual build.
I use to have many pieces of papers to sort through now everything is all on my thread mistakes and all. Lol, you just got to love it. It seems to be working for me any how at this time and space in the dark side world of gasification.
I have settle on the nozzle tip set up, it will be 19" from the tip to through the grate to the wide exit of the barrel and up the square tube going my cyclone filter.
The gas from the tip of the nozzle will drop 8" to the top of the wide exit of the barrel. With this set up the gas will move much slower than in my wood gasifer reduction zone at the grate. Temperature ranging at 1350 and 1630 *f . The air velocity is fast. 318 cu. In. engine for a vacuum draw. The engine that will be drawing on this gasifer will be a 2.5 L which is about half as much. The nozzle will probably be the same type I am now using in my other charcoal gasifer that runs my genset. I design that nozzle to run the 2.5 L Subrau engine. Because of the smaller fire tube space and straight across design in it I now think it would get way to hot and burn the paint off the gasifer. Also just being way to heavy for my liking. Time will tell if I can make this unit lighter. Subrau’s are not noted for their heavy duty rear suspensions and springs. If I find a 4×4 drive Dodge Dakota it might end up in the back bed of that truck. Boy they are hard to find a good one around in this part of the state. 1991 to 1995 models.
Bob
Bob, l am a bit buissy at the moment and dont want to give any skechy answers without reading/thinking it out thurly. I will get back on it tomorow in more detail l hope.
Throwing an eye just on the skeches, first of all, nice to see you got back to building!
I am afraid a cross draft charcoal gasifier will not give you the benefits you are looking for. Here is why. A downdraft charcoal gasifier must be designed so that no tar, moisture or unreduced gases can bypass the “lobe of hell” and while the crossdraft still is beter thain a updraft, gases still can go around the lobe and out the grate.
No problem if you plan for useing just dry charcoal in it. But the way l see it, the usefullness of a true downdraft char gasifier comes from the fact you can burn preetymuch anything mixed with char in it and have 100% safe gas.
This allso answers the question of controling the heat inside. The downdraft beets them all here since it can burn moistened charcoal. I learned if l add about 20% water to charcoal by weight, a lot of charcoal related problems go away. There is no more dust handling it. No more fuss with water injection as its automatic. More char gets burned, more water is released in real time. The temperature is self regulating. There is no frost problem as it is with water injection.
You can add all sorts of crap in there. Used cooking oil, used motor oil, old antifreeze… the stuff thats problematic to dispose off, the char will soak it right in and it will even boost the gas quality.
You can even substitute half the volume of charcoal with wood, if you get low on engine grade charcoal, it will work fine. Chainsaw sawdust allso is no problem. Even pellets work but only between refuelings, cooldown can make them turn to mush.
But like l sayd, the only way to get this benefits is a downdraft char gasifier.
Excellent, excellent well lined out post KrisijanL. The best I’ve read in a long time.
You approach the design problems based on experiences. With the priority as the Fuel-Inputs to best useable fuel gas output. And with the primary and secondary problems self-correcting as a function of the base design chosen.
ALL Charcoal-tiers, wanna-bees. Read this. And start here.
Nice drawings BobMac.
But re-examine your system-use premise.
You can choose one of these three:
Build a charcoal fueled system based on this boned out WK hearth tube core.
Build a system best use on your already owned Suburu station wagon.
Build a system with the widest practical input fuels use flexibility as Kirstijan is lining out.
Yes. Yes. The Joker in me would say that you can choose any ONE of these three. But only one.
Not true. You can choose the #2, and #3 together. The light weight station wagon base giving enough challenges; in and of itself.
Let that original style WK core be a static show and tell, teaching prop. " Yes. Yes. For gasification to work well we must create, and maintain a core system ‘lobe of hell’. The devil we confine to do our work in that hell wants to burn his way out and escape. See this. And believe."
And show and tell this without having to fire up. Just showing the results.
Don’t allow it to become the tail that wags the dog, eh.
Best Regards
Steve Unruh
Hi Bob,
On my charcoal Tracker I siliconed a glass marble in a pipe cap lighting port so I could
look into hell.
On my charcoal lawn tractor it was a puffback hole that needed the mirror to see.
Looking forward to see what you finally come up with.
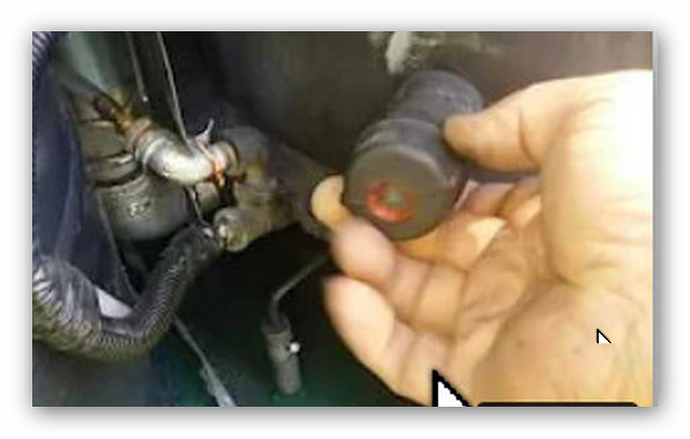
I don’t know about a charcoal gasifier or the exact system but I have a 2 inch check valve on my stainless WK for all my intake air. it hardly opens at all at an idle. I don’t know if this helps you but its what i know about flapper valves on gasifiers
Hi Bob,
Just an idea. Perhaps one of those new type digital thermometer pistols could be taken apart. The sensor could be aimed permanently into the gasifier nozzle and the digital display could be mounted on the dash.
Rindert
Another idea…
…the intake port could be extended with a T. The 90° part of it being the check valve and a fixed inspection glass on the straight part. I like the periscope idea.
Not if you design it right. Yes you need to design a cross draft so you can not bypass the reduction zone. It dont matter if its sideways, pointing down, pointing up what ever. The idea of this diagonal cross draft is to build, basically a down draft with a single jet. Giving the gas the longest possible dwell time as possible; while still creating process layers that you can not get with a cross draft or updraft.
I think Bob will need to create a troft inside the barrel as you are right this space is too great and the gas can migrate around the hot zone. This is why the machines Im building now are a box. The width of the unit had this in mind.
Thank you Kristijan, I know you are a very busy man with all you are accomplishing in your world of family and the new house, farm and work. You answered my question that I had still in my mind about the reduction zone missing and not forcing all the air/ gases through it for a complete processing of the gas to create the richest form possible of gas. My WK gasifer will do it all it is hard to beat. It will except wood, charcoal and all the other items you mentioned. Heck you can throw in a dead cat you found on the side of the road for fuel and get a mile or two out of it. @Wayne lol I just love that comment. The only problem with the WK is Weight it has to go into a vehicle that can handle it. Not a Subrau.
This is why on my last gasifer build I made the three sided restriction zone with charcoal on top hoping it would work. It just filled up with ashes in three hours of running time, because it had no grate for the ashes to fall through and gases to be force through it. This has really got me thinking now. The reduction zone with the ash cone protection is the key where the velocity picks up speed from the first high velocity speed coming out the nozzle or nozzles blast furnaces effect. That is what’s missing.
Kristijan, what is the distance from your nozzles to the reduction zone, and than to the grate?
I’m thinking it was from the nozzles to the grate was about 8" or 20 cm. From the nozzles to the reduction zone it 5" or 13 cm give or take. The important thing is there is a reduction zone that everything had to go through period. And it had ash cone protection.
Modified the last drawing. Now it is still diagonal cross flow barrel charcoal gasifer with a added reduction zone drop added with ash protecting it. I am going to have to get a fresh piece of grafting paper.
Bob
Hi Matt, I am tracking what you are saying. My want to be gasifer had a troft, but it was flat and filled up with ash. I will be changing this on that unit by removing the plate and letting charcoal fill in below it giving it the diagonal effect. Just posted a new drawing above.
Bob
Hi Don, yes the marble, I have that book marked. Some where in my mess boxes is a clear marble, I need to find it. Thanks for the reminder.
Bob
Hi JO, that T idea is a great one. Thank you and that will solve the flare back problem too, by routing the air intake with piping to a safe flare back spot if it happens.
Bob
Hi Rindert, yes I have something like that. It is Digital and and it will blue tooth to my tablet sceen. I will just have to buy another set of 2. Thanks for the input.
Bob
Hi Steve, and thank you, as usual you are right. The Hotter than hell lobe has to be contained and the only way to do this is to restrict the oxygen it gets. Keeping it over reduction zone that will rob it of It’s oxygen, forcing it down a path it can not go with out cooling down. Oxygen getting all used up. Reduction completed, with useable gases left over to be burned in a engine.
It is wonderful to have all of the members looking over my shoulders in my gasification endeavors.
Bob
Hi Jakob, did you build your check valve? And if you did do you have any pictures of it.
Thank you for the in put.
Bob
I didn’t it was just a cheap check valve from the hardware store.
