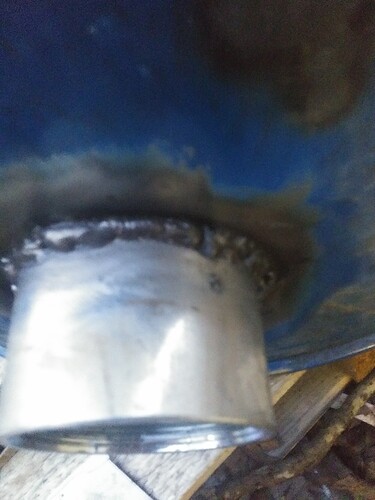
Got impatient and actually came out alright. I set the welder to Min and the speed to higher than I normally use and I guess because it was shoving more of the wire in it kept it cool enough. I’ll check for leaks and seal up accordingly.
Thanks Cody, everything is looking great.
Bob
Also yes that coupler is galvanized and yes I welded it outdoors, not leaning over it, and I drank milk before and after welding. Wish I had a fan to give me a cross breeze as it wasn’t very windy today.
Came out of that short welding session with a pounding headache and I wasn’t sure if it was from all the leaning over the barrel cutting 5 holes with a diamond grit hole saw holding the drill with a death grip or if it was the galvanizing!
I am going to thread in the nipple and try to figure out a way to make or find a hose clampable attachment to run to a cyclone filter. I have a few emptied and purged propane tanks and I could use one as the cyclone but I’m wondering if the diameter of it is too big. Standard 20lb tank size.
Hey Cody the good rule is you’d be safer corse grit grinding off the galvanizing layer in the heat affected zone versus welding vaporizing it.
Have you ever done gas brazing?
Regards
Steve unruh
Whats the displacement of your engine Cody?
2 Liters, roughly 80 horsepower stock.
Ok. I thod l missed something, from the other thread where you sayd something about Sierra.
With charcoal its good to go a bit bigger. Measurements are not that strict as there usualy is litle tar to crack. Plus if you calculate that actual live char volume you will come near the ideal volume.
I was just going to see if it will also run my Sierra 4.3L. This one will go on my Mazda until the engine completely dies.
Just soldering and normal welding. I don’t have an oxy torch.
Also I think it’s high time I build an actual retort for making my charcoal. I have 4 of these drums so I guess I should make a more permanent stationary unit.
I also have old pool siding metal from our above ground pool that got retired.
I’m thinking of a 55 gallon drum with it laid on its side held up by a brick frame, and the siding over all that to trap more heat with a pipe running under the drum to self heat once it’s set off. If I’m feeling really froggy I might weld two drums end to end for a 110 gallon size.
I would need to pave under the kiln too because I’m paranoid of burning my woods down.
Well brazing steels is just like soldering.
It really takes very little gas in comparison to gas cutting, or even gas welding.
Keep an eye out for a used portable oxyacetylene set. Great for steel bicycle frame repairing and other lower temperature jointing. Non-ferrous fillers rod too for aluminum and such.
For me the quest was true; no-smoke; no-seen; no-visible-flame; no-complained-about charcoal making. And not burning up, and not oxidize activating my fir woods.
Read the beginning posts here:
I settled onto the James Hookway single barrel system. You can DOW search it up for the latest revised design improvements.
And this should be as fire escape safe as is possible.
It puts the cooking heat in the center of the barrel. With the barrel outer insulated wrapped.
Enough cycles and you’ll burn out the barrel. Why he personally makes his non-welded to exchange out all of the working elements to a new barrel.
Regards
Steve unruh
Right now I use a TLUD with an afterburner, it works pretty good but I am not a fan of having to check on it.
I really like the Hookway retorts and I’ll probably build one eventually but I like having the retort sit sideways so I can just shovel or sweep the char out. I’ll try to draw out my plan, it’s a pretty standard design.
Only reason I built the TLUD was the barrels my work gets are solid topped so all I do is cut open the top with one of those nifty sparkless cutters. Still fill them up with water, Brake Kleen is no joke.
Oh yeah almost forgot. I’m also replacing all of the exhaust components on the Mazda. Removed the stock manifold and pipes, so now I need to plug up the EGR nipples on the airbox. This friggin’ thing had TWO catalytic converters! I got a tubular header, 4 into 1 type, exhaust pipe is now a half inch bigger in diameter. I’m thinking of just running half the length of the stock pipes with a tractor muffler and make it come out of the side instead of the back.
With just the header on she still starts up surprisingly, I thought it would screw up the AFR too much. It feels like she has no bottom end right now and maybe that’s from a complete lack of backpressure, sounds like a WW1 airplane. Maybe I’m just perceiving that because I didn’t want to lay on the throttle like I normally did.
Hopefully with a more freely flowing exhaust system I can get just a little bit more HP, that and figure out how I’m going to make an adjuster for the distributor.
Lucky it only had 2…replaced a lot of faulty clogged cats in my day, some vehicles have 4. Crown vics and Silverado come to mind of recent, along with nissans genius idea (sarcasm) to build the first cat in each cylinder bank integral one piece non removable from the exhaust manifold. To the tune of 1200$ per side!!! It cost more to replace cats on the little frontier pickups then you can buy the whole truck for used. Case in point my step father retired his at 250,000 miles to the scrap yard needing cats and got 1000$. Down payment on the new nissan frontier complete!  He likes those little pickups
Do you think I should stagger the layout of the flute holes? Or make the three opposing holes face each other directly? I am thinking of just making the holes face each other, but yes definitely pointing down a bit, aiming at the insulation.
My thinking from the beginning of this concept discussion was and is to point them down to the 4 and 8 o-clock angle so that as the cooler char flows down and takes the place of the char that is disappearing into gas that it will keep more heat away from the nozzles and form the white hot lobe below and centered.
Yeah it’ll be aiming down the burn tube, I should have clarified what I meant by aiming at the insulation. I mean aiming into the burn tube but towards the insulation below the opposite flute so the reaction isn’t blowing directly into each other. Forgive my crude paint skills I hate drawing with a laptop touch pad.

I also need to find a way to seal off the flutes if I plan to shut down quickly or need to seal off from weather when not in use. I’ll hunt around for metal slip on caps that will fit over the ends of the flutes. Could get all fancy and use little chains so I don’t lose them!
I am keeping them even and not staggered, point them down a little so they are not blasting at each other. I think this will help keep the heat in the firetube or box more, keeping the hopper area cooler. Between the hopper and firetube or box I will have some ceramic wool. Also ceramic wool on the back and top side of my square flutes.
Bob
I think l wuld poin them at each other and down just as you plan.
Nice work. Way to go! I’m so excited to see how this works.
Not a big deal, but exhaust systems are tuned by pipe diameter to give the best flow. There is an optimum I.D. for maximum flow under load. It is counter-intuitive, but a slightly smaller diameter exhaust pipe may give you a “more freely flowing exhaust system” than a large diameter pipe. I also replaced my exhaust manifold with a header, then chose my pipe ID after a little research.
