To raise the rear end I might pony up for some C channel to access the nuts for the pillow block bearings. I’ll have to lift the rear end about 4 inches or so.
1 Like
You could try two hardwood blocks, to prop it up. Or weld two angle irons into a C chanel.
2 Likes
Winding down the build for the day. Getting tired and sick of sweating all over my work. I hope with my new schedule change at the job I’ll see overtime make a difference in my checks again.
3 Likes
Either tonight or tomorrow morning I’ll put my double pulley on the Briggs engine and MAYBE see about moving the gearbox. With it laying flat again I can use good old gear oil with just a little bit of lithium grease inside the Tecumseh transmission. Should help keep it well lubricated and cooled down at the higher speeds.
1st gear is a 4:1 reduction, 2nd is 3:1, and 3rd is 2:1. Going from a 4" engine pulley to a 3" input pulley, output on the Tecumseh is 9 tooth and axle has a 40 tooth sprocket. #41 chain. I think when I did the math with the 20" OD tires on I’ll get 35mph at full tilt 3600rpm in 3rd gear.
EDIT: I got my gear ratios wrong it was 4, 3, then 2:1.
3 Likes
My biggest hope is that the woodgas actually derates the 10hp Briggs enough to match the gearbox. It was originally on a 6.5hp snowblower according to the guy on eBay. It’s another reason why I took that Diesel off of it.
3 Likes
Bought 30 feet of 1" EMT. Going to use my leftover 2" EMT as the ends of the gas cooler. I probably won’t use all 30 feet for the cooler since I’ll need plumbing and whatnot. Since Joni has such good luck with not using a drop box I’m wondering if I should need one? Just go straight from the reactor to the cooler, then filter.
I’m definitely using the Transformer case as my hay filter. I have tons and tons of pine straw that I can just gather for free from the forest floor. Just rake it up into my wheelbarrow.
I’m not sure if I want the cooler to be horizontal with the 1" lines, or vertical. Most likely horizontally aligned with the 2" ends being vertical.
I don’t see much need to do a whole guard rail type cooler so I’ll just do a headache rack type cooler. More simple for me.
2 Likes
For the shift linkage, I have a brand new and very overbuilt forklift push pull cable lever. I need to file out a linkage arm that I think was from an automatic transmission and fit that in place on the shifter barrel. It has a post coming out of the gearbox with two flats filed into the post, it’s about 10mm wide at it’s narrow parts.
1 Like
Also for the steering, I already have a beefed out 5/8" drag link from Speedway Motors on ebay. They’ll make a custom length drag link which was really handy for me. Had to get it in 45" just to give me room for adjustment in or out.
I pressed in some aluminum spacers to bring them down to 5/16" from the original 5/8" bore the tie rod ends had.
Ordered a go kart rack and pinion kit from eBay, 48 dollars said and done. Rack, both ends, steering wheel column sans steering wheel but that’s fine because I have a 17" diameter wheel I’m using for that.
I’m just going to use one end of that steering rack because it isn’t long enough to tie into both ends, that’s what the Drag Link is for. If my steering rack’s tie rod ends are bigger than 5/16" I’ll just press out the spacers and bore them out to whatever size I need, same for the spindle arms on the axle. My guess is they’re either 5/16" or 3/8".
2 Likes
Got the arm attached to the shifter barrel on the Tecumseh Peerless. This is a Peerless 505 transmission. Luckily the angle iron I have as the mount will make re attaching easier. I can just leave it bolted to the gearbox as a guide for welding.

Luckily the disassembly bolts for the case are on the top, so I can open it up for cleaning without making too much of a mess once I have it laying flat like it should.
I’m going to scoop out all the old nasty grease and lightly grease the teeth and fill half the case with the heaviest gear oil that I can find. It uses oillite bushings as the bearings so I figure with higher speeds the gear oil will keep from burning up those bronze bushings.
4 Likes
Got the gearbox relocated. Boy what a chore. Found out from the engine’s rotation I had to flip flop the gearbox so I would have 3 forward gears instead of 3 reverse gears ![]()
I have the forklift pto cable hooked up but it isn’t anchored yet. I’m really hoping it’s strong enough to shift it, it has a sort of rack and pinion reduction built inside the lever assembly and it’s solid cable.

6 Likes
Shifter is fully set up! Gee whiz it took the entire throw arc to go from R to 3rd. Just barely. I think I’ll try to find a dogleg extension for this shifter and mount it externally like an old timey horseless carriage. Throwing the lever all the way forward puts me into reverse and I pull towards myself to go into my forward gears. The Peerless 505 only has one little locking lug when shifting so if you’re going into a gear it can lag sometimes as it has to go into a full rotation to index. This might prove annoying.
2 Likes
For my clutch setup I’m going with foot tensioned so I can slip it more finely. I’m thinking of making a lock down lever that holds down the clutch if I’m going on the road for any length of time that will disengage when I hit the brakes. I don’t trust a spring that I’ve put in to make enough tension on a belt and I certainly don’t trust a cable setup to take tension off like a normal car clutch.
This’ll drive sorta like a Model T Ford with the hand throttle and stomp clutch. Once I get this bad boy moving I can see if I can go with a smaller rear end sprocket for more top speed.
3 Likes
Still figuring out the safest way to mount this unit. My biggest worry is my welds aren’t good enough and the whole gasifier will just fall off of the truck and dump fire all over my yard/woods/country road. I might just mount it inboard of the frame and weld up a lip around the body of the reactor. That way it won’t just be attached on one side and wiggle like a diving board off the side. Will also give me better center of gravity.
2 Likes
4 Likes
I also took apart the gearbox and cleaned it up. Nasty brown spent lithium grease everywhere and none of it was really on the gears. I put some Lucas Red N Tacky lithium grease on all the bearing surfaces and then used some of dad’s old Bel Ray Hypoid Gear Oil SAE 85W-140. Thick like honey and STINKS of sulphur. I filled it up so the smallest cogs just barely touch the grease so maybe just half of that half of the case, 1/4 full considering full volume of the case. Laid a bead of silicone and closed her back up.
Shifting is smoother and the gears spin easier now.
I figured to add this gear oil because a lot of guys that build racing mowers do the same thing. Plus I’m a cheapskate and don’t want to shell out for a new gearbox and then have to make a new mount for that.
2 Likes
Had to increase the size of my input pulley on the transmission to get any sort of tensioner to work without cramming the belt together. So I’ll have to decrease my sprocket size on the axle to get my speed back.
I’m going to look for a 6" output pulley as well, and get a 20 tooth 1" bore sprocket and that will give me a very high top speed in 3rd gear. I’m going to get the trucktor in working driving condition before i change the gear ratios anymore though. So I’m waiting for the steering rack and I need to finish mounting the reactor, build the cooler and filter and plumb that up.
3 Likes
I have the reactor mounted.
For the time being it is tack welded in place and feels very solid. I will weld on angle iron to the body of the reactor and then weld that onto the platform so I have more bead surface area. I’ll weld in some gussets just to make extra sure it is anchored in really good.

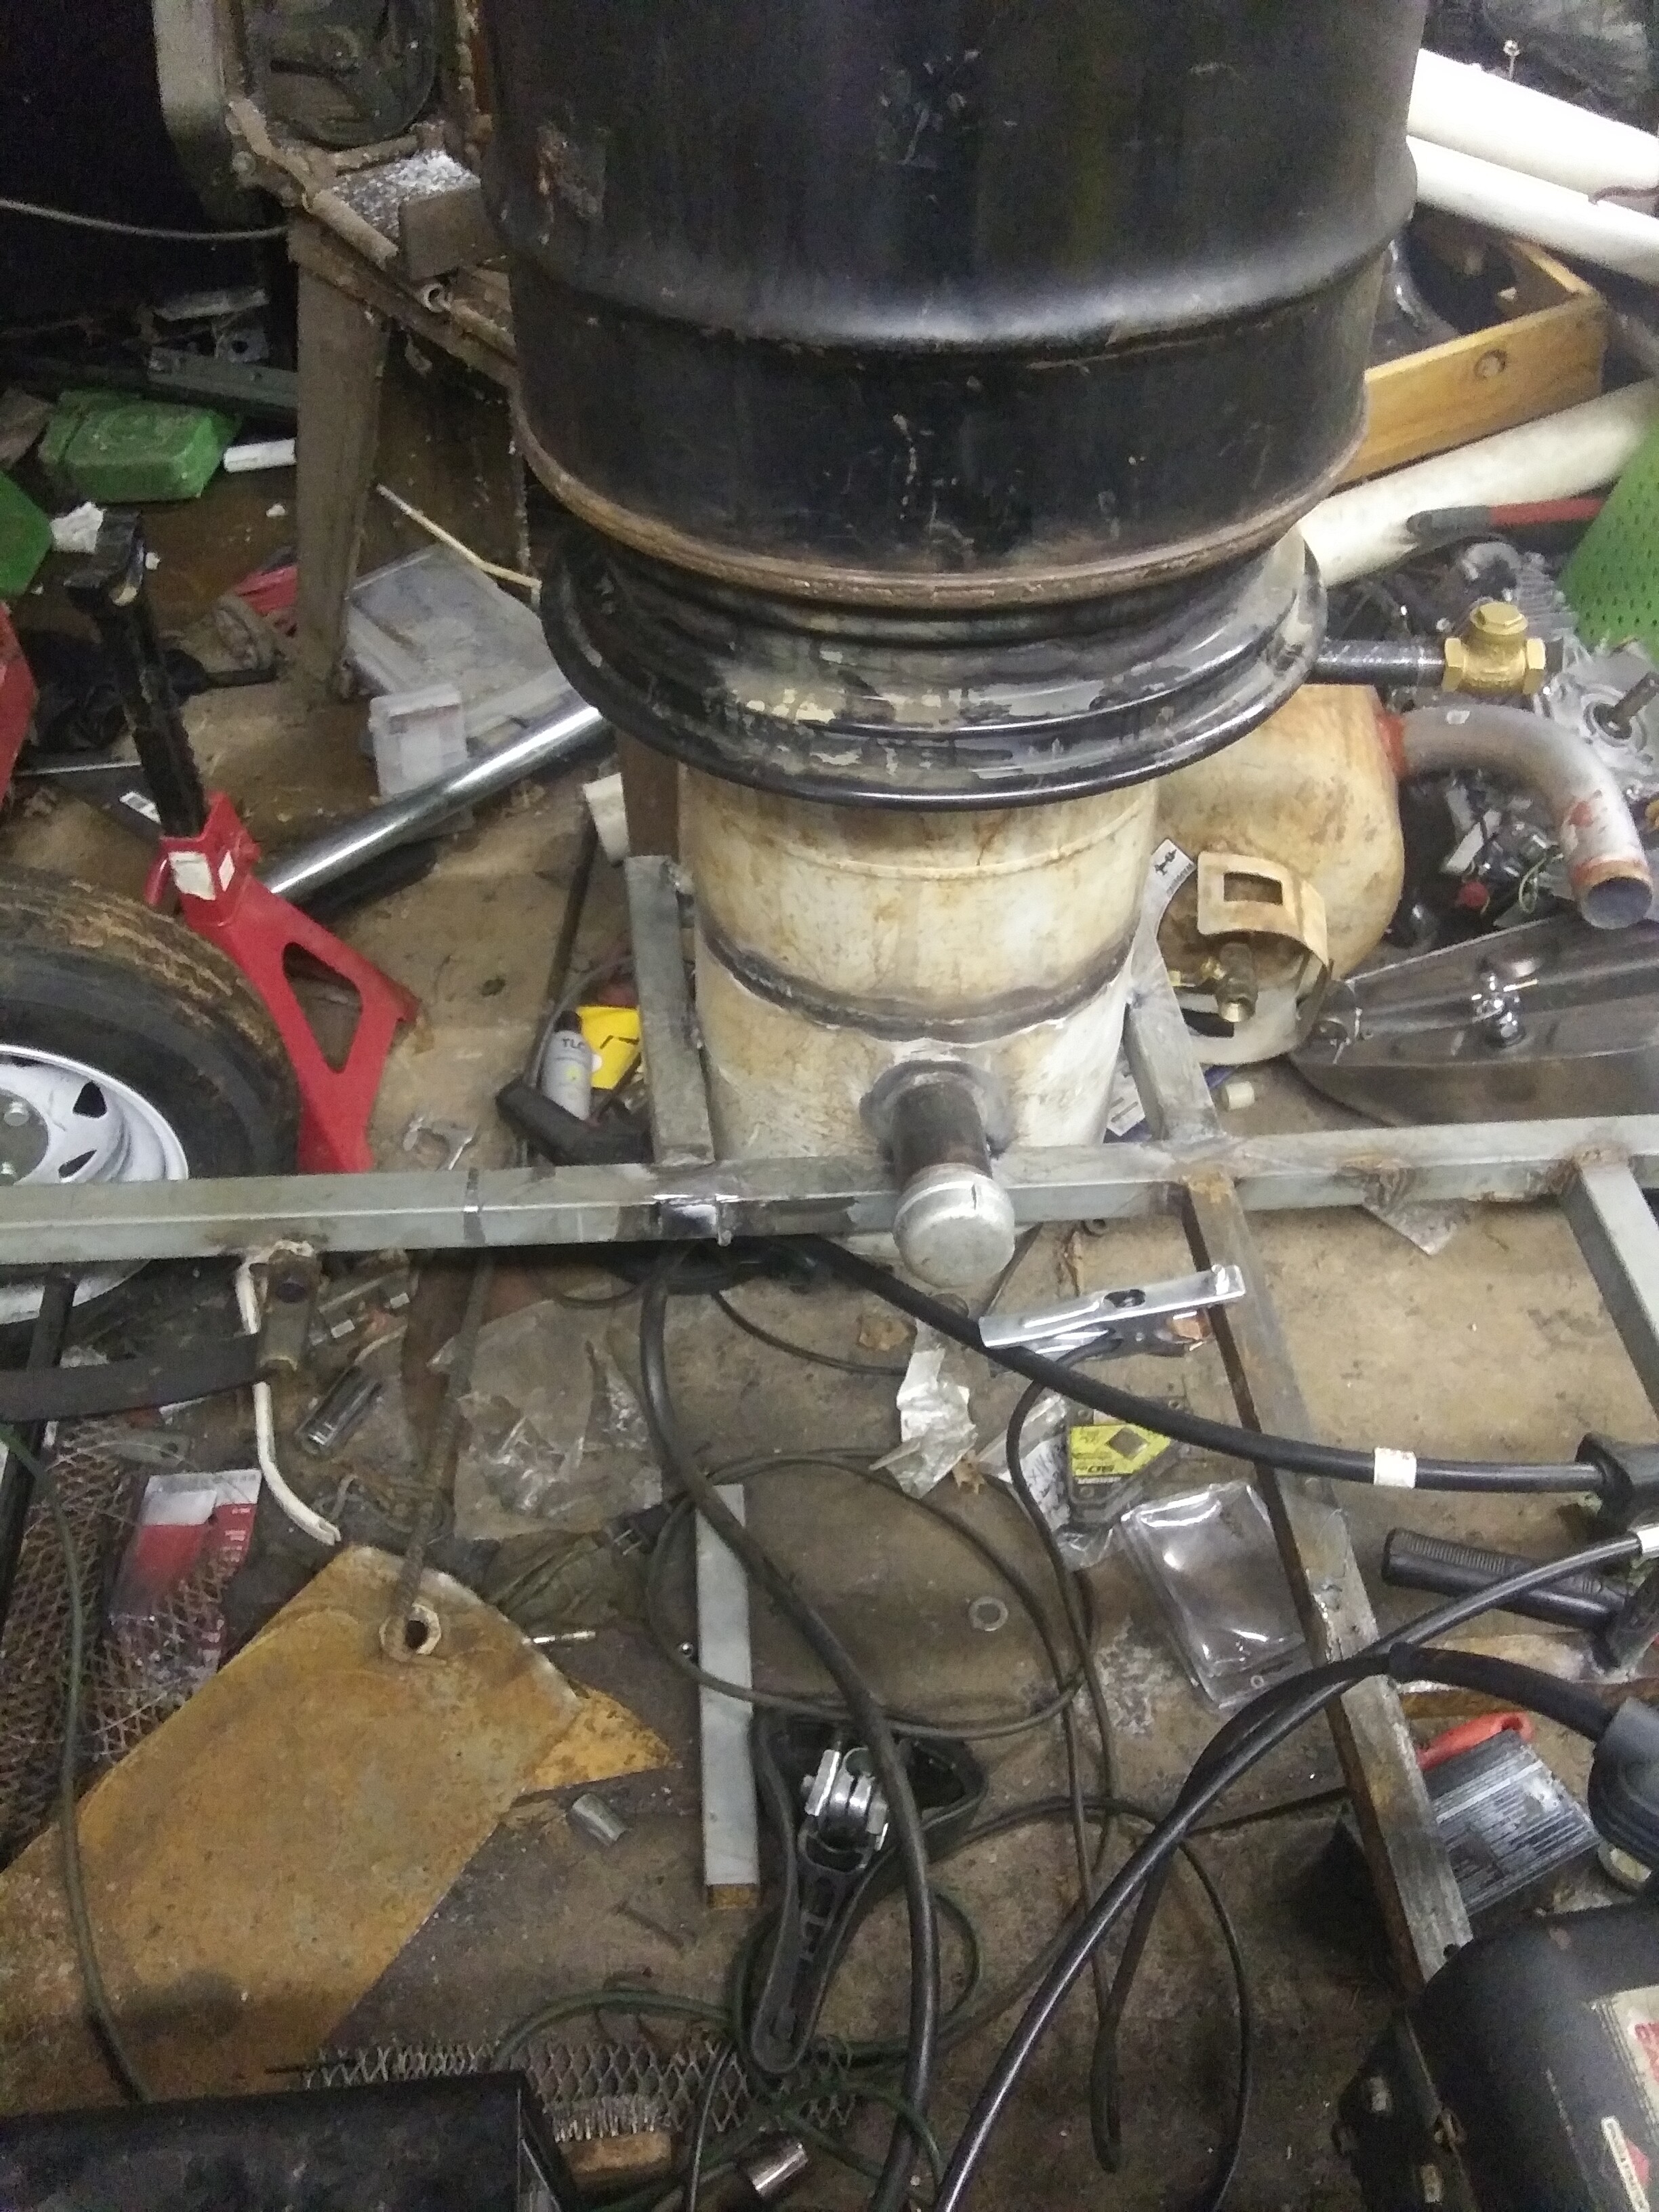
I had to mount it sidesaddle like originally intended because I otherwise would have zero room. We’ll see how well my welds hold up I guess!
8 Likes
Got the steering rack today, trying to figure out if I want the spindles pointing forwards or backwards. My castor angle is already set so all I have to do is flip the spindles over.
Also trying to figure out how the heck I’m going to mount this thing, it doesn’t have any bolt holes. There’s two bolts in the body at the center but I think those are to hold the plastic shell together. I’ll probably use U bolts or something. Don’t know how these are meant to go on to karts if there’s no way to mount though.
3 Likes
You might have to bodger up some fitted clamps. You could make them out of plastic, or even hardwood/plywood to get the concept proven out. I like U-bolts, but they tend to put clamping stress on parts of your “thing being clamped” where they are not wanted, distorting, binding up, or even damaging your important steering gear.
2 Likes
Cody,
I built one of these sometime back. I would suggest you weld in a 2" ID pipe reducer 180° opposite of your nozzle. Weld a bar on a 2" pipe plug and screw it in for now. Later if you need to rod out the slag, you have a port to do so with. If the nozzle proves unworkable, you can screw in various sized tuyeres (nozzles) at different distances in to the hearth.
Definitely weld in the reducer so you have an inspection port…use it like you use a spark plug. Greg Manning used glue in a piece of oven glass on a nipple and screw it in his so he could watch what was happening.
The thing is, these things seldom work right the first time. Its nice to have a way to trouble shoot.
5 Likes