I’m Simon from Switzerland and I’m following this forum now for some weeks. It’s really nice to see and read what you guys are building and all the information you have collected here. This helps a lot!
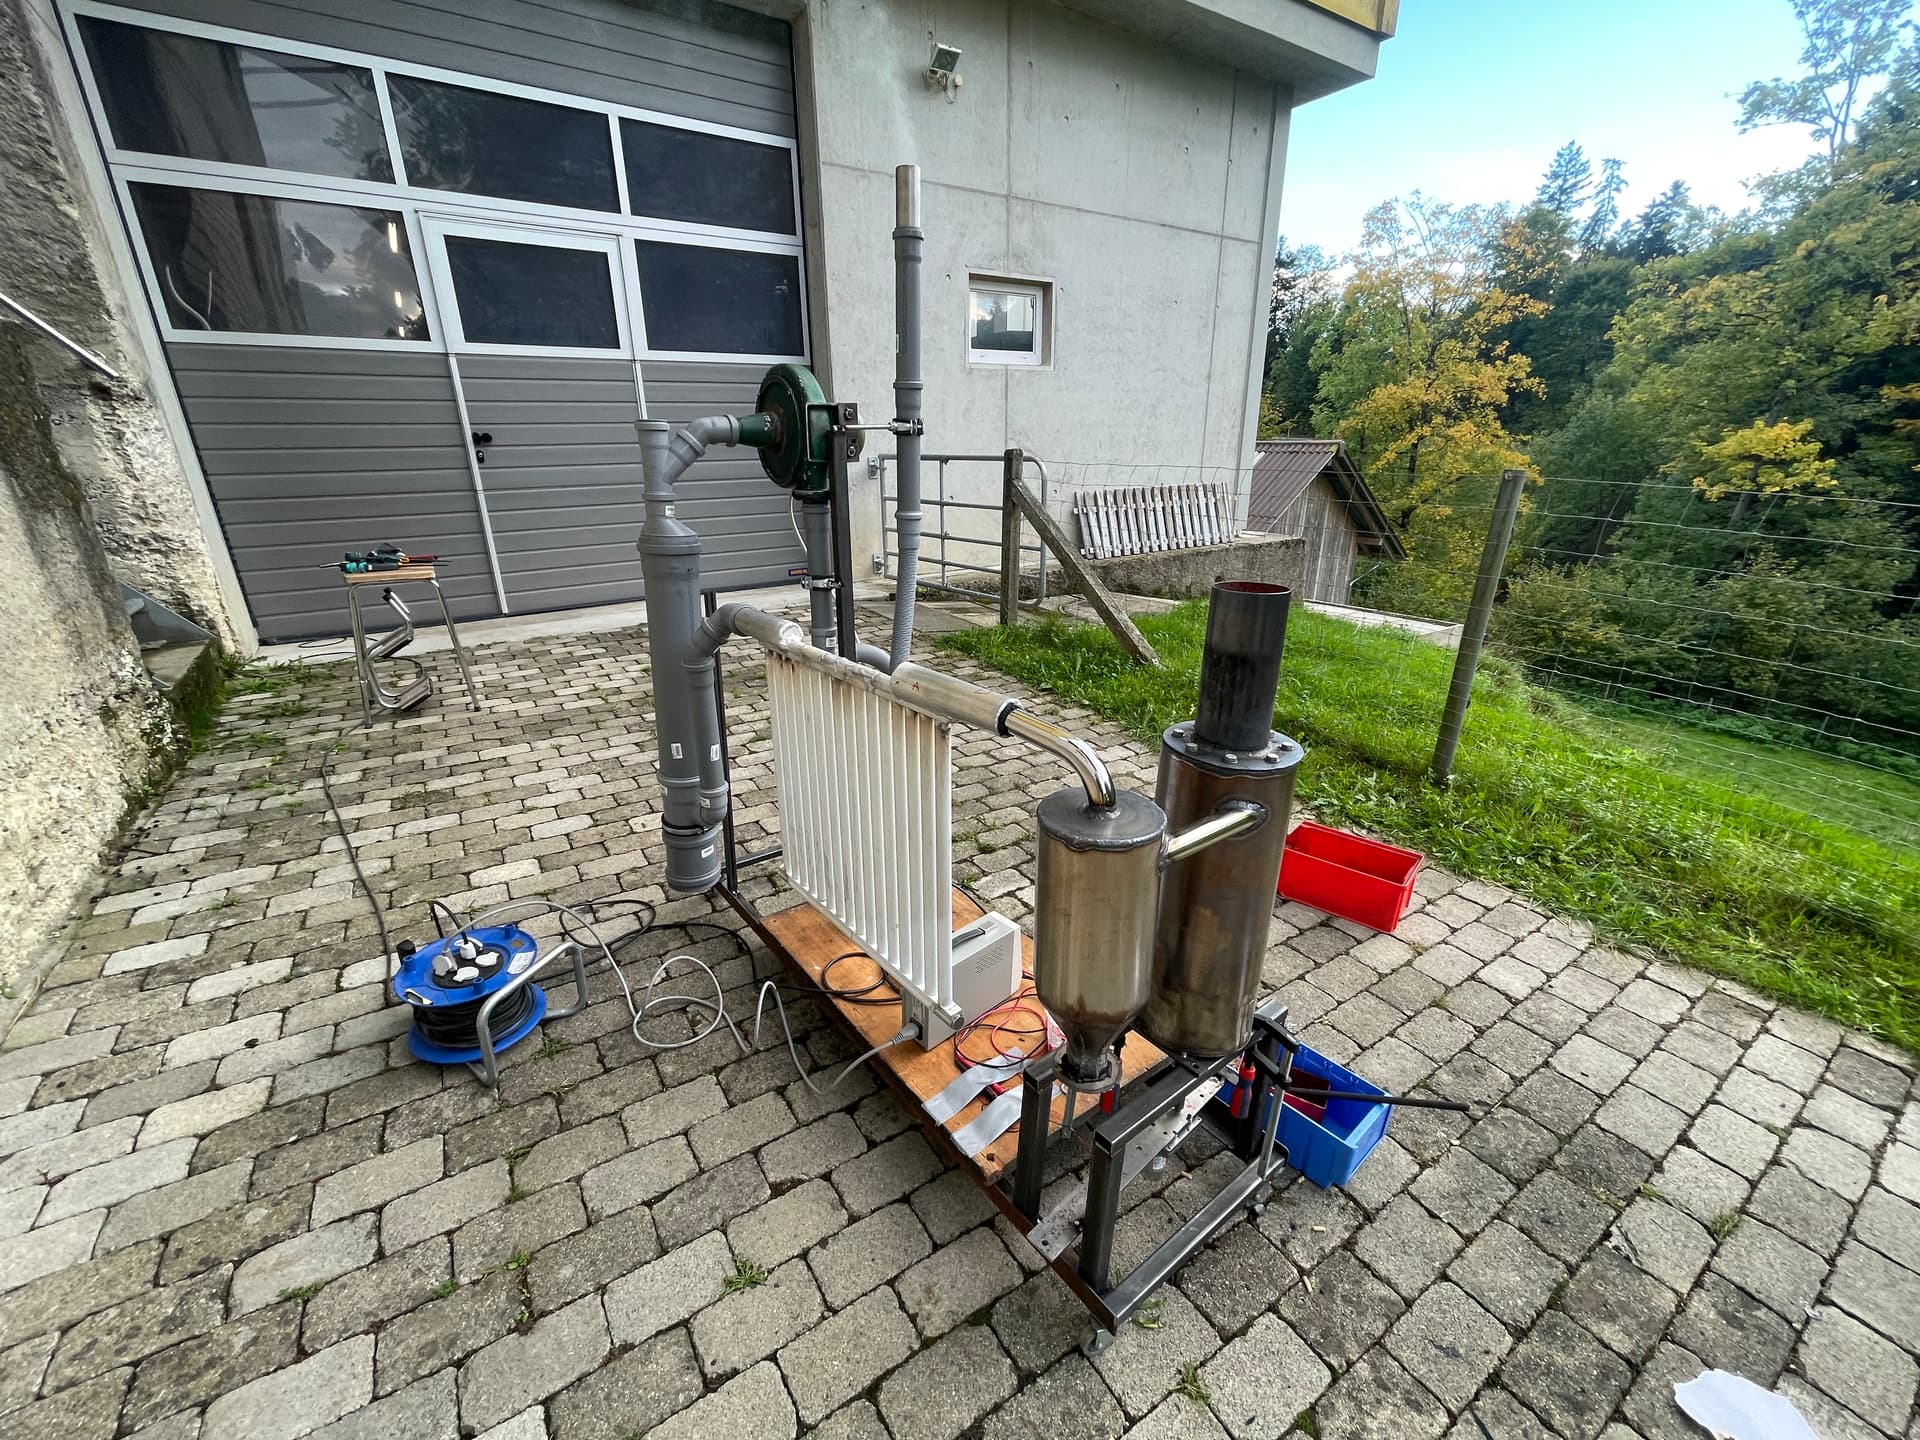
Over the last weeks I’ve tried to look into the Drizzler gasifiers, which I find highly interesting. The last weekend I could finish my first prototype and now I would like to share my progress with you.
I’ve tried to use as many recycle parts from a second source store nearby:
old stainless steel umbrella stand (the big tubes)
stainless steel pipe fittings from the bathroom
old aluminium radiator
other metal scrap parts
the blower I could find in on an old grinding machine from my father which was used to suck away the metal dust
The build was a lot of fun
What I would like to do next:
improve the filtering system (either a high voltage filter or another saw-dust filter)
connecting the system to a generator
installing an automated feeding system for the pellets
adding a pyrotouch to the drizzler
I’ve some questions where I would be glad to receive some help:
I have still quite a lot of water vapor in the system. How can I get it out in an easy way? Does the e-filter help with that as well? What are your experiences with this?
You mentioned moisture in the gas. It’s difficult to completely dry out the gas, but you could use more cooling rails and perhaps a coalescer using hay as a media before the sawdust filter.
In your style of cooler, it is best for the gas to enter from the bottom, and make it’s way up. As moisture drops out of the gas it will run down the tubes and help keep them clean.
Also it looks from just the images I don’t see a way to collect the condensate in the cooling rail/radiator. Does it just rest at the bottom of the cooler?
Also if your gas is still warm as it’s entering the filter, it may make moisture evaporate from the sawdust media over time.
What is your end goal with the gasifier? Is this for fueling an engine, or for something else?
I would also like to say that is one very tidy build you have made there Simon and you should be smiling from ear to ear with delight at your achievement , i watched for many years how this style of gasifier was conceived into a useable style unit for power generation .
I think as long as you have a large enough condensing tank you should be ok for a engine , but if you can increase the temp of the gas above ambient before the engine it should dry the gas good enough .
Well done so far cant wait to see more .
Dave
The top-tube is closed. So the gas has to go down first and then on the other side up again. No matter whether i make the connection on top or bottom, one time the gas would need to go down.
I thought this way the smaller tubes are used more efficient as the gas has to flow in a longer distance through the cooler.
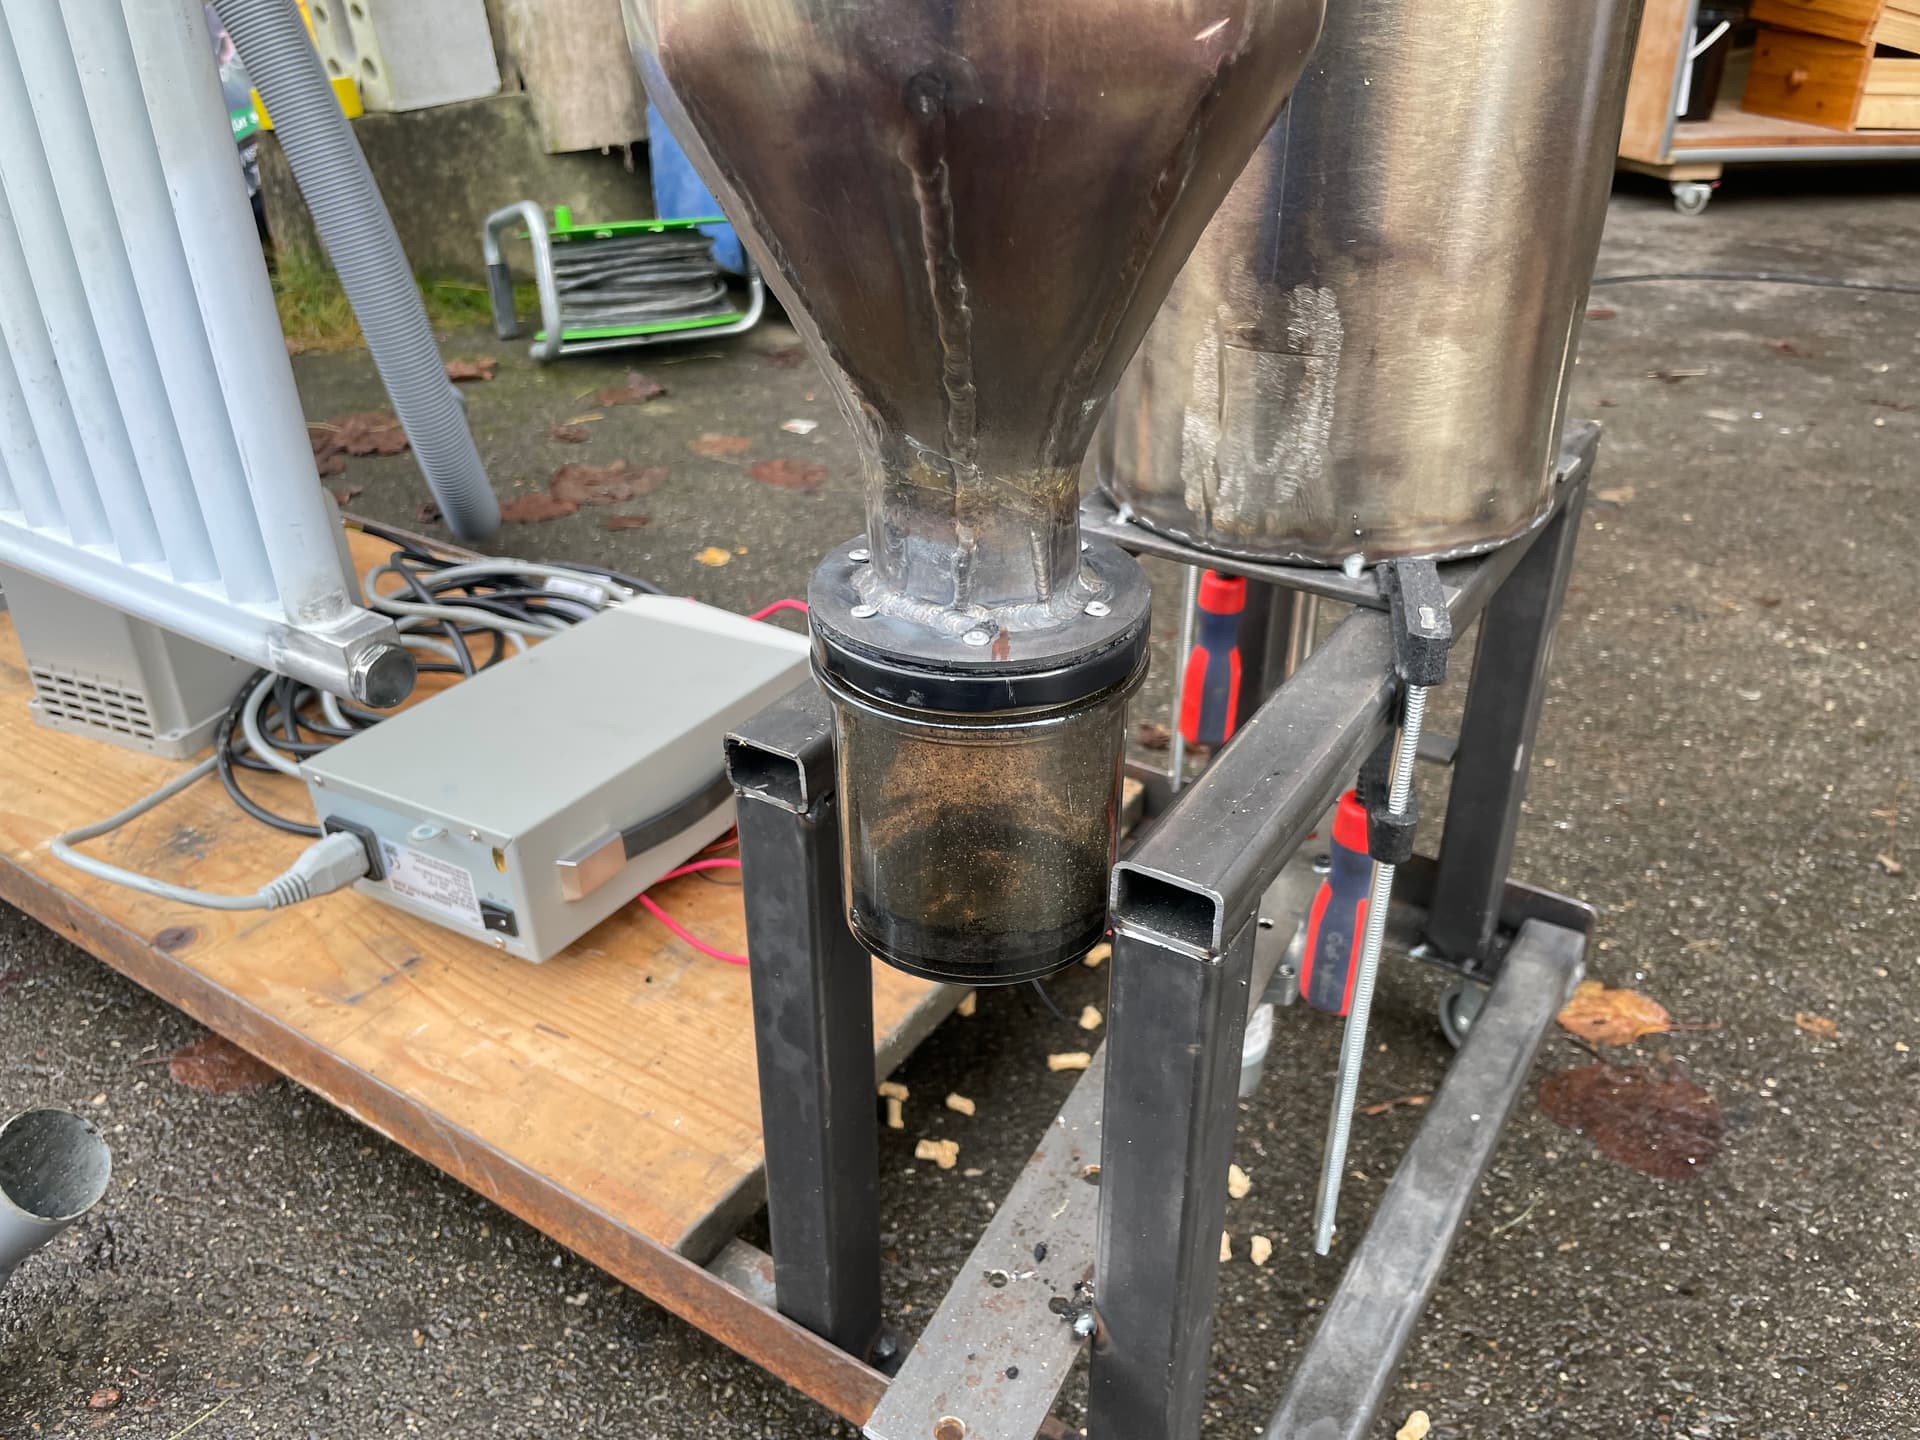
Yes you’re right, there is no way to collect the condensate yet. And during the first test I’ve also heard that the water is bubbling inside already. So I definitely need to add an outlet or something…
My goal is to fuel a generator and make some electricity. I’ve no idea yet how much power I can create with this setup. So the next few experiments will tell
Your radiator is set up very well and you can use a single spout connecting to a tank. Maybe tap it in along the cooler side of the radiator, about here perhaps.
Or on the cold end of that connecting pipe of the radiator, but from the bottom will ensure you don’t have the bubbling effect and it all drains out.
Another thing you might want to add later on down the road is cleaning ports for all the tubes, to make sure none of them are plugged up and so you can clear any plugging. But that can be done later for convenience. You could just add ports on the top, and with the drain you can rinse them clean to be collected in the tank.
Welcome Simon, works nice! I see ceramic balls. You didnt use them yet? No restriction? I played a little with a Drizzler too, works like a charm and it is build in hours. I really want to know if it can run a generator , tar free. Is that your next step?
thanks! That’s what I thought as well to add soon. On the colder side of the radiator there is a big bolt and a thread so I think it should be easy possible to add a tank or something. I plan to mount the radiator slightly tilted towards that end. So the water should flow to the tank. Will definitely do that next!
great tipp, thanks! I will consider that further down the road.
Hi Joep! Exactly, these are ceramic balls. I’ve found simple baking balls like them here: Amazon.de
They are quite cheap. The only thing I can’t explain yet is that somehow they clogg to each other after a while and get a very shiny surface. I don’t know whether they have some kind of a coating or whatever…
Let the experts tell something about that, I dont have any experience (yet). This frenchman had problems with clogging too. because of impurities in the pellets he says. And therefore redesigned his grate.
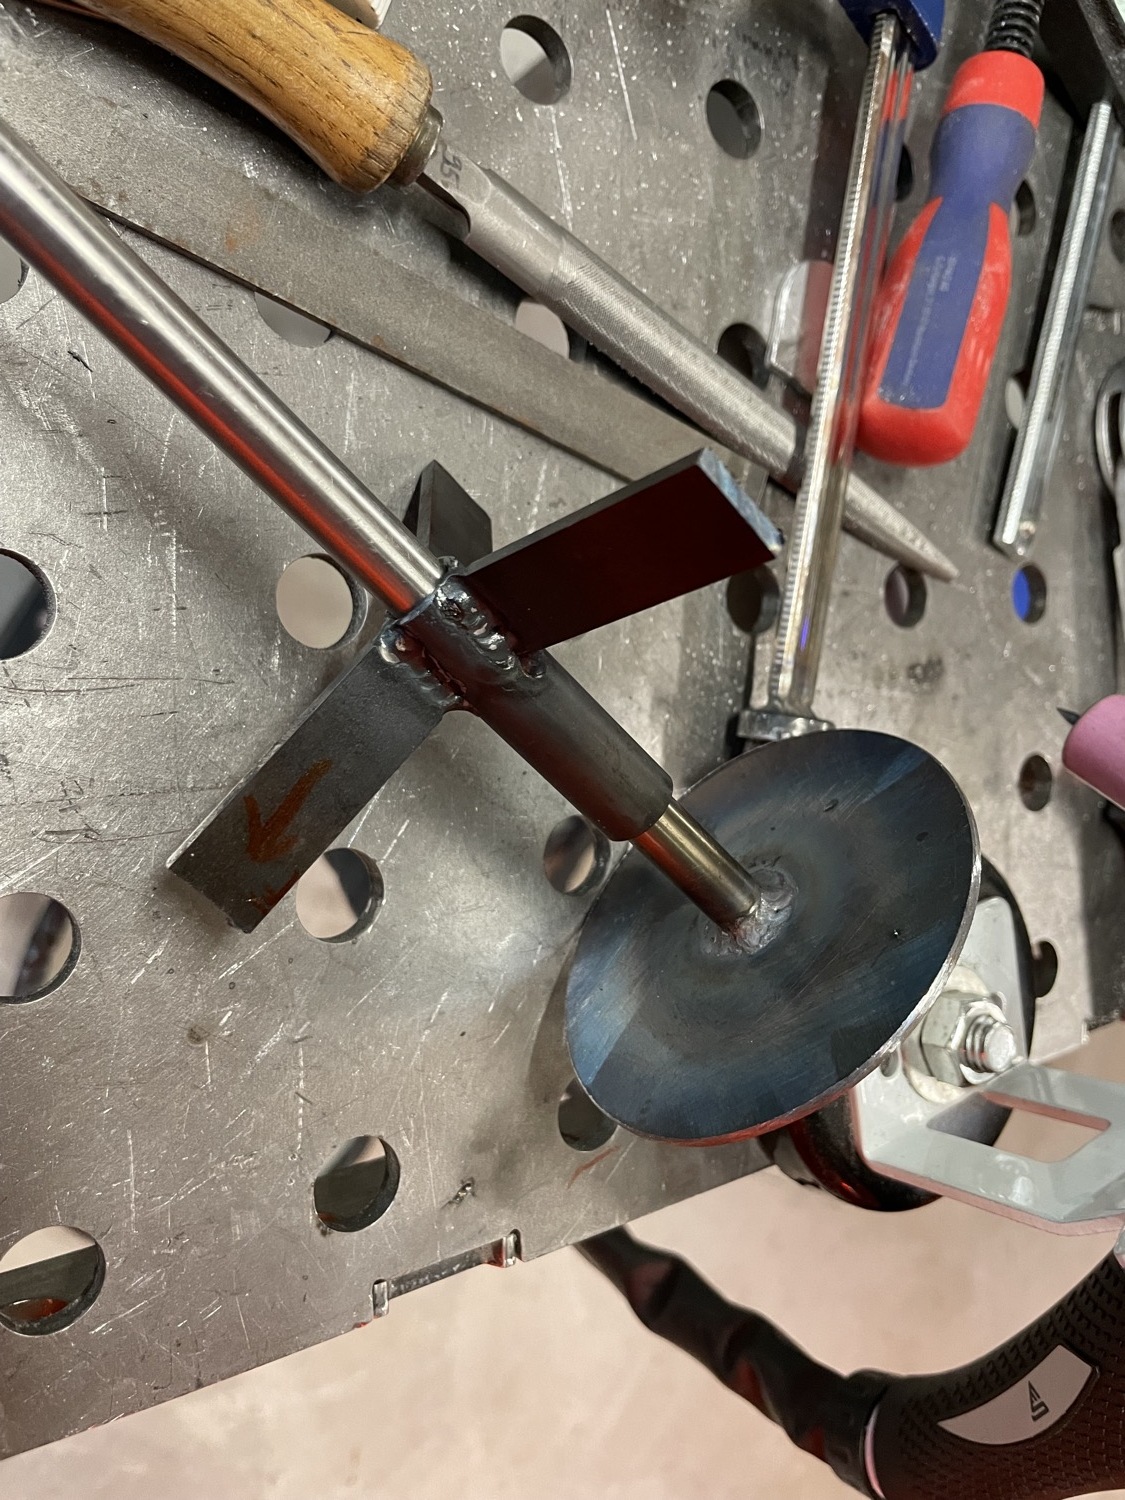
This will be my next grate if I can find some time. And maybe a restriction yes or no. Some clever people here, I wish someone would comment on that.
I hope someone explains it. I don’t have the big brain some of you do. I’ve seen Drizzler’s before but I don’t understand if this cone shaped grate is fixed or does it ride up and down on the shaft. If it’s in the reaction zone it doesn’t seem like it would have a long life.
I am not too experiance in wood gas perfecting, Not too mention a drizeler design, though maybe some sort of preheat ,heat exchanger added in line would help reduce moisture and the extra heat may help make less tar, if it ends up too tarry too run in a motor, Then you should have a way too test your pellets for moisture, and being a drizeler design might likely require a little extra drying process steps. PS. good luck with it, its an interesting design, were all rooting for great design working unit. THANKS FOR POSTING THIS DESIGN find. AND as others have noted, a good sizable charbed below the chips coming in, will help cook moisture and tars allso.
Clever grate design, looks as if he is moving the grate up and down in the burn tube or restrictor/ reduction zone,? Not sure what the hole sizes in the upside down funnel grate. Hopefully you will get a reply from some other builders, on that design.
Hi Kevin , the system has been around now since i first got interested in wood gas i since took a different path going with charcoal so i am not up to date as it goes , but here is one of the founder member’s system take a look at a few of them here .
Nice vidio Dave Or Brian, that flare looks about as good or better than most wood gasifier fliares. That Really clears up how the drizeler gasifier works.SEEMS TOO WORK EXCELLENT.
Unfortunately I couldn’t find any time the last few weekends as too many other things were going on I hope to continue on the project latest in the beginning of November.
you will probley need too build some sort of wood chip dryer ,if you deside too run wood chips through it. mybe some 12 by 48 inch baskets would dry chips, hanging on a line in the sun or warm work shop, location.
It’s always fun to be in the store and build the things out of the pipes right there. That way you don’t forget anything.
I have now 2 filter systems. The first tube is filled with saw dust and the second one with hay (thanks @ForbiddenTuna again for the hint) With that I’ve managed to filter out nearly every dirt and moisture.
Yesterday we had a small event with some friends where we tested out the gasifier on a snow blower. It ran successfully for a few minutes on my pellet-gasifier. What a feeling!
Here’s a friend running his snow blower:
Up to now I still can’t tell how efficient or how much energy I can generate with this small gasifier. But I’m going to do a little bit more “scientific” test with some temp-sensor in the burner and an electricity generator in a few weeks. Will keep you updated