Onan twin carb connection

Yes. Its a reluctance motor, same type as a plug-in clock and it literally is a clock. It will only run if powered by AC. But the rest, well that’s open to tinkering with and its not outside of reasonable to think you could make a wood powered engine as the prime mover and some simple switches to run the valves to DOW a wash machine.

I will make a donation to the first person that DOWs a wash machine and takes it to the salt flats to set a record on how much cloths it can wash in 12 hours…

And now for something completely different a washing machine timer…

2 Likes

it must be a synchronous reluctance motor. I forgot about those. :stuck_out_tongue: That video makes me want to use one to drive a music box. :slight_smile:

You should be able to just replace that with a microcontroller and some relays which could keep the voltages down. There is an off-chance, it would work with 24Vac with the 60hz frequency which would be a lot easier. I don’t have one to play with though.

I’m not sure about the bet, because it is pretty easy to speed up the cycles which means the actual limit is how fast you can get clothes in and out of the washer. lol

1 Like

Yes, but that’s a lot of trouble.
All you need is a couple of switches for water in and solenoids to control the agitator and spin cycle and pump. The rest is just watching the machine. In the old days you had to remember you turned on the wash machine and you had to remember to go and finish the load by a certain time, but that’s less work than washing by hand.

Its not entirely outside the possibility of using a small DC motor replace the reluctance motor and setting it up to run the clock. But again that’s probably going to get involved and requiring tinkering. It might not be reliable too!

This looks like it might work…
Clear your browser history before you go to aliexpress or they might think you speak Russian or something.

Now I am startin to think about the wood powered dryer for those times when you can’t use the line…
Here’s a look inside to get you thinking.
AND I am sorry for hy-jacking another thread.

It isn’t that hard to get a micro controller to run the relays. You could do a whole touchscreen and more cycle options.

But creating 24v ac is more trivial. It should work with square waves, then you just need an h bridge to run mosfets. And like 10 lines of code. Alternatively since a lot of you guys like analogue, you can use a 555 chip to work as the oscillator/frequency generator instead of the microcontroller. (There are youtube videos on it)) The question is whether 24v AC can run the motor which there is a good chance it can… but the clock motor needs ac so you have to generate that signal. It seems like the main motor would need AC or pulsed dc as well…

The agitator just uses a transmission on the old school ones. The water is turned on and off via solenoids.

I guess I was not specific.
Most Pilot devices 120Vac relays and coils, solenoids ect will work just fine on 24DC. Some are even clearly labeled

You are clear. You are saying run the various components with switches on 24v thus converting to 24Vdc is simple. I am saying don’t bother adding switches, just feed the timer motor 24Vac, and use the existing motor and contacts.

If you want to use a woodgas engine, you need to add an electronic clutch like on a lawnmower deck so it can shut off the input during a soak/fill/drain cycles.

It restricts to increase the velocity of the air which helps for turbulance in the air/gas mixing.

The volume doesn’t change. It has to do with the vacuum pressure. And the 2" probably helps because it connects to an air filter and it helps keep more even pressure on the filter because you are only drawing air 1/4 of the time with a single cylinder 4-stroke engine.

The wider the pipe, requires less vacuum pressure needed to draw in a volume of the mixture. A smaller pipe requires more pressure because the air has to travel further to get the same volume. You will see diminishing returns the more the size gets increased and it means more air you have to clear out when starting it.

If you --have-- 1/2 stuff already I would try it, but if you are going to buy something I would go larger, and where you mix them, do like a 1/2x1/2x3/4 fitting. It is slightly undersized for 3/4". For the maths, you can ignore the length because we assume that is the same. So you compare the area of the circles using pi*R^2. 1/2 comes out to 1/16 pi. 3/4 comes out to 9/64 pi or just slightly larger then 1/8 pi. Assuming both 1/2" valves are wide open it is 1/8pi. You might be creating too much vacuum.

I didnt know a simple charcoal device would be as simple i found the video from years back of the gravely mower i have charcoal drying now so much wood/waste i can use to make it work
the blue well tank pictured with the welded cap what would be the best way to use it as a charcoal device?
i had the idea of using it on its side and loading it with plastic and building a fire under it to turn it to fuel the tall tank was my first condensation collector then water cool the lighter gas i have noticed with plastic there is a “burn off flare” in mr T’s videos he uses wood also in a similar fashion of building a fire underneath…so i was building a dual purpose type of distiller i had thought i could burn off the flare gas as how mr t had done in the generator but since charcoal is simple i could do that i thought about laying it on its side and putting my nozzle in the welded cap letting the air flow across the top of the charcoal then exit i could fill it up then turn the cap downward and put exit line at the top of the tank my intake air pipe could be made long to reach the end of the tube or could go in just under the load tube to get the air intake directly in the charcoal
i want to weld it one time…oxy torch welding is new to me…so i have kinda got the hang of it to not burn holes but still unnerving on thin stuff so cutting a tank in half and welding back is a little more advanced im still shocked my cap holds water…im thinking of melding aluminum and leveling it to make for a rubber seal surface at the end…so many options and questions
does the device need super air tight and does the nozzle have to be in the charcoal?

The way you do it. :slight_smile: I would do it vertically though. It give more fuel to be accessed and will fall down via gravity, and you need a hole to add fuel and they are usually airtight so the seal will end up being smaller and less likely to leak.

The

You can use that method to make charcoal, and you can burn the offgases in an engine, but we don’t refer to that as a charcoal gasifier. It is the closed retort method for making charcoal. Most people use an open retort TLUD. Drying charcoal takes forever, you might be better served to just make new stuff.

You can use it similarly for plastics, but if you are doing plastics they get tricky because you have to be -really- careful about not including plastic with chlorine as it can create some really really nasty chemicals. The way I have seen the liquid portion collected is similar to a thump keg.

I believe it could be considered a distillery, so I would check with state law enforcement whether it is legal or not. It varies by state on what paperwork you need.

If casting an aluminum cap is in your skill set it might be the easiest route. You want it airtight.

Ryan,
Search this forum for “Simple Fire” and you will find a lot of information and examples of this simple charcoal gasifier design. I have built three different sizes and they all work great.

2 Likes

the welded cap is a coupler is like conduit but galvanized the threads dont seam tight so i was thinking of sitting it level and pouring molten aluminum since liquid finds its own level i figured a torpedo level would give an even surface where i could get a rubber seal i could teflon tape it but
every reload would mean cleaning it off and reapply my weld job has a pine hole if that i could epoxy that if its an issue

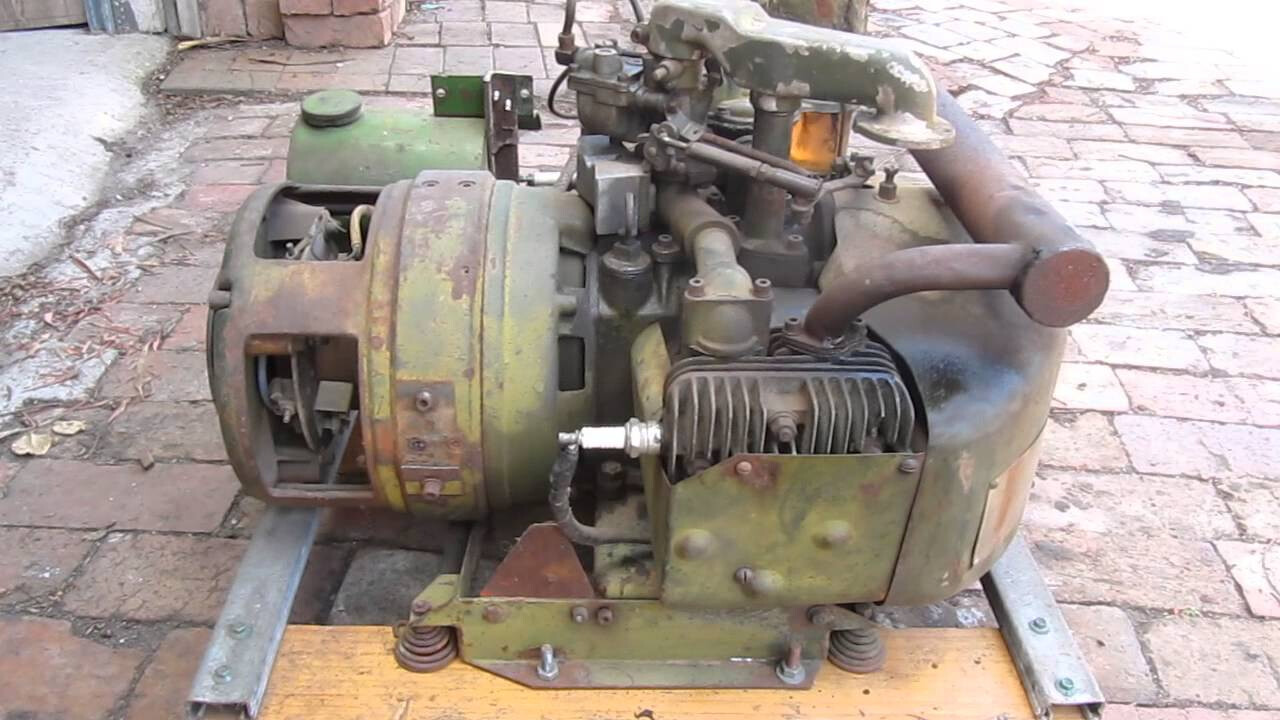
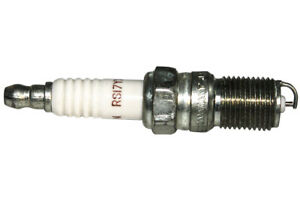
The spark plug for the BGE head is RS17YX.
image

If you look at the shell electrode its completely covering the centre. On this engine ( Your BF ) it also has a ground strap electrode fully covering the centre as made by the factory. its tricky be careful but cut that ground back so it cover only half, and close up the gap to about .018. Wood gas is a little harder to ignite but its dry so this modification will help you get a little better spark if you find its got a miss. Many Onans ob NG or propane suffer from a light load miss and this trick helps.

This is a BF service manual for a tractor but the settings are near the same.
I will find a proper manual later. Aim for that .025 spark gap and hot running closer to the 25 DBT hot. A timing light will help.

With the BG head on the BF block the spark plug is more central located so its timing requirements are a little less

I had a hard time reading the data plate on the engine but I know its a BF so I know it has a conventional ignition. You could use an HEI modual from a GM car and Dual post ignition coil from a Subaru if you want/need a hotter ignition. Unlikely you will but if there is a miss you can not clear up thats a good modification. Use ther original point to fire the HEI for simplicity and if you have an ignition failure you can quickly switch back to conventional ignition.

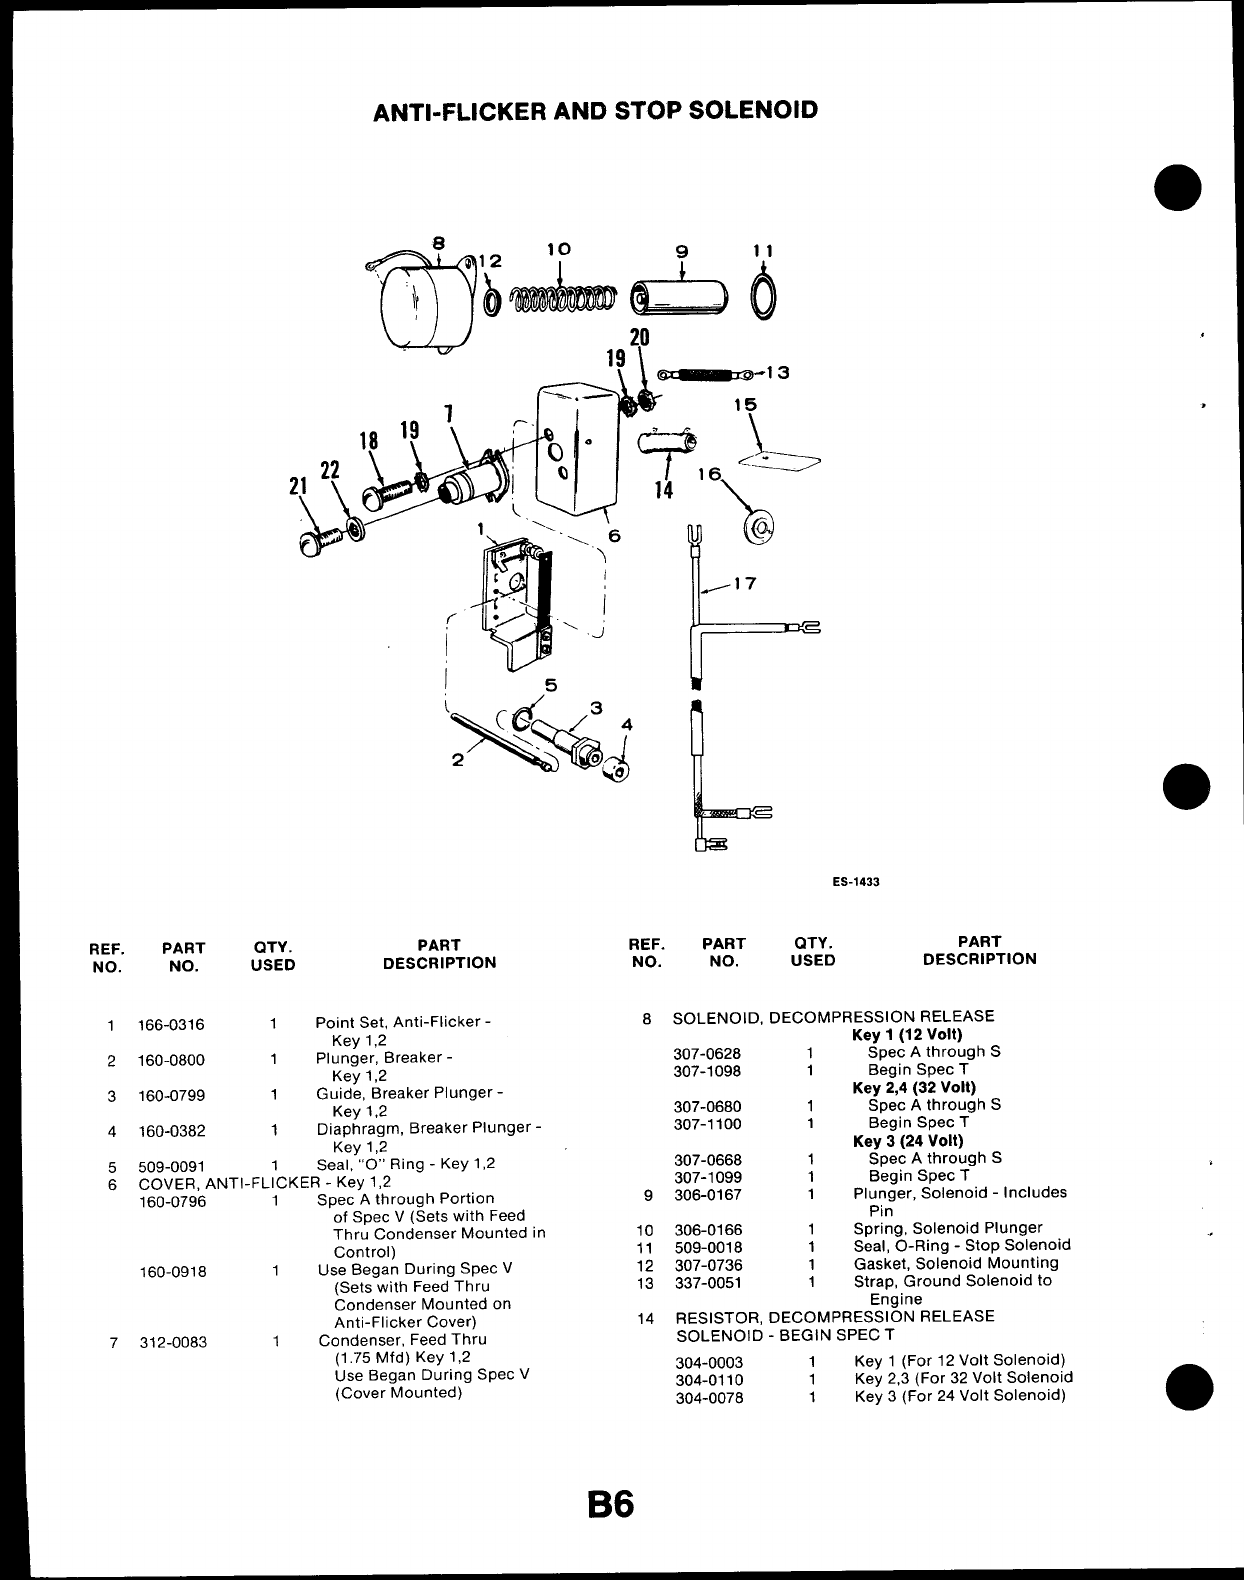
A good read here with some tips by Brian Miller to improve the ignition on these flt heads
http://gardentractorpullingtips.com/ignition.htm

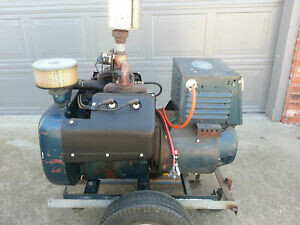
Again because I can not read the speck I have to guess, but this manual indicates that generator most likely has a dual voltage connection for the generator. BUT you probably just have it wired up for 120 volt and a factory installed Airpax 30 amp breaker on board.
I bet if you open up the connections you will see the M1 threw M4 wires to convert it to a 3 wire Eddison connection ( this can be done on a lot of BF and BG units, but cannot be done with any of the exciter cranked types that use a stationary field generator. )

The regulator on these is a transformer type. Not much to go wrong there just keep the sip rings clean with a Brillo pad if they get dark and dirty ( maybe once a year )

Page 50 shows a remote oil filter option for this you can add this part or improvise a remote filter, I strongly recommend this for wood gas just in case you get some dust sneaking past your filter.

ANY 9 bolt head gaskets fit this engine and they can be reused so its not critical to keep spares if you did or did not chose to make some copper ones.
You can buy copper high compression after market gaskets for the 10 bolt NH engine ( crazy people build airplane engines out of the NH, the same guys that make those can make them for the 9 bolt heads. Copper gaskets can be used over and over and over )

Added information:
I am reading up on the BF and I think I am confused about the generator end. I think it uses the same generator as the last production CCK square head. If that’s the case and it does use the exciter to start and has a stationary field then is is what its and the connections can not be changed.

Each generation of these after the CCK has been a slow evolution.They resemble each other very closely and Onan was very slow and deliberate not to make too many changes at once.

I need to try and read the spec number to find out.

1 Like

This is everything I can find in my usual places. I will keep digging.

https://www.twinslan.net/~n0nas/manuals/onan/T-019%20Use%20of%20Engine%20Fuels%20with%20Onan%20Generators%20(08-1964).pdf
https://www.twinslan.net/~n0nas/manuals/onan/900-0322%20Onan%20BFA%20NH%20Auxillary%20Genset%20Installation%20manual%20(11-1981).pdf
https://www.twinslan.net/~n0nas/manuals/onan/965-0120%20Onan%20BF%20(spec%20B)%20RV%20Genset%20Operator’s%20manual%20(02-1976).pdf
https://www.twinslan.net/~n0nas/manuals/onan/965-0220%20Onan%20BF%20RV%20Electric%20GenSet%20Parts%20Manual.pdf
https://www.twinslan.net/~n0nas/manuals/onan/965-2501%20Onan%20BF%20Genset%20Supplementary%20Parts%20List%20to%20965-0250%20(02-1975).pdf

This last one has a lot of different units in be sure you have a spec and model number that matches before you try and use the print for wiring and trouble shooting.

With some units you have no idea what you are getting. My LK has a CCK controller on it from the factory with modifications made to bypass the CCK stuff. A fellow can get very confused by this sort of thing…

https://www.twinslan.net/~n0nas/manuals/onan/0900-0186%20Onan%20Mobile,%20RV%20&%20AUX%20Genset%20Wiring%20Diagrams%20(06-1989).pdf

1 Like

4.0 BFA -1R/16020A
1783383894
120ac volts ph1
kva4
kw4
pf1.0
amps 33.3
hz60
rpm1800
bat12

1 Like

When I saw the title “Onan Twin Carb —”, I thought it meant 2 carburetors! That makes me wonder if dual carbs, each one mounted right over an intake port, might allow more total volume into the cylinders during each intake stroke.

2 Likes

DW Onan had some ideas and the design of his OTCs did not change much. When someone says something radical like a twin carb split intake on a B motor I kind of cringe a little. Nothing about it sounds like it would work any better and if anything I think it would harder to tune…

First half of the 1940s the first OTC.

The last one made was a B43G for John Deere back in the last days when they still made things on this continent (Late 90s I believe, and in Canada under contract because the tooling had been scrapped )
image

The only thing that comes close in my mind is the Wisconsin V-465 that can trace its lineage back to the thirties ( and they just quit making it a couple years ago ). I would not go crazy and try and re–engineer that big fellow after all its done its part for 80 years
image

There’s a machine that would be good…on wood .

image

2 Likes

my orginal thought was being there is two pistons more vacuum i have seen most wood devices on smaller single cyl generator’s my thought was that with a single cyl your getting a vacuum pulse for short time where twin its occuring more often
i have a horror story about building those buckets of fuel and run your vehicle on fumes contraptions
before they was on youtube it was a method used when a fuel system was bad to move or start an engine
let me tell you dont try it without real concern over flashback and the gm 454 was known for backfires i went to move a truck that was rigged this way just to move it it backfired and the plastic bucket half full of gas that was sitting in the passenger side nearly exploded it caught the vacuum cleaner hose alight under the hood i managed to get the fire out…but i about turned white and had a full pants if you ever do that ordeal have it outside and fire suppression ready an exploding 5 gallon bucket full of liquid fuel is no joke in an enclosed cab my angel was working overtime that day
there was a suside captured in the 90s on tv news a guy did something of the sort intentionally blew the windows out servere burns no hair since that only mamed him in agony walks out a few feet and finishes with a firearm but the whole thing was caught on news helipcopter back when it wasnt exspected the police was trying to talk him down they had the la freeway stopped but still a horrific site

1 Like

Well you are correct about the double cylinder vacuum events being advantageous on a needs-to-suck gaseous maker system.
Even the uneven events V-twins show this.
Go with 3 cylinders another advantageous step-up.
Four cylinders and more; and you can consider the common intake vacuum as steady.

Onan and other small AC electrical generator makers going multiple cylinder it was to combat the AC voltage flicker problems with single cylinder engine systems at the low 1500/1800 RPMs. More poles in the generator head can combat this too. Complexity = costs (and weight) so usually only on “Government” systems. Or Telecoms needing the best smooth solid stable outputs.
Ha! For the rest of us high speeds of 3000/3600 RPMs does the AC outputs flicker reducing, smoothing’s. At the costs of wears and noise.

And you are also right that liquid fuel vaporizing systems are madness!!
I am glad you have left you madness pursuits behind you. And came out the other end unscarred.

Woodgas and charcoal gas making/using is not dangerous madness. Just challenging.
Regards
Steve unruh

1 Like

There are work arounds but 4 cylinders are simply nicer sets

Nothing small about this one…
This is a 7500 Kohler set with 4 cylinder Wisconsin. Its a particularly good candidate for a woodgas build because it will pull like hell on a gasifier and still have room to make power. This particular unit in rated at 7500 watt but it is virtually identical to the 15000 version ( just a bigger generator head ).

It could put out its rated 7500 watts on low cal wood gas. Better build a big gasifier for though because its not going to be easy on wood…
image
This one is actualy smaller but water cooled ( its a marine version from a small boat, the guy on Tube does not know what he has… )

It would be an excellent unit for off grid because of the extra heat you could salvage from the exhaust manifold for heating home

2 Likes

Flicker…
The king of flicker the LK 205. If you look closely ( and I ain’t got any pictures )
You can see a large ignition point box with two set of contacts. The anti-flicker in there, its just a set of points timed with the ignition that introduces a little resistance in series with the field to reduce the flux temporarily as the armature accelerates on the power stroke. I have an identical one to this and if you listen and watch you can see how something with only 1 cylinder is going to gallop a long and flicker the light ( both this one and mine do not have the anti flicker, these are the contractor units designed for use on a service truck )

Scratching my head for a moment as to what exactly this diagram is from.
DJA diesel single cylinder 1800 rpm, the anti flicker is even running off the same cam lobe as the ignition…

The OTC engines and the J range twins have a feature that reduces flicker. They have one power pulse every 360 deg of crank revolution… Think about that Steve… That would mean both pistons on the J range are moving up and down together instead of being staggered like a lister or wisconsin. This is in fact the case…

image

1 Like