2000 watt charcoal generator project

Alright, all this talk about Argos 2019 has me feeling like I need to get a project going so that if I were to make it, I would have something to talk to you all about!

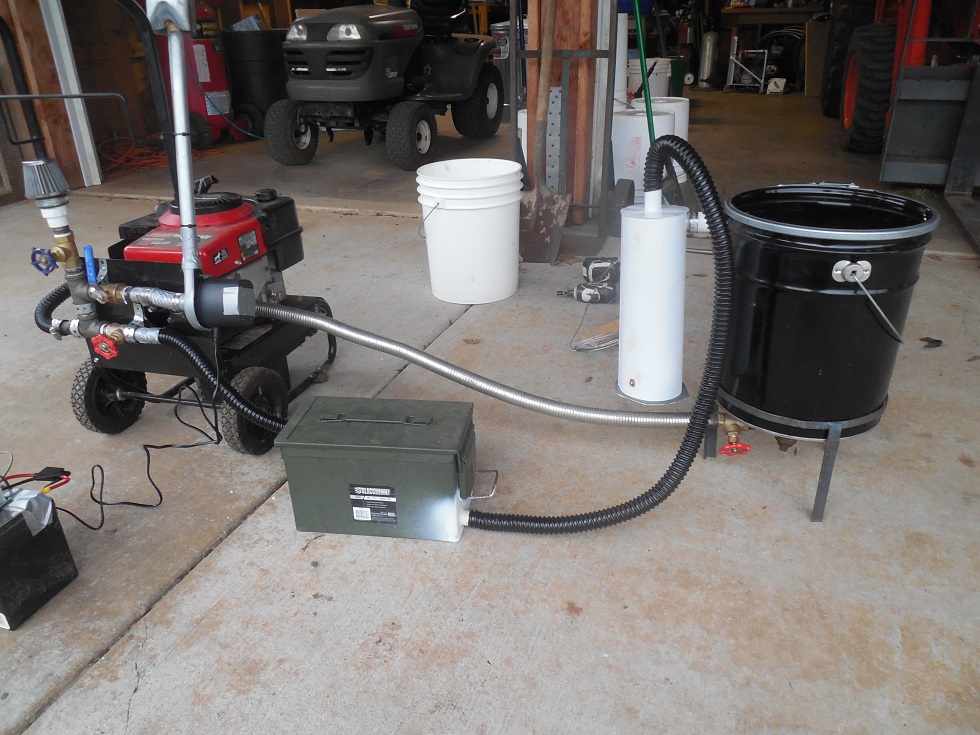
I have decided to charcoal gassify a little dinky 2k generator set I picked up on craigslist. It ran fine on gasoline, and had plenty of juice to run my backup battery charger for my off-grid batteries.

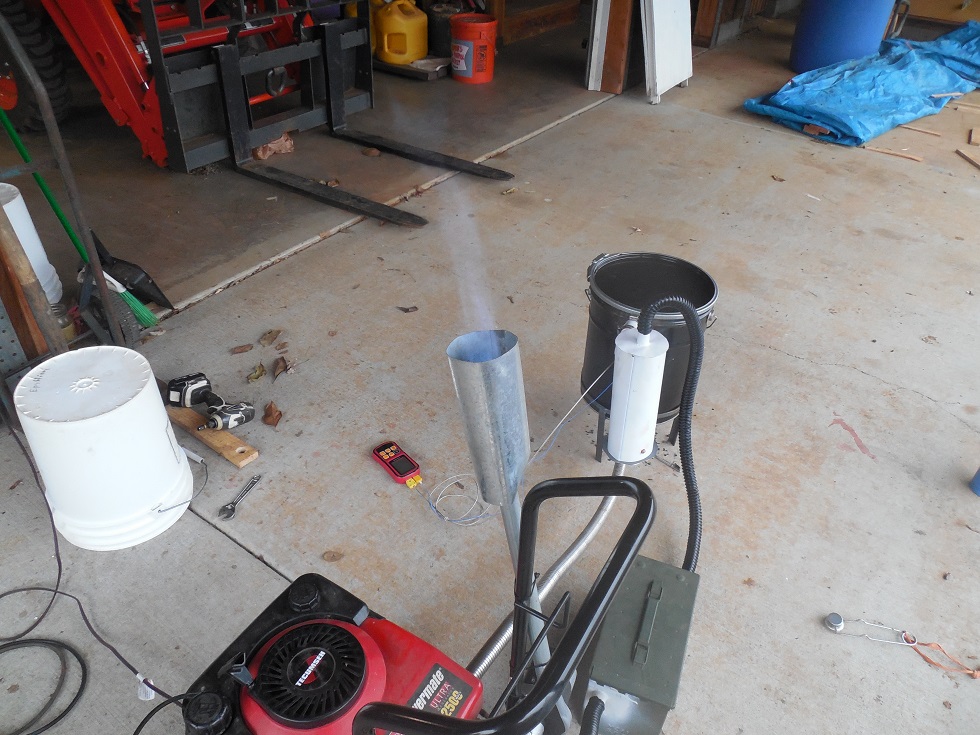
On my last project I was having trouble keeping a flare going, so I am going to really try and be more on top of air leaks. I got a little 12volt blower, and also ordered a DC speed controller for it to dial in the right suction. Once I get things plumbed up I will try running it in reverse and check all the fittings with soapy water.

I also had a lot of condensation forming in my pipes and filter, possibly due to our 90%+ RH this time of year. To address that, I put together a very thin walled “cyclone” in the hopes that I could get some of the vapor to drop out before getting to the filter.

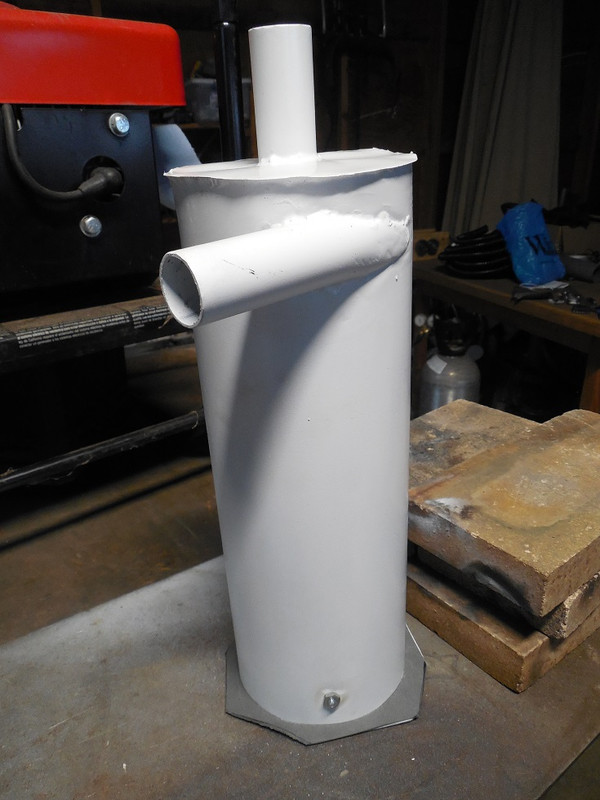
The inlets are 1" od tube, and the body is made from a 12" section of crimped 4" single wall duct. The top is just a piece of galv roll flashing that I ground the zinc off of and brazed (very carefully) to the duct. It did warp a bit.

The bottom is heavier gauge sheet, with a piece of rubber-fiber gasket material.

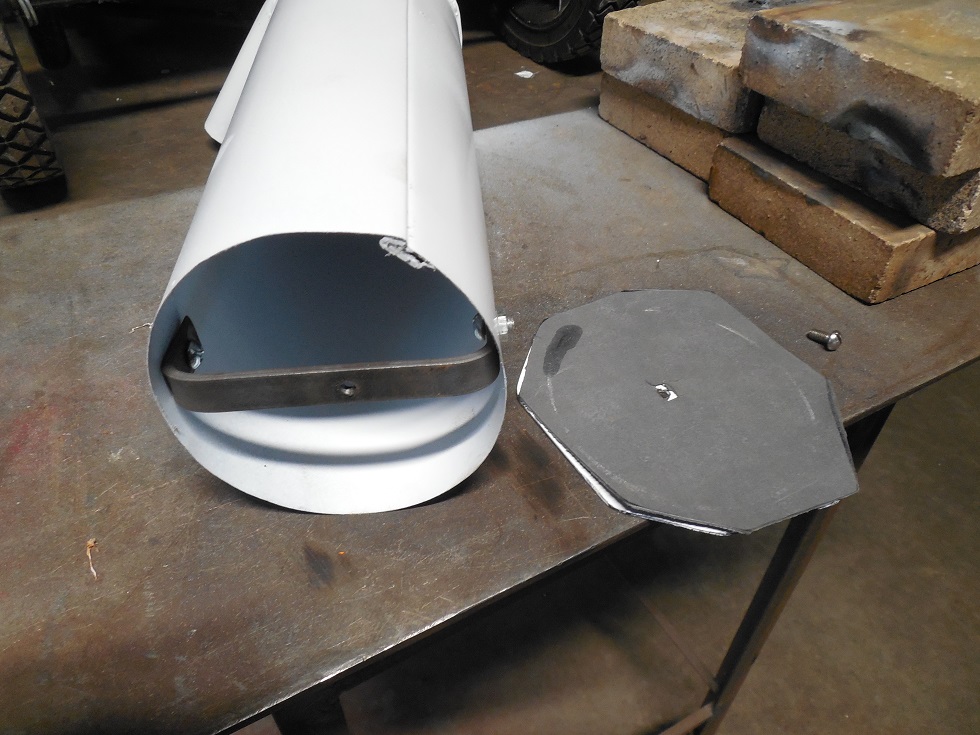
There is a threaded hole in the retaining bar, which holds the bottom in place. I will put some RTV in the bolts and such, and test the crimped seam for leaks.

I am not sure if the geometry of this thing will allow it to catch any dust, but If it does I will consider it a bonus.

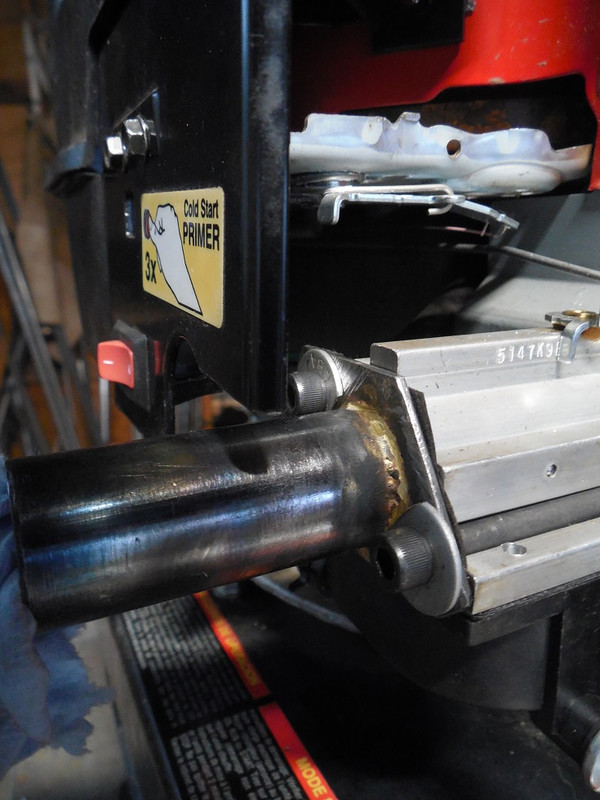
I also finished a new intake tube and bolted that to the outside of the carb. I put a shut-off in the fuel line so that I can still use it on gas if I wanted.

I am going to reuse the same air intake/ mixing manifold that I built for my last project, but I have not gotten it mounted yet. More to follow!

15 Likes

Hi Carl,
For another take on cyclones, check out my posts in the “Small engine section” under
“My first small engine run”.
I have a bunch of “how I did it” posts you might find interesting and/or helpful.
Pepe

1 Like

It looks really nice. :slight_smile:

If you run it, and it gets hot, you might add vertical fins to it to help it cool. If it works as well as you hope, I would also consider adding a plug or clear tube with a valve at the bottom to make it easier to drain. The clear tube may allow you to drain on the fly, but you will know whether that will work after you run it a few times. The humidity right above water is 100%, you don’t want to reintroduce the water vapor.

While I am off on a tangent, if it still doesn’t work well, you might get a 6" duct to put over it, and then use your 12v blower to push air through it. .

2 Likes

Thanks for the input guys, I got sidelined by having to babysit some contractors that are building a new porch for my mom. I guess they had never laid a tile roof before, and their attempt at learning on the go was truly horrible. Anyway, I finally got some time to work in the shop, and I am finally making progress.

Here is the whole setup. The generator has a nice little set of handlebars, and I stuck on a little plate and mounted the intake to that. The valves are not set up the way they were before, but by being able to shut off the gasifier line (red gate valve) I can really easily run it on gasoline by just opening up the air filter intake (blue gate valve).

I have a speed controller for the blower, so I can fine tune the suction, and the new cyclone is mounted directly to the reactor.

I warmed the engine up on gas, ran my blower for a couple of minutes and got a nice self-sustaining flare. I got the engine to turn over and it ran roughly as I tried to get the fuel-air mix right. Then it died, and wouldnt restart. The flare no longer stayed lit either, so I think I have air leaks developing somewhere. Now that I have my handy blower fan, I will try pressurizing the system and do a soap solution on all the joints.

I feel like I am getting close to my first goal of generating useful power from charcoal!

16 Likes

Hi Carl, Yes, you certainly are getting very close to running the engine. I have also had the experience of getting a nice flare then starting the engine just to have it sputter out. When you go to relight the flare…nothing. It is pointless to try to start the engine if the chargas cannot sustain a flare. Air leaks are definitely a problem so look for those. Has your charcoal gotten wet since you made it? Too much water in the charcoal will conspire to make poor gas too. Don’t get discouraged. You will find the problem and then you will have to suck lemons to get the grin off your face.
Gary in PA

8 Likes

Hey Gary, thanks for the input. I am starting to suspect that moisture might be the culprit. I checked for leaks today with compressed air and found that the bottom of my cyclone leaked a bit. Once that was sealed, I tried it again, and had more or less the same results as before - a brief flare, a few sputters, then nothing. I let it cool off for a bit, and then popped the top off my reactor. A few wisps of steam came out - and there was condensation on the bottom of the lid.

I went ahead and spread 100 grams of my charcoal on a tray in the oven at 200 for 2 hours, and then reweighed it. It came in at 91.3g. Has anyone else ever tried to determine the moisture content of the char they are using? I have not been very good about storing mine in airtight containers, so I assume it has just soaked up moisture over time.

I will have to see what I can dream up to try and dry out enough for another test, and then make sure to not leave it sitting around in bags in the future.

6 Likes

While searching for info on drying charcoal, I came across something I had never heard before, which is the notion that wet charcoal (or coal) can self-ignite. This article was pretty interesting https://www.straightdope.com/columns/read/2169/will-charcoal-self-ignite-if-wet/ The consensus seems to be that it cant happen with just a small quantity at ambient temps, but it did just make me wonder just how much charcoal I do have piled up in bags in my shed… I feel like I recall someone mentioning that charcoal left in a stainless container in the sun can light itself - which would certainly lend credence to the idea that thermal runaway is possible. I think I maybe need to invest in a bunch of those metal garbage cans with tight-fitting lids…

5 Likes

What I’ve read in the past is that right after the charcoal is produced it is the driest. If it absorbs water at just the right amount and rate (specific) the latent heat in the moist charcoal will be released in an amount to start combustion. A wee bit like how an A/C system works. The Missouri sawdust gasifier had the same issue with it’s screw exhaust dryer when shut down. However, that is just the talk that I read in some articles. The talk was that after the charcoal had time to season is was safe and then added to the bulk storage. I always store charcoal in metal trash cans or barrels if inside of some kind of building. Trash cans are nice because they nest when empty.

6 Likes

I cracked open the gasifier today after letting it cool down, and there was enough condensate under the lid that it ran off in little trickles and made a wet spot on the pavement. I have propped up a garbage can inside a barrel to try and make a charcoal drying rig, but I am not sure yet if its going to work. I am going to play around with it tomorrow, and then do another dehydration test and see if I made any difference.

3 Likes

Hi CarlOR,
If you have been following it, do not be confused by the “maybe use wet-ish” charcoal on Kristijan topics thread.
He/they are talking about AFTER a gasifier is pulled up good, hot and active By-A-Much-Larger car engine then maybe be some befits.
From cold starting up you need the driest input fuels you can produce.
Only being small blower “encouraged” you need the driest input fuels you can put into it.
With your goal of a small 2000 watt generator (on gasoline?) you will need the driest fuels you can feed it.
Maybe . . only maybe; if you were able to keep everything HOT and producing with a maximum capable continuous electrical loading would you m-a-y-b-e then have the extra hearth heat to play with water turned to steam.

Take GaryG’s advice and use engine exhaust EGR once you get engine running loaded down. It will already be hot-to-warm. Have pre-vaporized water and warmed carbon dioxide in it.

Regards
tree-farmer Steve unruh

8 Likes

Yeah, I have been following that topic, and it does make sense to me that with an updraft you would want to avoid any extra moisture in the hopper as it will simply turn into steam and dilute the gas without any chance of it cracking. My drying setup seems to have worked a little bit - the new sample has dropped to about 5% moisture. I am going to test that and see if it improves things. I wonder how fast bone dry char can absorb moisture out of the air - certainly some water will be inevitable - it would be nice to know if there was a limit to what was acceptable in a basic Simple Fire setup.

4 Likes

Well, it would seem that if there is a limit to how moist char can be, it appears to be less than 5%. I still had moisture problems today, although I had a slightly longer run of decent flaring gas. Seems that once the reactor gets up to temp, if there is ANY moisture in there it is going to crap up the works.

I think I am going to start from scratch with my charcoal, and be very careful about keeping it sealed away from our moist winter air.

I also suspect I am having trouble with my nozzle setup, so I think that will need to be addressed too.

I probably should not have tinkered so much, and I would be up and running a long time ago :grinning: I suppose I am in no real hurry, and pretty soon I will be an expert on all the ways to make a charcoal gasifier that doesnt work!

8 Likes

Hi Carl , i have not had a problem with damp charcoal to the degree where i could not light a flare or run a engine , where i live the clouds roll in over my garden it is a real damp area , and yet apart from a few little pops now and again when i first light up i don’t notice any problems at all .
All none starting problems or non flaring have always been down to air leaks or the flare nozzle not having the correct air holes or a burnt out nozzle .
One other thing to mention when using a small reactor is to always make sure it is as full as possible with charcoal , other than that i am stumped as to why you should be having problems getting it going .
what type of nozzle set up do you have ?
Dave

1 Like

It will dry out eventually. I had a pan I ground up in the meat grinder, and it took about 2 weeks on a seed bed starter heating pad to dry out after letting it try to dry out in the sun for a week. just to put it into perspective. It takes about 10 days to dry out sopping wet sand to bone dry, It is probably closer to clay for drying time, Clay takes about 2 weeks to get from sopping wet goo down to where it is starting to form crusties with the same system.

1 Like

Hey Dave, the nozzle on my reactor was a firebrick with a 3/4" hole that sat over the hole from the pipe fittings coming up from below. On top of that is a tungsten ring that chokes it down to about 16mm. In the past I had it seated down in a thick layer of ashes, but this system seems to be unworkable. I got a hot spot developing on the side of my drum, so clearly air is leaking under the brick.

I have decided that I am going to shelve that system, and try to build a new reactor body that will mount with a flange to the bottom of my 5 gal pail (or a larger hopper in the future).

I have not seen anyone else replicate (and document?) the success that @KristijanL has had with his thick-walled steel nozzle - so I am going to give that a try. I have a question I want to run by you all. Since I am thinking of running 200-300cc eninges with this, any thoughts on 1 vs multiple holes? I know Kristijan you were trying to keep your reaction height down, but do you think that in theory this could work with a single say roughly 1/2" nozzle? I think my biggest drill bit is 14mm - would that be sufficient, or do you think that the multiple smaller holes in your setup are integral to its success?

The nozzle tube is about 3" diameter with 5/16" thick walls, and weighs about 7lbs.

I need to work on a flange for the top of my reactor, but work is progressing a lot faster now that I have invested in a new welder.

Its a little 120v Mig setup, and I am really happy with it. I got some good practice in making the cart for it to sit on out of an old crappy hand truck.

7 Likes

The only time i tried Kristijans horizontal tube with a row of 4 small holes in it was to run my 7KW inverter generator, i did not have any thick walled tube to hand and all i had was some stainless steel pipe that had about a 1 mm wall thickness to try, it did work well for a while but the more i used it the harder it became to light it up due to all the slag formation around the holes , in the end the pipe gave up and burnt out .
As for the number of holes , well if your reactor is going to be the same sort of size as your old drum then i would go with maybe the 4 holes same as Kristijan used , i think the more height the better and longer the run will be .
The other good thing about using the thick walled pipe you could run it through both walls of the reactor and drip water through it that will turn to steam real quick and any excess water runs out the other end of the pipe .

Dave

2 Likes

Hi Carl, l see no problems with using only one hole. If you do go multiple holes, be sure you make them smaller. Alot of guys (including me) found biger air velocity work better. If you go with one nozzle, l wuld go with something around 9mm.

Allso it is a good idea to file down one inside corner of the nozzle as Bruce did. This alow you to poke the nozzle from the inside prior to every lightup, to bust the slag off the nozzle.

Looking forward to the project!

3 Likes

Thanks for the input Kristijan, I am thinking I will make a curved flange on my nozzle like the original simple fire setup, that way I can take it out easily and redrill or adjust the holes as needed. I will start out with trying a single 9mm nozzle and see how that works.

Also, what are your feelings on implementing EGR with this system? I seem to recall you used that at some point, are you still? If so how are you plumbing it into the thick nozzle? There are so many threads going back so far that its hard to remember what ideas people had success with, and what they have moved on from.

Hey Dave, I am quite curious about this now, and would like input from any of the charcoal guys on charcoal moisture content. Using charcoal that has been stored in paper bags in a dry shop I get condensation forming inside my cyclone and filter. Its not just enough to fog the surface, it forms little puddles. I found moisture ranging from 5-10% would cause this. My test method was to spread 100g on sheet of aluminum foil in the oven at 200F for 2 hours, then re-weigh it. I would be curious what numbers other people come up with.

1 Like

Carl, I’m so glad that you will try the single 9mm hole. That seems very small compared to Gary G’s 1" or even Koen’s (5/8"?). I would love to find out how that one tiny vertical hole works. I hope we can capture some of your results and add them under the “nozzles for charcoal gasifiers part 2” topic.

5 Likes

I agree, a single smaller nozzle hole will produce a higher velocity intense air jet, should be interesting to see how it may change reactions. It will tend to raise the reaction zone if aimed vertically.

1 Like