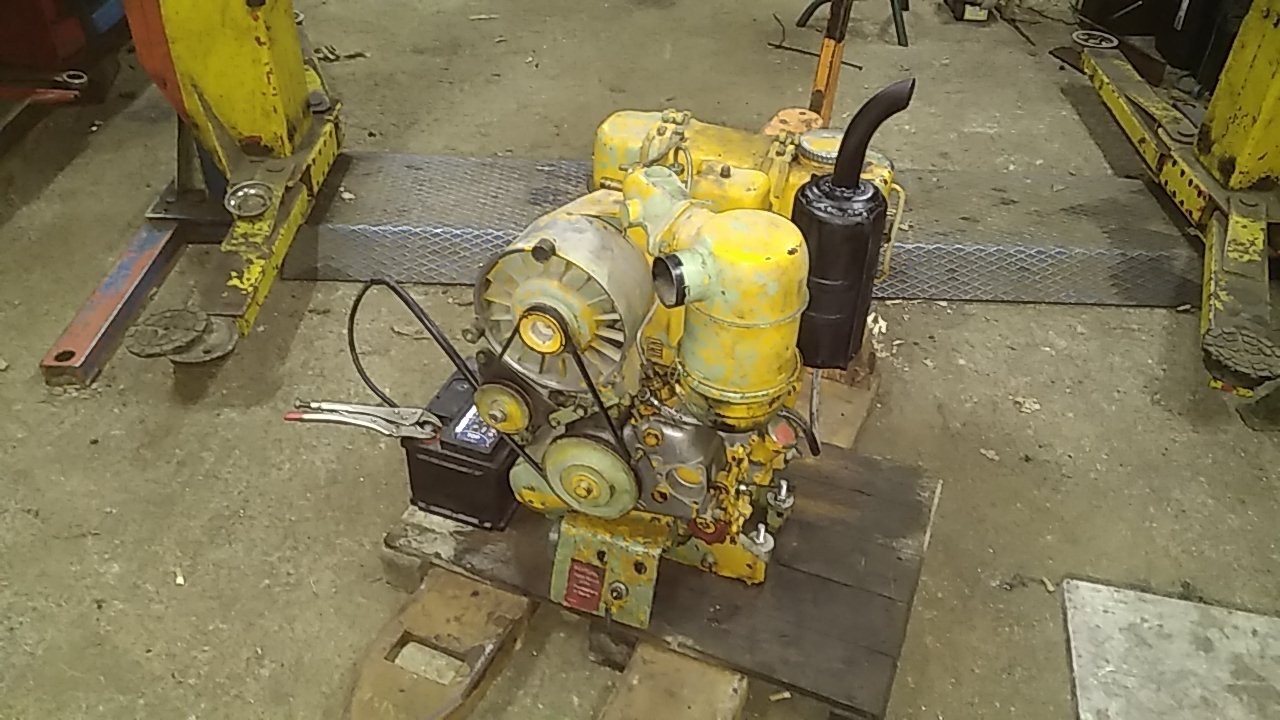
In the meantime, I’ve been servicing an old Deutz diesel engine, changing the nozzle, belt, cleaning the tank, repairing the exhaust pot, repairing the electricity, … it may be good for running a Christian saw, or … but first it will have to smell wood gas.
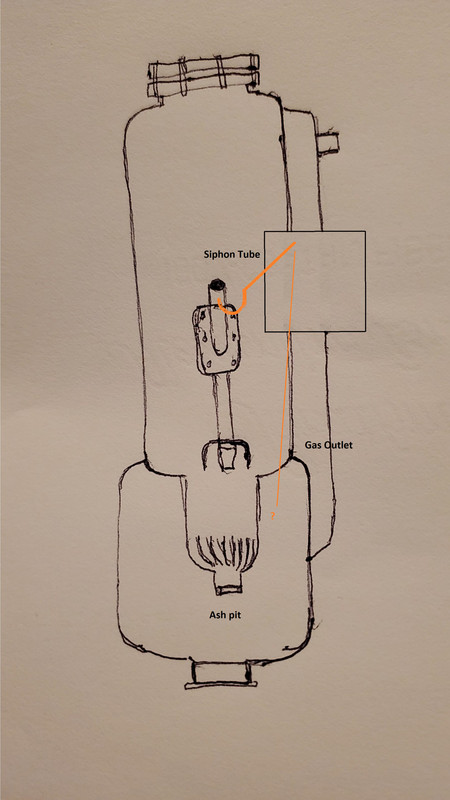
I am curious about how you set up your steam generator. I am looking at a still image at 0:14 where I can see a new metal structure welded on around the gas outlet, is this the water tank? Is it passively heating from the outgoing gas, or is there copper tubing inside the reactor? I like how you have plumbed the steam in from the bottom, looks promising. I found that steam really boosted gas quality on my generator, so I will be interested to see what your conclusions are. Keep up the good work, I am looking forward to seeing your contraption in action!
Hi Carl!
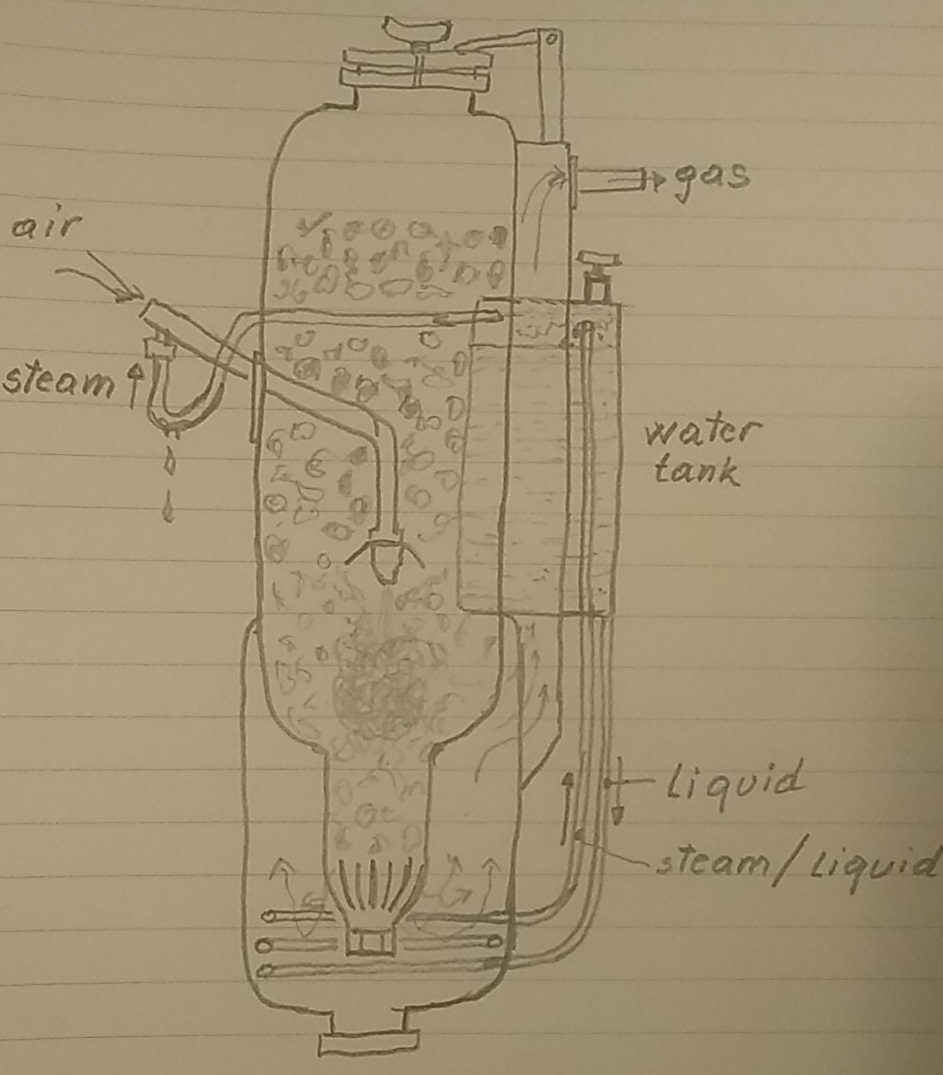
In the lower part, there are 3 wrappers of copper tubes fi 6 so that they cool the generator gas, then it is sent back to the tank, and the steam extraction is connected from the top of the tank and via the siphon tube to the suction side, in the lower part of the siphon there is a hole for drainage of liquid
Borrowing Bruce’s sketch, i added in the water tank and the siphon tube that feeds steam to to the air inlet.
looking back at the video I see there is an external copper pipe that goes from the top of the water tank to somewhere lower on the reactor - It was not entirely clear to me from the video where it was going. Are the coils you described down in the ash pit, or are they inside the gas outlet channel? Also, I only saw one pipe, is there an internal connection somewhere?
Yes, that drawing is quite clear now, and it looks like a good design. Insulation on the steam delivery tube would probably cut down on the steam condensing back into a liquid, but the drain you have devised seems like it also prevents the water from getting into your intake, which is good.
Sorry for all the questions, but I hope to someday get around to making another charcoal gasifier, and I am always looking for design elements to “borrow” .
I wanted to know how you got the coil of copper tube inside the reactor - it was added after the unit was assembled, was it not? Also, while I am asking questions, is that 1/4" tubing, and did you use bronze braze or a lower temp solder at the joints?
Hi Tone , couple of questions that i may have missed seeing .
Are you lighting it from your air inlet pipe ? if so what do you use , and is it easily lite after say 3 or 4 runs , mine always lite up within seconds on fresh charcoal , but take a little longer on old fuel left over from the last runs .
The other thing i notice is on the steam coming into the air inlet the video makes it look like its also blowing steam out and away instead of sucking it all into the inlet pipe when ever i have tried this nearly every last bit of steam vapor was sucked in .
Anyways its a very cool build glad to see more charcoal generators on here and cant wait to see how the internals have all held up when you strip it down for maintenance .
Dave
Hi Dave!
I burn through the inlet hose, a piece of charcoal burns the gas burner, otherwise I only boiled twice. I still have to do a cyclone filter and a gas mixer to make the thing useful.
Hi Tone,
Maybe I missed this, but how are you going to remove the ash that will accumulate around the slotted grate? I see the clean out plug below this grate but don’t see how you are cleaning out the slots when the gasifier is working. Or are you going to clean them out when it is cold and do so from the bottom clean out?
I’ll also be curious to see how your “tent” over the nozzle holds out. In my experiance, they got destroyed by the heat. As Dave, mentions, it will be nice to see how everything holds together after extended run times.
Gary in PA
Hi Everybody:
I have open a new topic call:
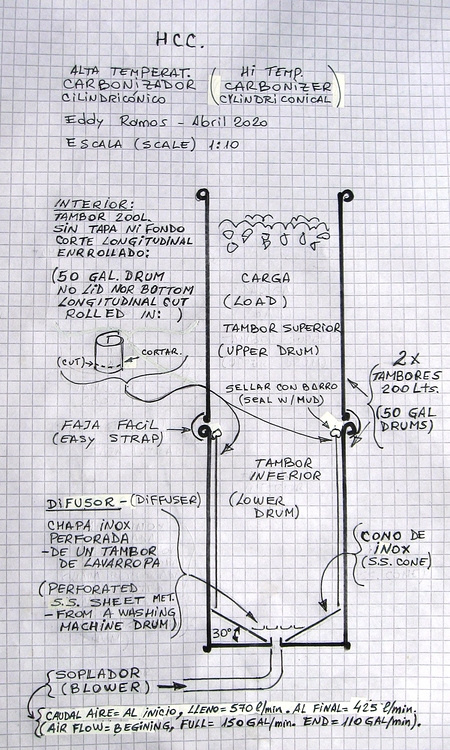
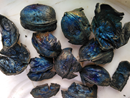
“Hi-Temp Carbonizer for bio-waste”
It’s a very simple carbonizer. The result is a low tar, blueish & crispy charcoal.
I don’t want to be redundant, so that is why instead of posting it here again, I am simple refering it to this new topic.
Best Regards.
Eddy Ramos (Argentina).
Hi there to everybody:
For some reason some people can not find my topic: “Hi-Temp Carbonizer for bio-waste”, so I am posting here the last page of my first post in that topic.
Is it possible to get more information on the oder free portable toilet? Also interested in the poo pasteurization process. With only two people here in camp we don’t generate a lot of poo, but it still needs to be disposed of.
Dried poo from herbivores burns pretty good but dog poo burns hotter.
Never burned human poo. Always buried it.
Now we are composting it with sawdust from a sawmill. Still have to dispose of it.
Jesse
Can’t bury poo here the bedrock is only a couple inches down. Hard to even drive tent stakes. Don’t want to think about the headache of driving fence posts next spring. When I’m setting up for livestock.
Hi Jesse,
When I was in the Marine Corps we would “burn the s&*%%@rs”. Just a 55 gallon barrel. You weren’t supposed to pee in there, so with the tp it worked out well. We would use about a half cup of diesel to get it started.
Rindert
Below is a description of our Ejo Heza (A Better Tomorrow) toilet that we introduced to our friends in Rwanda.
Charcoal is a well-known liquid and gas adsorbant (not aBsorbant), so it takes in pee without expanding and sucks up odors. Pee comes out of the body filtered and pathogen free so can be used in the garden. Urine inoculated biochar is a high nitrogen fertilizer. If the pee donor is consuming pharmaceuticals, then don’t use on vegetables. Use screened charcoal granules on both pee and poo (screened to reduce annoying dust). Poo must be heated to 165* F to kill nasties. It can then be used as fertilizer or formed into fuel briquettes.
Toilet parts: 5 gallon bucket, 5 gallon plastic Jerry can, enlongated toilet seat (readily available at all hardware stores) and wood to build a frame.
Building Method: 1) Cut the top off of the jerry can to leave maximum side height. On one side of jerry can saw a 4 inch slot at the corners. Heat with heat gun or torch along a horizontal line between the bottoms of said slots and fold this flap down to fit snuggly over the edge of the 5 gallon bucket. You now have the essential components of a simple UDDT (urine diversion dry toilet). The bent connecting flap that hooks over the bucket prevents pee from falling between containers. The opposite and unbent side of the jerry can deflects pee downward into container.
2) Build a wood frame that will support the enlongated toilet seat. Allow 2 inches space between toilet seat and containers below as scrotum clearance over the bent connecting flap. Build frame so that both containers are stable and even. This toilet is used by both men and women.
Usage: Start with an inch of charcoal granules in each container. Add charcoal after each use as needed. Since we excrete 10 times as much urine as feces, the pee container will be emptied more frequently than the poo bucket. The pee adsorbing charcoal eliminates odor, splashing and spilling. If a metal bucket is used for poo, it can be heated directly without emptying. Pasteurizing without emptying, greatly reduces danger of exposure to fecal pathogens. Where cooking fuel is limited and expensive, heat poo bucket in a steam bath over a poo briquette fire.
Thanks Bruce
The pastuization was pretty much straight forward. I was just curious, whether it was liquefied first or not.
The toilet is a neat design. Was going to build one that was a bit simpler than the one you described above. Will have to get busy making charcoal. Got an Old small garbage can I can use for now. Make small batches till I can get a couple 55g barrels.
Jesse
The book was written before in 1846
Dr. John Snow is credited with taking bold action when he sensed that contaminated water from the public pump on Broad Street was the cause of deadly cholera during the 1854 outbreak in London.
“The Board of Guardians met to consult as to what ought to be done. Of that meeting, the late Dr. Snow demanded an audience. He was admitted and gave it as his opinion that the pump in Broad Street, and that pump alone, was the cause of all the pestilence. He was not believed – not a member of his own profession, not an individual in the parish believed that Snow was right. But the pump was closed nevertheless and the plague was stayed.”


 .
.