I was on a short vaication, fishing and rafting trip with my family, lots of fun, and some woodmiles under the belt
Everytring run great! No problems with the gasifier, exept a bolt hinge has broken on my air mixer, leaveng me controleless. Hammered in a screwdriver for a fast on the road repair
About 350km of pleasant drive, about 50 kg wood burnt and about 3l of petrol.
Lots of fun goeing on since l was gone!
Max, l am not quite sure how to visualice the beehive idea, culd you describe it some more?
On the silo finns. The expansion is a problem… one culd use elastic heat silicone, but it has poor heat conductivity.
I think the easyest part wuld be puting in 2 rivets on each fin to lock it tight, then use heatsink glue (the one that is used to glue heatsinks on electronic components) for heat distribution.
You have a rectangular silo; straight L- profiled ribbons need a heat resistant glue, the silicone stuff has no glueing properties + leaking rivets is no pleasure.
I have suggested some of the metal glues, that the American colleagues have presented. Sawing up the connecting foot a bit will take care of the differing heat “pumping” toward the steel silo.
Narrow sawed-up jumps in the foot and part of the “long L”-part at each 1" will allow enough “heat-play” longitudially.
Take your time and study the American Al-based glues; some of them withstands >500*Celsius!
The internal fan blown ribbons add nothing new for curious watchers!
Wood-framed “behive frames” vertically with 10 mm air-slots between them are well ventilated, but taking off the individual outer peripheral wood frames is a delicate job, each time you should clean them, is nothing pleasant in the long run!
The horizontal silo-ribbon cooling by the fan keeps all the condensate and tar where it belongs, without any extra undertakings, well hidden!
The cooling air-stream, split in two, one on each side of the silo makes for an even distribution and effective cooling.
For this you need tight cowlings following the cooling ribbons on each side of the silo.
Repeating the ribbon profile suggestion 3 X 15 mm, 1mm thick Al,
3 mm being the “foot” for glueing to the silo-sides. ~120m.
Tight, foot to foot… like on an air-cooled air plane motor.
The gap between the fins has eventually to be fitted to the pressure of the blower; avoiding too much friction for a weak blower.
Its certainly more foulproof thain glue, andmore heat conductive. Cheaper!
Welding a 2mm thick 15mm wide strip of mild steel shuld be easy to weld eaven with stick welder.
I dont intend to make any more drastic changes on this gasifier/hopper as its performing quite well as such, filtration and gas cooling culd be improved thugh!
But! When l start a nother project, and its likely gonna be a inkognito build as well, your idea will come more thain handy!
As the silo metal is thin, the full cooling effect needs tight division!
That’s why I suggested glueing at 3mm division with a 3mm bent “foot”.(1mm Al)
Hi Max,
My next build will not be towbar mounted, so l can afford a few extra pounds. Rough calculation says 80 fins shuld weigh about 20 kg. Yeah its more thain alu but shild be good.
A question thugh. Do you find it worth the extra money to make the hopper stainless?
Hi, Kristijan!
17.6.2017
Missing the scrapyards?! From Germany you can probably find and order, or fetch used stainless, almost perfect barrels, etc. Often with lids!
Used for different chemical transporting, then scrapped…
New rolling from sheet stainless asks for very good connections…
I have found scrapyard tubes and bends, etc in Germany on the Baltic sea costal towns, scrap imported from Finland! ~ 2€/kg.
Generally speaking, if a construction is “maturly” dimensioned and long-time satisfactory, then scrap SS will pay back.
But, then you have to use SS or acid-proof welding tread (in MIG)!!!
Using “iron” thread is a disaster; all jonts are destroyed very fast!
A great source of SS tubes, bends, containers, ect will be Dairys and because they are dealing with food stuffs for human consumption they will not be able to reuse the items themselves , we have managed to get hold of a lot of amazing stuff over the years from them .
Dave
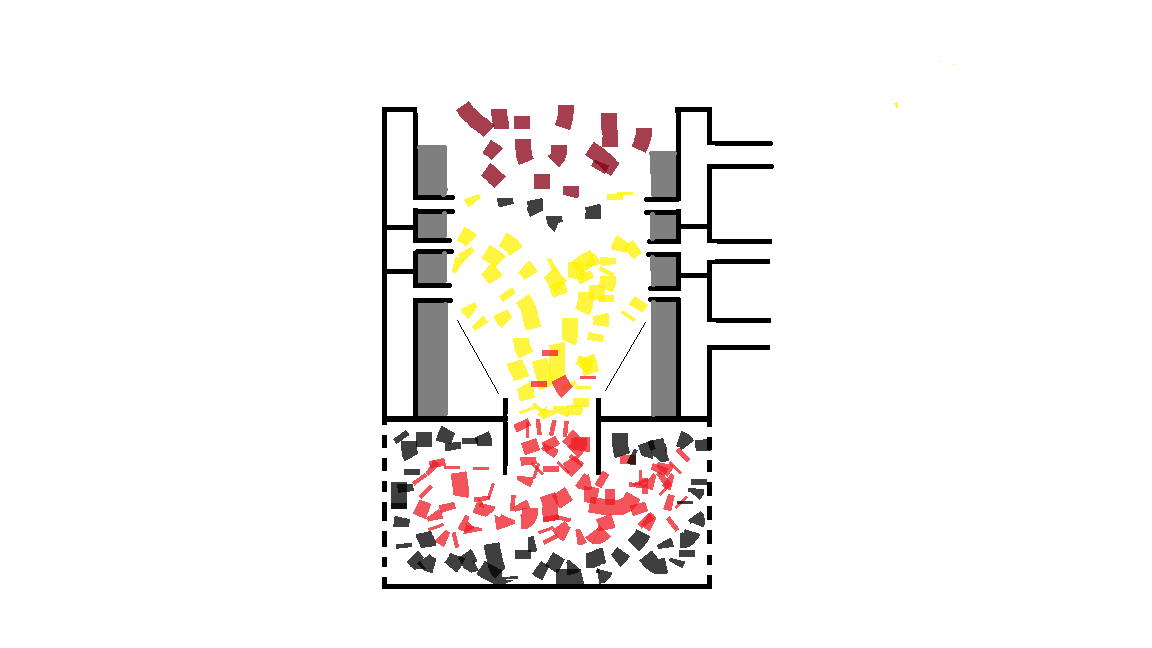
This is my new idea. It combines a WK air preheat, the new cheramic blanket firetube insulation firetube, the reduction l am useing now and a feature l and Max discussed a while back.
The WK is great at traping exess heat from both firetube and outside of the hearth.
The cheramic blanket keeps heat where its supposed to be.
The crossdraft reduction works as a char reserve, reduction insulation, and lowers the system considerably. Allso, makes the lower feature possible.
And last, but not least, 3 plane air injection. Multiplane air injection has been done before with much sucsess, but never a CONTROLED multiplane air injection. Features?
Well, basicly, at every gasifier there is a turndown ratio. So, idealy, one shuld have 3 gasifiers to acheave gasoline like turndown ratio.
One for idle.
One for medium performance.
One for extreme gas demand.
Haveing 3 gasifiers for a mobile unite is unpracticle. But, one gasifier with 3 gasifiers within sounds better.
My current reduction alows great turndown ratio. I have 10l of char in, while lmbert chart says for about 1l for my size engine.
BUT this works only untill the upper part fails to produce enough char to feed it. This is where controled multiplane air injection comes in.
The idea is to have a extra lever in the cab, wich dictates how much air gets on each nozzle plane. This extends the oxidation zone considerably, makeing clean gas at idle and enough gas at extreme demands.
None of the nozzle planes wuld ever be completely cut off of air. Let a litle air in, just so that the surface before the nozzle glows a bit. Then, at expectred different gas demand, lever is turned, puff, air rushes in and fuel burns instantly on a nother plane.

 stick is all l ever had. Down to 2mm is child play, 1,5mm requires some skill.