Is that a Hunter furnace Bruce?
I can’t remember the name. I have some paperwork on it somewhere. I bought it used. Made in Germany in the 70s. Dual fuel boiler, oil and solid fuel.
Hello all, I have had my woodgas project on hold here over the winter, as the new hydro setup was so successful that I didnt need a backup generator even once this season! In fact, I dont think my batteries have dropped below 90% (when the hydro shut off in the night from a clogged intake). Anyhow, I still have a big stockpile of charcoal wood, so I decided to make some time to burn it down before the dry season sets in. Charcoal making seems like a winter-time pursuit.
I did run a batch in my horizontal retort, and I am still not happy with it. Too much smoke leaks around the lid, still takes too long to get going, etc. So, here is another project I have been working on.

I am calling it the the Tandoor - basically it is an old burned out barrel that I have lined with clay. I was inspired by the guy who makes the Primitive Technology videos on youtube. I think his video on charcoal making has been posted on this forum before. Anyhow, my thinking is to use free and abundant materials to extend the service life of the steel components, and also, playing with mud is fun. I did not do due diligence with the clay I used, and it shrank like crazy. huge cracks everywhere, but thanks to the steel shell, they couldnt really fall apart. For this test, I just crammed in more clay and went with it, but I have made a test brick that has mix of sandier soil blended with the clay, and that looks a lot more promising. The drum has like 8-10 ~1" holes in the sides to let in a draft, but I think it needs more. I also wrapped it in some leftover insulation.
Yesterday I did a test batch, using some sheet metal for an afterburner, and it did pretty well. I poked air holes in the afterburner, but that proved insufficient as well, and I had to lift it up on a couple of iron bars to get it to burn off all the smoke. Once it was dialed in, though, it ran very cleanly.

To shut it down I spread a layer of damp ashes all around the lip, and set down a 2’ square of maybe 1/8" steel plate. the drum is not very even, but it sealed tolerably well. About an hour later when i checked on it i could see spots where some smoke was escaping, so i plugged it with clay. The coals were still warm today, and started to relight when I opened it - so i shoveled them over into a drum and sealed them up.

I got maybe 1/3 of a drum - I didnt sift out the ashes yet (there was a decent amount in the bottom) and there were a few brands in there that I will have to pick out when it cools. it was not hard to shovel it out, I found a 90 degree stovepipe elbow made a good scoop for the stuff on the bottom.
I would say I am optimistic that this system has potential, and I am going to try some more experiments with clay. The possibility of a ceramic lid/afterburner intrigues me…
5 Likes
I got another sunny day to play around with my charcoal project, so I ran another batch.

I recorded the weight this time - 121 lbs of wood went into the barrel, including the kindling piled on top. This system worked flawlessly on the “produces no smoke” front. Here it is maybe 5 minutes after lighting:

I am not sure how the thermal mass and insulation affects the performance compared to you guys who are running straight barrels, or sheet metal lined barrels, but I am really happy with how this thing seems to operate. It never roars, no steel part ever gets cherry red, it just plugs away. Here it is after about an hour:

The super thin sheet metal afterburner is hot, but not glowing - it hasnt even melted all the zinc off the bottom. I think I plugged the first hole by about 1 hour, and by 2 hours everything was sealed below and It had died down enough that I decided to seal off the top.
This thing holds heat like crazy, so the last batch got shoveled out warm into a barrel.
DO NOT PUT HOT OR EVEN WARM CHARCOAL INTO A BARREL AND SEAL THE LID.
The vacuum it created was unreal. I ended up hammering the rim into oblivion to break the seal, on my shiny new barrel no less! I should have drilled a hole in the lid. Next time.
The quality of the charcoal produced with this method does seem inferior to the stuff I get out of an indirect heated retort, but I am thinking that in terms of efficiency they might be pretty comparable. My first run yielded 23 pounds:

I got only 5 lbs of nice lump charcoal (>1"), 11 lbs of (1" to 1/2") and 7 lbs of fines (<1/2"). For producing engine grade charcoal, this might be a good thing, as the smaller pieces will need less grinding, and the coals seem softer to me. They dont ring like glass, but sound more like styrfoam, maybe.
Anyway, I am really happy with this setup. I will update with my yield info when it cools off (and it stops raining again).
6 Likes
Looking good, Carl,
<7 lbs of fines (<1/2"). >
My interpretation of fines is anything that will go through a 1/8" grid of hardware cloth on a wooden frame. Above that, I have a sliding box with 1/4" grid screen. I used to use a big hand brush (like people use with dustpans) to run over the stuff on the 1/8" screen, but after wearing out three brushes, I just use a pair of gloves and rub the fines over the screen. What doesn’t go through the screen is gathered up and saved in bags or jars for the garden, or for giving to people who show an interest in charcoal or biochar. (Sometimes, I just toss it in the container with the larger pieces when I empty the shaker box. Have you even noticed the size charcoal Koen Van Looken uses? He makes it from Bamboo, and it is really small stuff. Like less than 1/4"…
Your system seems to be doing a nice job, especially since it is not making any visible smoke.
Yesterday, I ran barrel #294 using mostly very dead dry oak from a tree that blew down on the fence line. All the logs were around eight to ten inches in diameter, and the stuff on top to get it started was very thorny Huisache and Mesquite. Lots of punctures in my fingers, even when I was using welding gloves. The logs broke down really nice, and the little thorny stuff is all gone. Fingers will heal. I didn’t measure the yield, but guess it is around 20%. There is more of the tree yet to be hauled up to the charcoal making area…
3 Likes
Yeah, I ran out of buckets so I hadnt sorted it any further than through the 1/2" mesh. I later screened a bunch of other batches and sifted out the “engine grade” (<1/2" >1/8") and was left with only a gallon of actual fines. I still do not have an operational grinder, so I am just going to try and make a big stockpile of charcoal to process down later. I still have a bunch of dry wood, so I would like to run another 5-10 batches.
When you do big chunks, do you pack in smaller stuff around them, or do you try and keep the size of the pieces fairly uniform?
1 Like
I try to keep the pieces uniform, and if I can, the length of the barrel. The tree I am working on now has been a dead skeleton for years, and finally rotted off at the ground and fell over. I have six chainsaws, and recently got some new bars and chains for some of the Husqvarna saws, and didn’t want to cut on that hard dry oak with a new chain (like making rounds, etc.) so I cut logs the length of the 55 gallon drum. There are three other very large green Post Oak trees that got blown over, too. (Way more wood than I will ever use.) I’ve been cutting rounds about 4" thick, (+ or -) out of the green wood. I use the smaller branches to fill in all the voids in the 55 gallon drum loaded with the dead logs. I also gather wood from a wet weather creek that runs through the center of my farm, and this stuff is so old it is almost petrified. (Fills in the gaps.)
I figure the smaller stuff is going to be nothing but ash if the large logs are in the barrel. It is best to have everything the same size.
Chunks are another thing. Once the barrel of wood is going good, I will toss a large chunk into the top and let it get reduced in size. At the end of the burn, there might be some part of that chunk left, so I dig it out and put it into a bucket of water, or into a large hole that may contain water (if it recently rained, for example.) Then, if that chunk will fit into my little wood stove, it goes into the firewood pile.
I bought some bar/chain combinations from an eBay seller “outdoorpowerdeals” that are labeled “Forester”, and are the best bar/chains I have ever used. Very aggressive, and will bury you in chips in no time. My conclusion is that OEM Husqvarna chains are extremely safe, but don’t cut as well as these Forester ones.
The grinder that Gary Gilmore put together using a three inch pipe with railroad spikes welded onto it works for me.
3 Likes
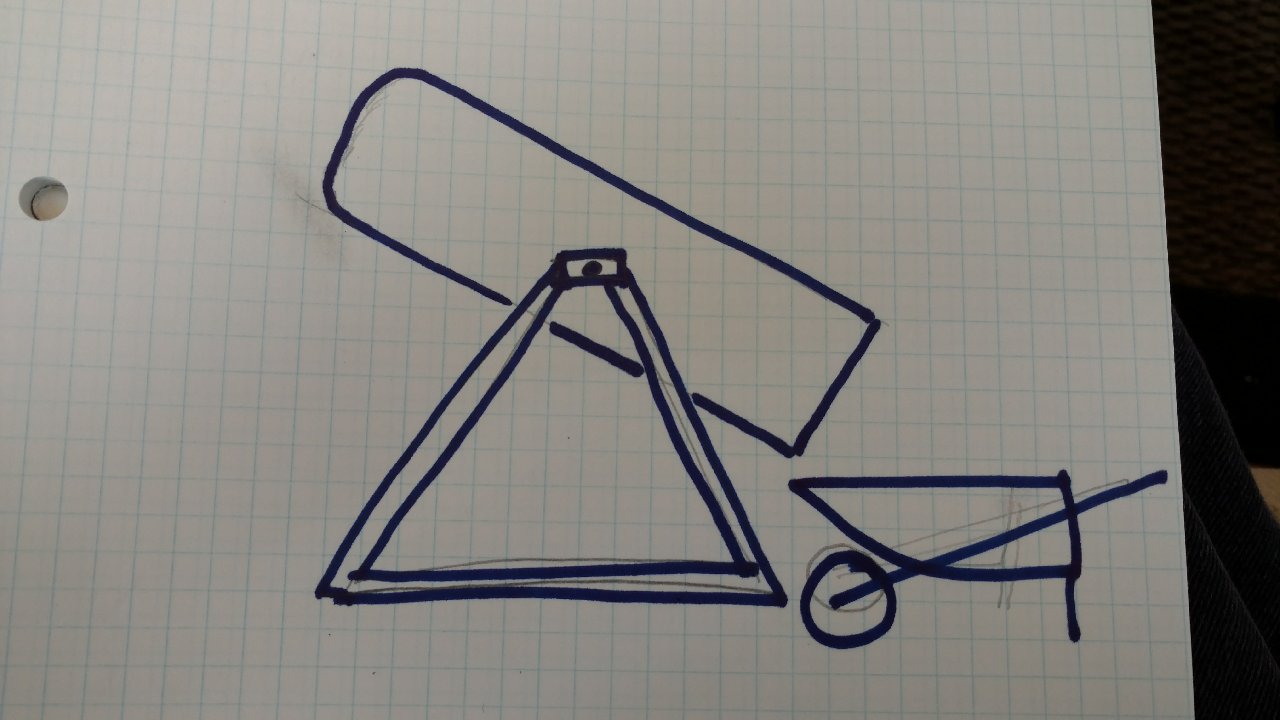
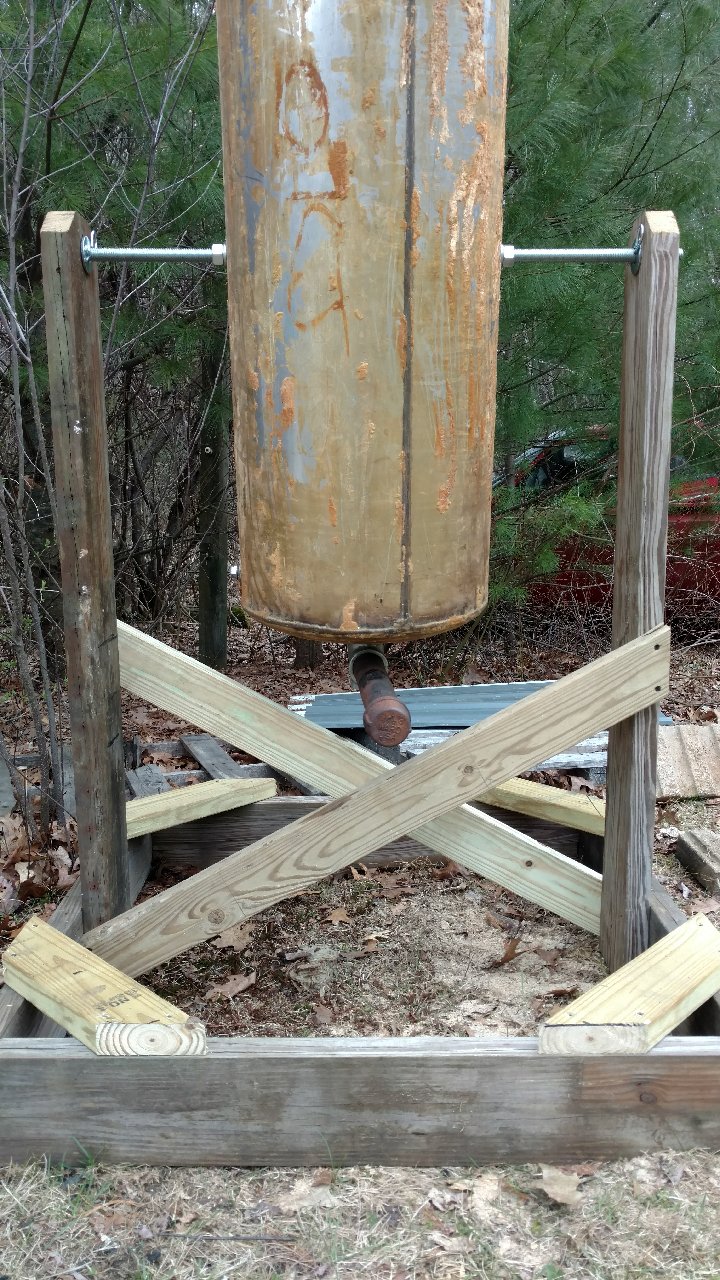
Somewhere I think I mentioned getting a SS hot water tank and even posted pictures of stripping the styrofoam off. I think I also posted this sketch last November of my idea for a giant TLUD, but don’t remember under what topic.
Well today I built it. See it here with blow dryer to provide air.

I found this SS screen and perforated the inlet pipe which also supports the screen.
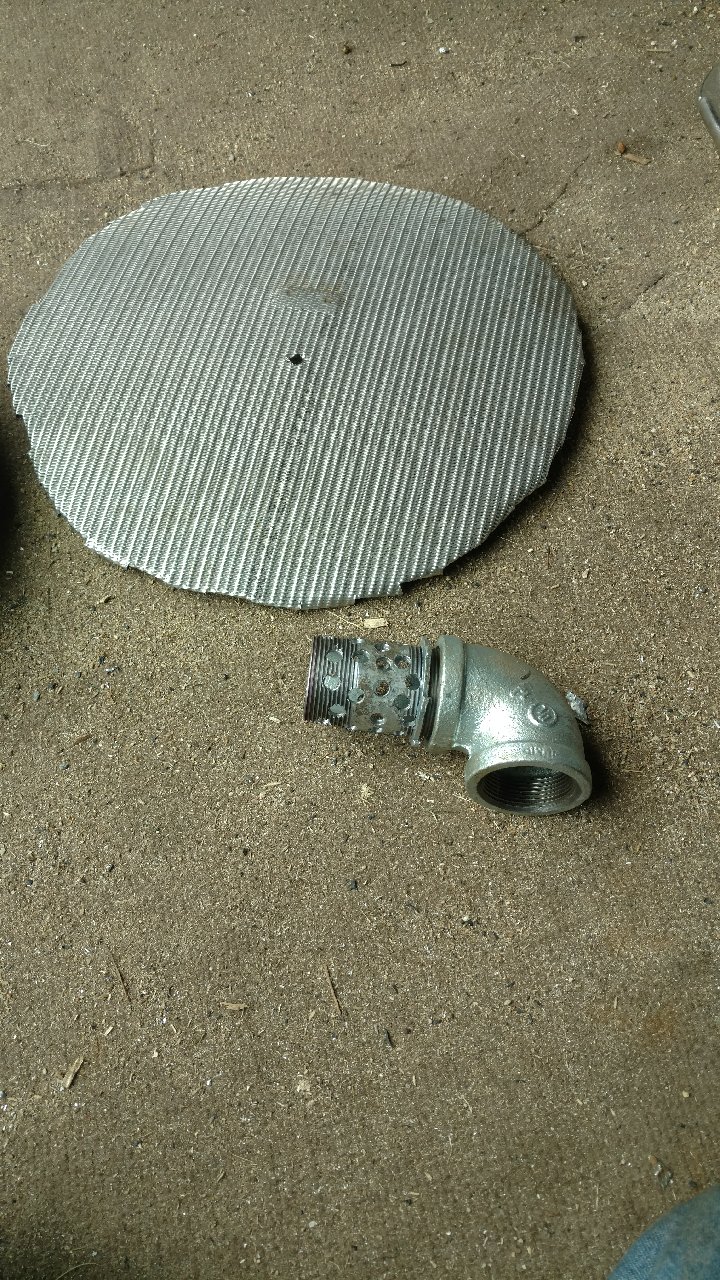
Here is a view down the throat.

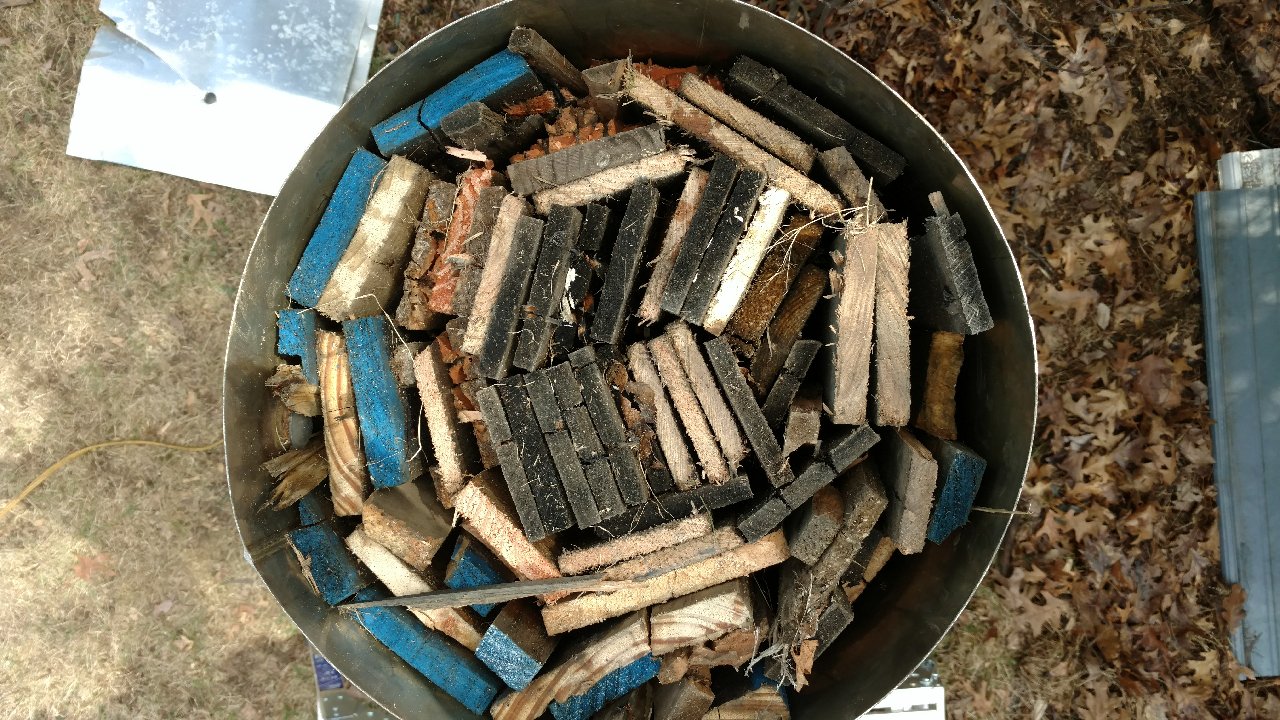
My intent is to pyrolyze screened woodchips to eliminate the need to grind my charcoal.
I’m out of chips right now so will do the first burn with pallet wood.
6 Likes
I like the idea. I am not sure if the wood supports are far enough apart to get scorched, and I would be a little concerned about the rod holding it up in the middle will start bending after getting hot plus the weight on it. Otherwise, I was really hoping to hear how it worked. ![]()
1 Like
Sean,
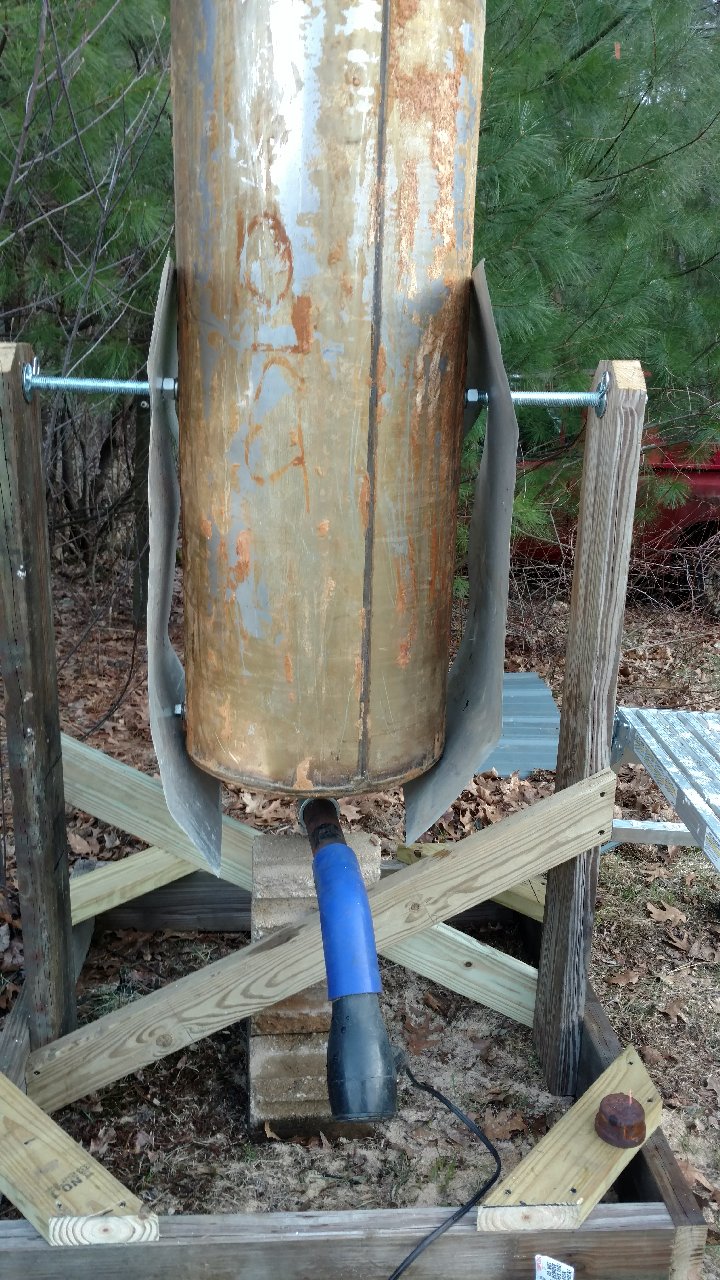
My original plan was to use angle iron braces on both sides of the tank. I will put a block under it for the first run and see if this 3/4" all thread sags. I figured that adding metal shields to protect the wood supports would be an easy add if the 8 inches is not enough distance. Your concerns have led me to make a couple of shields to hang over the all thread if things get too hot.
I just finished packing it tight with pallet wood that has been out in the rain. The tipping sure makes loading easy. I put the blowdryer on low (and no heat) to dry out the feed stock. My wife and son both have projects for me today, but I hope to fire things up later.
1 Like
Bruce, you could cut some water pipe or EMT conduit to shield your 3/4" all-thread. It would insulate the threaded rod and keep the threads cleaner. You could even wrap the threads with some rock wool or something before you slipped the tube over, but now that I mentioned it that might be too awkward.
1 Like
Mike,
I was thinking the most heat would be conducted by the rod from the hot section in the middle as the pyrolytic front passes by? But you are probably right about a lot of radiant heat, especially from the bottom half of the burn. If I put my side shields near the tank, they might protect the all-thread and the wood uprights? I’ll hopefully have the verdict by tonight.
3 Likes
That’s kinda funny Bruce, around here, with Jakob’s new grinder, the grinding is the fun part.
3 Likes
Have you posted pictures of Jakob’s grinder and classifier yet?
1 Like
there are some vids youtube links on his thread
1 Like
I think you should be good to go. If you put a loose fitting top on it, it should be able to trap heat in it to dry faster and you get a convection current too. It is about a day in the hot sun with the 55 gal barrel and no fan. Hairdryer fans aren’t really designed for long continuous run times. However, what you have should work, maybe even better.
The metal will get soft with the heat, and you can see the metal glow a little bit. Mine will throw radiant heat about 12-18" enough to singe bushes. The shields should work though. You will know what needs to be modified if anything after the first run. ![]()
I didn’t look at the details of the grinder, but it did look fun.  He probably needs his own thread for that thing.
2 Likes
I had overlooked Jakob’s charcoal making system. I just went back and viewed all the vids. Good stuff! I’m going out now to light up my TLUD.
2 Likes
OOPS! Well I messed that up. Started nicely.

Then several problems. Wet wood, so I dumped a bunch of charcoal lighter fluid on top. Bad idea! I forgot that last time that I used this method, I had to reduce the fan. With fan hooked to pipe and on low there was still too much air. The lighter fluid ignited and the flame travelled with it to the BOTTOM. Now I had a BLUD Bottom Lit Up Draft. Notice discoloration at bottom of tank.
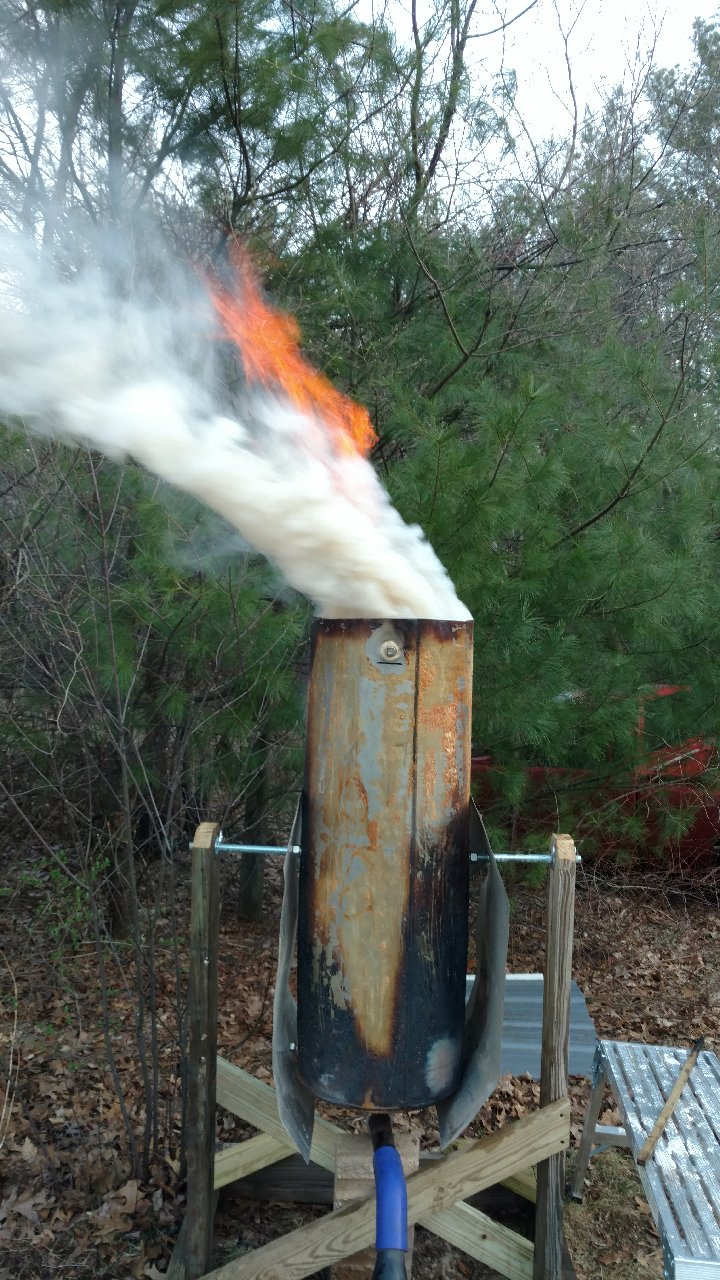
So now I had to use a torch to ignite the smoke.

finally settled down.
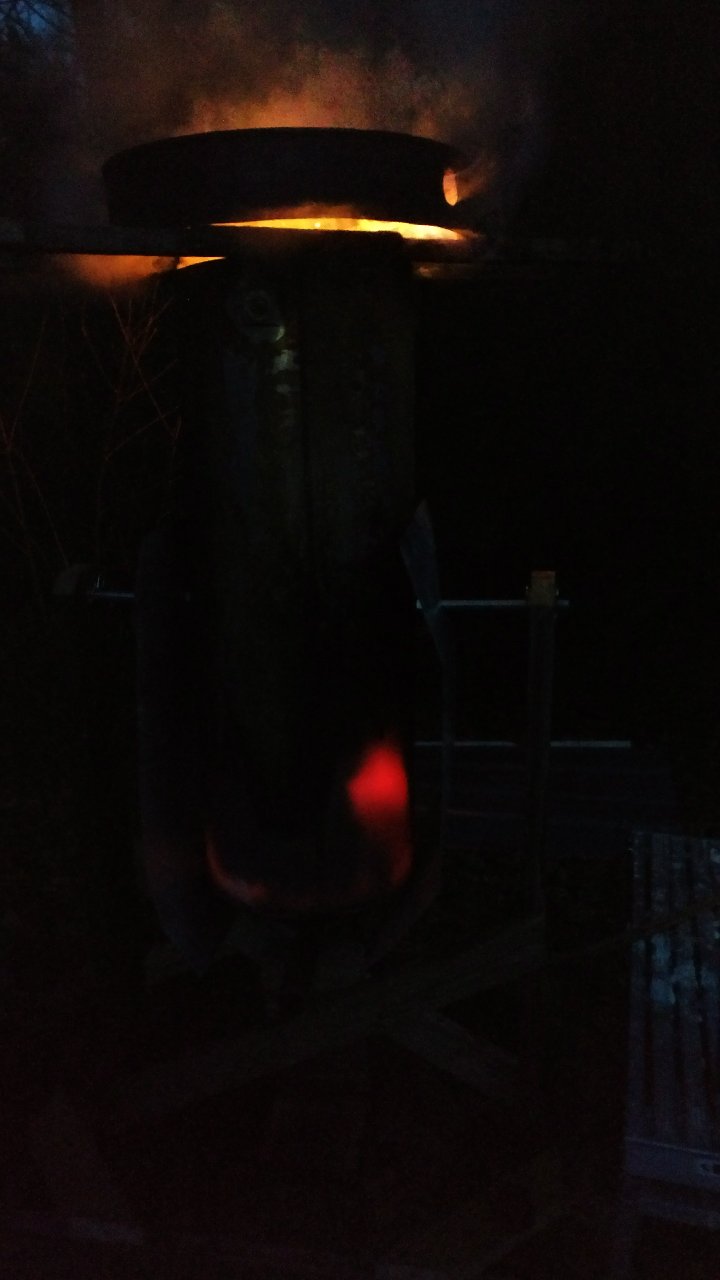
Shields worked good.

At 1 1/2 hours it calmed down to a nice burn. When yellow flames stopped and wood was glowingI shut her down and sealed top and bottom.

Next time use dry feed stock, and reduce fan to just enough to sustain pyrolytic front moving from top to bottom like a good TLUD should. Oh well, live and learn.
7 Likes