Charcoal Powered Lumina APV Minivan

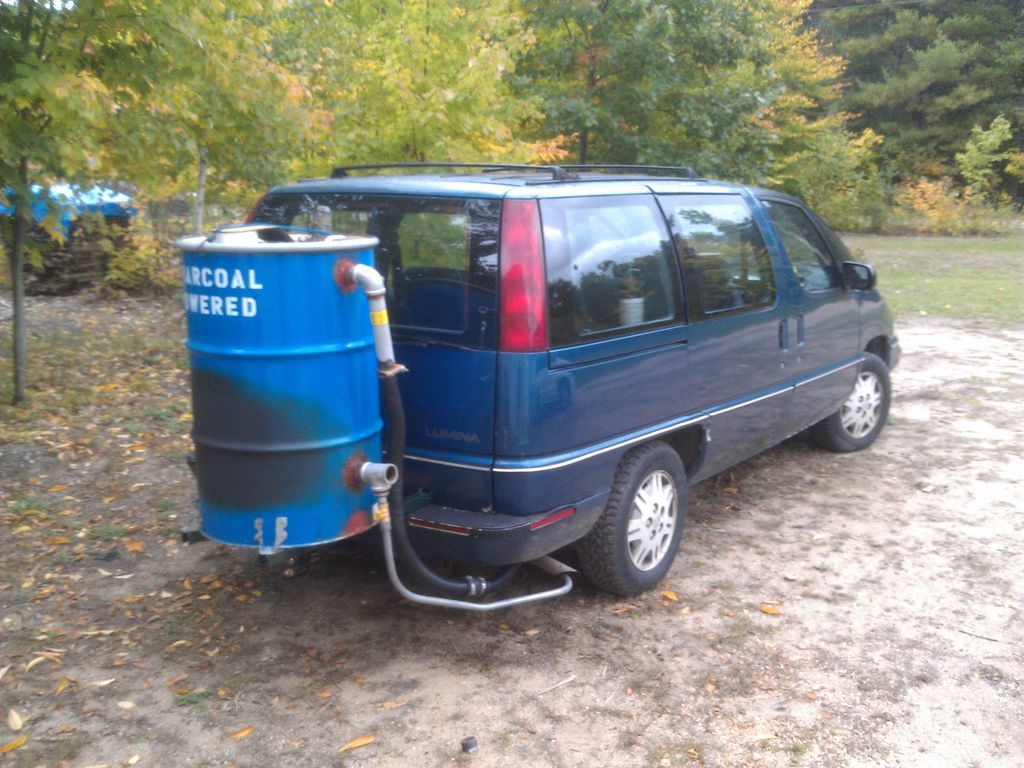
Hi all, I’m new here but thought I would share my experiences with an old 1991 Chevy Lumina APV minivan that I added charcoal gasification to. I also have a 1970’s Bolens tractor that I’ll detail in another post. I’ll put a few of the best pics here but the rest you can see on my wordpress blog.

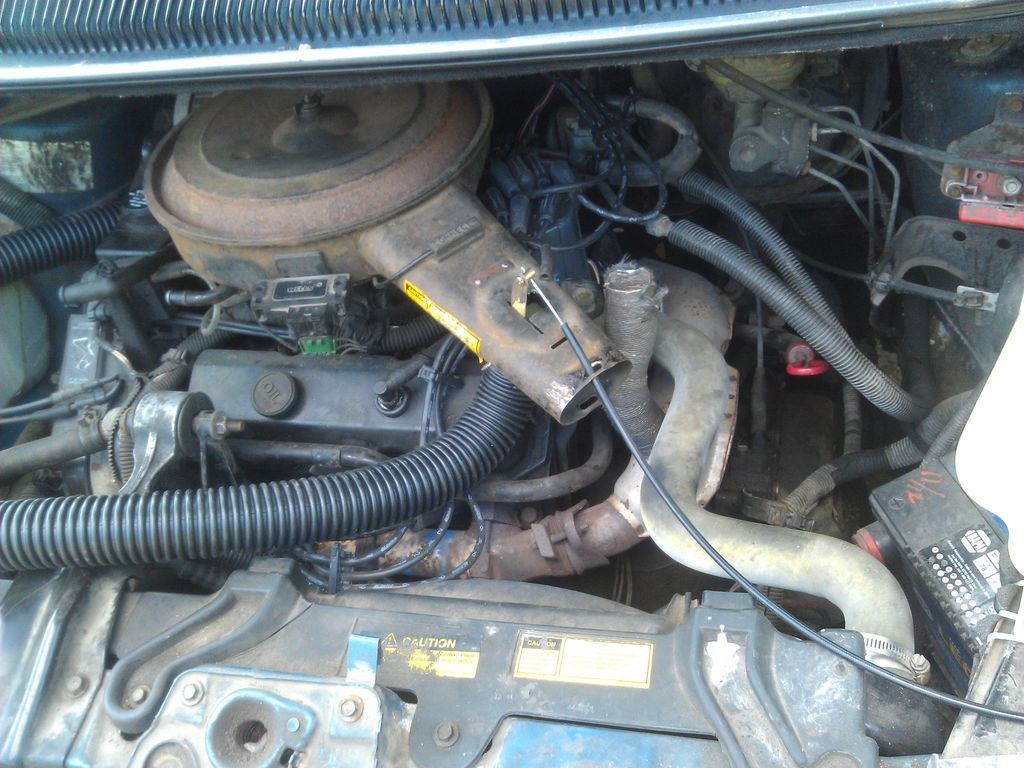
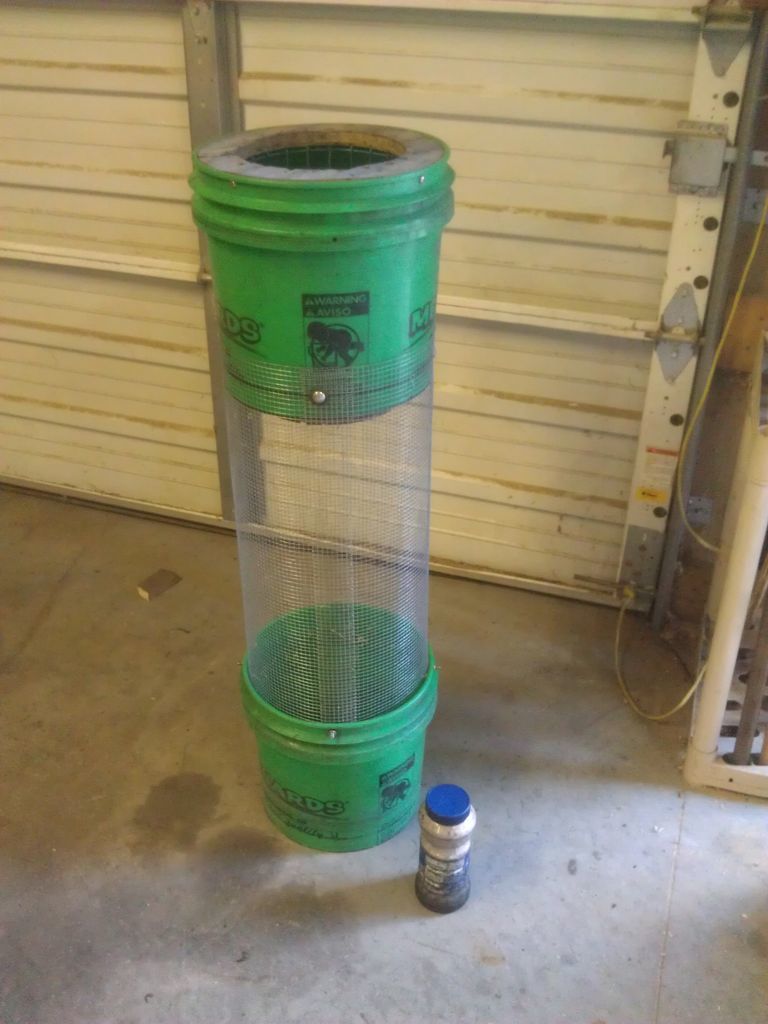
This van has a 3.1L v6, with throttle body injection (TBI) and a mechanical distributor. I have not done anything with timing yet, but plan to. One of my goals with this project was to make the gasifier as minimalistic as possible. The filter is inside the main barrel of the gasifier, EGR comes from the tailpipe, very little welding was done. No (specifically intended) cooling radiator for the gas. And yet it works quite well, but I consider it still in somewhat the “first try” stages. I suspect the ~20 feet of corrugated sewer pipe helps with gas cooling.

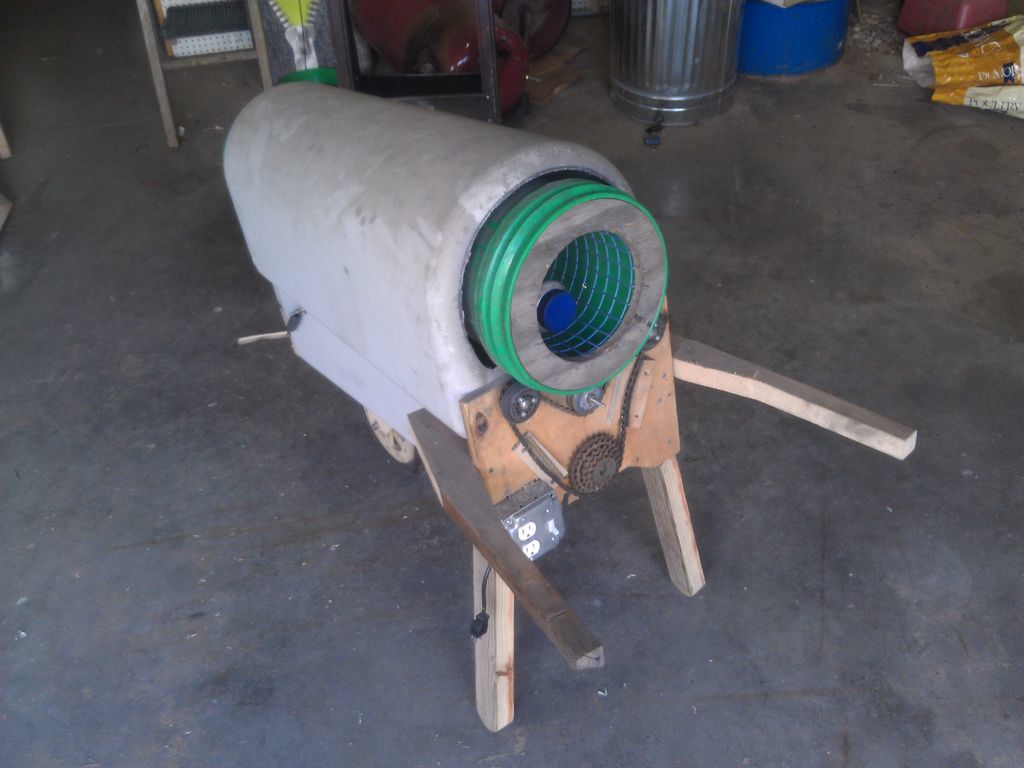
One thing that I think is quite unique is the side-drafting firebrick hearth design I finally settled on. It uses standard 4x9 firebricks cemented together with high temp mortar, and secured inside the barrel with silicone rtv. The Kalle/Gilmore style steel air intake pipe just did not hold up, even though I gave it a refractory tip. (I did not try stainless, maybe that would have worked.)

The van does lack power, but I’ve had it up a little over 55 on the flat, and it will do it consistently. I will probably consider adding gas cooling (although the gas exits at around 120F, not terribly hot in my opinion) and definitely will make the timing adjustable. Since I’m a software engineer by day and tinker by night, there are definitely thoughts of automatic arduino-controlled air mixture and egr mixture valving coming to mind.

Thanks so much everyone here and especially Wayne Keith for hosting this site, I’ve been emboldened to try driving on wood and very much more educated by everyone’s experiences here. I own a reprint copy of the 1942 “Producer Gas for Motor Vehicles” book that I got 10 years or so ago from Lindsay Publications which was probably my first introduction to wood gasifiers.

I’m 100% open to your comments and criticisms, don’t be shy about insulting my construction methods or anything. I still have a few problems, one is how to deal with moisture, it tends to collect in the sags of the gas suction hose and isn’t a real problem yet, but will be in the winter (I’m in Michigan). Also, I felt that I should paint a title on my scary-looking scorched barrel so that a) people that are curious know what it is, and b) people that might be afraid or suspicious can rest their minds. But there could be more reasons to (or not to) communicate the purpose of the barrel on the back. Eager to know your thoughts on that. I feel self-conscious with this thing and find it attracts a lot of attention. I’m happy to tell people what the thing is, I just don’t want people to be suspicious or frightened by it.


2 Likes

Welcome aboard Mr. Dan .

Neat , I like it :slight_smile:

Thanks for posting Dan and welcome to the DOW woodgas site. This solidifies Michigan’s lead as the state with the most woodgas operators. Nice work on the Lumina. Very simple construction. Too bad you couldn’t run a 2 inch gas line to the engine. That would give almost double the gas volume as the 1-1/2" line. Did you ever calculate how many miles you can drive on a barrel full of charcoal? What charcoal making method do you use? Last question: How do you transition the air inlet pipe into the firebrick box and then where does the charcoal core burn - just past the end of the firebrick? Thanks again for your post.

A bigger gas line is definitely in the plans.

The other day I went 34 miles and dropped the level to the first ring. It’s hard to tell exactly because at the top is the filter, which takes a little volume, and the fill hole is off to one side which makes it hard to fill 100%. I thought it was pretty economical.

I’ve used three methods to make charcoal: a) my wood stove, b) Haitian barrel method and c) burning brush piles.

My wood stove is an Alladin Quadrafire, and is very efficient at making charcoal. Just burn it real hot till no yellow flame, then shovel out the glowing embers into an ash bucket with a tight lid. Everything heats, no waste. In the winter, the stove is running full throttle to heat the house anyways. I know that CO could be a problem with letting the ash bucket cool indoors, but it’s never registered anything on the CO detector.

In the Haitian barrel method, I just knock the end(s) out of a barrel, so the barrel is just a cylinder. Prop it up on bricks, then pile it full of wood scraps and light from the top. Once it burns down to where it’s all blue flames, no more yellow, then kick the bricks out from the bottom, pile sand around, and put on a lid for 24 hours. If the wood is dry, there’s little to no smoke. Yield is about 30% by volume, depending on whether soft or hard wood.

In the brush pile method, burn brush till there’s a big pile of embers and no more yellow flames (that’s the tar). Then shovel the glowing embers into a barrel, and put a lid on it till cool.

Then for grading, I made a dual-screen trommel with 5-gallon buckets and a little concrete roller (a plastic peanut jar full of 'crete) to go with it. The inner screen has about 1x1 squares, and the concrete roller bounces around in here and beats up the coals till they fall through. Then the outer screen is 1/4" mesh, and the way it works is that everything’s small enough to go through the 1x1, and the dust and fines go out the 1/4 mesh. Out the very end comes the graded charcoal. I should probably get a finer mesh for each stage, the 1/4" loses a lot and the 1x1 lets too-big chunks through sometimes. But it works, seems consistent and is serviceable. The “cabinet” which is made from an old water softener, allows me to hook up the shop-vac for negative draft (dust control) and do the processing in the garage without the dust going everywhere. The trommel is a work of art in itself, has a wheel and handles so it can be pushed around like a wheelbarrow. See pics.


3 Likes

The ends of the firebrick are just gooped up with high-temp silicone rtv and smooshed against the side and bottom of the barrel. Think of a “box” made of firebrick, and one end against the side of the barrel where that fitting is, and the other end extending toward the center of the barrel. The charcoal burns exactly where the air meets it–at the inner end, toward the center of the barrel. The theory is that the rtv is at the cooler end and should take whatever heat there is there, and the hot end just has firebrick meeting charcoal, no metal to melt or burn away. Today I drove about 22 miles and got some air leakage so there’s another little paint scorch spot, oh noes! But the van still ran good and the firebrick hearth itself isn’t deteriorating at all. I hope to continue the air intake saga with pictures when I get a chance.

WOW!

You, sir, deserve the “Redneck Achievement Award”

Please don’t be offended - that is a badge of honor. Your work shows diligence, resourcefulness and frugality - all virtuous character traits.

Excellent work.

AT in TX

1 Like

Thanks Alex! It is a badge of honor, and I think it’s important these days to mix together high and low tech in practical ways. One thing I’m considering in addition to the lettering, is a QR code stenciled onto the black part of the barrel, so that folks can snap it with their smart phone and end up here at driveonwood, or perhaps my blog. BTW are there driveonwood.com bumper stickers for purchase anywhere?

Dan, get some 1/8" hardware cloth and nail it to a wooden frame that will fit over a wheelbarrow. Dump your fines and dust into that frame and swish it around with a broom (a windy day + dust mask is good for that.) The ash and dust go into the wheelbarrow, and you are left with charcoal greater than 1/8" and less than 1/4". KVL, in Thailand, on this list, likes the smaller stuff in his charcoal units. Also, your gardening friends like to receive small quantities as gifts for their compost tumblers and for use in planting mix. I ordered my hardware cloth from Amazon. It is galvanized, and seems to last forever. Ray

You’r another proof of ingenious thinking :slight_smile:
Love it.

As ray mentioned, i use small size charcoal, anything bigger then dust and smaller then 1/2"
To reduce the moister in your tubing, try to use smaller charcoal, your reaction surface will be bigger and a more rich gas obtained. also less heat going around in your barrel to drive the moister in the gas.

Welcome to the DOW DanH.
Good DOing you are achieving. Since you did ask for suggestions . . .
Best charcoal that I’ve made WAS in a Quarafire stove produced, hot. Then as you do, put hot into a metal air tight container. THEN stuff those containers into a snow bank to cool. Winter heating; folks expect a little woodfire smoke and smell.

On vehicle unit labeling???
As much as some of us want to promote . . .
As much as some of us would like to “in your face!” shout out . . . ENERGY FREEDOM!
Best, I think to be a little conservative.
Charcoal Powered says “a carbon monoxide hazard producer” to anyone with firefighting, or safety training.
Here in my over-Green state of Washington “WoodPowered” will have Greenie’s chucking coffee containers at you for rape/killing “thier” sacred trees idols.
And I’ve had more than a few tell me now that I am a tax-cheat. That I am NOT supporting a modern (consumer) society. UNFAIR! That I/we have the trees to be able to independtly Power Out Lives. Neighbor gal in a 3500 square foot house with an additional enclosed additional 2000 square foot swimming pool told me that. They heat All with trucked in propane. Lots, and lots of propane.
I’d suggest: “Solar Bio-Carbon-Air Cell Powered” It’s True!
Then read the eyes with your face to face explaining. Be flexible on those explanations.
Ha! And I NEVER wear back side logo printed clothing where I cannot SEE the reactions. Read the Ayes. Read the Nays.
Regards
Steve Unruh

1 Like

I prefer “bio char powered” for some reason biochar is cool and green, charcoal is rainforest destroying desertification causing… Good rebranding whoever did it… Love the van. really like the crusher sieve combo. I need a better processing technique…
Best regards, David Baillie

I am so glade you posted a van I have been teasing my wife for a while we have 2 caravans and I think that would be awesome the wife not so much.but I love seeing it thanks.

Dan, I like your charcoal processor. The pics don’t show the motor. I am guessing it is underneath somewhere and connected to the bike sprocket. How fast does it turn and how fast can you feed it? How long does it take to fill that tub? A video would be nice. Hint, Hint.

SUPER impressive, Dan! I’m particularly impressed with how much you’ve done with what seems like little budget.

Recommendation: Use a TIG welding cup for your nozzle. They are rated for temperatures far beyond what a gasifier will produce. Here are some pics:

https://www.google.com/search?q=large+tig+welding+cup&rlz=1C1CHFX_enUS436US436&espv=2&biw=1745&bih=829&source=lnms&tbm=isch&sa=X&ei=IHo5VOI6ip7yAcucgNAL&ved=0CAcQ_AUoAg

Awesome work, Dan… Keep it up.

Troy

1 Like

The fact that the gasifier is a CO producer may not be readily known to most people, even with the lettering, and might not add any additional significance to the already well known CO potential of any fuel burning machine. What I’m saying is that anything burning gasoline, diesel fuel, etc is already well known to produce CO, so I’m not sure if I should be worried about anyone’s reaction in that context. Steve, your idea on the labeling is definitely good, and its funny how “biochar” marks a different political boundary than “charcoal” while referring to the same thing (in this case).

Don, the motor driving the charcoal processor is a small gear motor, probably 1/25 hp and that sprocket is on the output shaft. It turns the trommel screen at roughly 60 rpm, about 1 revolution per second. I can run a 55-gallon drum’s worth through pretty quickly, I don’t know exactly but maybe 15-20 minutes. Here’s a video: http://youtu.be/jq7hEFuvi_U

Dan, that is a very cool video. I like the loose roller to do the crushing. I have seen a much larger unit for topsoil sifting. It had a funnel arrangement that fed the material into the rotating drum. Maybe less labour feeding it? Sometime this winter I will have to build one… Thanks again.

Dan, I like your heating stove method of making charcoal because you use the heat of the wood while making charcoal. I use the double barrel method which is quick and clean but I waste the heat. How I make charcoal - YouTube

Charcoal is looking better all the time.

What a fantastic project! Very simple and practical, indeed!

Dan, do you have any photos of the hearth inside the unit? I can’t quite imagine how that works, but the great thing is that you got it to work.

I don’t have photos of it yet, but I need to empty out the gasifier to re-seal the hearth soon. There is no ash cleanout. At the temperatures generally encountered, there aren’t too many ashes–only a big clinker-ball that forms below the hearth, that I remove once in a while. I’d be curious myself, what other people do about ashes.