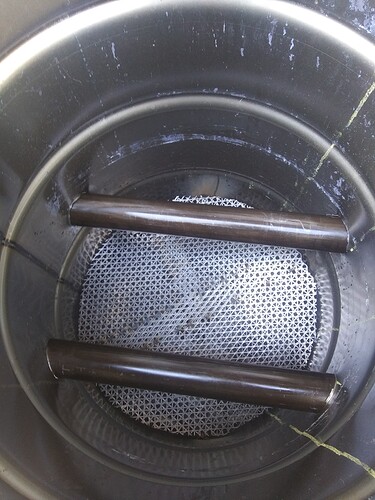
Cody,
Does your grate cover the whole diameter of the drum? What is the gas flow through the grate and the gas exit pipe? Can gas be pulled through the grate up to the barrel sides or is it restricted some way so that doesn’t happen?
It covers the whole inside diameter yes. I have the gas exit sitting below the grate, elevated above the very bottom of the drum so it won’t suck in huge particles of ash or bits of char. I don’t have any sort of restriction right now. Ironically when I had the ceramic wool burn tube the gas lit sooner. It doesn’t seem to have any problem pulling the gas out as far as I can tell.
With this next test I’m just going to use some Permatex Ultra Red RTV. Supposed to withstand 650°F and the muffler sealant is annoying as all get out.
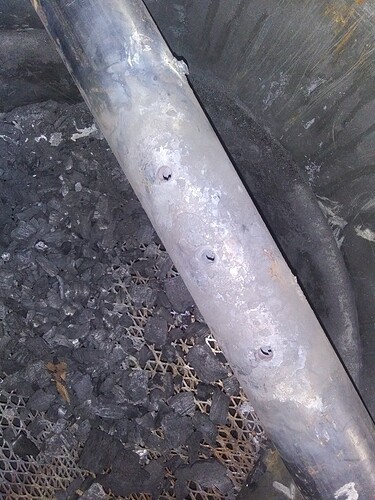
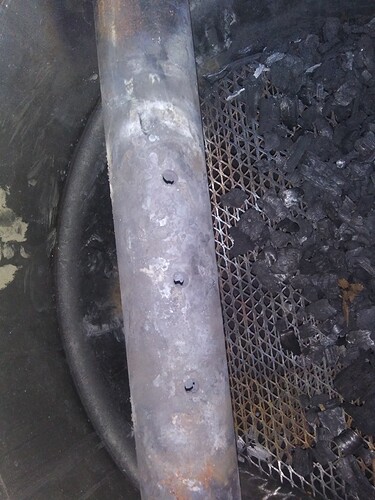
The ends of the flutes didn’t even get close to that hot so I’m sure it will be fine. Hottest they got was 350F
With this next test will you be welding in the shields again but higher up and closing the gap between the nozzles ? or will you just be trying a different angle on your flute’s , its very hard not too but really only 1 thing at a time must be changed other wise it will get messed up if it does not work again .
Good luck
Dave
I have removed the shelves. They were creating a void under the flutes and allowing the underside to bake. All I’m doing is 45 degree upwards angle. No nothing but the flutes and the grate.
Here’s what the flutes look like after only 3 test runs.
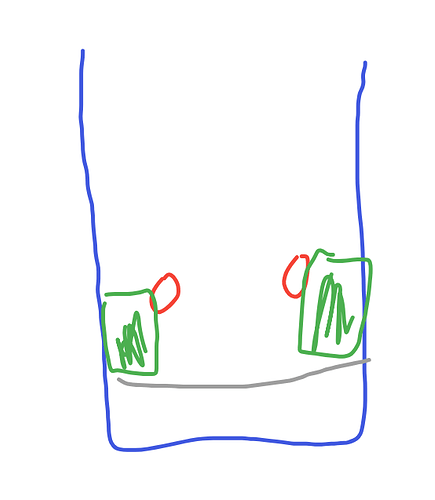
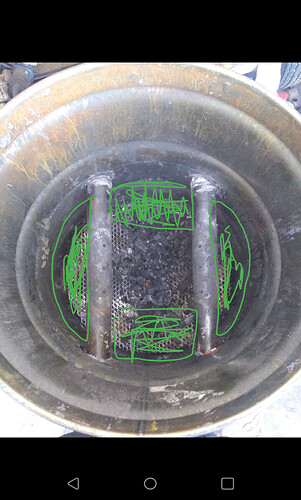
If this test comes out with good temps I might reinstall ceramic wool but only behind the flutes where the nozzles aren’t pointing. Just to actually fill up that space to force moisture into the lobe.
Like so
Green representing ceramic wool.
Cody,
I’m certainly not the expert here, but it seems that most cross and downdraft charcoal gasifier designs do limit the area where the gas goes through the grate. I am thinking a rectangular shape with sides in line with the flute nozzles and keeping the burn zone several inches away from the barrel side where your flutes go through the barrel wall–my 2 cents worth. I’m watching with interest the results of your experiments. I’m afraid I’m more of a follower. My fabrication skills are very limited. That discourages me from experimenting.
Definitely a YES on change “one thing at a time” like Dave said or you can’t be sure what made it better or worse. Good luck.
Right now I’m just tackling heat issues. I’m hoping Kristijans idea works. I also hope it doesn’t reduce my mileage too much for this iteration. If it works phenomenally I will restart with a new barrel and the flute being closer to the grate.
If my masonry skills were better I would just pour in refractory for my burn tube to direct gasses in a controllable and predictable area for best moisture control. Behind the flutes and down, and anywhere the flutes aren’t pointing towards like my ceramic wool tube.
The wool itself wouldn’t last long like that though.
Like this from the flutes down
Green being either some kind of refractory cement or something. I don’t have a way to pile ash up as my burn tube without it just collapsing.
Anyways this RTV needs to cure for 24 hours so I’ll do another test tomorrow.
Hey Cody this is a picture of the cut and formed thermal bricks for my woodstove.
All made out of the same 9" X 4-1/2" X 1-1/2" insulative bricks.
These can be bought in stock shape as individual bricks at woodstove stores; or on the Internet, and shipped.
Easy to hand cut, hole drill and even hand rasped into form.
Consider doing your filling in with these. Just loose fit standing up. With a top edge angle iron V cut top retainer.
If you worry about tightness between just cut and stuff compressible strips of your ceramic wool when setting your bricks.
These must be loose fit to handle the heat.
Regards
Steve unruh
That looks like the ticket. It’s looking more and more like a Svedlund! Might nickname this the Simple Sved if it works.
I’d consider reinstalling the metal shelves if you are going to use ceramic wool under the nozzles. I have a ceramic wool heat riser in my Rocket mass Heater and after a year I pulled the barrel/bell and it looked fine. Just a little discolored. The shelf above the wool would keep charcoal from eroding it. I think weight would be an issue for a vehicle gasifier as far as using refractory, but you wouldn’t need much for skill. Just a right sized container to fit between the nozzles and Pour in behind it. The container will burn away in time anyway.
Cody, your idea on the skech is what l wuld do!
Guys, there literaly is no material more refractive thain charcoal. Keep it simple! Over time charcoal fines WILL plug each and every void where there is no velocity to clear them.
Refractory cement is not ideal. Its heavy, and takes for ever to heat up and make good gas. Good for hours long trps, not for a dayly driver.
Cody, if you are pleased with the flute temperature now, and the performance of the gasifier, l wuld focus on the vehicle part. Build the connections, valves, cooling rack and filter. No need to go crazy on the cooling rack, charcoal needs less cooling thain woodgas. Then, temporairly install this gasifier. Real life test on the truck will give you exact position of the burn zone and position of the grate for your next barrel.
To determine this, l got a trick for you. You take a stainless steel rod, around 2 or 3 mm. You put it in the hopper right in the midle, trugh the center of the burn zone till you feel the grate and leave it there. Drive a bit. Then stop and quickly open the gasifier and pull out the rod. It will glow where the burn zone is and you get a exact location of your fire. Add a nother inch for good measure and you got your ideal grate position specific to your gasifier, vehicle and drive style!
Fire brick is pretty lightweight compared to refractory though. But for driving testing I’m going to stuff ceramic wool in a square shape.
I definitely need to focus on making a grinder. I have some 3" PVC thick wall and some random large bolts so I’ll probably copy Bruce’s design for that. Hook it up to a bicycle or my 12V motor if I can find the darn thing. Old recall Denso power steering motor from a Chevy HHR.
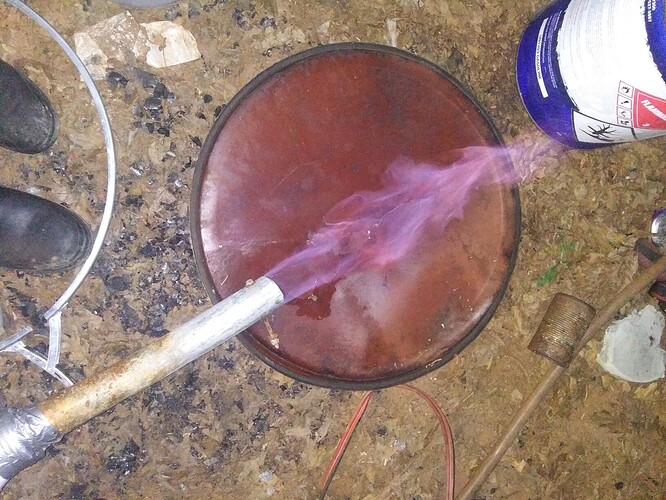
Running the test tonight. Flare won’t sustain, still feel moisture coming out with the gas. Can see condensation coming out of the flare tube. Getting mostly blue with red tinges. I did add the ceramic wool burn tube again just as a means to try to force all the gas through a hot zone. So far the hottest the flutes are getting is 450°F at the top area and about 250°F at the bottom of the flute facing opposite the holes.
Water in the flutes reacts better than last time. Actually steams some of it up and gets sucked in. Makes the flare sustain for a time. I still don’t have a drip apparatus.
Flare sustains at a very low pull from the blower. Below half power.
Don’t worry about the Methanol can it’s just water.
Lid has been getting hotter than normal.
Shut down after an hour. Temperature seemed very stable. Didnt get past 600°F in the nozzle hole area. Upwards direction seems to be a winner. I think that the firetube just isn’t tight enough to prevent all the gas from leaking past the lobes. I thought the charcoal had dried but I guess not. Guess I’ll dump this char and make more for an updraft. I think I lack the know-how to really make this work and be worthwhile. I also think a barrel is a bad form factor for this design.
Cody , your saying you can see and feel moisture in the gas , plus you are adding water into the flute’s , if i were you sounds like you have enough water in the charcoal all ready so adding more in wont really help the gas other than cooling down the flutes a little maybe .
So you have also changed where the nozzles are now pointing from what you said it now sounds like they are pointing vertically upwards and you are then sucking from below , in my head that sounds like a disaster for the flutes as the lobe will not go upwards and then be pulled down but rather be pulled horizontally and then pulled down so the side of the tubes will be in the hell zone .
Dave
They are at a 45 degree angle as Kristijan wanted me to try out. They overheat pointing at each other and pointing downwards.
sorry just reading that sounded like they were pointing upwards
Dave
Yeah I understand. I was just giving progress reports on the fly.
It was weird because when I added drips of water the flare was sustainable. Maybe some of the gas is being consumed? Not sure. I didn’t feel any excessive heat in the areas I had suspected of air leaks and that i had sealed up.
Cody if i were you i would leave everything as it is , grab hold of a small container and fill with wool or foam or even towel material and use that as a filter and then offer a hose to a small engine , really any engine that you can run for a few hours .
The flare looked good in your photo so next chance you get make more charcoal and just top up and relight and pipe to a engine for real world testing .
Then decide where your going with this design or if you want to go another direction .
Dave
If you ever have to use water again to maintain the flare just use it till you get that constant flare but after a few mins stop the water drips and see if the flare stays alight , just be interesting to see if it is weak gas or just needing more time to come up to heat .
Yeah I’ll probably do that. One thing i liked was even though an hour had passed, the rubber clamp couplings for plumbing were still supple and not drooping from the exit gas port. I think if I were to run this setup I would need cooling tubes to catch as much moisture as possible.

